
Profitable Membership sites are a great way to make money online by sharing your knowledge. It’s like running your own exclusive club where people pay to access your valuable content.
Instead of making a one-time sale, you earn recurring monthly income. Sounds great, right? Plus, you don’t need to be a tech expert—WordPress makes the process super easy.
In this guide, I’ll walk you step-by-step on how to create a profitable membership site, keeping everything simple and easy to follow.
What Makes a Membership Site Work?
A membership site is basically a website where some content is hidden behind a paywall. People need to pay a fee to see the good stuff. It’s like having a VIP section at a club.
For example, let’s say you’re really good at cooking. You could create a membership site where you share your best recipes, cooking videos, and tips. People would pay maybe $10 a month to access all this content.
The key is having something valuable that people can’t get for free somewhere else. Your content needs to be worth paying for.
Why Should You Start a Membership Site?
Make Money Every Month
The biggest reason to start a membership site is the steady income. Instead of making one sale and that’s it, your members pay you every month. This is called recurring revenue, and it’s the holy grail of online business.
Let’s do some quick math. If you have 100 members paying $20 a month, that’s $2,000 every month. Not bad for sharing what you already know!
Build Your Own Community
When people pay to join your site, they become more engaged. They’re not just random visitors – they’re invested in what you’re doing. This creates a strong community around your brand.
These community members often become your biggest fans. They’ll tell their friends about your site and help you grow.
Low Cost to Start
Starting a membership site doesn’t cost much money. You just need a domain name, hosting, and maybe a plugin. That’s way cheaper than starting a physical business or even an online store with products.
Different Types of Membership Sites You Can Build
Online Learning Sites
These are probably the most popular type. You create courses and lessons that people pay to access. Think of sites like Udemy or Coursera, but smaller and focused on your expertise.
Community and Networking Sites
These sites focus on bringing people together. Members pay to network with others in their industry or hobby. It’s like LinkedIn but for a specific group.
Content Sites
These sites offer premium articles, videos, or other content. News sites often use this model – you can read some articles for free, but the best stuff requires a subscription.
Service-Based Sites
Here, members pay for ongoing services like consulting, coaching, or support. It’s like having a retainer client but with multiple people.
What You Need Before You Start
Domain Name
First, you need a domain name. This is your website address, like “myawesomesite.com”. Pick something short and easy to remember. It should relate to what your site is about.
Web Hosting
You need a place to put your website. This is called web hosting. There are many good options out there. Look for one that specializes in WordPress hosting.
WordPress Installation
WordPress is the software that will run your site. Most hosting companies can install it for you with just one click. It’s free and easy to use.
Right Plugin
A plugin is like an app for your website. You’ll need a membership plugin to handle subscriptions, payments, and content restrictions.
Complete Step-by-Step Guide to Build Your Membership Site
Now let’s get into the real work. I’ll show you exactly how to build your membership site from start to finish. Each step is important, so don’t skip any of them.
Step 1: Get Your Domain Name and Hosting Set Up
First things first – you need a place for your website to live. Think of this like getting an address for your new business.
Choosing Your Domain Name
Your domain name is what people type to find your site. Keep it simple and related to what you do. For example, if you teach guitar, something like “guitarmastery.com” works great.
Here are some tips:
- Keep it short (3-12 characters is best)
- Make it easy to spell
- Avoid numbers and hyphens
- Pick a .com if you can
Getting Web Hosting with ServerAvatar
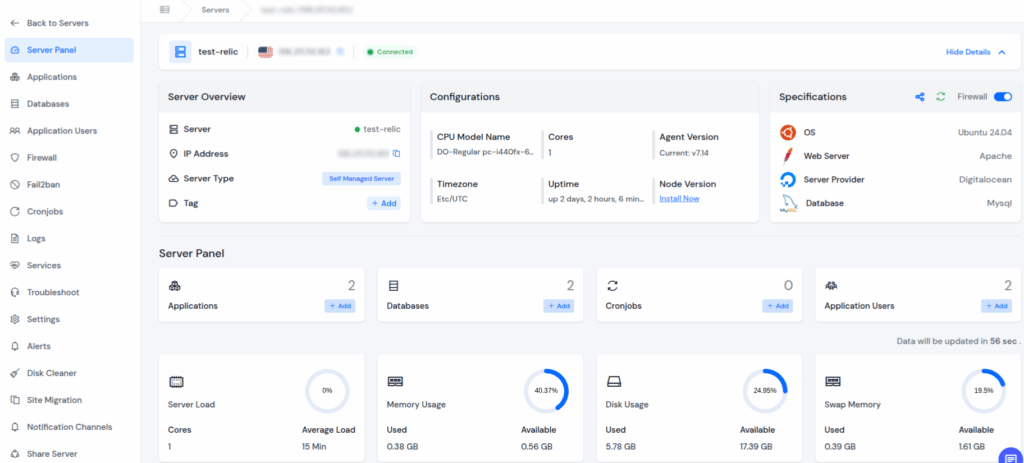
What is ServerAvatar
ServerAvatar is a managed cloud hosting provider that simplifies the deployment, management, and monitoring of servers and applications, no deep technical expertise required.
with ServerAvatar you can:-
- Deploy servers directly on top cloud providers like DigitalOcean, Vultr, Hetzner (Linode coming soon).
- No need for your own cloud provider account.
- Easily deploy and manage apps like WordPress, Laravel, n8n, custom PHP, and Node.js.
- Enjoy one-click deployments for faster setup.
- Access features like monitoring, backups, free auto-renewing SSL, firewall, fail2ban, and more to simplify daily tasks.
- Supports various stacks: LAMP, LEMP, OLS, and Node Stack.
- Comes with a built-in log monitoring suite.
- Get 24/7 expert technical support.
- Enjoy affordable, scalable pricing plans.
Install WordPress in ServerAvatar Guide:-
https://serveravatar.com/install-wordpress-apache-ubuntu/#install-wordpress-using-serveravatar-6
Step 2: Pick and Install Your Membership Plugin
This is where the magic happens. The membership plugin handles all the subscription stuff so you don’t have to.
Why Paid Member Subscriptions is Perfect for Beginners
For this guide, we’re going to use a plugin called Paid Member Subscriptions. Here’s why it’s great for people just starting out:
- It has a free version that works really well
- Super easy to set up and use
- Works with any WordPress theme
- Handles payments automatically
- Great customer support
What Makes This Plugin Special
Paid Member Subscriptions does everything you need:
- Creates subscription plans easily
- Restricts content with simple shortcodes
- Handles recurring payments
- Manages member accounts
- Sends email notifications
- Works with popular payment methods like Stripe and PayPal
How to Install the Plugin
Installing is super simple:
- Go to your WordPress dashboard
- Click on “Plugins” then “Add Plugin”
- Search for “Paid Member Subscriptions”
- Click “Install Now” then “Activate”
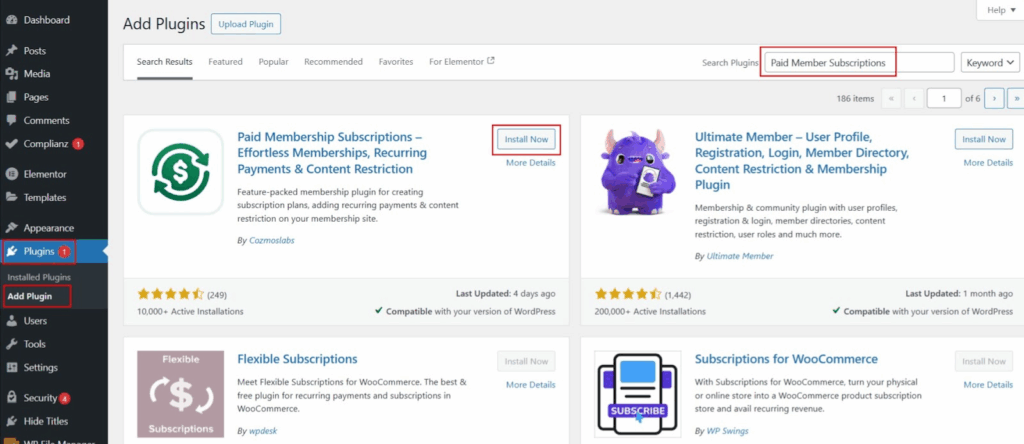
That’s it! The plugin is now ready to use.
Step 3: Choose a WordPress Theme That Works
Your theme controls how your site looks. You don’t need anything fancy – simple and clean works best.
Look for a theme that:
- Works well with your membership plugin
- Looks good on phones and tablets
- Loads quickly
- Has good reviews
Many membership plugins work with any theme, but some have recommended themes that work extra well.
Step 4: Set Up Paid Member Subscriptions Plugin
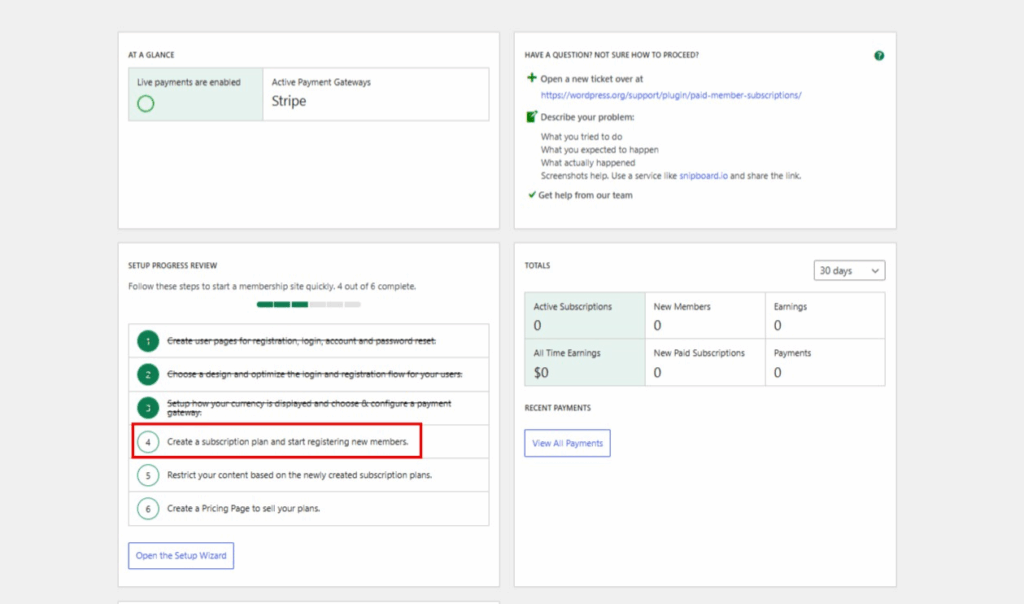
Now it’s time to configure your membership system. The Paid Member Subscriptions plugin makes this really simple with its setup wizard.
Create User Pages for Registration, Login, Account and Password Reset
To get started, go through the setup wizard and allow the plugin to create registration, login, account management, and password reset pages. To do this, toggle on the switches and then hit continue.
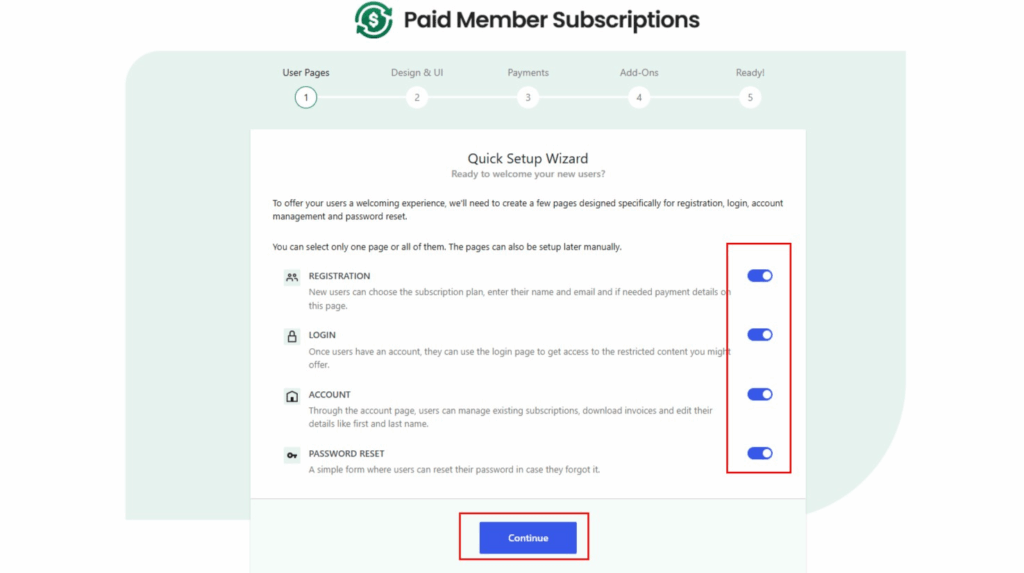
The plugin will automatically create these important pages:
- Registration page (where new people sign up)
- Login page (where members log in)
- Account page (where members manage their info)
- Password reset page (for forgotten passwords)
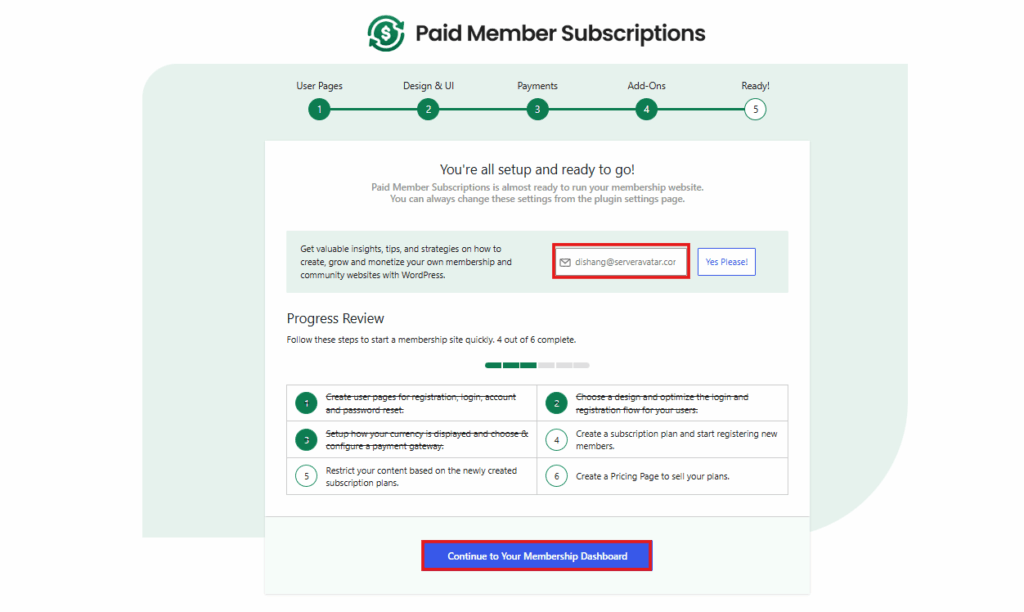
Understanding the Plugin Dashboard
Once setup is complete, you’ll see the main plugin dashboard with these sections:
- Members: See all your site members
- Subscriptions: Manage subscription plans
- Payments: Track all payments and transactions
- Settings: Adjust how everything works
The plugin keeps everything organized so you can easily manage your membership site.
Step 5: Choose a Design and Optimize the Login and Registration Flow for Your Users
Next, optimize the login and registration flow for your members. Toggle on the switches again and then hit continue.
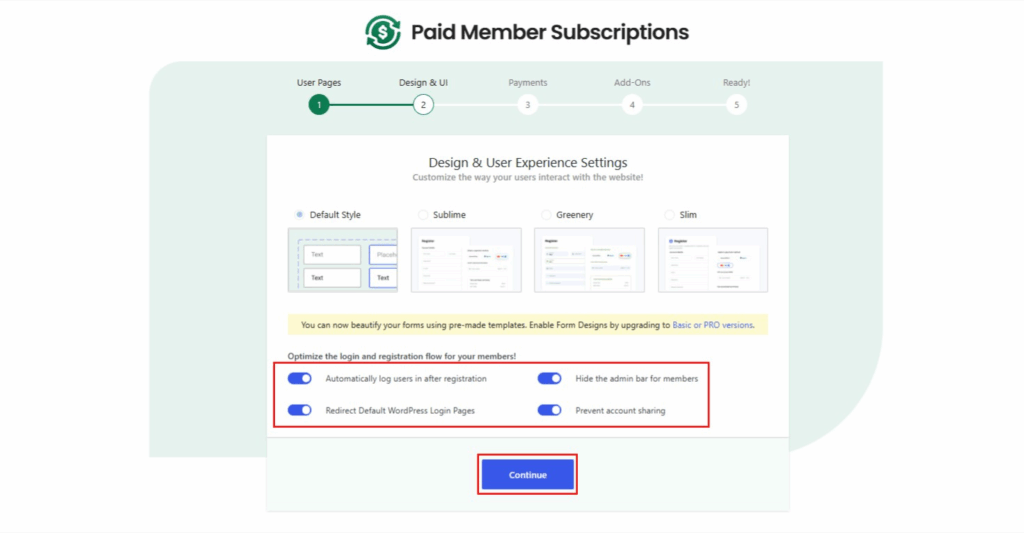
This step helps make it easy for people to join your site. The plugin will ask you about:
- How you want the registration form to look
- What information to collect from new members
- How to style the login page
- Whether to enable social media login options
Keep registration simple—only ask for what you really need:
- Name
- Email address
- Password
That’s it. You can always ask for more info later.
Step 6: Setup How Your Currency Is Displayed and Choose a Payment Gateway
Now, choose your preferred currency, renewal setting, and payment gateways. I’ll stick with the default Stripe payment method.
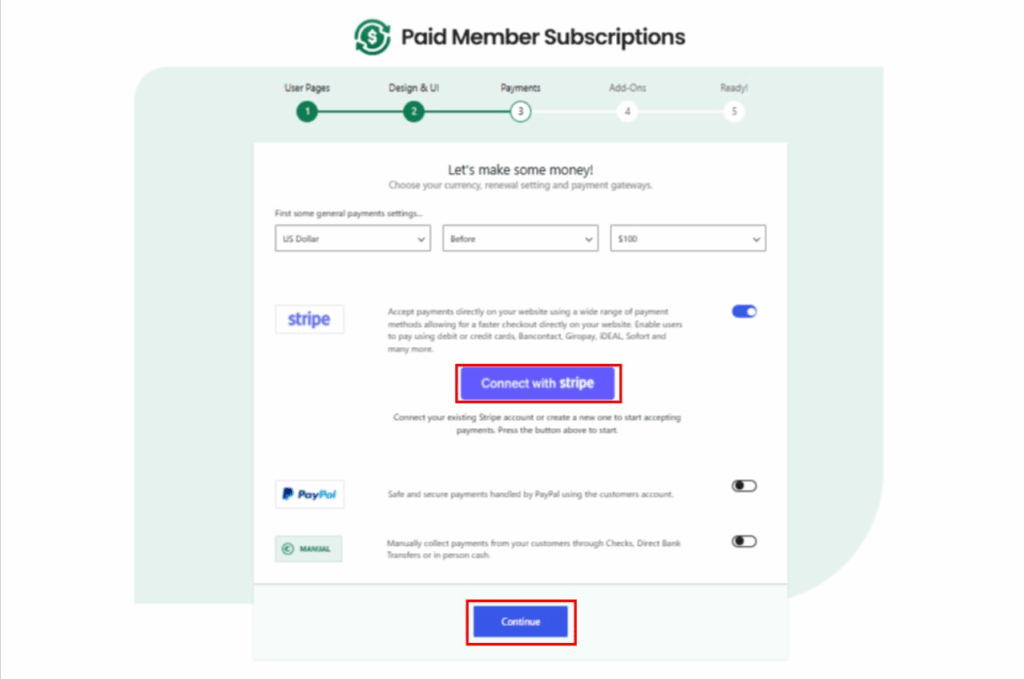
Setting Up Stripe Payment
Click on the Connect with Stripe button, enter the email address associated with your Stripe account, and click on the continue button
Complete the account creation setup to move to the next step, which is creating a subscription plan.
Why Choose Stripe
Stripe is the best choice for most membership sites because:
- It works in almost every country
- Very secure and trusted
- Easy to set up
- Works great with WordPress
- Handles recurring payments automatically
Currency and Payment Settings
Set up these important options:
- What currency you want to use (USD, EUR, GBP, etc.)
- How often to bill members (monthly, yearly)
- What happens if payments fail
- Email notifications for successful payments
Testing Your Setup
I won’t complete this step as I don’t intend to make any actual payments. This is just to show you how a membership plugin would work if you connect it to your preferred payment method, like PayPal.
Before going live, always test your payment system with Stripe’s test mode to make sure everything works correctly.
Step 7: Create a Subscription Plan and Start Registering New Members
Now it is time to create a subscription plan. Customers can access your content only after purchasing a subscription plan.
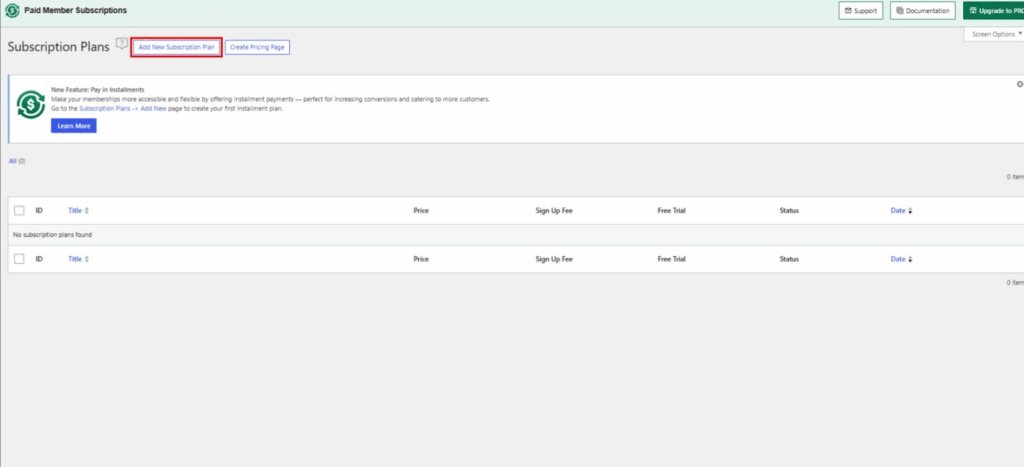
Click on Add New Subscription Plan and then create a subscription plan for your membership site. You can set the price to whatever you like, adjust the duration, and define how you want membership subscriptions to be renewed.
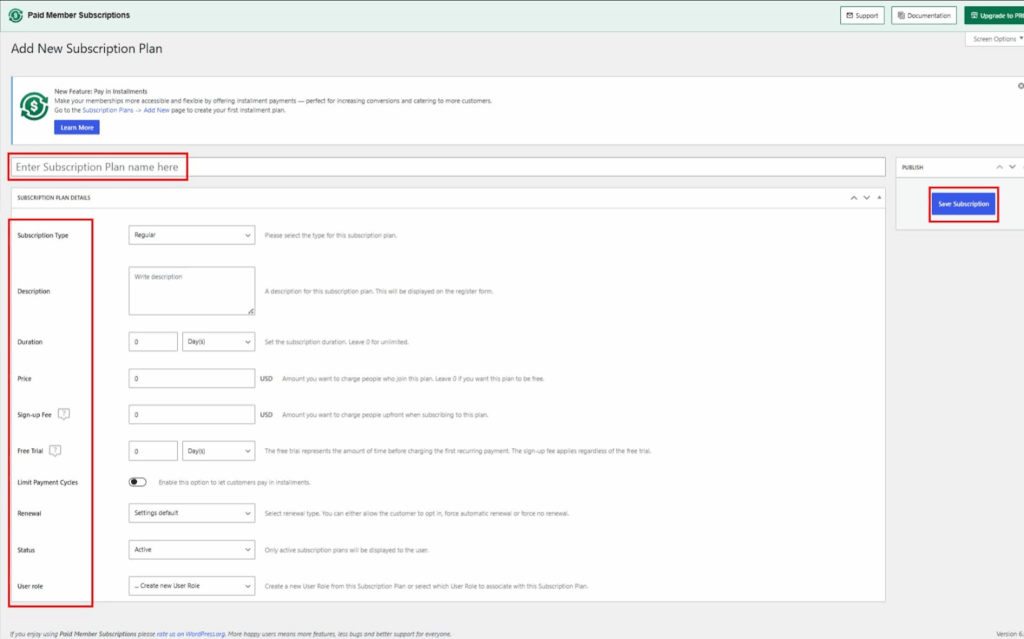
Setting Up Your First Plan
When creating your plan, you’ll need to fill out these details:
- Plan Name: Give it a clear name like “Monthly Access” or “Premium Membership”
- Price: Set how much you want to charge (start with what feels fair)
- Duration: Choose monthly, yearly, or lifetime access
- Description: Explain what members get with this plan
Choosing the Right Price
Pricing can be tricky, but here’s what works:
- Look at similar membership sites in your niche
- Start with a price that feels reasonable to you
- Remember, you can always change it later
- Consider offering both monthly and yearly options
What to Include in Your Plan
Think about what value you’re providing:
- Access to all premium content
- Downloadable resources
- Member-only community access
- Regular updates and new content
- Email support or coaching
Setting Renewal Options
Decide how memberships should renew:
- Automatic renewal: Members get charged automatically (recommended)
- Manual renewal: Members have to renew themselves
- Trial periods: Offer a few days free to try your content
Most successful membership sites use automatic renewal because it’s easier for everyone and creates steady income.
Step 8: Restrict Your Content Based on the Newly Created Subscription Plans
To restrict any content, you can use the
<p><strong>Premium Content:</strong> This is an exclusive tutorial on advanced WordPress techniques. In this section, you'll learn how to optimize your website for speed, implement advanced SEO strategies, and create custom functionality without coding. This content is only available to our premium members who have access to our complete library of professional tutorials and resources.</p>Real Example of Restricted Content
Here’s what a complete restricted section might look like on a cooking website:
[pms-restrict subscription_plans="12"]
<h3>Secret Recipe: Grandma's Famous Chocolate Cake</h3>
<p>This recipe has been in my family for generations and is only shared with our premium members.</p>

<h4>Ingredients:</h4>
<ul>
<li>2 cups all-purpose flour</li>
<li>2 cups sugar</li>
<li>3/4 cup cocoa powder</li>
<li>Secret ingredient (revealed below)</li>
</ul>

<h4>The Secret Technique:</h4>
<p>The secret to this cake's amazing texture is adding 1 tablespoon of mayonnaise to the batter. This creates the moistest, most delicious chocolate cake you've ever tasted!</p>

<p><a href="/download/recipe-pdf">Download Full Recipe PDF</a></p>
[/pms-restrict]
How to Add Content Restrictions Step by Step
Step 1: Go to Your Post or Page
- Open the post or page you want to restrict
- Click “Edit” to open the WordPress editor
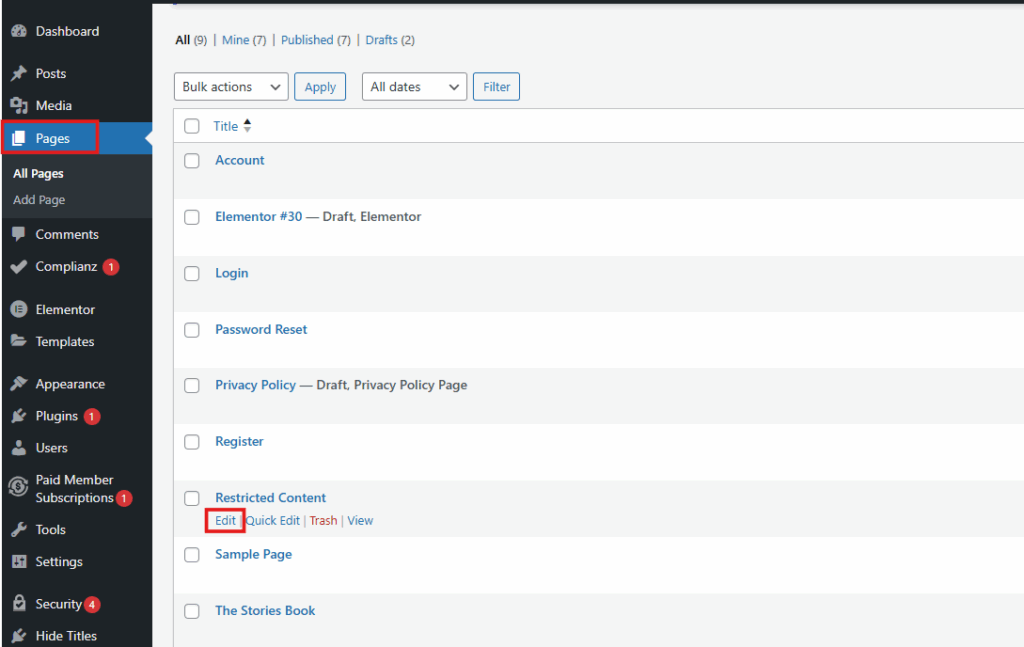
Find the spot where you want to add restricted content
Step 2: Add the Shortcode
- Type the opening shortcode: [pms-restrict subscription_plans=”12″]
- Add your premium content after the shortcode
- Close it with: [/pms-restrict]
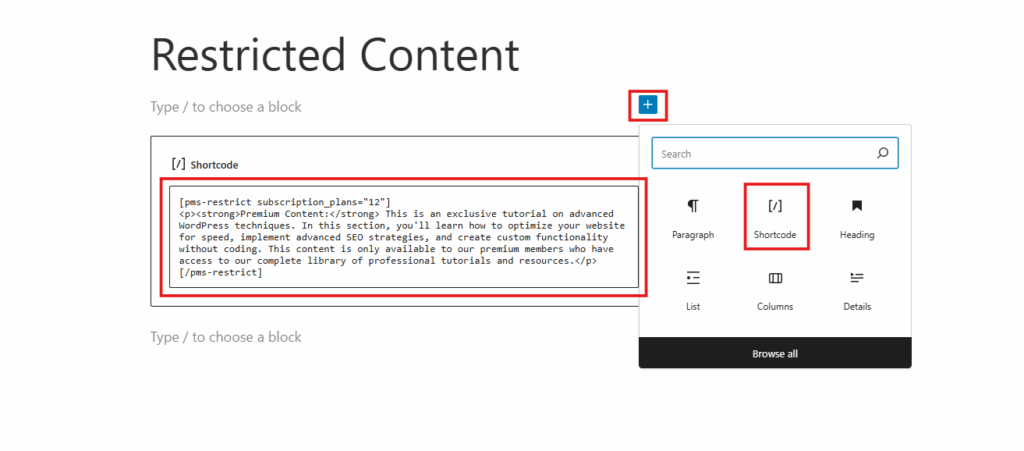
Replace “12” with your actual subscription plan ID number
Step 3: Find Your Plan ID Number
- Go to your WordPress dashboard
- Click on “Paid Member Subscriptions”
- Click on “Subscription Plans”
- Look for the ID number next to your plan name
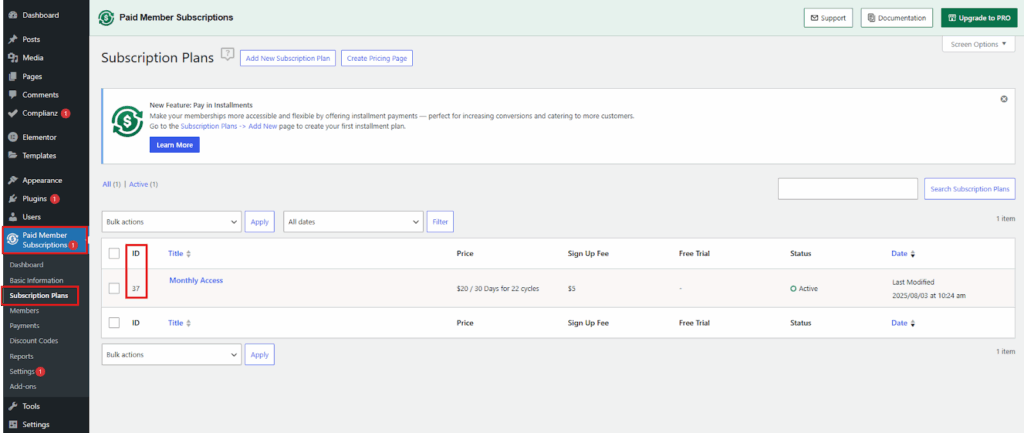
- Use this number in your shortcode
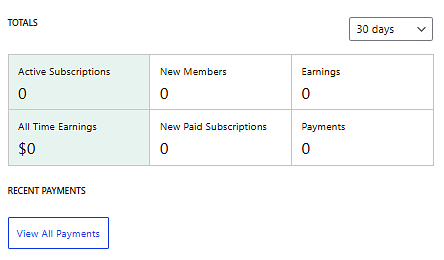
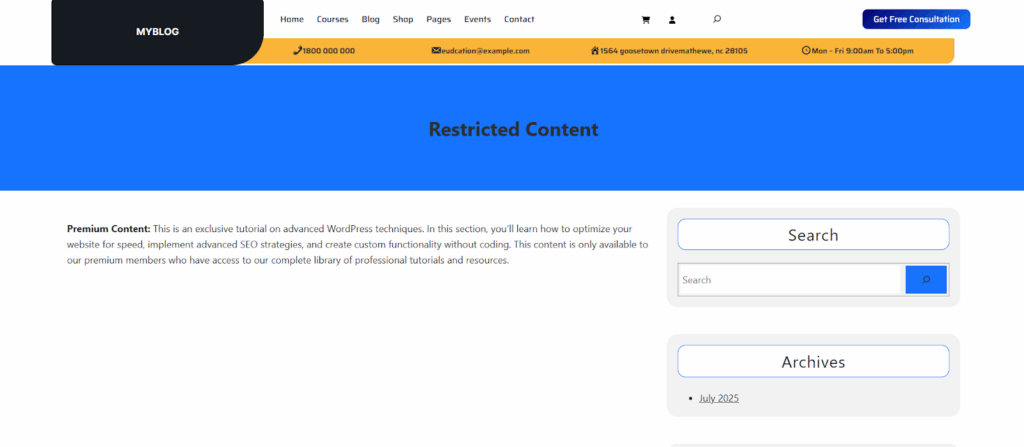
What Your Content Looks Like Without Restrictions
The image below shows how content on your site would appear without membership restrictions – everyone can see everything for free.
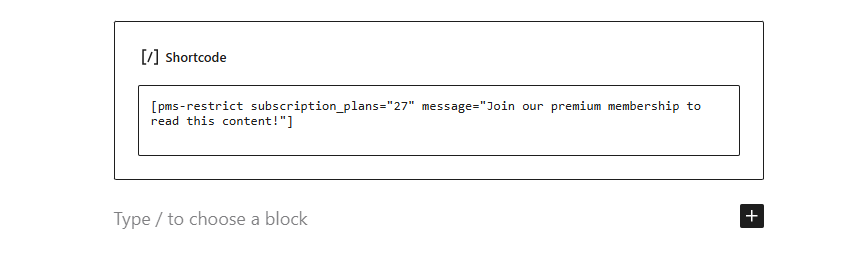
Setting Up Custom Messages for Non-Members
When you’re restricting content, you can choose to show a custom message to logged-out users and logged-in users who don’t have the right subscription.Then
How to Add Custom Messages:
- In your shortcode, add: message=”Your custom message here”
- Example: [pms-restrict subscription_plans=”12″ message=”Join our premium membership to read this content!”]
Good Message Examples:
- “This premium content is available to members only. Sign up today!”
- “Upgrade to our premium plan to access this exclusive content.”
- “Want to read more? Join our community for full access.”
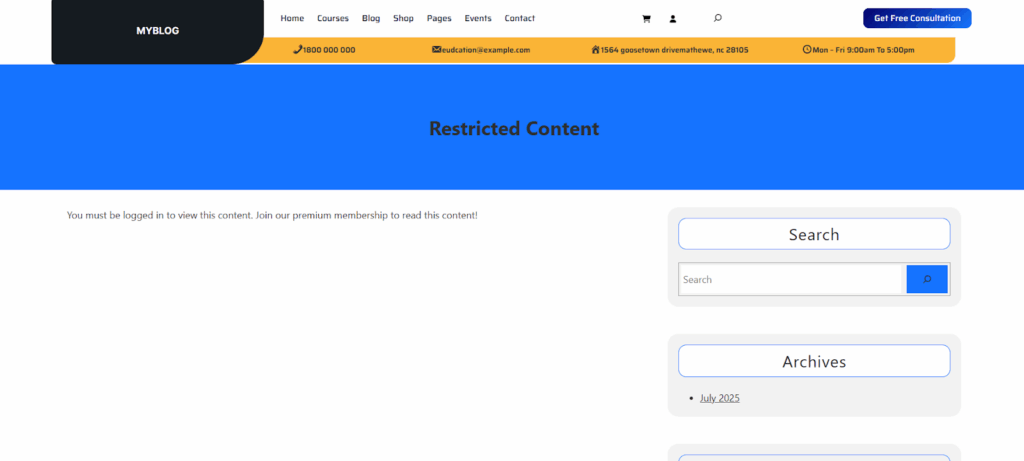
What Happens When Non-Members Try to Access Content
So now if a user who is not logged in tries to access your content, they’ll see your custom message instead of the premium content. This encourages them to sign up for your membership.
Quick Tips for Content Restriction
- Always test your shortcodes before publishing
- Keep some content free to attract new visitors
- Make your custom messages encouraging, not pushy
- Use clear plan names and descriptions
- Check that your plan ID numbers are correct in the shortcodes
Step 9: Build Your Pricing and Sales Pages
You need pages that sell your membership. These are super important because they convince people to join.
Create a Pricing Page
Your pricing page should include:
- Clear pricing for each plan
- List of what’s included
- Sign-up buttons
- Maybe some testimonials (if you have them)
Keep it simple and focus on the value people get.
Write Compelling Copy
Don’t just list features – explain benefits. Instead of “50 video lessons,” say “Learn guitar in just 30 days with our step-by-step video course.”
Step 10: Set Up Member-Only Areas
Create special areas that only members can see. This might include:
- Member dashboard
- Download area
- Community forums
- Exclusive content sections
Make these areas feel special and valuable.
Step 11: Test Everything Thoroughly
Before you launch, test everything multiple times:
Test the Sign-Up Process
- Try registering as a new member
- Make sure email confirmations work
- Check that payments process correctly
- Verify members get access to restricted content
Test Different Scenarios
- What happens if someone cancels?
- Do failed payments get handled correctly?
- Can members update their payment info?
- Do password resets work?
Get Someone Else to Test
Ask a friend to try signing up. They might catch problems you missed because you know the system too well.
Step 12: Launch and Monitor Your Site
Once everything is tested and working, you’re ready to launch!
Soft Launch First
Don’t announce to the world right away. Instead:
- Tell a few friends about it
- Get some initial members
- Fix any problems that come up
- Gather feedback and improve
Monitor Key Metrics
Keep an eye on:
- Sign-up conversion rates
- Payment success rates
- Member retention
- Support requests
This data helps you improve your site over time.
How to Make Your Site Profitable
Building the site is just the start. Here’s how to make it actually profitable:
- Create valuable content regularly
- Listen to your members and give them what they want
- Promote your site (but don’t be spammy about it)
- Keep improving based on feedback
Remember, it takes time to build up a good member base. Don’t get discouraged if you don’t have hundreds of members right away.
Common Problems and How to Fix Them
Problem: People sign up but don’t stick around Solution: Make sure your content is really valuable and you’re adding new stuff regularly
Problem: Payment issues Solution: Test your payment system thoroughly and have good customer support
Problem: Members can’t access content Solution: Check your content restrictions and make sure they’re set up right
Problem: Not enough sign-ups Solution: Look at your pricing and value proposition. Maybe you need to adjust something
Conclusion
Building a profitable membership site in WordPress isn’t rocket science, but it does take some work. The key is to focus on providing real value to your members.
Start simple, test everything, and keep improving. Don’t try to build the perfect site right away – just get something good up and running, then make it better over time.
Remember, the most successful membership sites solve a real problem for their members. If you can do that consistently, you’ll build a profitable business that pays you every month.
The technical stuff might seem overwhelming at first, but once you get the hang of it, it’s not that hard. WordPress and the right plugins do most of the heavy lifting for you.
So what are you waiting for? Pick your niche, choose your tools, and start building. Your future members are out there waiting for what you have to offer.