
If you’ve ever felt like your website or application is moving slower than it should, you’re not alone. Think of a Redis as memory booster for server. Redis (Remote Dictionary Server) is a tool that stores data in memory to make apps run faster. It helps in quick data access. In this guide, you will learn how to install and set up Redis Cache on Ubuntu in an easy and clear way.
Whether you’re a developer or just want to speed up your server, this step-by-step guide will help you install and configure Redis easily, without any confusion.
What is Redis and Why Use It?
Redis is like your server’s memory on steroids. Redis stores data in RAM, ao there is no need to fetching data from a disk everytime. It’s commonly used for caching, session management, real-time analytics, chat applications, and queues. The result? load times gets faster and application responsiveness gets improved.
Prerequisites Before Installing Redis
Before diving into the installation, make sure:
- You’re using Ubuntu 20.04 or later
- You have sudo/root access
- Your system is connected to the internet
Now, you need to update your system packages:
sudo apt update && sudo apt upgrade -yStep-by-Step Redis Installation on Ubuntu
- Installing Redis on Ubuntu is simple using the apt package manager.
sudo apt install redis-server -yThat’s it. Redis gets installed in a single command. Simple, right?
Starting and Enabling Redis Service
- To make sure Redis starts automatically after a reboot, enable it:
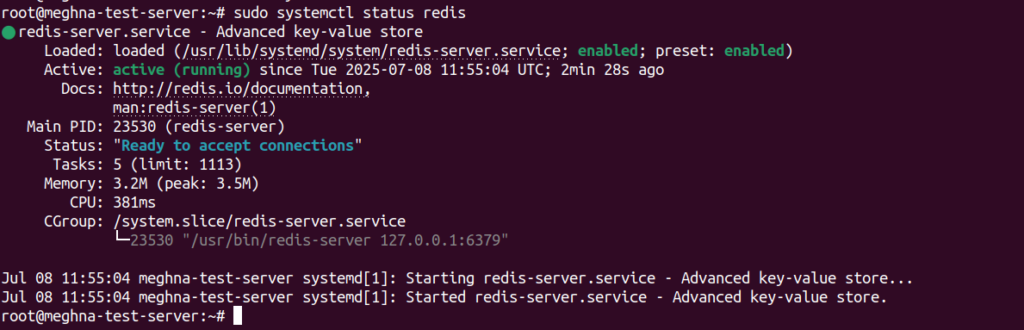
sudo systemctl start redisWant to check the status?
sudo systemctl status redisIf it shows “active (running)”, you’re all set. The Redis is activated and running as mentioned in the below image.
Verifying Redis Installation
Run the below command to test if Redis is working:
redis-cliThen type: “ping“
pingYou can see a response: “PONG“, which means Redis is working!

Basic Redis Configuration Overview
Redis configurations are handled in a file named “redis.conf”, usually found at below mentioned configuration path:
/etc/redis/redis.confInside this file, you can fine-tune how Redis behaves. From setting memory limits to enabling security options, this file is the heart of Redis customization.
Editing Redis Configuration File
To open the config file:
sudo nano /etc/redis/redis.confSome useful changes you can make:
- Change the default port (6379) for security reasons
- Bind Redis only to localhost or a specific IP
- Enable authentication
Restart Redis after making the changes by using the below command:
sudo systemctl restart redisSecure Redis with a Password
- Adding a password is necessary nowadays, it ensures only authorized users can access your Redis instance.
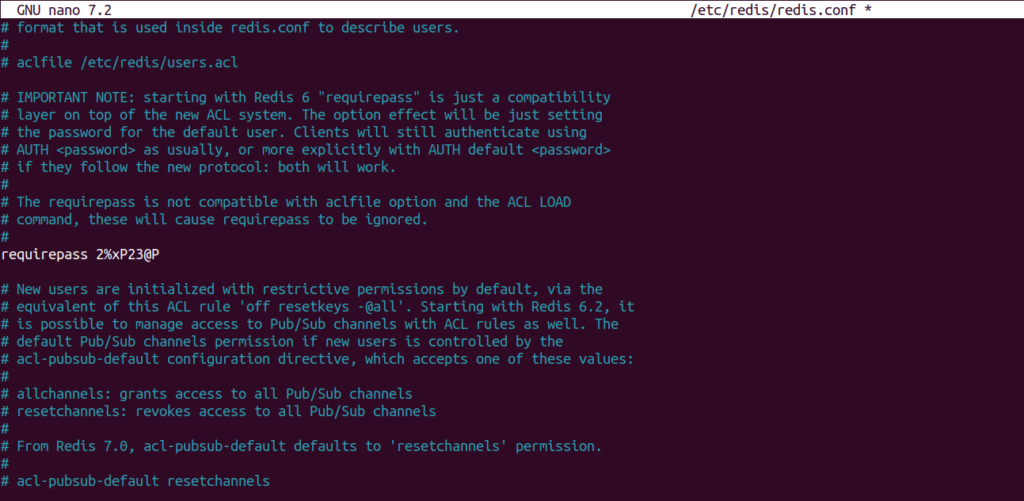
- To secure Redis with a password, navigate to Redis config file as mentioned above, and find the “requirepass foobared”, remove the “#” to uncomment it, and remove “foobared” and enter your required password there as mentioned in the command below:
requirepass YourStrongPasswordHere- Enter your required password at the place of “YourStrongPasswordHere”, and save your file.
- As you can see, I have added a password as mentioned in the image below:
- Restrart your redis service by using the below command.
sudo systemctl restart redisNow, when you are trying to connect via CLI, you’ll need to authenticate with your password:
redis-cli
auth YourStrongPasswordHereIt replied with “OK”. That’s it, Security is peace of mind.
Enabling Redis Remote Access (If Needed)
By default, Redis only listens to 127.0.0.1 for security purposes. If you need access to Redis from other servers, follow the below steps:
- Edit the bind address in redis.conf:
bind 0.0.0.0- Set up your firewall to allow connections only from trusted IPs.
- Don’t forget to secure it with a password (as shown above).
Warning: Enabling public access without protection is a huge risk.
Testing Redis with Redis CLI
Want to try storing and retrieving data?
redis-cli

set name "RedisTest"
get nameYou should get “RedisTest” in return. That’s Redis doing its job.

Setting Up Redis as a Systemd Service
Redis usually installs with “systemd” integration, let’s start it:
sudo systemctl start redisThis makes sure Redis starts on boot and stay running in background.
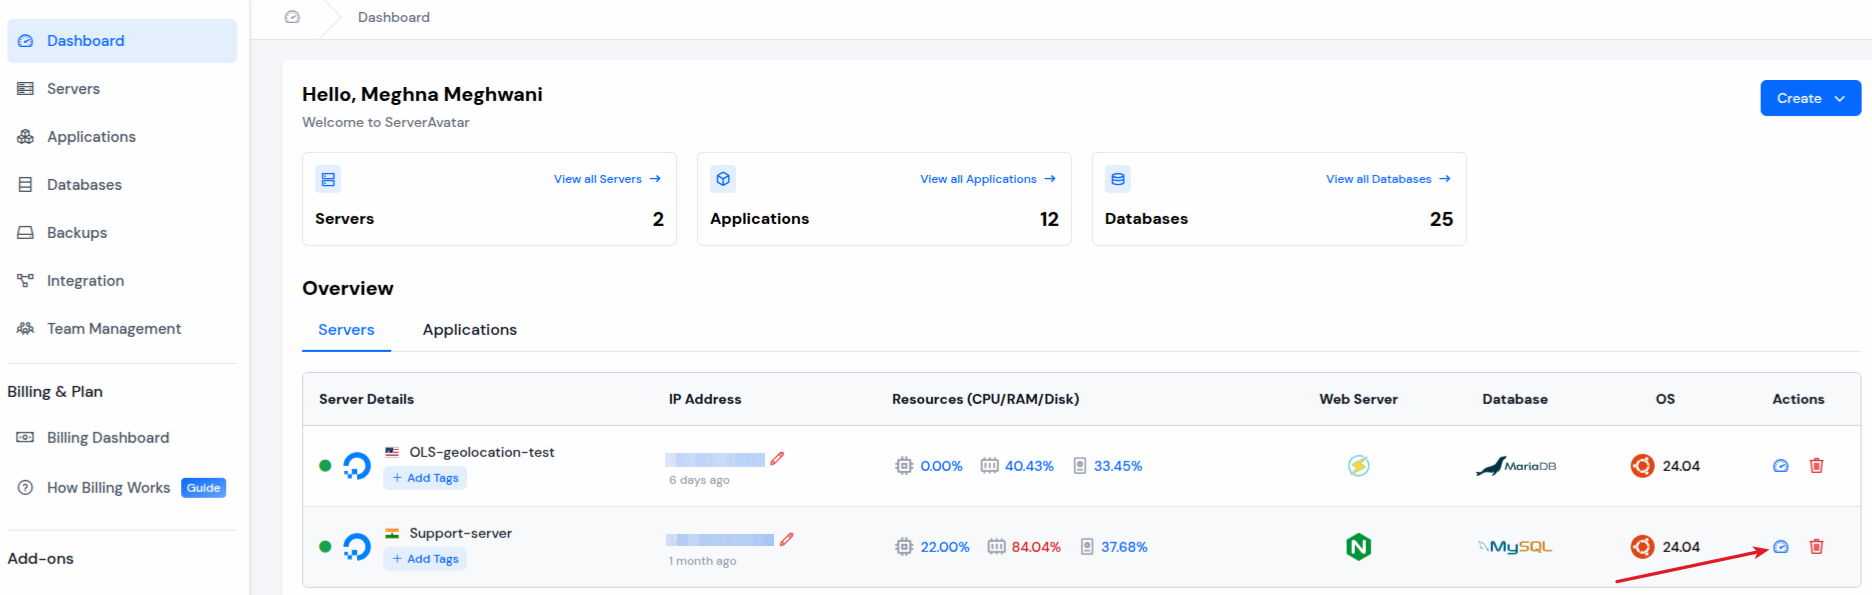
If you are using ServerAvatar to manage your servers and applications, you can easily checkout the redis password and change it with just a few simple steps mentioned below:
Step 1: Log in to the ServerAvatar Account, and Dashboard button for the server you want to change the general settings for.
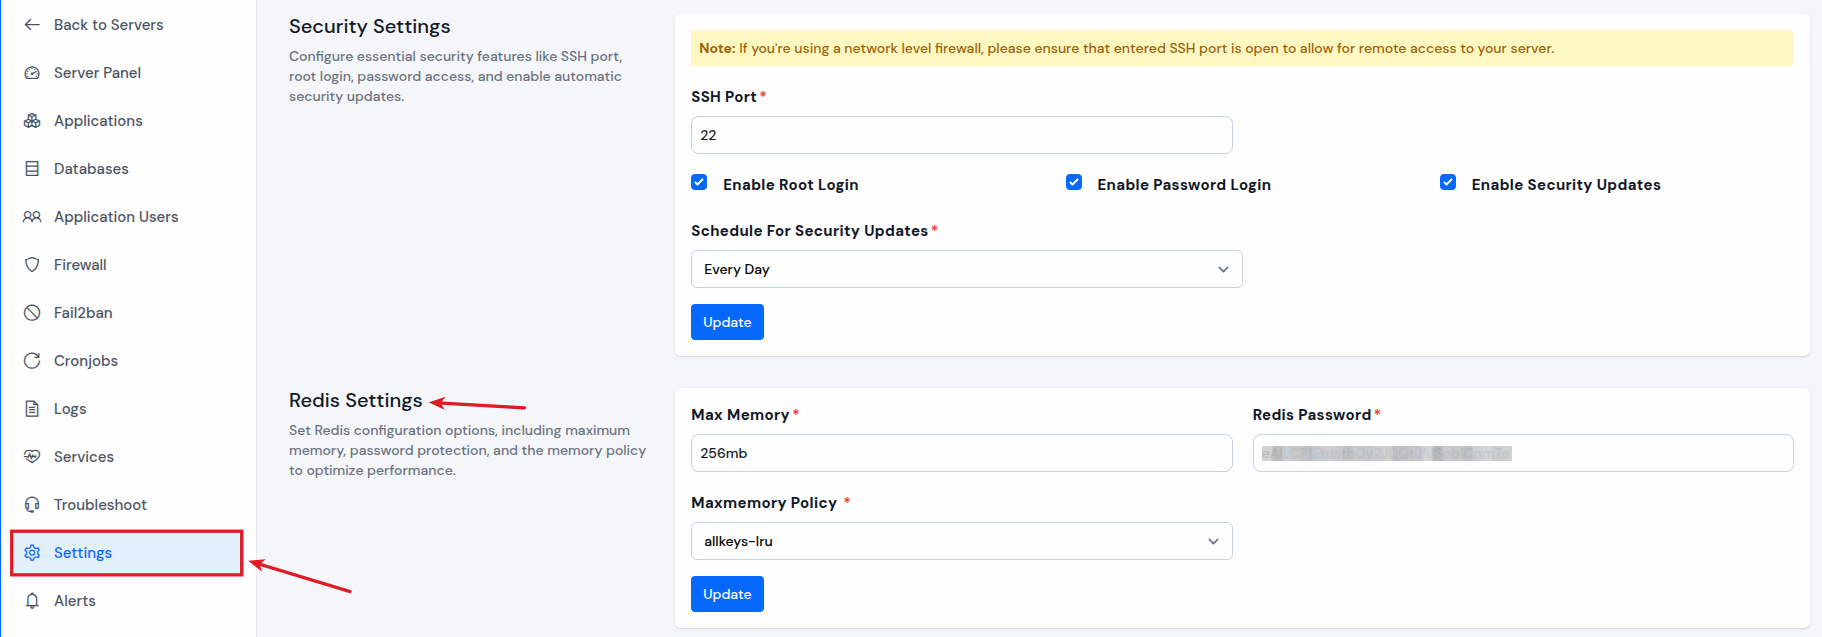
Step 2: Click on the “Settings” from the left-hand sidebar from the server panel. After scrolling some down you can see the option of Redis settings there.
- You can modify the Max Memory, Redis password and Maxmemory Policy with just changing the value and click on the “Update” button.
- Max Memory: It sets maximum amount of RAM that Redis can use. Once the limit is reached, Redis uses the defined policy to free up space.
- Redis Password: It is password used to secure access to the Redis server. Clients must authenticate using this password before executing any commands.
- Maxmemory Policy: It defines how Redis handles data when memory is full. Options include the least recently used keys, oldest keys, or returning an error.
Optimizing Redis for Performance
Here are a few performance tips:
- Enable appendonly yes in redis.conf to ensure data persistence.
- Tune maxmemory and maxmemory-policy based on your server’s RAM.
- Monitor slow logs to identify and fix Slowdowns.
These tweaks are like giving Redis a comfortable workspace, it simply performs better.
Common Redis Commands You Should Know
Here are a few Redis commands you’ll use often:
- SET key value – stores a value
- GET key – retrieves a value
- DEL key – deletes a key
- FLUSHALL – clears everything (use with caution!)
- EXPIRE key seconds – sets key expiry time
Troubleshooting Common Redis Issues
- Redis not starting? Check log file at /var/log/redis/redis-server.log
- Cannot connect remotely? Ensure your firewall and configuration allow remote access.
- Password not working? Double-check for typos and restart the server after changes.
Conclusion
Redis is like the caffeine shot your server needs, it wakes things up and keeps them running efficiently. With its super-fast performance and easy setup, Redis is a no-brainer if you want to level up your app’s speed. Now that you know how to install and set up Redis on Ubuntu, it’s time to boost your server’s performance.
Whether you’re a web developer, system admin, or just someone curious about technology, Redis worth your time.
FAQs
1. Is Redis free to use?
Yes, Redis is open-source and completely free to use under the BSD license.
2. Can Redis be used with WordPress or other CMS?
Absolutely! Redis can cache database queries, speeding up WordPress, Joomla, Magento, and more.
3. How do I know if Redis is improving my app’s performance?
Monitor your app’s speed with and without Redis using tools like GTMetrix, Pingdom, or Redis’s own stats (INFO command).
4. Is Redis secure for production environments?
Yes, if properly configured with authentication, access control, and firewalls. Avoid open/public exposure without security.
5. What’s the difference between Redis and Memcached?
Both are caching systems, but Redis offers more data types, persistence, and advanced features compared to Memcached.