
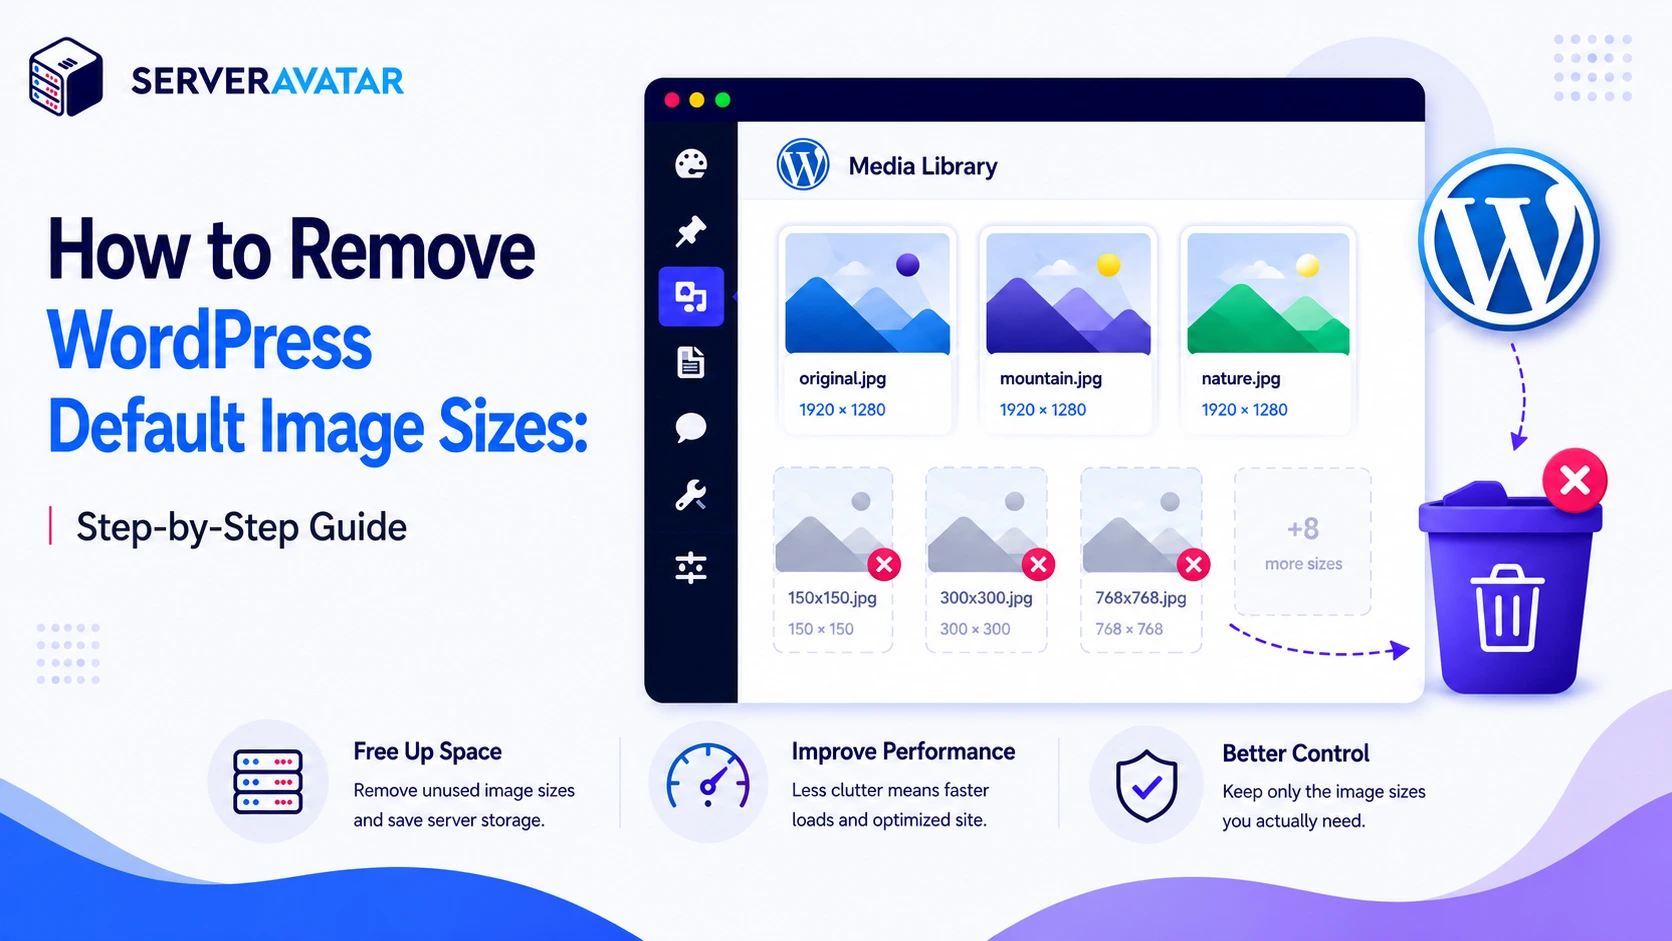

If you’ve uploaded images to WordPress, you’ve probably noticed your wp-content/uploads folder filling up with multiple copies of the same image. That’s because WordPress Default Image Sizes automatically generate several resized versions of every uploaded image, even if your website never uses them. Over time, these extra files can consume valuable server storage, clutter your media library, and make backups larger than necessary.
Over time, these extra files waste storage, increase upload processing, and add unnecessary server load. While WordPress lets you change image dimensions, it doesn’t provide a built-in option to disable image size generation completely.
In this guide, you’ll learn how to stop WordPress from creating unused image sizes using a plugin or code, and how to clean up the extra images already stored in your media library.
TL;DR
- WordPress creates thumbnail, medium, and large versions of every image you upload by default
- These extra files consume server storage and increase upload processing time
- You can stop this behavior using a plugin or by adding a filter to your theme’s functions.php file
- Existing images need a separate cleanup step to remove previously generated sizes
- Choose the method that matches your comfort level with code
What WordPress Does Behind Every Image Upload
Uploading an image to the WordPress Media Library does more than simply save the original file. During every upload, WordPress automatically creates multiple resized versions of that image for use across different areas of your website.
By default, WordPress generates:
- Thumbnail: 150 × 150 px (cropped square), commonly used for galleries and widgets.
- Medium: Maximum 300 px on the longest side.
- Large: Maximum 1024 px on the longest side.
- Full Size: The original uploaded image (unchanged).
| Image Size | Default Dimensions | Common Use Cases |
|---|---|---|
| Thumbnail | 150 × 150 px (cropped square) | Widgets, comment avatars, gallery grids |
| Medium | Max 300 px on longest side | In-content images needing something smaller than full size |
| Large | Max 1024 px on longest side | Full-width content images, detailed displays |
| Full Size | Original upload (unchanged) | The source file WordPress never modifies |
Custom Image Sizes
The default sizes are only part of the story. Many themes and plugins register their own image dimensions, including:
- Page builders
- Gallery plugins
- Slider plugins
- WooCommerce
- Custom WordPress themes
As a result, uploading one image can generate 5–10+ files depending on your site’s configuration.
Why It Becomes a Problem
If your website stores hundreds or thousands of images, these additional copies consume a significant amount of server resources.
Common drawbacks include:
- Increased disk usage
- Slower image uploads
- Longer backup times
- Higher storage costs
- Extra CPU usage during image processing
- Larger media libraries to maintain
Example
- 500 original images × 2 MB each = 1 GB
- If WordPress creates five additional sizes per image, total storage can easily exceed 5 GB, even when many of those files are never used.
| Original Images | Avg File Size | Sizes Generated Per Image | Total Storage Used |
|---|---|---|---|
| 100 | 2 MB | 5 | ~1 GB |
| 500 | 2 MB | 5 | ~5 GB |
| 1,000 | 2 MB | 5 | ~10 GB |
If your theme never displays certain image sizes, generating them simply wastes storage and processing power.
Two Ways to Control WordPress Image Size Generation
You have two solid paths to stop WordPress from generating image sizes you don’t need.
- The plugin route is the most approachable, it gives you a settings interface and doesn’t require touching any code.
- The code route is more precise and doesn’t add another plugin to your site, but it does mean working with your theme’s functions.php file.
Neither approach is wrong. Pick based on what you’re comfortable with.
Method 1: Using a Plugin (Beginner-Friendly)
A plugin provides a simple interface for disabling unwanted image sizes without editing any code.
One popular option is EWWW Image Optimizer, which includes controls for preventing WordPress from generating selected image sizes.
Here’s how to use it:
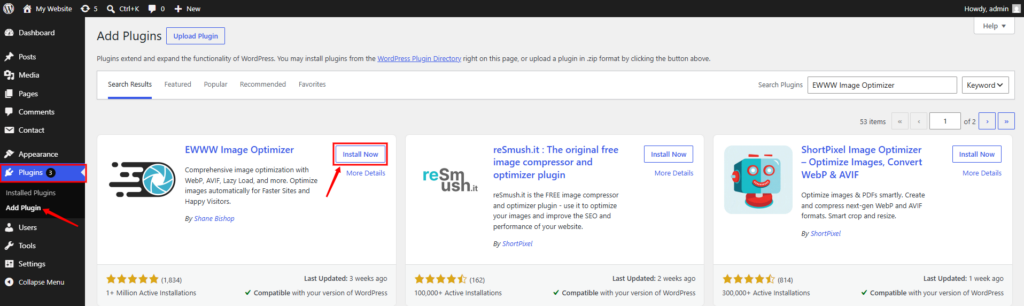
Step 1: Install and activate the plugin
- Go to Plugins >> Add New.
- Search for “EWWW Image Optimizer”
- Click Install Now, then Activate it.
Step 2: Navigate to the Resize settings
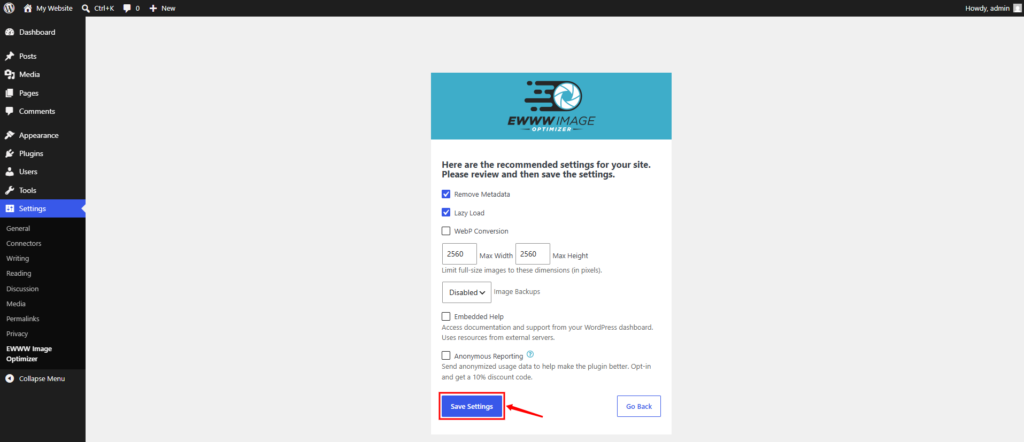
- Navigate to the Plugins section, and click on the EWWW Image Optimizer >> Settings.
- While setting up, you will see the recommended settings section; configure it as per your requirements and click on the “Save Settings” button.
- Navigate to Resize section, and review all image size.
- Uncheck the sizes your website doesn’t require.
- Save the settings.
- Upload a new image to verify that fewer image files are created.
Before Disabling Sizes
Don’t disable every size blindly. First, confirm which sizes your theme actually uses.
A good approach is to:
- Check your theme documentation.
- Inspect your templates.
- Test uploads on a staging site before applying changes to production.
Many modern themes rely on their own custom image sizes, allowing you to disable the default Thumbnail, Medium, and Large sizes without affecting the site’s appearance.
Other Helpful Plugins
- ThumbPress: Offers thumbnail management along with cleanup tools for existing image sizes.
- Regenerate Thumbnails Advanced: Helps you rebuild or remove unused image sizes after changing settings.
- Disable Generate Thumbnails: Lightweight plugin focused only on thumbnail generation.
- Media Cleaner: Scans and removes unused media files to keep your uploads folder optimized.
The advantage of the plugin method is that it is fully reversible. Re-enable a size whenever needed, and WordPress will generate it again for future uploads.
Method 2: Using Code (More Targeted)
If you prefer not to install another plugin, WordPress allows you to prevent image generation by using a simple filter in your functions.php file.
The filter removes selected image sizes before WordPress begins processing uploaded images.
Here’s the code:
function sv_stop_generating_default_image_sizes( $sizes ) {
    unset( $sizes['thumbnail'] );         // Disables the 150×150 thumbnail
    unset( $sizes['medium'] );            // Disables the medium size
    unset( $sizes['large'] );            // Disables the large size
    return $sizes;
}
add_filter( 'intermediate_image_sizes_advanced', 'sv_stop_generating_default_image_sizes' );Let’s break this down.
- The
intermediate_image_sizes_advancedfilter runs during WordPress’s image processing workflow, just before resized image files are generated and saved. - It receives the
$sizesarray, which lists all the registered image sizes that WordPress is preparing to create. - Using
unset()allows you to remove specific image sizes from the array, preventing WordPress from generating those versions. - Once the modified
$sizesarray is returned, WordPress generates only the image sizes that remain in the array.
What This Code Does
- Stops generating the default Thumbnail size.
- Prevents creation of the Medium image.
- Disables the default Large version.
- Keeps the original uploaded image intact.
You can remove any individual unset() line if you’d like to keep a specific size.
Where to Add the Code
There are two safe places to put this snippet, and one place to avoid.
Use a child theme’s functions.php (recommended): If your theme has a child theme, and it should, if it’s a custom or commercial theme, add the code there. This ensures your change survives theme updates, which overwrite the parent theme’s files. To access it;
- Go to Appearance >> Theme File Editor in your WordPress admin.
- Select your child theme from the dropdown at the top right
- Click on Theme Functions (functions.php).
- Add the snippet at the bottom of the file, then click Update File.
- Avoid adding this to the parent theme’s functions.php. Your changes will be wiped out the next time the theme updates.
Use a code snippets plugin (convenient alternative): Plugins like Code Snippets let you add PHP code through the WordPress admin without touching any files. This is handy if you don’t have FTP access or aren’t comfortable editing theme files directly.
Before You Start
Always create a backup before editing PHP files. A small syntax mistake can make your website inaccessible until the error is corrected
What About the Images You Already Have?
The changes we made only apply to new uploads. Existing images in your Media Library still contain all previously generated sizes.
Disabling image sizes now will not remove old files automatically. You have two practical ways to clean them up:
Option 1: Regenerate Thumbnails (Recommended)
The easiest method is to regenerate your media library using a dedicated tool. A common choice is the Regenerate Thumbnails plugin.
How it works:
- Scans your existing media library
- Removes sizes you’ve disabled
- Regenerates only the required image versions (if needed)
Steps:
- Install and activate Regenerate Thumbnails
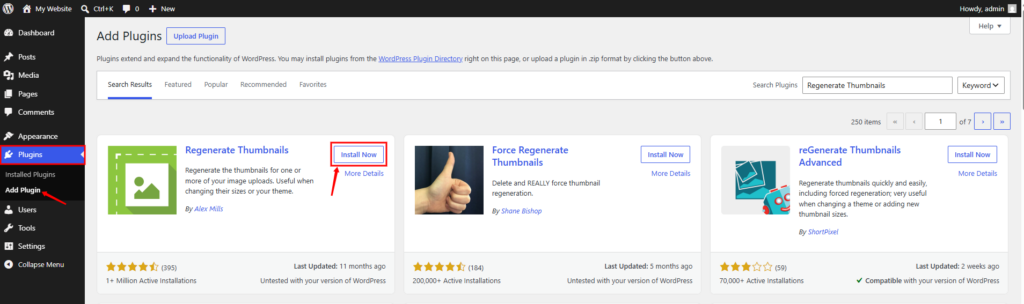
- Go to Tools >> Regenerate Thumbnails
- Choose your required option and click Regenerate Thumbnails
- Start the process and wait for completion
Important notes:
- Processing can take time on large libraries
- Uses server CPU and memory during execution
- Shared hosting may slow down or throttle the process
- For large sites, run in batches if supported
Option 2: Manually Remove Unused Image Files
If you prefer full control, you can delete unused image sizes manually.
How to do it:
- Access your site via FTP or SSH
- Go to:
wp-content/uploads - Look for files like:
image-name-150x150.jpgimage-name-300x300.jpg
Be careful:
- Deleting active image sizes can break layouts
- Always verify what your theme actually uses first
- Check for custom sizes before removing anything
You can inspect registered sizes using tools like What The File or by reviewing add_image_size() calls in your theme files.

Key Things to Do After Disabling Image Sizes
1. Check Your Theme’s Registered Sizes
Themes often define custom image sizes that are separate from WordPress defaults. You can list them using:
global $_wp_additional_image_sizes;
print_r( $_wp_additional_image_sizes );What this shows:
- All custom sizes added by themes or plugins
- Their exact dimensions
- Which sizes may still be in use
Temporarily add this to your child theme and check the output in your page source or debug tools.
2. Test Your Website Thoroughly
After making changes, review key pages such as:
- Homepage
- Blog posts
- Product or service pages
- Galleries or portfolios
What to look for:
- Broken or missing images
- Blurry or stretched visuals
- Layout shifts in grids or sliders
- Incorrect featured image sizes
3. Watch Your Upload Dimensions
Disabling sizes does not resize original uploads. So make sure:
- You upload images close to required display dimensions
- Avoid overly large or overly small originals
- Match your theme’s layout requirements
Otherwise, images may appear blurry or stretched.
4. Monitor Plugin Behavior
New plugins can silently add image sizes. Common sources:
- Page builders
- Sliders
- Gallery plugins
- E-commerce tools
Best practice:
- Check registered image sizes after installing new plugins
- Keep track of changes periodically
- Review media behavior after major updates
5. Reversibility (Nothing is Permanent)
You can always undo changes:
If using a plugin:
- Re-enable sizes from settings
- Save changes
If using code:
- Remove or comment out
unset()lines - Or delete the filter entirely
WordPress will resume generating those sizes for new uploads.
6. Front-End Uploads Are Also Affected
If your site allows:
- User profile images
- Guest uploads
- Product submissions
Then those uploads follow the same image rules.
What to check:
- Whether required sizes are still being generated
- Whether forms rely on specific dimensions
Always test upload forms after making changes.
7. Is It Safe to Disable All Default Sizes?
In many modern setups, yes. You can usually disable:
- Thumbnail
- Medium
- Large
But only if:
- Your theme uses custom image sizes
- You’ve confirmed layouts still display correctly
- No templates rely on default WordPress sizes
Older themes may still depend on medium or large, so always verify before removing everything.
Conclusion
Managing what image sizes WordPress generates is one of those small details that makes a real difference as your site scales. You don’t need to be a developer to take control of it, the plugin route handles it cleanly for most people. And if you’re comfortable with a few lines of PHP, the code approach gives you precise control without adding overhead.
The bigger habit to build is auditing your media setup periodically. Every new theme or plugin has the potential to register new image sizes. Making it a point to check what gets registered when you add something new saves you from slowly accumulating image bloat over months and years.
FAQs
Will removing default image sizes break my existing posts?
No, both methods covered in this guide only affect new uploads going forward. Your existing images and their generated sizes stay exactly as they are until you manually regenerate or delete them using the Regenerate Thumbnails plugin.
Can I prevent plugins from creating their own image sizes?
Some plugins let you configure or disable their image size registration in their settings. For others, the Disable Generate Thumbnails plugin gives you a UI to uncheck sizes registered by any source, including plugins, so you can manage everything in one place without writing code.
Will this reduce my existing storage usage?
Not automatically, the changes only prevent new sizes from being created going forward. To reclaim storage from images you’ve already uploaded, you need to run a thumbnail regeneration process or manually delete the old size files from your server.
Is it safe to disable all three default sizes?
It depends on your theme. Many modern themes rely on custom image sizes and don’t reference WordPress defaults at all, making it safe to disable all three. Some older or simpler themes may still pull medium or large sizes in certain templates. Auditing your theme first is the safe play.
How do I restore a size I’ve disabled?
With the plugin method, re-check the box for that size in the settings and save. With the code method, either remove the corresponding unset() line or delete the entire filter block from your functions.php file.
Key Takeaways
- WordPress creates thumbnail, medium, and large copies of every image you upload, even if your theme never uses them
- These extra files waste server storage and add processing overhead on every upload
- You can block new size generation using a plugin or a PHP filter in functions.php
- Existing images need to be cleaned up separately using a regeneration tool
- Always audit your theme’s registered image sizes before disabling anything
- Both methods are fully reversible, you can re-enable sizes anytime
- Test your site thoroughly after making changes to ensure no broken images appear
Related Articles
- How to Speed Up WordPress Website With Object Cache Pro: Caching and image optimization go hand in hand when it comes to WordPress performance.
- Optimize WordPress Performance with Rewrite Rules & Cache: Rewrite rules and cache management are key to keeping your WordPress site fast.
- Improve WordPress Performance with Preloading Tricks: Preloading helps your server anticipate what users need before they ask for it.
- Reduce Server Response Time in WordPress (TTFB Optimization Guide): If you’re working on reducing server resource usage, TTFB optimization is the next logical step after managing image sizes.
- How to Fix WordPress 500 Internal Server Error in 2026: A useful companion guide for troubleshooting issues that can arise after making changes to your WordPress site.
About the Author
Meghna Meghwani is a technical writer focused on Linux, Ubuntu, VPS hosting, server management, WordPress, PHP, Node.js, cloud hosting, and DevOps. She creates beginner-friendly tutorials, practical hosting guides, troubleshooting articles, and server security content designed to help developers and businesses manage applications and servers more efficiently.