
Hey there, ServerAvatar users and tech explorers! Keeping a server running and managing it smoothly can sometimes feel like a headache, but not with ServerAvatar. ServerAvatar v7.15.3 is now live with several important updates focused on improving control, flexibility, and overall user experience. This release brings enhancements to log monitoring, PHP management, SSL handling, UI usability, and application-level controls.
The goal of this update is simple: make server and application management more reliable, more transparent, and easier to handle for users of all experience levels. In this blog, we’ll walk through every major feature, improvement, and fix included in ServerAvatar v7.15.3.
This release is not about flashy changes alone, it’s about removing friction from daily server tasks and giving users more confidence and clarity. Whether you’re managing a single website or multiple applications, these updates are designed to make your life easier without adding complexity.
Let’s walk through what’s new and why it matters to you.
Overview of ServerAvatar v7.15.3
This release improves how users interact with servers and applications inside the ServerAvatar dashboard. The update adds better controls at the server level and application level, improves notifications, and refines the interface to reduce manual effort.
The changes are especially helpful for users managing multiple applications or working with different PHP versions and monitoring setups.
Feature Update Highlights
1. Log Monitoring Suite (InsightHub) Management
Logs are like a server’s diary, they tell you exactly what happened and when. ServerAvatar now allows full control over the Insighthub Log Monitoring Suite. With this update, Insighthub log monitoring becomes far more flexible.
You can now easily install, update, or remove Insighthub at:
- Server level
- Application level
This means you’re no longer locked into a one-size-fits-all setup. You decide where deep monitoring is needed and where it’s not.
What’s new
Users can:
- Install Insighthub at the server level
- Install Insighthub at the application level
- Update Insighthub when a new version is available
- Remove Insighthub when monitoring is no longer needed
Why this matters
Previously, log monitoring options were more limited. With this update, users can choose exactly where detailed log tracking is required. This helps reduce unnecessary monitoring overhead and keeps logs focused on critical applications.
Manage Log Monitoring Suite
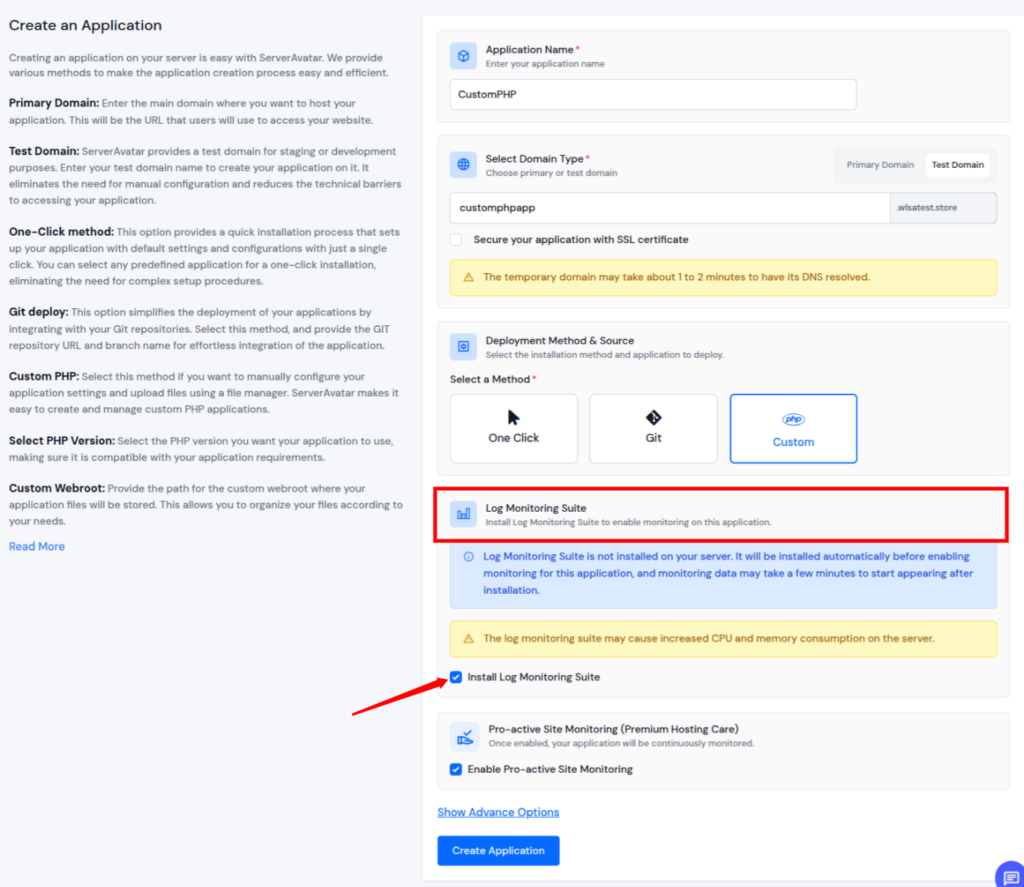
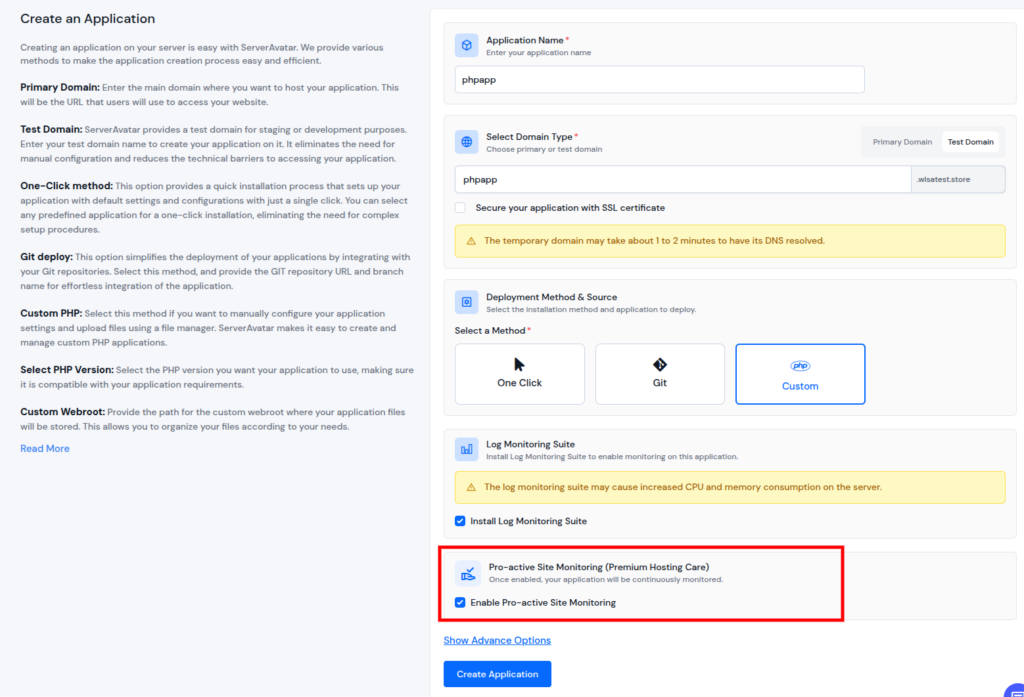
1) Install Log Monitoring Suite While Creating Application
- Navigate to the Server Dashboard for your preferred server
- Click on the Applications Section from the left sidebar
- Click on the Create an Application button, and fill up the required details
- You will see the checkbox for installing Log Monitoring Suite for the application you are creating
2) Install Log Monitoring Suite
- Navigate to the Server Dashboard for your preferred server
- Click on the Applications Section from the left sidebar
- Navigate to the Application Panel for your preferred application by clicking on the Dashboard icon
- Click on the Log Monitoring Suite Section from the left sidebar
- Click on the Install Now button
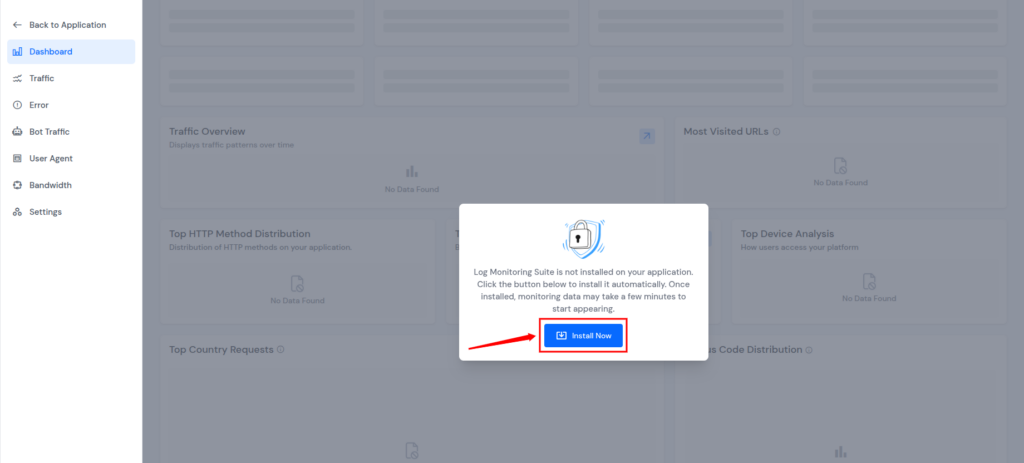
- Another option is to navigate to the Settings section and click on the Install button.

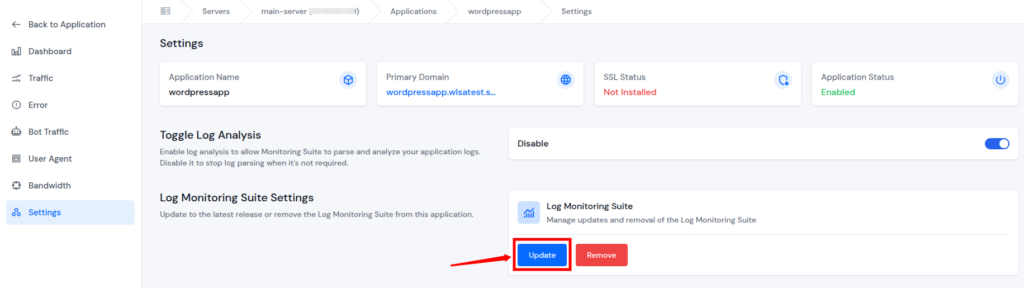
3) Update Log Monitoring Suite
- Navigate to the Server Dashboard for your preferred server
- Click on the Applications Section from the left sidebar
- Navigate to the Application Panel for your preferred application by clicking on the Dashboard icon
- Click on the Log Monitoring Suite Section from the left sidebar
- Navigate to the Settings section, and click on the Update button.
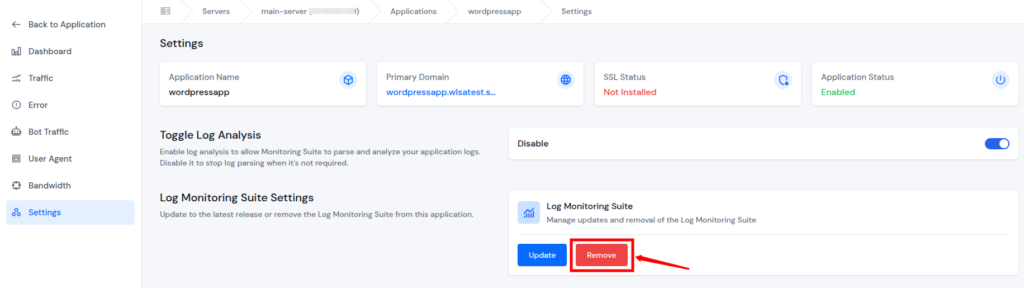
4) Remove Log Monitoring Suite
- Navigate to the Server Dashboard for your preferred server
- Click on the Applications Section from the left sidebar
- Navigate to the Application Panel for your preferred application by clicking on the Dashboard icon
- Click on the Log Monitoring Suite Section from the left sidebar
- Navigate to the Settings section, and click on the Remove button
5) Install or Remove Log Monitoring Suite For All Applications Directly From Server
- Navigate to the Server Dashboard for your preferred server
- Navigate to the Settings section from the left-hand sidebar
- Click on the Log Monitoring Suite Section from the Left-hand sidebar
- Select the given checkbox to install Log Monitoring Suite on all the applications on the selected server, and click on the Install button
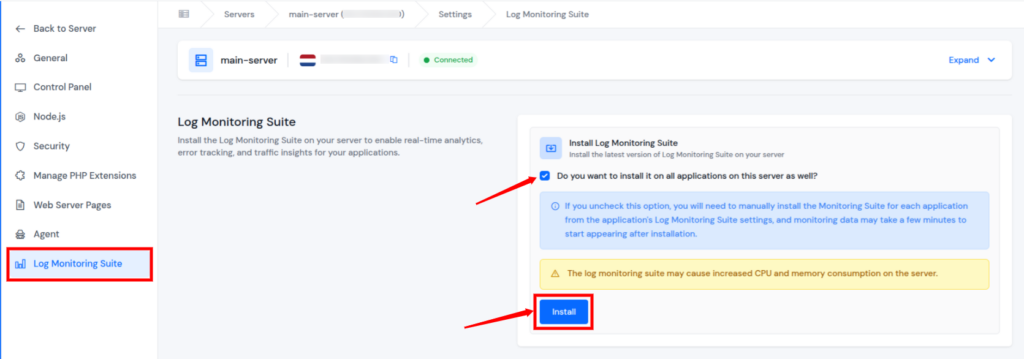
- Click on the Remove button to remove the Log Monitoring Suite from all the applications on the selected server

Key benefit: Better performance control with targeted monitoring.
2. Pro-active Site Monitoring Toggle (Premium Hosting Care)
For users with a Premium Hosting Care Plan, managing Pro-active Site Monitoring is now easier than ever. It can now be managed directly from individual application settings.
Additionally, when a user creates an application, a checkbox will appear to
Enable Pro-active Site Monitoring.
What’s new
- Enable monitoring for a specific application
- Disable monitoring when it is not required
- Enable Pro-active Site Monitoring while creating an application
Why this matters
Not all applications need constant monitoring. This update allows users to apply monitoring only where it is useful, making alerts more relevant and reducing noise.
Please Note: This feature is available only to users who have purchased the Premium Hosting Care plan.
1) Enable Pro-active Site Monitoring While Creating Application
- Navigate to the Server Dashboard for your preferred server
- Click on the Applications Section from the left sidebar
- Click on the Create an Application button, and fill up the required details
- You will see the checkbox for enabling Pro-active Site Monitoring for the application you are creating
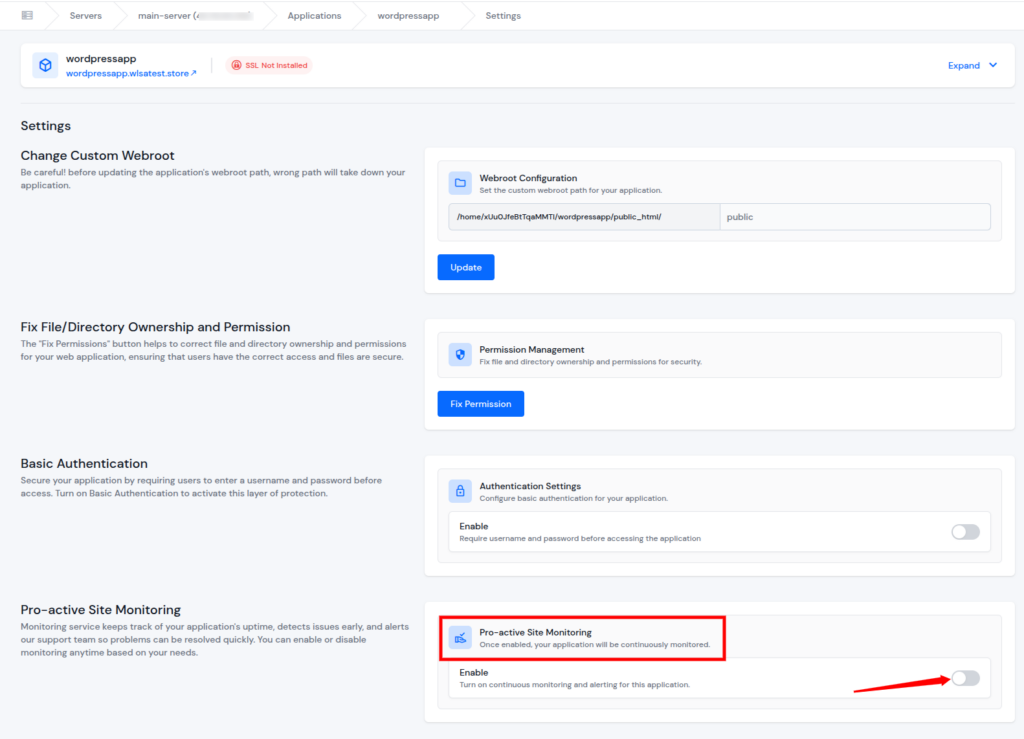
2) Enable Pro-active Site Monitoring
- Navigate to the Server Dashboard for your preferred server
- Click on the Applications Section from the left sidebar
- Navigate to the Application Panel for your preferred application by clicking on the Dashboard icon
- Click on the Settings Section from the left-hand sidebar, and find the Pro-active Site Monitoring section
- Enable or Disable the Toggle for Pro-active Site Monitoring as per your requirement.
Key benefit: You stay informed without being overwhelmed by alerts.
3. PHP Extensions Management
Managing PHP extensions used to feel like rearranging everything. Not anymore. ServerAvatar v7.15.3 improves PHP extension handling by making it more precise.
What’s new
Users can:
- Install PHP extensions for specific PHP versions on the server
- Remove PHP extensions for specific PHP versions on the server
- Manage extensions for specific PHP versions
Why this matters
Different applications often require different PHP extensions. This update allows users to avoid conflicts by managing extensions separately for each PHP version installed on the server.
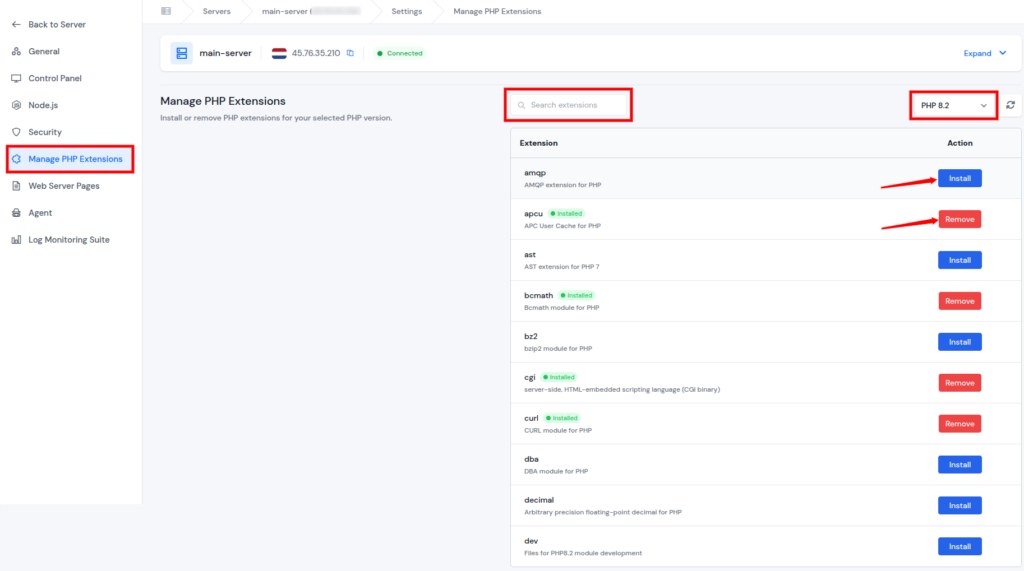
1) Manage PHP Extensions
- Navigate to the Server Dashboard for your preferred server
- Navigate to the Settings section from the left-hand sidebar
- Go to Manage PHP Extensions section from the left-hand sidebar
- From here, you can easily Install or Remove the PHP extensions for a specific PHP version. You can also search for the particular PHP extension.
Key benefit: Cleaner setups and fewer compatibility issues.
4. On-demand PHP Version Installation
Missing a PHP version? No problem. ServerAvatar now allows manual installation of PHP versions directly from Server Services. You no longer need to wait or rely on pre-installed options.
What’s new
- Install PHP versions only when needed
- No dependency on default or pre-installed versions
Why this matters
This gives users flexibility to test applications, prepare for upgrades, or support legacy apps without rebuilding servers or using workarounds.
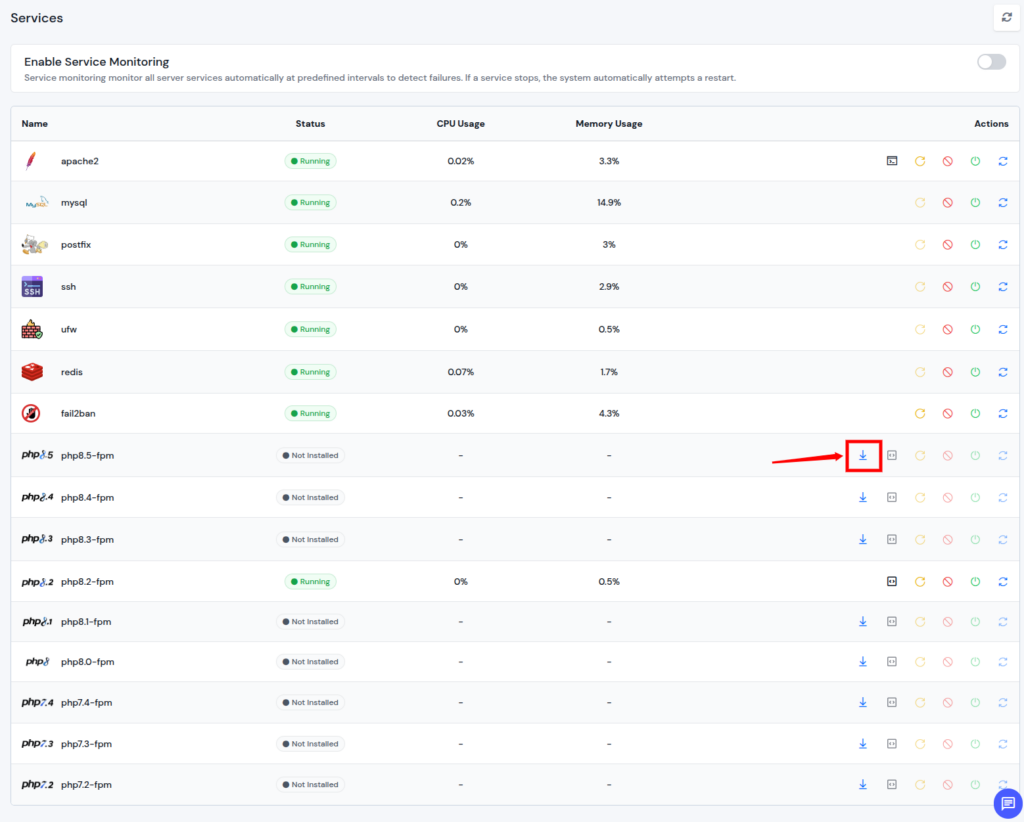
1) Install PHP Version
- Navigate to the Server Dashboard for your preferred server
- Navigate to the Services section from the left-hand sidebar
- Install the required PHP Version by clicking on the install icon.
Key benefit: Testing apps across versions or preparing for upgrades without downtime.
5. PHP 8.5 Support
Staying updated is essential for performance and security. That’s why PHP 8.5 support is a big highlight in this release.
What’s new
- PHP 8.5 is available for installation on servers
- Compatible one-click frameworks support PHP 8.5
Why this matters
PHP 8.5 brings performance improvements and security updates. This ensures users can keep applications modern and ready for future updates.
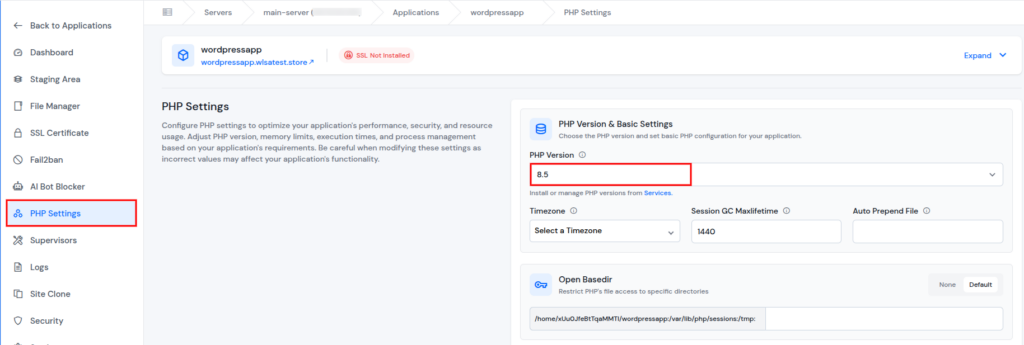
1) To check out the PHP 8.5
- First, install the PHP 8.5 from the Server Panel >> Settings section
- Then, navigate to Applications section >> PHP Settings from your required application panel
- Here you can see the PHP version 8.5 for your application, you can also change the PHP version for your application.
Key benefit: Faster execution, better memory handling, and readiness for modern applications.
6. WordPress Search Indexing Option
Not every website should be visible to search engines from day one. A new option to control search engine indexing has been added.
What’s new
- Checkbox to enable search engine indexing during WordPress application creation
- Option to disable indexing at the time of setup
Why this matters
This helps users control website visibility from the start, especially for development or staging WordPress sites that should not appear in search engines.
1) Enable WordPress Search Indexing
- Navigate to the Server Dashboard for your preferred server
- Click on the Applications Section from the left sidebar
- Navigate to Application Panel, and click on the Create an Application button.
- Fill in the required details, and select the application method as a One Click and WordPress as an application.
- Select the given checkbox to enable Search Indexing from the WordPress Search Indexing section

Key benefit: Small change, big impact on SEO control.
7. SSL Renewal Failure Email Notifications
SSL certificates are easy to forget until something breaks. ServerAvatar now sends email alerts when SSL renewal fails.
What’s new
- Automatic email notification on SSL renewal failure
Why this matters
SSL issues can cause browser warnings and trust problems. Early email alerts allow users to fix certificate issues before visitors are affected.
Key benefit: This early warning system helps you fix issues before visitors see scary browser warnings.

8. Schedule Server Reboot at a Specific Time (UTC)
Reboots are sometimes necessary, but timing matters. Users can now schedule server reboots at a specific UTC time.
What’s new
- Choose an exact reboot time
- Avoid immediate or unexpected restarts
Why this matters
This helps users plan maintenance during low-traffic hours and reduces service disruption.
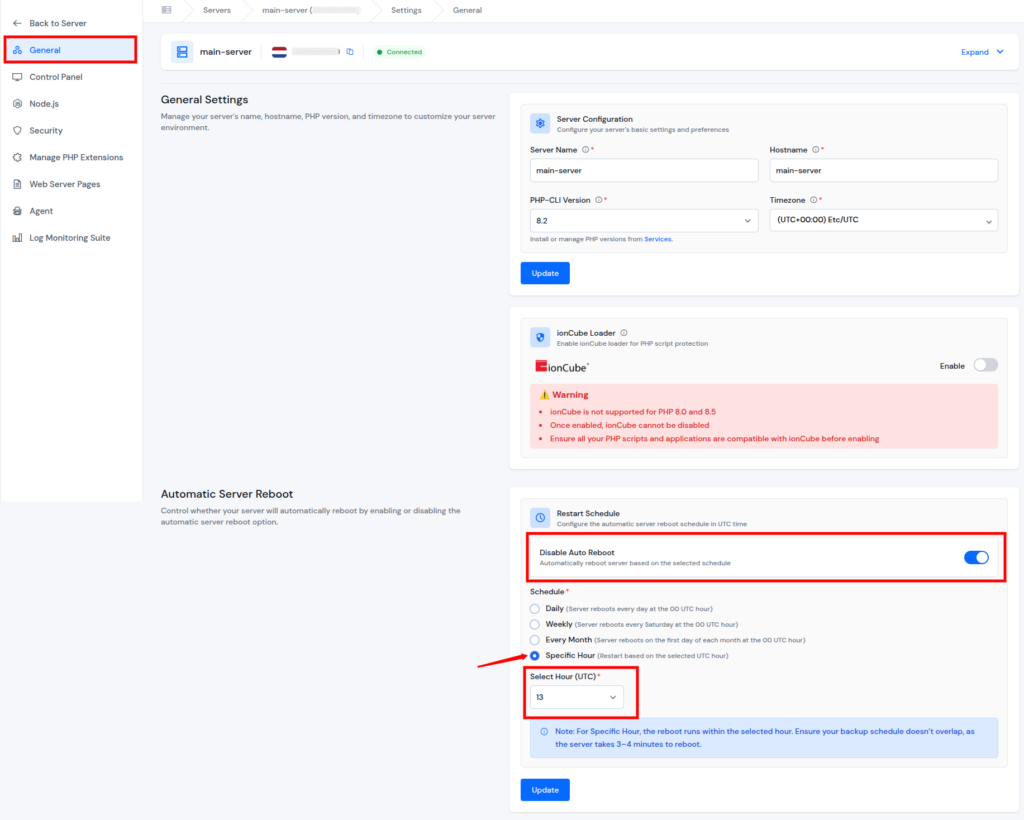
1) Schedule Server Reboot at a Specific Time
- Navigate to the Server Dashboard for your preferred server
- Click on the Settings Section from the left-hand sidebar
- Find the Automatic Server Reboot section in the General Section.
- Enable the Auto Reboot, and select Specific Hour.
- Select your preferred Time (UTC) from the given dropdown and click on the Update button.
Key benefit: No surprises, no sudden downtime.
9. Let’s Encrypt Alias Support
Now, domain verification just got smarter. SSL domain verification has been improved with alias support.
What’s new
- Let’s Encrypt now supports domain aliases during verification
Why this matters
This improves SSL certificate issuance for servers with multiple domains or complex domain configurations.
Key benefit: Fewer SSL issues and smoother certificate generation.
10. Mautic One-click Installer Upgrade
Marketing automation users will appreciate this one. The Mautic one-click installer has been updated to the latest stable version.
What’s new
- Latest Mautic release
- Improved security and performance
Why this matters
Users can deploy Mautic with confidence, knowing they are using a supported and up-to-date version without manual installation steps.
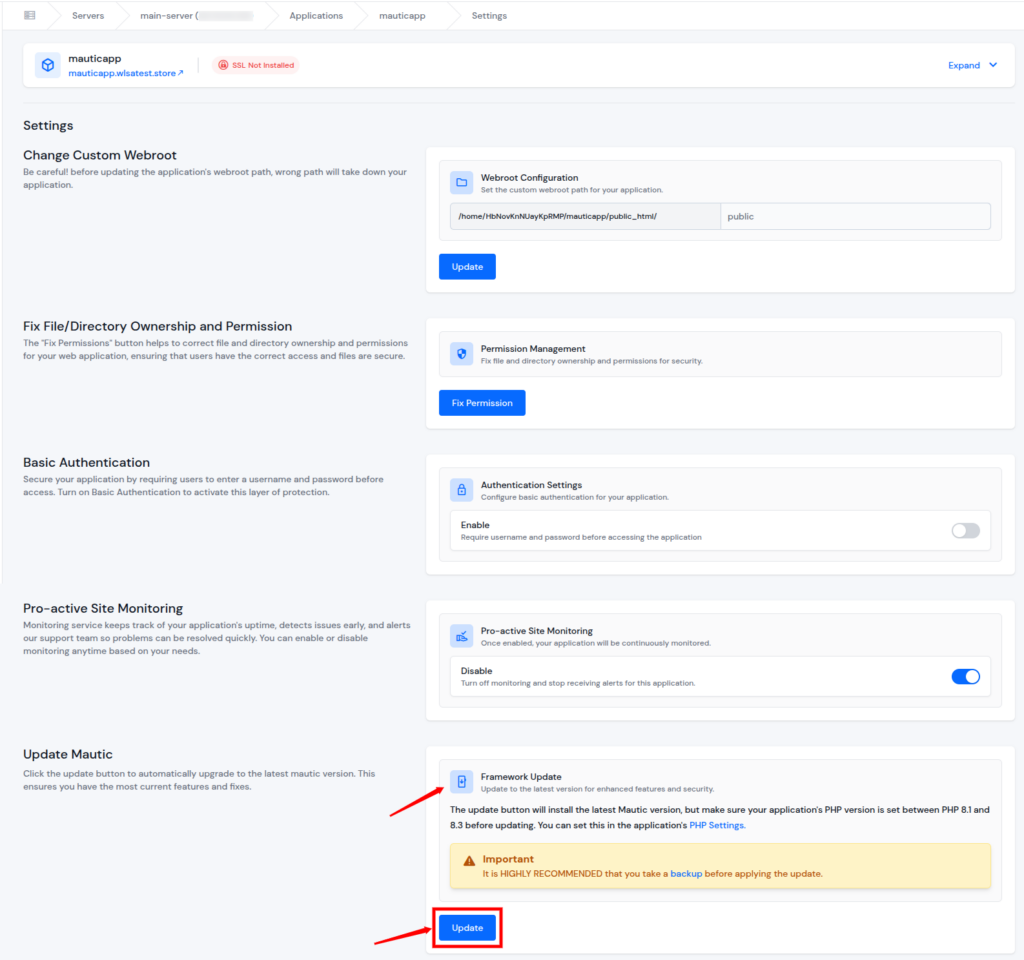
1) Update Mautic application
- Navigate to your Mautic Application Dashboard
- Click on the Settings Section from the left sidebar
- Find the Update Mautic section in the settings section, and click on the Update button.
Key benefit: Improved security, better performance, and access to the newest features without manual updates.
UI Improvements
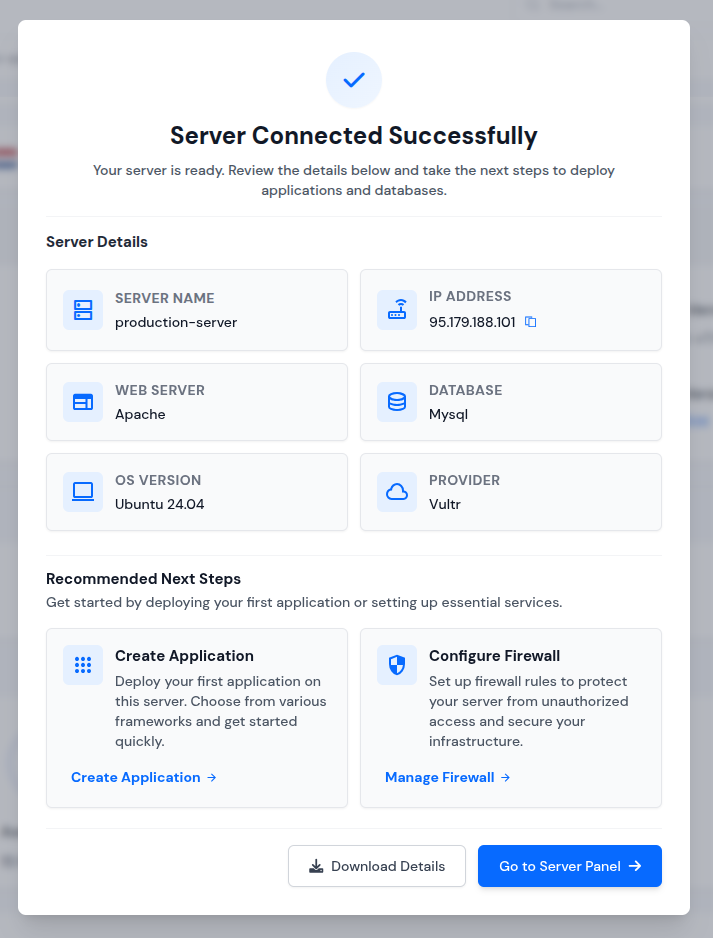
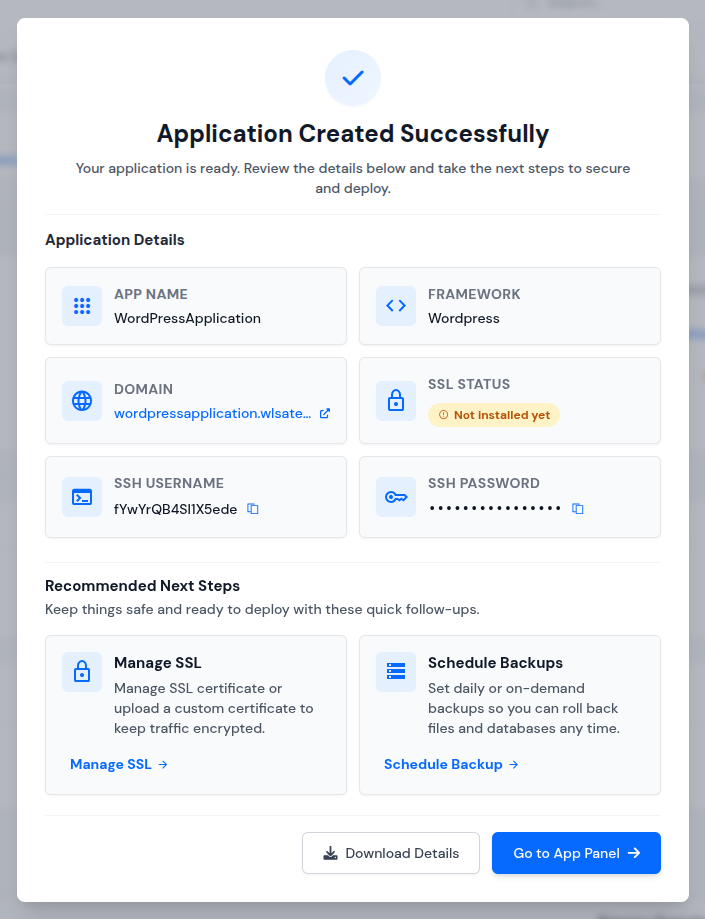
11. Creation Celebration Flow
Who doesn’t enjoy a small win? After creating a server or application, you’ll now see a celebration pop-up.
What’s new
Now users can:
- Download creation details
- Navigate directly to relevant management pages
Why this matters
This improves onboarding and helps users quickly move to the next step after setup. It’s a small touch, but it makes onboarding feel rewarding.
1) When you create a server
2) When you create an application
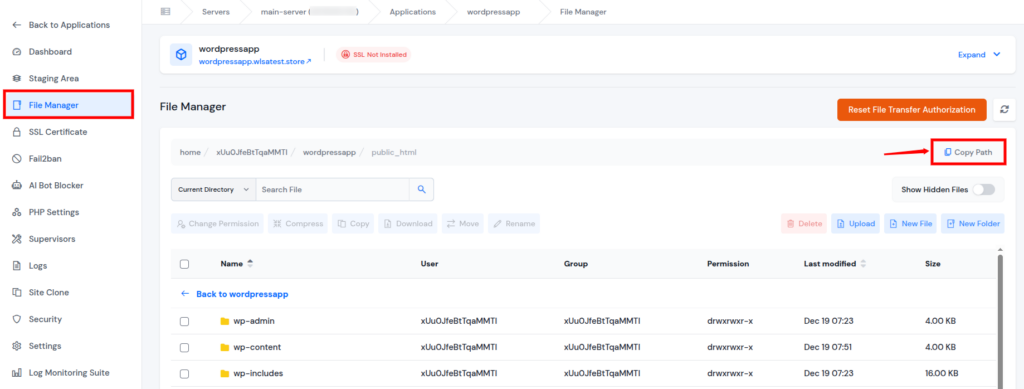
12. File Manager Copy Path Enhancement
File management just got faster. It now includes a Copy Path option.
What’s new
The Copy Path option allows you to:
- Instantly copy file or folder paths
Why this matters
This saves time when configuring applications, editing settings, or sharing file locations. No more manual copying or guessing directory structures.
1) Copy path from File Manager
- Navigate to your Application Panel
- Click on the File Manager Section from the left sidebar
- Navigate to the path you want to copy and click on the Copy Path button.
- You can also copy the configuration file path and the file name by navigating to the file and clicking on the copy icon, as shown in the image below.
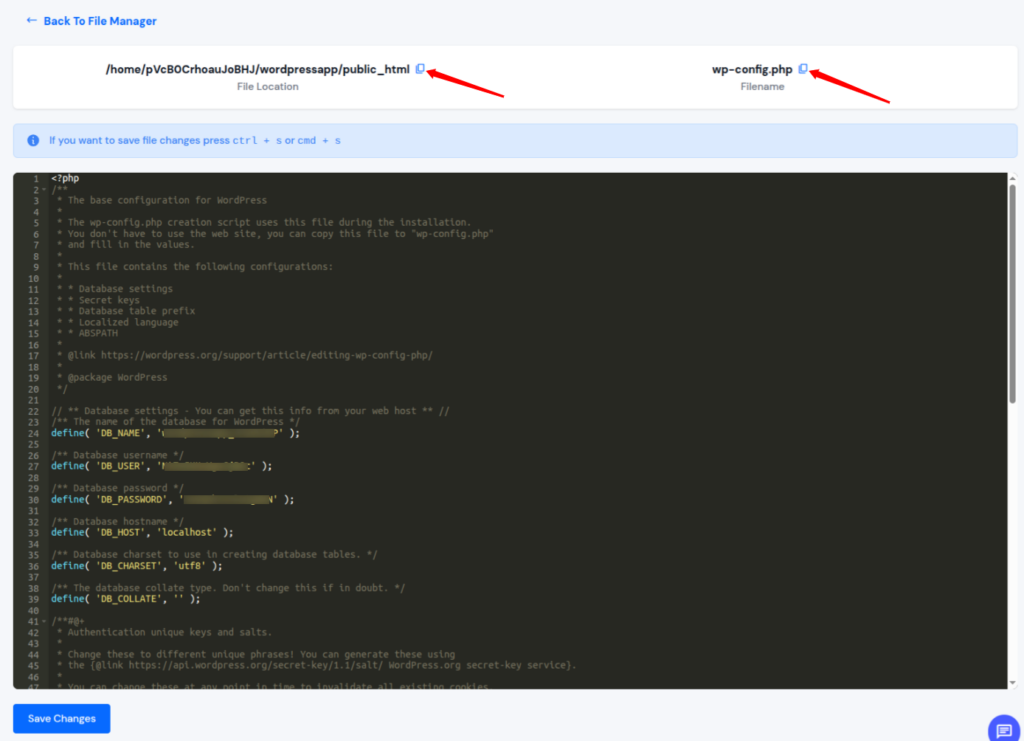
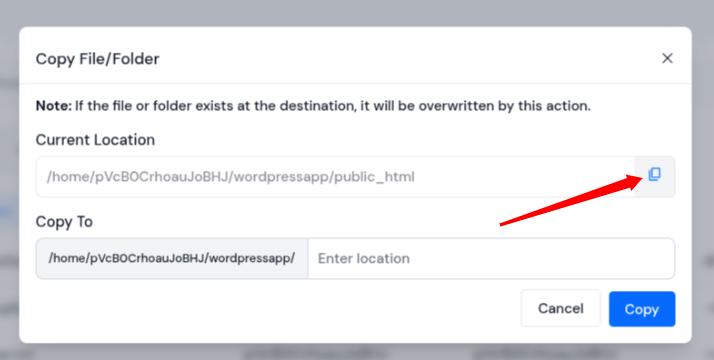
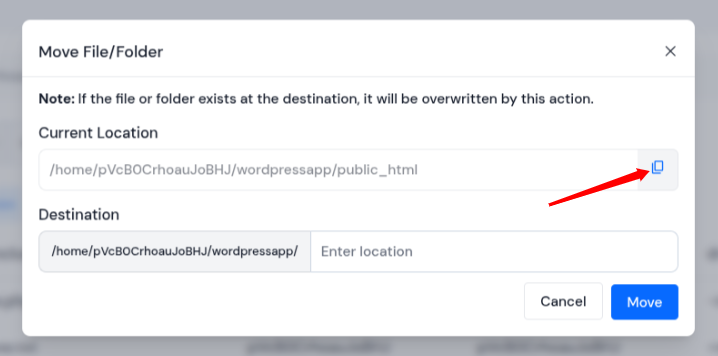
- Additionally, you can copy the file path while copying, or moving a file by selecting the file and then selecting the Move or Copy option.
- While Copying the File:
- While Moving the File:
13. Instant Form Validation
Forms across the dashboard now include instant form validation with immediate user feedback.
What’s new
- Immediate feedback while filling forms
Why this matters
This reduces form submission errors and helps users correct mistakes instantly.
14. Copy Logs Option
Users can now copy logs directly from the dashboard.
What’s new
- Copy server-level logs
- Copy application-level logs
Why this matters
This makes it easier to share logs for debugging, audits, or support requests without downloading files.
1) Copy Server Logs
- Navigate to your Server Panel for your server
- Go to the Logs section from the left sidebar and select the log you want to copy.
- Click on the Copy Log button.

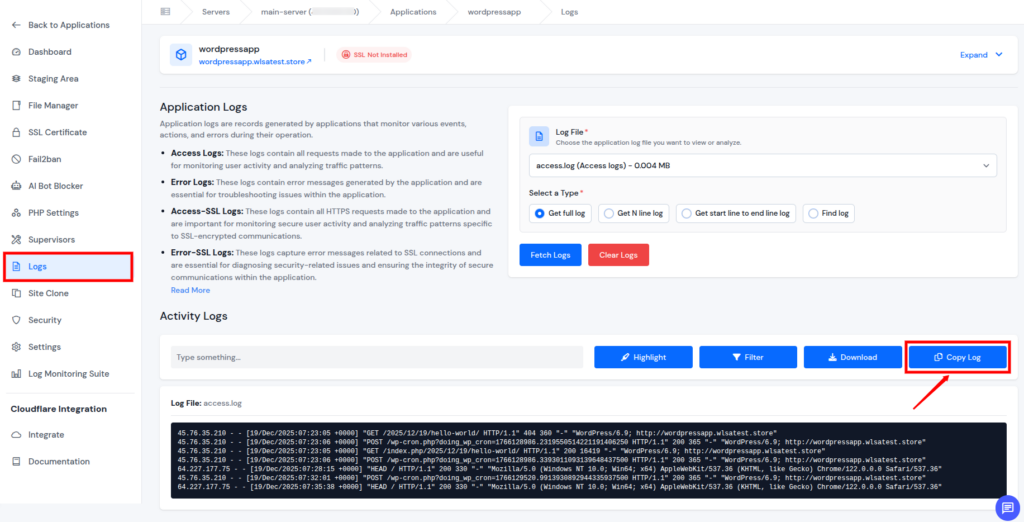
2) Copy Application Logs
- Navigate to your Application Panel for your application
- Go to the Logs section from the left sidebar and select the log you want to copy.
- Click on the Copy Log button.
Why These Changes Matter
ServerAvatar v7.15.3 is not just a technical release, it’s a step toward a more user-friendly and dependable platform. These updates are designed to solve real, day-to-day challenges faced by users.
- More control where it matters: Manage monitoring, PHP versions, and extensions at both server and application levels.
- Fewer surprises: SSL failure alerts and scheduled reboots help prevent unexpected downtime.
- Cleaner workflows: On-demand PHP installation and targeted monitoring reduce unnecessary setup and overhead.
- Better visibility: Improved log access, copy options, and real-time form validation make troubleshooting faster.
- Smoother experience: UI refinements like celebration flows and quick navigation save time after setup.
- Future-ready setup: Support for PHP 8.5 and updated installers keep applications modern and secure.
Together, these improvements help users spend less time managing issues and more time focusing on their applications and projects.
Our goal is simple
To give users clearer control, better visibility, and smoother workflows so managing servers and applications feels easier, faster, and more reliable every day.
Conclusion
ServerAvatar v7.15.3 is a thoughtfully crafted release focused on making everyday server and application management simpler, smarter, and more dependable. Instead of adding complexity, this update gives you more control exactly where it’s needed, whether that’s managing logs at the right level, choosing when and how PHP versions are installed, or deciding which applications truly need proactive monitoring.
With improvements like PHP 8.5 support, targeted log monitoring, smarter SSL alerts, scheduled reboots, and refined UI workflows, this release helps reduce manual effort and prevent avoidable issues before they impact your users. In short, ServerAvatar v7.15.3 empowers you to manage your infrastructure with confidence, clarity, and flexibility, so you can focus more on building and scaling your applications, not firefighting server problems.
FAQs
1. Do I need to upgrade manually to ServerAvatar v7.15.3?
No. If you’re already using ServerAvatar, the update is applied automatically. You can start using the new features.
2. Can I enable Pro-active Site Monitoring for only specific applications?
With v7.15.3, Pro-active Site Monitoring can be enabled or disabled per application, giving you more targeted and meaningful alerts.
3. Does PHP 8.5 replace older PHP versions on my server?
No. PHP 8.5 is added as an additional option. You can install it on demand and choose which PHP version each application should use without affecting others.
4. What happens if my SSL certificate renewal fails?
ServerAvatar will send you an email notification immediately. This allows you to fix the issue before visitors encounter browser security warnings.
5. Who benefits most from this update?
This release is especially useful for users managing multiple applications, working with different PHP versions, or looking for better monitoring and visibility, without adding extra complexity.