WordPress is a big deal right now. It is because nearly 30% of the websites run on WordPress. Some of the huge sites and blogs like Techcrunch, BBC America, and Facebook Newsroom are running on WordPress.
It is because WordPress is easy to use and has a massive repository of paid and free plugins. Not only blogs but you can also create an E-commerce store using WordPress. WordPress also has a vast repository of themes to select from. There are thousands of free themes and plugins that can be used to modify your WordPress website however you want.
In conclusion, we can say that WordPress is the most flexible content management system world has ever seen. That’s the reason why 30% of the website owners chose WordPress to run their sites. This 30% of the websites include small websites that get less than 20 visitors a day (like this blog) and also the websites that get tons of visitor on a daily basis (We are talking in millions here!).
When you have a website that gets thousands of visitors on a daily basis, you want to optimize your website for speed so that you can serve those visitors your rich content as fast as possible. That’s what we are going to do.
In this article, We will cover the following topics in-depth.
- Importance of using a remote database server
- How to setup a Database server using ServerAvatar (Click here for the in-depth article)
- How to set up WordPress with a remote database
Let’s get started with the first and the most important topic of this article so that we can get to the most exciting topics as soon as possible.
Importance of using a remote database server
When you are getting a lot of traffic, the first thing you do to scale your website is to host your database on another server. Initially, your database and your website files are hosted on the same server.
When you keep your database and website files on the same server, your database management system will also use the resources your server has. When your website grows up, you will have to move your database to a separate database server so that a web server can serve pageviews faster and utilize the resources that are freed by a database server.
With the remote database server, your web server will be able to handle more traffic because it will get extra 20-30% of the computing power that it doesn’t get when a database is hosted on the same system because database management system also needs some resources to process queries.
So, why not create our website with a separate database server from the start? It won’t cost you a lot, and it’s not even a hard thing to do with ServerAvatar (Yes, it’s hard if you are just getting started with system administration and doing everything by yourself for the first time).
With ServerAvatar, you can create a WordPress website with the database hosted on an entirely different machine as easy as regular WordPress installation. The only thing extra you have to do is to select the server on which you want to host your database.
So, Let’s first set up our database server. It’s straightforward, and it usually takes less than 5 minutes to setup database server using ServerAvatar.
How to set up a database server using ServerAvatar
It’s not as hard as it sounds. Considering you have an empty Ubuntu server with nothing installed on it, connect it with ServerAvatar by clicking on the Add -> Server on the top-right corner of the dashboard. You will see a form containing three fields. You have to enter the name of your server, IP address of your server and the root password of your server just like the following image.
If you want to know how to connect your server with ServerAvatar in-depth, click here.
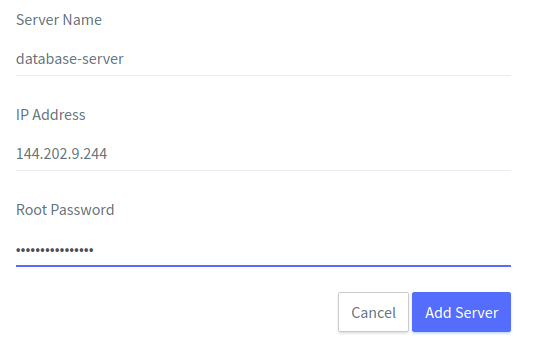
Don’t get confused on what to enter in the Server name field. It’s just a nickname for your server. Enter anything you want. After filling the necessary information, click on the Add Server button and you will get notification within 3 minutes that your server is configured and you can now access the server panel.
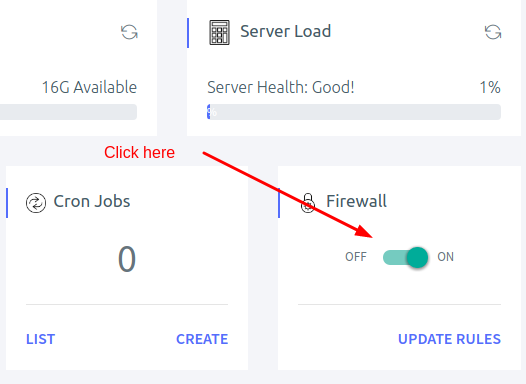
The first thing you have to do is to turn on the firewall because it is very much crucial for security. Without turning on the firewall, you are allowing anyone to attempt to connect to your server no matter if the person/computer is authorized or not. Turn on the firewall by clicking on the firewall switch given on the server panel.
Now, as it’s our database server, we are going to stop the services that we are not going to use. It is because we want all of our resources to be used by our database management system which is MySQL in this case.
We are going to turn off Apache2 because we are not going to serve HTTP/HTTPS traffic on this website, php7.0-fpm because we are not going to process php code on this server either and also, we will turn off postfix because we are not going to send e-mails from this server.
To turn off the unwanted services to get 100% out of our server, Click on the Services section given on the sidebar and you will see something like the following image.
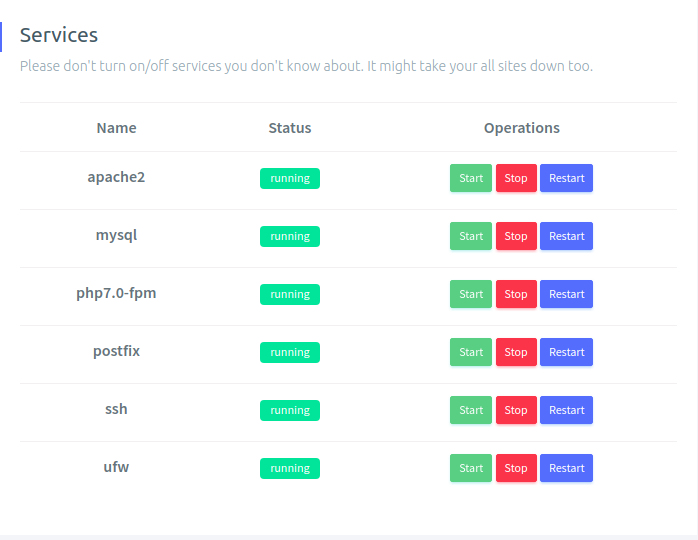
Click on the Stop buttons corresponding to Apache2, php7.0-fpm, and postfix. Once done, Our database server is ready to handle database queries! Now, it’s time to install WordPress on a regular server.
Set up WordPress with a remote database
The only thing left is to add an application on our web server. By web server, I mean a server that will host our WordPress website. Finally, we have two servers in our ServerAvatar account (we also connected one server to host our application).
Now, Click on the Server panel of a web-server or application-server or whatever you call it. Open a Server panel of the server that will host your website/application.
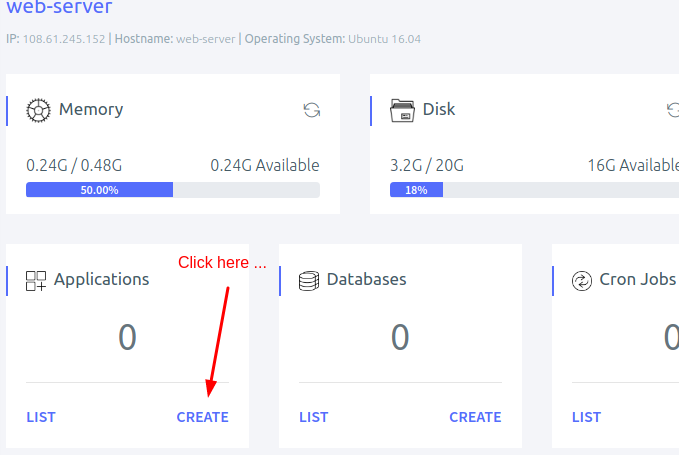
On the server panel, Click on the Create button in the application card given on the left part of the server panel just like the following image.
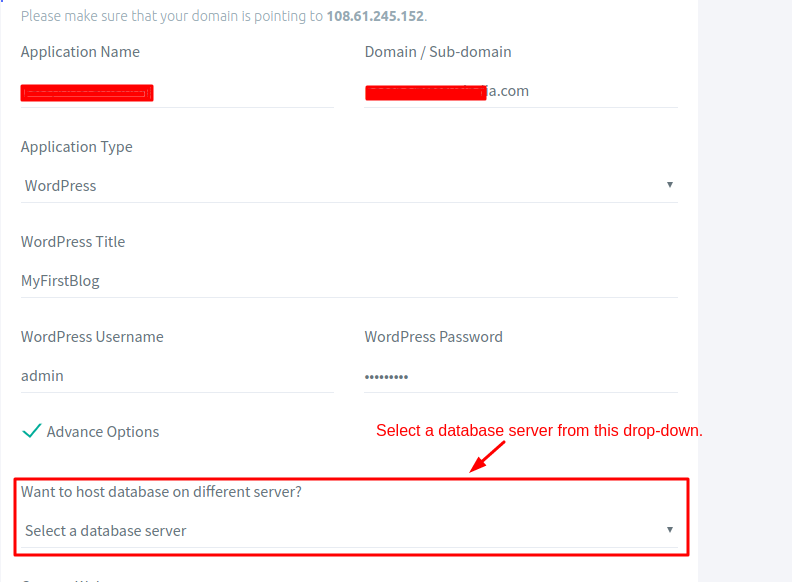
Now, you will have a page containing a form with the bunch of fields to enter the bunch of information. You know the most of it like Application name, Domain/subdomain, Application type (Select WordPress). Just Enter the required information and then click on the Advanced options checkbox given at the end of the form. It will reveal more fields, but we just have to care about only one drop down menu with label Want to host database on different server?.
In that drop down, you will find other servers connected to the same account. In our case, we will see only one server named database-server in the drop down. Select a server on which you want to host a database for this WordPress website. Now, your form should look like the following image.
Once you are done, click on the Create application button given at the bottom of the form and your WordPress website with the remote database server will be ready in 10-12 seconds. That’s all!
So, this is how you can setup a WordPress website that is divided into two servers made for the specific purpose. One server will only handle database queries, and one will handle just web traffic. This way, your servers will have their resources to work on, and this website will be at least 2x easy to scale.
BONUS
Yes. We know that when you have a website that is so important that you need two servers to manage traffic, you also need essential monitoring for your database server too! So, we came up with a basic query monitor that you can find on your database server’s panel. It is placed beside Basic server monitor.
A basic query monitor will show you how many read/write queries are being executed on your database server as well as how many total queries are being executed. Just like the following image.
On the left side, you can see server load (Blue), Disk usage (Red) and memory usage(green) in the basic server monitor which is important for Web server as well as a database server.
On the right side, we have Basic query monitor. It will show you questions (Blue), Read queries (Red) and write queries (Green). Values are updated every 15 minutes so that you can keep an eye on what’s going on with your Servers.
Conclusion: Setting up a WordPress with the remote database isn’t a big deal. It’s just about understanding how WordPress deals with the MySQL database server. With ServerAvatar, when the firewall is already active on the database server, ServerAvatar will automatically deal with the firewall rules so that you don’t face issues with the firewall.
Do you want to scale your WordPress website and want to spread it on multiple servers to distribute load? ServerAvatar will help you scale/optimize your website because that’s what we do. If you want to migrate your website from other server management system or want to get your servers and websites on ServerAvatar, just shoot us an email at support@serveravatar.com.
If you have questions regarding this tutorial, Just comment down in the comment section and we will respond as soon as possible!