
If you’ve ever worried about someone sneaking into your computer or server from the internet, you’re not alone. Think of your device like your home, would you ever leave your doors unlocked, especially at night? Of course not! The same logic applies to your Ubuntu system. The UFW Firewall acts like a security guard at your door, allowing only trusted visitors in and blocking unwanted intruders.
In this guide, I’ll walk you through how to set up the UFW Firewall on Ubuntu in a simple, friendly, and easy-to-follow way. No complicated jargon, just practical steps that even a beginner can follow comfortably.
What is UFW and Why Use It?
UFW (Uncomplicated Firewall) is a simple and user-friendly tool built for Ubuntu to help you control what traffic enters or leaves your system. Unlike complicated firewalls with hundreds of commands, UFW keeps things clean and beginner-friendly.
So why should you use it?
Because the internet isn’t always safe. Hackers and bots constantly scan IPs looking for weak systems. UFW acts as your system’s shield, stopping them in their tracks.
Benefits of Using UFW on Ubuntu
Using UFW brings several advantages that make your server or computer safer:
- Easy to Use: You don’t need to be a Linux expert.
- Improves Security: Blocks unwanted access attempts instantly.
- Customizable: You can allow or deny only specific traffic.
- Lightweight: Doesn’t slow down your system at all.
Imagine having a smart bouncer at a club door, letting in guests on the VIP list, but keeping troublemakers away. That’s exactly what UFW does.
How UFW Works (Simple Explanation)
To put it simply:
- Allow rules = “Let this traffic in”
- Deny rules = “Block this traffic”
- If no rules match, UFW blocks by default when active.
Think of UFW as a checklist at the entrance gate. If someone’s name is not on the allowed list, they stay out.
Managing Firewall Effectively with ServerAvatar
While UFW is a great way to secure your Ubuntu server, it still requires command-line knowledge, manual configuration, and regular monitoring. This can be stressful, especially if you manage multiple servers or aren’t comfortable working with Linux commands.
That’s where ServerAvatar’s built-in Firewall makes life much easier.
What is ServerAvatar?
ServerAvatar is a platform to simplify the hosting and management of servers and applications. It simplifies the process of deploying and managing PHP and Node.js based web applications on servers.
Why ServerAvatar Firewall Is a Better Choice
ServerAvatar provides a user-friendly, dashboard-based firewall management system that eliminates the need for manual UFW setup. Instead of typing commands, you can manage your firewall with a single click.
Here’s how ServerAvatar makes firewall security effortless:
- No Terminal Required: Enable, disable, and configure firewall rules from the intuitive UI.
- Pre-Configured Secure Rules: Block malicious traffic and keep only essential ports open without manual work.
- One-Click Port and Service Management: Easily allow or restrict SSH, HTTP, HTTPS, MySQL, and custom ports.
- Smart Protection for Beginners & Experts: Designed for users of all skill levels, no Linux expertise needed.
- Centralized Firewall Control: Manage firewall settings for all your servers from one panel.
It’s like having UFW, a security expert all baked into one clean dashboard.
Using ServerAvatar vs Using Manual Method
| Feature | Using ServerAvatar | Manual Method |
|---|---|---|
| Ease of Use | Beginner-friendly dashboard | Requires Linux CLI knowledge |
| Setup Time | 1–2 minutes | 10–25 minutes |
| Multi-Server Control | Yes, manage all from one panel | No, configure each server individually |
| Risk of Misconfiguration | Low | High for new users |
| Supports Custom Rules | ✅ Yes | ✅ Yes |
| Ideal For | Developers, agencies, SaaS providers, beginners | Experienced Linux users comfortable with CLI |
Configuring Firewall Using ServerAvatar
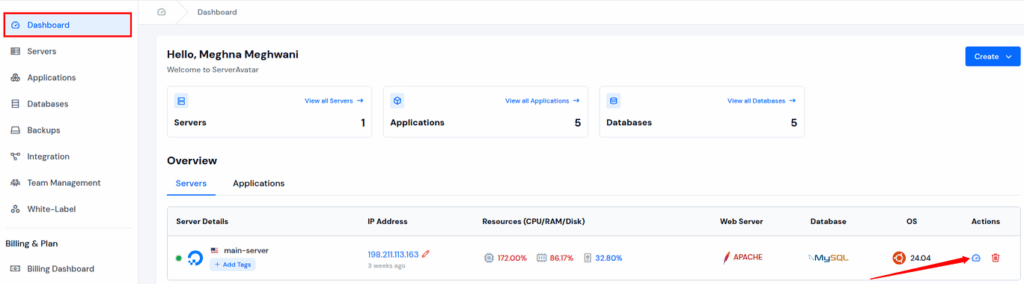
- Log in to your ServerAvatar account. Click on the Server Dashboard for the server you want to configure the firewall.
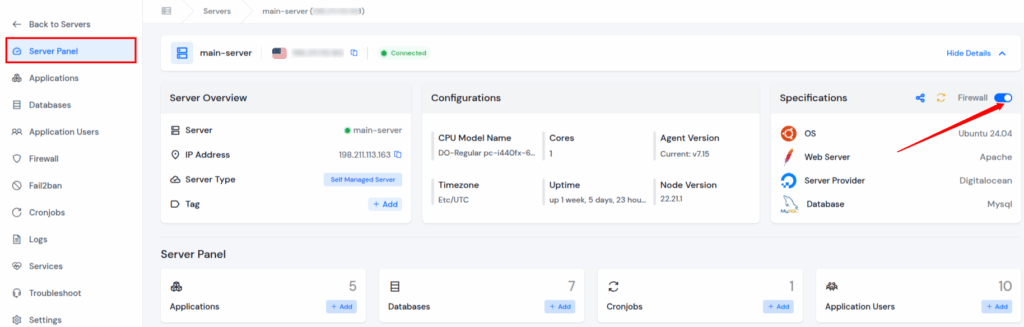
- Let’s first enable the Firewall from the Server Panel. Just navigate to the Server Panel and Enable the toggle button next to the Firewall.
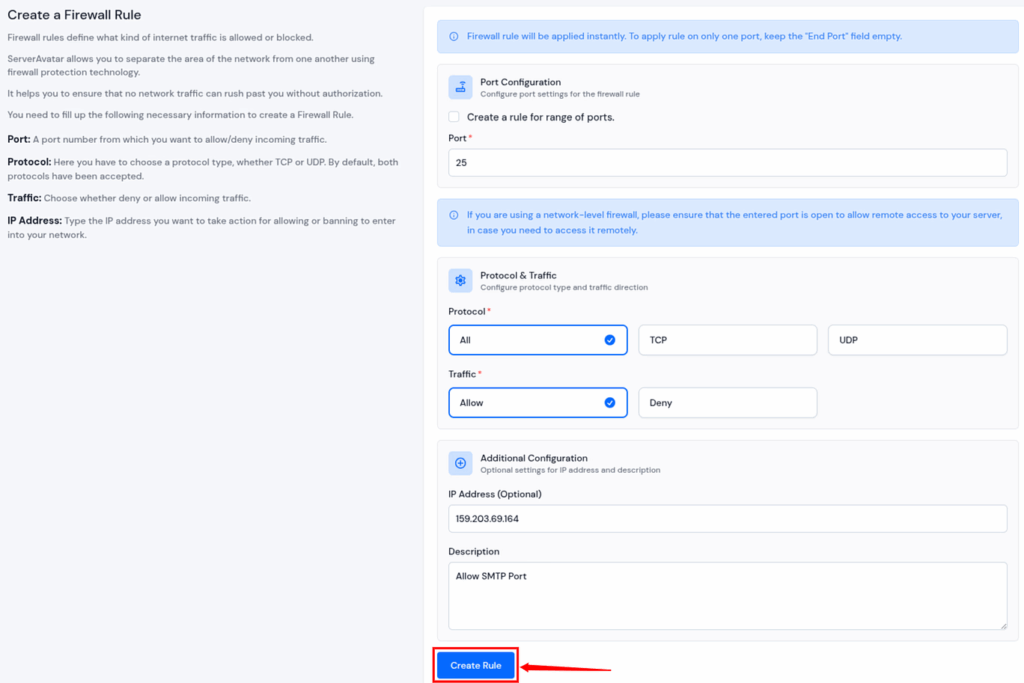
- Now, navigate to the Firewall section from the left-hand sidebar. You can see the preset rules of the firewall. Click on the Create a Firewall button.
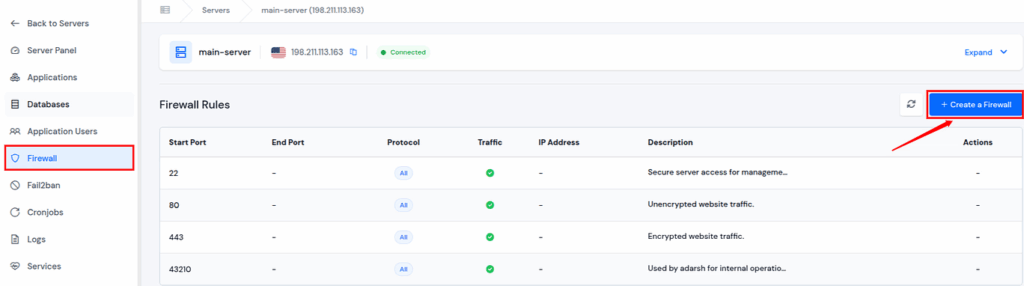
- Fill up the required details such as port number, protocol, traffic, IP address, description, and click on the Create Rule button.
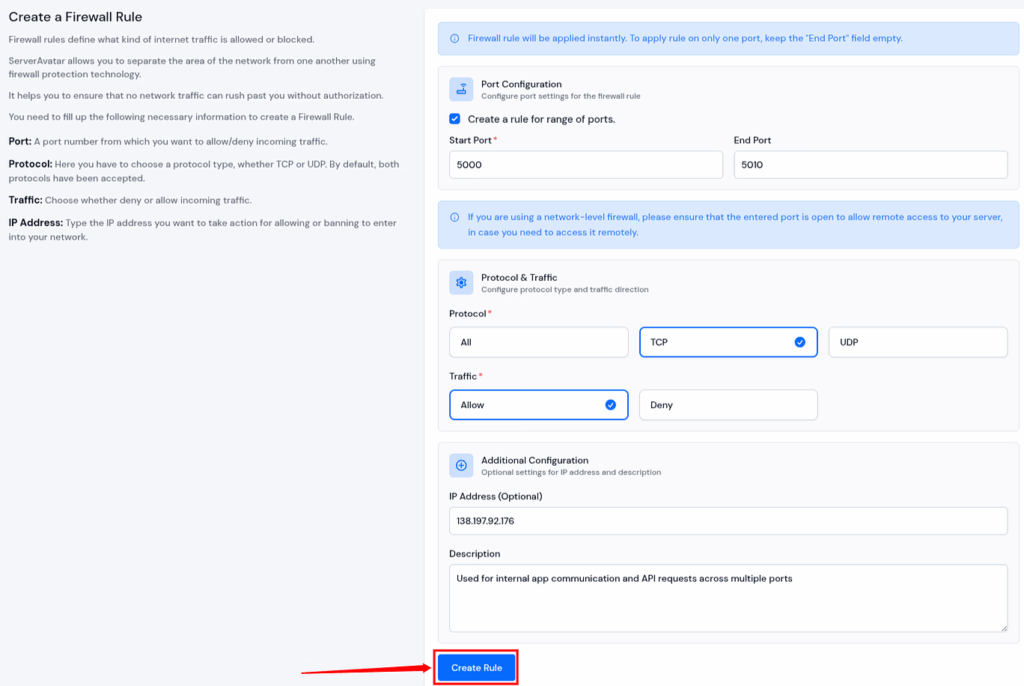
- You can also create a rule for a range of ports by just selecting the checkbox of ‘Create a rule for range of ports‘ and entering the start port number and the end port number.
When Should You Choose ServerAvatar Firewall?
Choose ServerAvatar if you want:
- A faster and easier way to secure servers
- To avoid complex commands and accidental lockouts
- To manage multiple servers with centralized control
- Built-in security essentials without manual configuration
In short, ServerAvatar is the zero-stress way to secure your Ubuntu server

Configuring Firewall Manually
Checking if UFW is Installed
- Most Ubuntu versions come with UFW pre-installed. To check, run the below mentioned command:
sudo ufw status- If it shows output (active or inactive), UFW is installed.
How to Install UFW (If Not Installed)
- In the rare case UFW isn’t installed, use this command to install UFW:
sudo apt install ufw -y- That’s it, installation complete!
Basic UFW Commands You Should Know
Here are some beginner-friendly commands:
| Purpose | Command |
|---|---|
| Enable firewall | sudo ufw enable |
| Disable firewall | sudo ufw disable |
| Allow a port | sudo ufw allow 80 |
| Deny a port | sudo ufw deny 23 |
| Delete a rule | sudo ufw delete allow 80 |
These are like the ABCs of UFW. You’ll use them often.
Allowing Essential Services and Ports
Before enabling UFW, allow the services you need.
For example:
Allow SSH
- If you’re managing a server remotely, allow SSH first:
sudo ufw allow sshor
sudo ufw allow 22/tcpAllow HTTP (Websites)
- Run the command below to allow HTTP:
sudo ufw allow 80/tcpAllow HTTPS (Secure Websites)
- Run the command below to allow HTTPS:
sudo ufw allow 443/tcpAllow Specific App Ports
- FTP: sudo ufw allow 21/tcp
- MySQL: sudo ufw allow 3306/tcp
- NGINX Full: sudo ufw allow ‘Nginx Full’
Blocking Connections You Don’t Want
- Want to block a suspicious IP?
Use:
sudo ufw deny from 192.168.1.50- Block a range of IPs:
sudo ufw deny from 192.168.1.0/24Blocking is useful when you notice unusual or harmful activity.
Enabling and Disabling UFW Safely
- Once you’re ready, turn on UFW:
sudo ufw enable- Want to stop it?
sudo ufw disableDo this carefully, especially on a remote server.
How to Check UFW Status and Rules
- To see if UFW is active and what rules are set:
sudo ufw status numberedThe “numbered” option helps you easily remove rules later.
Tips to Avoid Getting Locked Out
Many beginners accidentally block their own access. Here’s how to avoid it:
- Always allow SSH before enabling UFW
- Keep a second access method (console or panel) handy
- Double-check allowed ports
Better safe than sorry, especially on a cloud server!
Resetting or Removing UFW Rules
If something goes wrong and you want to start fresh:
sudo ufw resetThis removes all rules and disables UFW.
Common Mistakes and How to Avoid Them
| Mistake | How to Avoid |
|---|---|
| Enabling UFW without allowing SSH | Allow SSH first |
| Allowing too many ports | Keep rules minimal |
| Not checking logs | Monitor activity occasionally |
Remember, the fewer doors you leave open, the safer your system stays.
FAQs
Will enabling UFW break my apps?
Only if the required ports aren’t allowed. Always permit necessary services first.
How do I remove a UFW rule?
sudo ufw status numbered
sudo ufw delete <rule-number>
Should I enable UFW on my home PC or only on servers?
Both! Whether you’re on a home computer, laptop, or server, UFW keeps you safer.
Can I allow a range of ports in ServerAvatar?
Yes, ServerAvatar provides a simple checkbox option to allow a port range, no need to run complex commands.
Can ServerAvatar replace UFW?
Yes, ServerAvatar provides a simple checkbox option to allow a port range, no need to run complex commands.
Conclusion
Securing your Ubuntu system is not just a good practice, it’s a necessity. Whether you’re managing a personal server, business application, or client websites, a firewall is your first line of defense against cyber threats. UFW is a simple yet powerful tool that helps you protect your server with easy-to-use commands. However, if you want a faster, safer, and more convenient way to manage firewall rules, especially across multiple servers, ServerAvatar’s Firewall is a game-changer.
With its intuitive dashboard, preset security rules, and effortless configuration, ServerAvatar lets you secure servers without touching the terminal. So, if you prefer simplicity, automation, and zero risks of misconfiguration, ServerAvatar is the smart choice for firewall management.
Stay secure, stay protected, and always keep your server doors locked to intruders!