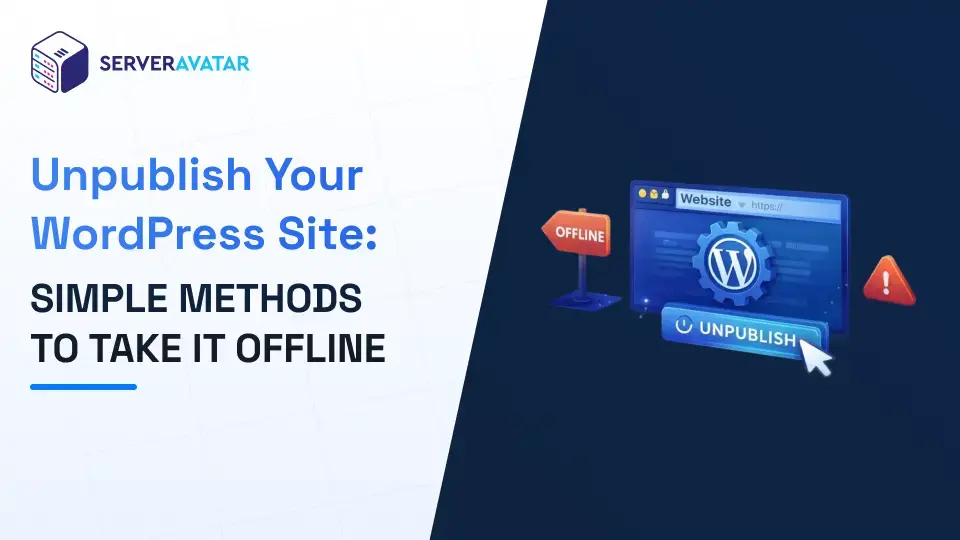

Sometimes, a website needs a pause. Not because something went wrong, but because you need time to update, redesign, or rethink things. When you unpublish your WordPress site, you can take it offline without deleting your hard work or losing valuable content. Think of it like putting a “temporarily closed” sign on a shop door, you are not shutting it down forever, just stepping back for a moment.
People thinks unpublishing is risky or complicated, but it is not reality and it don’t have to be. WordPress provides several simple ways to control what visitors see and when they see it. In this guide, you will learn simple methods to unpublish your WordPress site securely.
What Is WordPress?
WordPress is the world’s most popular open-source content management system (CMS), used to build websites, blogs, and e-commerce stores. It offers flexibility through themes and plugins, making it suitable for beginners, developers, and businesses of all sizes.
What Does “Unpublishing” a WordPress Site Really Mean?
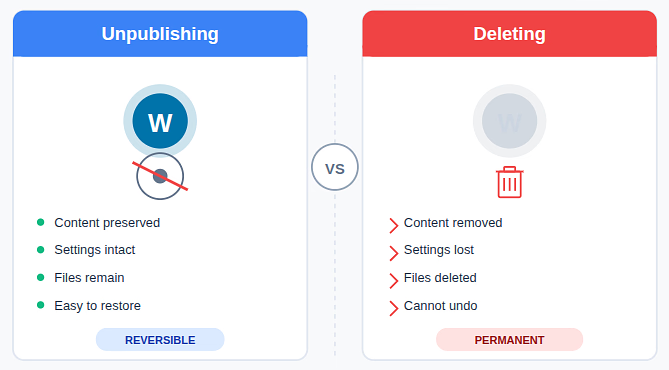
Unpublishing a WordPress site means making it unavailable to visitors without permanently deleting it. Your content, settings, and files remain intact. Only public access is restricted.
It is necessary to know that unpublishing does not mean deleting the website. Deleting means removing content completely, but unpublishing means simply hiding it. This gives you flexibility and control without risk.
Common Reasons to Unpublish a WordPress Site
There are many practical reasons why someone might want to unpublish a site:
- Major design or layout changes: Taking the site offline allows you to redesign pages without visitors seeing unfinished or inconsistent layouts.
- Content restructuring or cleanup: Unpublishing helps you reorganize, remove, or update content quietly before making it public again.
- Technical maintenance or updates: It lets you perform updates or fixes in the background without disrupting the visitor experience.
- Preparing a relaunch: Keeping the site unpublished gives you time to prepare everything perfectly before going live again.
- Fixing broken elements privately: You can repair errors or broken sections without exposing problems to users or search engines.
Unpublishing gives you breathing room. You can work without distractions and avoid showing incomplete content to visitors.
Things to Consider Before Unpublishing Your Site
Before taking your site offline, pause and review a few key points:
- Do you want to hide the entire site or just specific pages?
Decide whether you want to take the whole website offline or only restrict access to selected pages. - Should search engines still see your site or not?
Consider if search engines should continue indexing your site or temporarily stay away from it. - Do you need logged-in users to access it?
Think about whether registered or authorized users still need access while the site is offline. - Is this a short pause or a long one?
Determine if the site will be offline briefly or for an extended period to choose the right method.
Answering these questions helps you choose the right method and avoid unnecessary issues later.
How ServerAvatar Simplifies WordPress Deployment & Management
What is ServerAvatar?
ServerAvatar is a platform to simplify the hosting and management of servers and applications. It simplifies the process of deploying and managing PHP and Node.js based web applications on servers.
ServerAvatar makes WordPress and other popular applications, such as Mautic, N8N, UptimeKuma, etc, deployment effortless with its one-click WordPress application installer, allowing you to launch a fully configured WordPress site in minutes. It removes the complexity of server setup by providing an intuitive dashboard to manage servers, applications, databases, PHP versions, SSL, and performance settings from one place.
ServerAvatar supports multiple cloud providers and gives users full control over their infrastructure while eliminating the need for deep server administration knowledge. You can refer to the ServerAvatar documentation and the detailed blog to install WordPress effortlessly.
Key Benefits of Using ServerAvatar for WordPress
- One-click WordPress installer: Deploy WordPress instantly without manual configuration.
- Unified management panel: Manage servers and WordPress applications from a single dashboard.
- Performance optimization: Easily configure caching, PHP, and server resources.
- Enhanced security: Includes firewall, SSL management, and secure access controls.
- Easy scalability: Upgrade server resources as your WordPress site grows.
ServerAvatar is an ideal solution for users who want the power of cloud servers without the operational complexity. It simplifies WordPress hosting by automating server setup, streamlining application management, and providing performance and security optimizations out of the box.
Whether you’re a developer, agency, or business owner, ServerAvatar allows you to deploy, manage, and scale WordPress websites confidently while focusing on growth instead of infrastructure management.
Unpublishing a WordPress Site
Let’s check out how to unpublish a WordPress site securely and without any hard work. WordPress does not have a single “unpublish” button, but there are several simple and effective ways to take your site offline temporarily or hide specific pages from visitors.
Method 1: Disable the WordPress Application from ServerAvatar
ServerAvatar makes it easy to take your WordPress site offline directly from its dashboard, without installing extra plugins or modifying WordPress settings manually.
Disabling an application in ServerAvatar instantly makes the site inaccessible while keeping all files, databases, and settings safe. This is useful when you want a complete pause without touching WordPress itself.
Steps to Disable a WordPress Application in ServerAvatar:
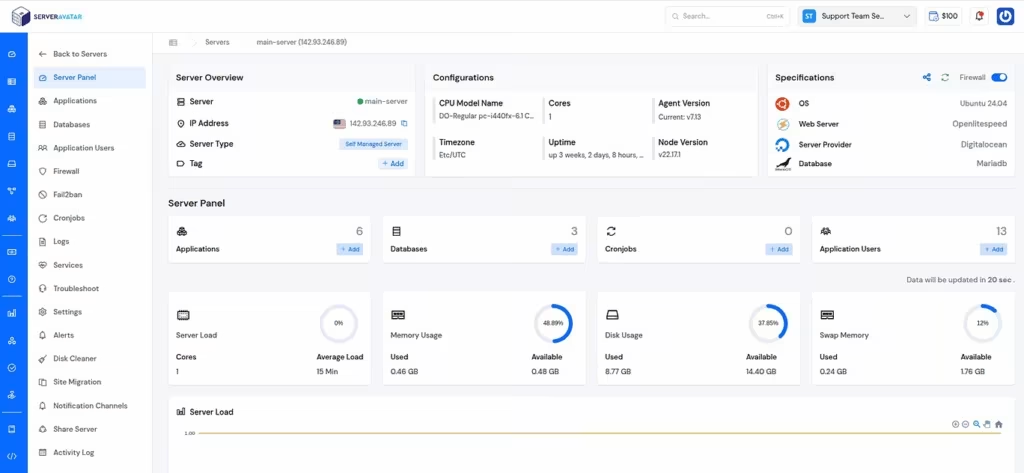
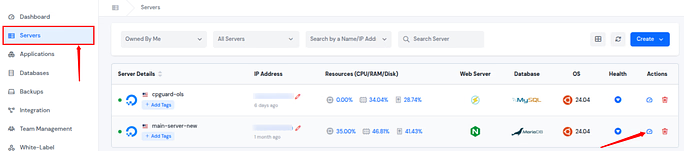
- Log in to your ServerAvatar dashboard, and navigate to the server panel by clicking on the server dashboard icon.

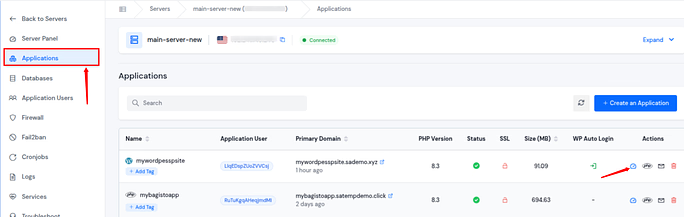
- Navigate to the Applications section from the left sidebar, and click on your application dashboard icon next to your application.

Once disabled, the site stops serving content publicly, but everything remains intact and ready to be enabled again at any time.
Edit the Application Disable Page in ServerAvatar
ServerAvatar also allows you to customize the page shown when an application is disabled or in maintenance mode. This helps you communicate clearly with visitors instead of showing a generic or confusing message.
Steps to Edit the Application Disable Page:
- Log in to your ServerAvatar dashboard, and navigate to the server panel by clicking on the server dashboard icon.
- Navigate to the Settings section from the left sidebar, and select Web Server Default Page from the left hand side.
- Locate the Application Disable Page section. You can edit the disable page for your application from here.
- Click on the Update button to save the changes.
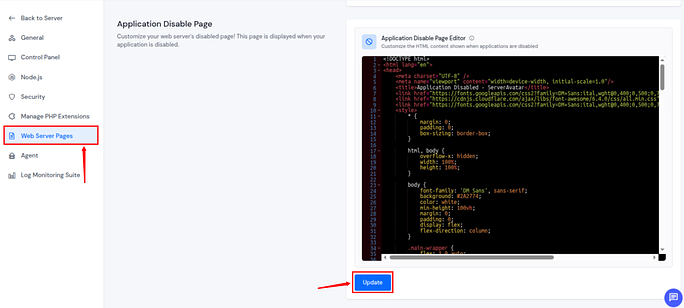
- This ensures visitors see a clear and professional message explaining that the site is temporarily unavailable.
Method 2: Enable Maintenance Mode for WordPress from ServerAvatar
Instead of relying on WordPress plugins, ServerAvatar lets you enable maintenance mode at the application level. This ensures a clean and controlled experience for visitors while you work on updates or changes.
Steps to Enable Maintenance Mode from ServerAvatar:
- Log in to your ServerAvatar dashboard, and navigate to the server panel by clicking on the server dashboard icon.

- Navigate to the Applications section from the left sidebar, and click on your application dashboard icon next to your application.

- Go to the Settings section from the left sidebar. Scroll some downside and locate the Maintenance Mode option.
- Enable the Toggle button to turn on the Maintenance Mode.
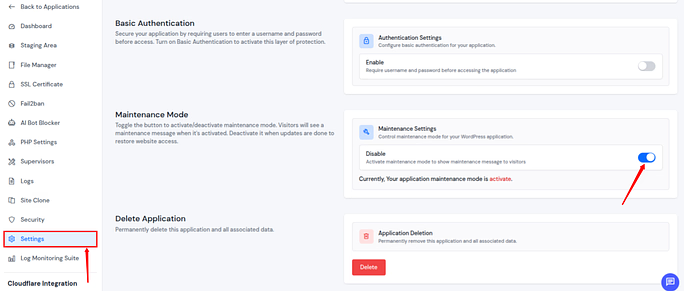
- When maintenance mode is active, visitors see a dedicated maintenance page, while administrators can continue working normally.
Method 3: Unpublishing a Single WordPress Page or Post
This method is best when you want to hide only specific content without affecting the rest of your website. It allows you to remove a page or post from public view while keeping it saved in WordPress.
Steps to Unpublish a Page or Post
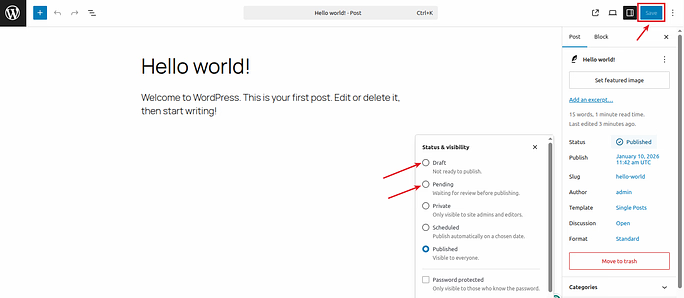
- Log in to your WordPress dashboard to access site settings and content.
- Open Posts or Pages from the left menu based as the content type.
- Select the page or post you want to remove from public view and click on the Edit option.
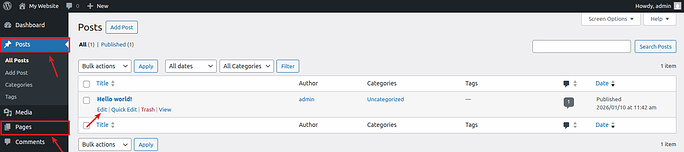
- Locate Status & Visibility in the right-hand settings panel.
- Change the option of Publish to change the current visibility option.
- Choose Draft or Private depending on who should access it.
- Click Save button to apply and save the changes.
What Happens Next
- Draft: Only visible to administrators
- Private: Visible only to logged-in users with permission
This method is ideal when only selected content needs to be hidden.
Method 4: Setting Your Entire WordPress Site to Private
This method helps limit access to your whole website by reducing public visibility and restricting who can view it. It is useful when you want only authorized or logged-in users to access your site.
Steps to Make Your Site Private
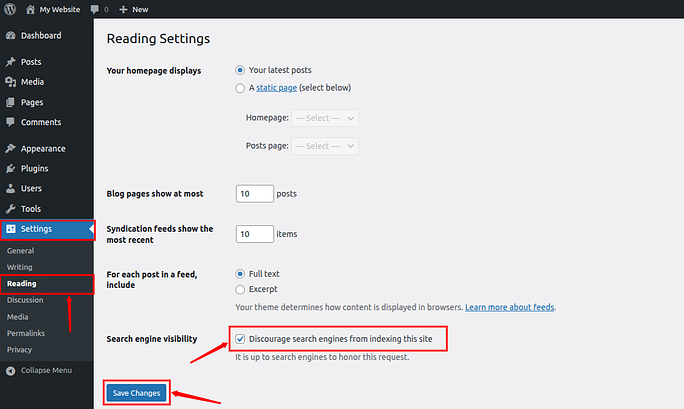
- Log in to your WordPress dashboard to manage site settings.
- Navigate to Settings >> Reading from the left menu.
- Locate the Site Visibility section on the page.
- Select the checbox option to discourage search engines from indexing the site.
- Click Save Changes to apply the settings.
For stronger privacy, use a membership or access-control plugin to block public access completely.
Method 5: Using a Maintenance Mode Plugin
Maintenance mode allows you to temporarily hide your WordPress site while showing visitors a clear and professional message. It keeps your content safe and unchanged while you work privately in the background.
Steps to Enable Maintenance Mode
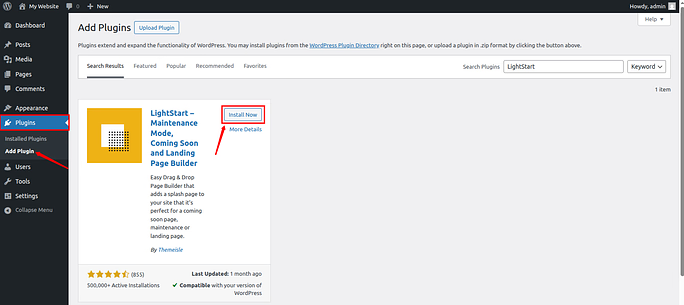
- Login to your WordPress Dashboard.
- Go to Plugins >> Add New from your WordPress dashboard.
- Search for a reliable maintenance mode plugin.
- There are multiple reliable and free plugins for maintenance mode such as, CMP plugin, LightStart plugin, WP Maintenance Mode plugin, Maintenance Mode Made Easy plugin, Smart Maintenance Mode plugin etc.
- I’m using LightStart plugin here.
- Install the plugin and activate it on your site.
- Open the plugin settings from the dashboard. Open the plugin from the leftsidebar.
- In the General tab:
- Set Status to Activated
- Choose Yes for Bypass for Search Bots (recommended for SEO)
- Save the Settings.
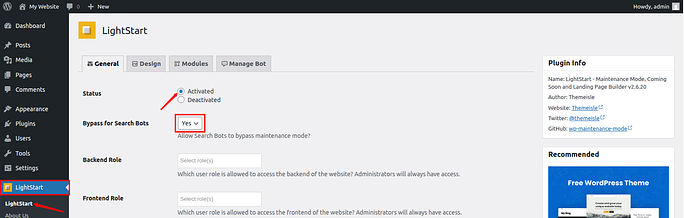
Your site is now in maintenance mode. Visitors will see the maintenance page, while logged-in admins can continue working normally.
To Disable Maintenance Mode, go to General section of plugin and change the status to Deactivated.
Why This Works Well
- Visitors see a simple notice instead of broken pages or errors.
- All website content stays intact and unaffected.
- Maintenance mode can be disabled instantly with one click.
- This method works like placing a temporary cover over your site while updates happen behind the scenes.
This method works like placing a cover over a project while you work behind the scenes.

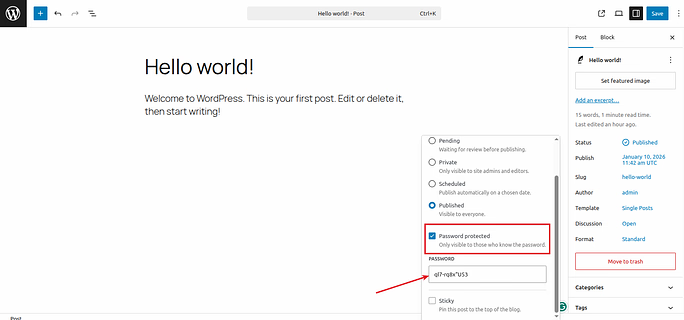
Method 6: Password Protecting Your WordPress Site
Password protection lets you limit access to your content without taking the entire website offline. Only users with the correct password can view the protected pages or sections.
Steps to Password Protect
- Open Pages or Posts from your WordPress dashboard.
- Open Posts or Pages from the left menu based as the content type.
- Select the page or post you want to restrict.

- Find the Visibility option in the settings panel.
- Choose Password Protected as the visibility type.
- Enter a secure password for access.
- Click Save to update and save the changes.
How Unpublishing Affects SEO and Visibility
Unpublishing a WordPress site changes how search engines view and access your content.
The impact on visibility depends on the method used and how long the site stays offline.
- Temporary unpublishing: Short-term methods usually have little to no negative effect on SEO.
- Long-term unpublishing: Keeping a site offline for too long can cause a drop in search rankings.
- Maintenance mode plugins: These often send safe signals to search engines, reducing SEO risk.
- Blocking search engines: Prevents search engines from crawling or updating indexed pages.
Choosing the right unpublishing method helps ensure your site regains visibility smoothly when it goes live again.
Best Practices While Your Site Is Unpublished
Keeping your site organized and well-managed during downtime helps avoid issues later. A few careful steps can make the transition back online smooth and stress-free.
- Keep backups updated: Regular backups ensure your data stays safe while the site is offline.
- Avoid frequent on-off switching: Repeatedly publishing and unpublishing can cause technical and SEO issues.
- Use clear maintenance messages: Inform visitors clearly so they understand the site is temporarily unavailable.
- Limit downtime where possible: Keeping offline time short helps maintain search visibility and user trust.
- Test pages before republishing: Check functionality and layout to ensure everything works before going live.
These small steps help prevent bigger problems later.
How to Republish Your WordPress Site Properly
When your updates are complete, bringing the site back online carefully helps avoid errors or missing content. Following a calm, step-by-step process ensures everything functions smoothly after republishing.
- Disable maintenance mode: Turn off maintenance settings so visitors can access the site again.
- Restore any renamed files: Rename files back to their original names to allow proper loading.
- Set pages back to Public: Change page visibility so content is available to everyone.
- Enable search engine indexing: Allow search engines to crawl and update your site again.
- Clear cache if applicable: Remove cached data to display the latest version of your site.
- Check site on different devices: Test the site on multiple screens to ensure proper display.
A calm, step-by-step approach ensures everything works as expected.
Common Mistakes to Avoid When Unpublishing
Small oversights during unpublishing can lead to bigger problems later. Being aware of common mistakes helps save time, effort, and unnecessary stress.
- Forgetting to disable maintenance mode: Leaving it on can block visitors even after work is done.
- Blocking search engines permanently: This can harm long-term visibility if not reversed.
- Unpublishing without a backup: Lack of backups increases the risk of data loss.
- Editing live files without testing: Direct changes can cause errors if not checked first.
- Removing important plugins accidentally: This may break site functionality unexpectedly.
Being mindful of these points saves time and stress.
Conclusion
Unpublishing a WordPress site is not about shutting things down permanently, it is about taking control when your site needs attention. Whether you are updating content, fixing issues, or preparing for a relaunch, WordPress offers flexible ways to pause public access without risking your data. From hiding individual pages to enabling maintenance mode or limiting access with passwords, each method serves a different purpose and situation.
For users who want a simpler and more powerful approach, ServerAvatar provides server-level control that removes much of the complexity. With options to disable applications, enable maintenance mode, and customize disable pages directly from the dashboard, ServerAvatar makes managing downtime clean, safe, and efficient. By choosing the right unpublishing method and following best practices, you can confidently take your WordPress site offline and bring it back online smoothly when ready.
FAQs
1. Does unpublishing a WordPress site delete any content?
Unpublishing only hides your site or pages from public view while keeping all content, files, and settings intact.
2. Which is better for taking a site offline: WordPress plugins or ServerAvatar?
WordPress plugins work well for basic needs, but ServerAvatar offers more reliable server-level control without adding extra plugins.
3. Will unpublishing my WordPress site affect SEO rankings?
Short-term unpublishing usually has minimal impact, but keeping a site offline for too long may reduce search visibility.
4. Can I still work on my WordPress site while it is unpublished?
Yes, administrators can continue editing and managing the site while visitors are restricted.
5. How quickly can I republish my WordPress site after unpublishing?
Republishing is instant in most cases and can be done by reversing the same steps used to unpublish the site.