
Migrating a WordPress website is often necessary, but it can introduce unexpected technical issues. WordPress post-migration troubleshooting becomes essential when you start noticing SSL warnings, DNS misconfigurations, or email delivery failures. These issues can affect your website’s performance, security, and communication.
WordPress is one of the most widely used content management systems, powering millions of websites worldwide. While migrating a WordPress website to a new server or hosting provider is common, even small configuration mistakes can lead to issues with SSL, DNS, or email functionality.
The good news is that most post-migration problems follow predictable patterns and can be resolved with the right approach. In this guide, you’ll learn how to identify and fix SSL, DNS, and email-related issues step by step, without confusion or unnecessary complexity.
Understanding Post-Migration Issues
After migrating a WordPress website, several components must align correctly for everything to function as expected. These components include server configuration, domain settings, SSL certificates, and email services.
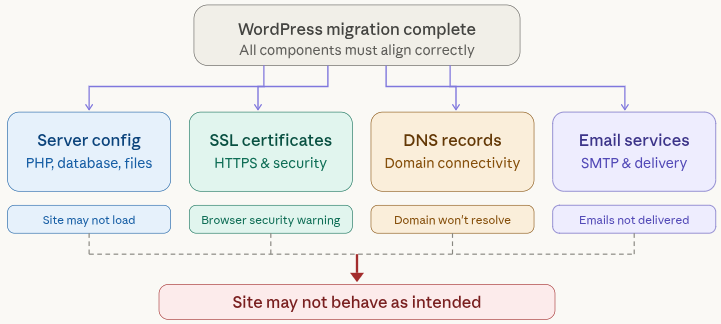
Key areas impacted
- Security (SSL certificates)
- Connectivity (DNS records)
- Communication (email services)
If any of these elements are misconfigured, your website may not behave as intended.
SSL Errors After WordPress Migration
SSL errors are among the most common issues encountered after migration. These errors typically appear as browser warnings indicating that the site is not secure.
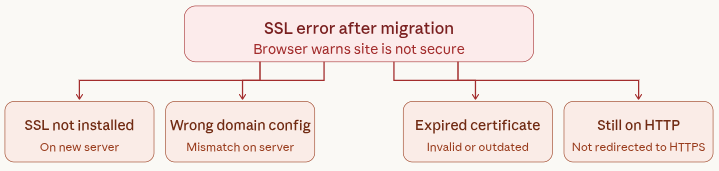
Common causes
- SSL certificate not installed on the new server
- Incorrect domain configuration
- Expired or invalid SSL certificate
- Website still loading over HTTP
Installing and Configuring SSL
Setting up SSL correctly ensures your website is secure and accessible over HTTPS. Following the right steps helps eliminate browser warnings and protects user data, follow these steps:
1. Install SSL Certificate: Ensure that a valid SSL certificate is installed on your hosting server.
2. Update Site URLs to HTTPS
- Navigate to WordPress Dashboard >> Settings >> General
- Update both the WordPress Address (URL) and Site Address (URL) to HTTPS
3. Force HTTPS Redirection
Redirect all HTTP traffic to HTTPS using:
- .htaccess rules, or
- Server configuration settings
4. Fixing Mixed Content Issues: Mixed content errors occur when secure pages (HTTPS) load resources over an insecure connection (HTTP).
Typical symptoms
SSL issues often show visible signs in the browser that indicate something is not configured properly. Recognizing these symptoms helps you quickly diagnose the problem.
- Broken padlock icon in browser
- Certain assets are not loading correctly
How to fix
These steps ensure all website content is securely delivered and properly configured.
- Replace all HTTP URLs with HTTPS
- Update database entries using search-and-replace tools
- Review theme and plugin files for hardcoded HTTP links
Step-by-Step SSL Error Troubleshooting
If your SSL is not working, you can follow a structured troubleshooting process to identify the issue. To verify your SSL configuration in detail, you can use tools like SSL Labs.
This tool helps you:
- Check certificate validity
- Identify configuration issues
- Detect security vulnerabilities
Running a test can quickly reveal what’s causing SSL warnings on your site. Once your SSL is properly configured, the next step is to ensure your domain correctly points to your new server. This is where DNS configuration becomes critical.
Common DNS Issues After WordPress Migration
DNS settings control how your domain connects to your server. If these settings are not updated correctly, your website may not load from the new server.
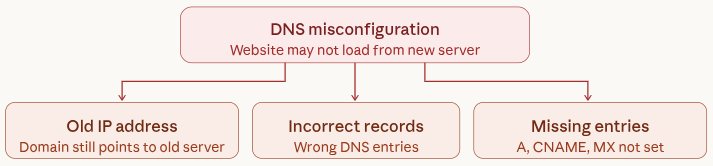
Common DNS issues
These errors typically occur when DNS settings are not updated or fully propagated.
- Domain pointing to old IP address
- Incorrect DNS records
- Missing essential entries
How to fix
1. Updating DNS Records Correctly
Proper DNS configuration ensures your domain connects to the right server without interruptions. Making accurate updates is critical for website accessibility.
- Update A Record: Point your domain to the correct server IP address.
- Verify Nameservers: Ensure your domain uses the correct nameservers provided by your hosting provider.
- Check Essential Records: Confirm the presence and accuracy of:
- A Records
- CNAME Records
- MX Records (for email)
A Record vs Nameservers: Key Differences
When updating DNS settings, it’s important to understand the difference between modifying an A record and changing nameservers.
A Record:
- Directly points your domain to a specific server IP address
- Used when keeping DNS management with your current provider
Nameservers:
- Transfer full DNS control to another provider
- Manage all DNS records from a new hosting platform
Choosing the correct method depends on how you want to manage your domain settings.
2. Domain Not Pointing to New Server
If your website is still loading from the old server, the issue is usually related to DNS propagation or incorrect configuration.
Steps to resolve:
- Verify updated DNS records
- Wait for propagation to complete (up to 48 hours)
- Clear local DNS cache
3. Understanding and Checking DNS Propagation
DNS propagation refers to the time it takes for updated domain settings to be recognized across different networks worldwide.
When DNS records are modified, changes are not applied instantly. Instead, they gradually update across multiple servers.
Best practices
- Use DNS lookup tools
- Check from multiple locations
- Allow sufficient time for updates
Typical timeframe
- A few minutes in some cases
- Up to 48 hours for full global updates
During this period, different users may see different versions of your website depending on their network.
Tools to Track DNS Changes in Real-Time
To confirm whether your DNS changes have been applied globally, you can use online DNS lookup tools. These tools show how your domain is resolving from different locations around the world.
Useful tools include:
Simply enter your domain name and check if it is pointing to the correct server IP address. If different locations show different results, your DNS changes are still propagating.
4. Cache and CDN Troubleshooting
Cached data can cause outdated content or errors to persist even after fixes.
Clear the following:
- Browser cache
- WordPress caching plugins
- CDN cache (if applicable)
Clearing Your Local DNS Cache
Sometimes your system may still store outdated DNS information, even after changes are made.
To fix this, clear your local DNS cache:
- Windows: Use Command Prompt and run ipconfig /flushdns
- macOS: Use Terminal with the appropriate flush command
- Browser: Clear browsing data and restart
This ensures your system fetches the latest DNS records instead of using old ones
WordPress Email Issues After Migration
Email functionality may stop working after migration due to incorrect configurations.
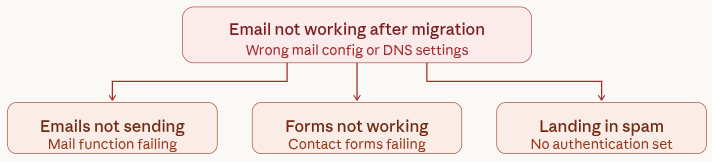
Common problems
- Emails not sending
- Contact forms failing
- Emails landing in spam folders
How to Fix WordPress Email Issues After Migration
Email-related problems are very common after migrating a WordPress website. You may notice that emails are not being delivered, contact forms stop working, or messages are landing in spam folders. These issues usually happen due to incorrect mail configuration or DNS settings.
1. Identify the Email Issue First
Before applying any fix, it’s important to understand exactly what’s going wrong.
Check the following:
- Are emails being sent but not received?
- Are emails going to the spam folder?
- Are contact forms failing to send messages?
You can also use email logs or testing tools to identify whether the issue is related to sending, receiving, or filtering.
2. Set Up SMTP for Reliable Email Delivery
By default, WordPress uses the PHP mail function, which is often unreliable on many servers. That’s why configuring SMTP (Simple Mail Transfer Protocol) is highly recommended.
To set up SMTP:
- Install and activate an SMTP plugin
- Go to the plugin settings
- Enter your “From Email” and “From Name”
- Add your SMTP host, port, encryption type (TLS/SSL), and login credentials
SMTP ensures that emails are sent through a trusted mail server, improving delivery success.
3. Choose the Right SMTP Option
You can configure SMTP in two main ways depending on your needs:
Option 1: Use Your Existing Email Provider
You can connect your current email service (such as your hosting email or business email provider).
Typical configuration includes:
- SMTP Host
- Port number
- Encryption (TLS or SSL)
- Username and password
Make sure to use secure authentication methods like app-specific passwords if required.
Option 2: Use Transactional Email Services
For better reliability and scalability, especially for high-traffic websites, you can use dedicated email services.
Popular options include:
- SendGrid
- Mailgun
- SendLayer
- Amazon SES
These services are designed specifically for sending large volumes of emails and provide better inbox delivery rates.
4. Fix Email Delivery Using MX Records
MX (Mail Exchange) records control how incoming emails are routed to your mail server.
To fix issues:
- Ensure your MX records match your email provider’s settings
- Remove any outdated or duplicate entries
- Verify that priority values are correctly configured
Incorrect MX records can prevent you from receiving emails entirely.
5. Prevent Emails from Going to Spam (SPF & DKIM)
Even if emails are being sent, they may still land in spam without proper authentication.
Configure these DNS records:
- SPF (Sender Policy Framework): Defines which servers are allowed to send emails on behalf of your domain
- DKIM (DomainKeys Identified Mail): Adds a digital signature to verify email authenticity
Adding these records improves your email credibility and helps avoid spam filters.
6. Test Your Email Configuration
After completing the setup, always test your email functionality. You can also use tools like Mail Tester to check your email deliverability.
These tools analyze your emails and provide insights on:
- Spam score
- Missing authentication records (SPF/DKIM)
- Blacklisting issues
This helps you ensure your emails reach the inbox instead of the spam folder.
Common SMTP Issues to Watch For
- Incorrect login credentials
- Blocked SMTP ports on the server
- Missing authentication settings
- Wrong encryption type (TLS/SSL mismatch)
Final Checklist After WordPress Migration
After applying fixes, thorough testing is essential.
Checklist:
- Website loads securely over HTTPS
- Pages and assets display correctly
- Forms function as expected
- Emails are delivered successfully
- Internal links are working
Managing all these configurations manually can be time-consuming and prone to errors, especially if you’re not familiar with server-level settings. This is where using a server management platform can significantly simplify the process.
How ServerAvatar Can Help With Post-Migration
What is ServerAvatar?
ServerAvatar is a server and application hosting and management platform that simplifies the process of hosting and managing servers and applications. It allows you to deploy and manage PHP and Node.js applications on cloud servers without needing advanced server administration skills. This reduces manual errors and speeds up post-migration troubleshooting significantly.
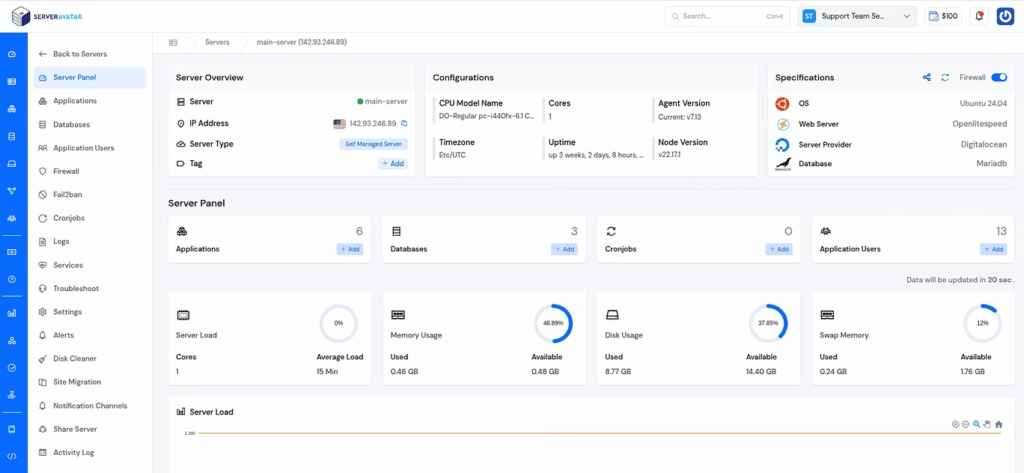
With an easy-to-use dashboard, ServerAvatar helps you handle essential tasks such as SSL installation, security feature management, backups, server monitoring, etc., in one place.
How ServerAvatar Helps After WordPress Migration
After migrating a WordPress website, managing technical configurations like SSL, DNS, and email can be challenging, especially if you’re handling everything manually.
This is where ServerAvatar can make the process much easier:
- Easy SSL Management: Install a free automatic SSL Certificate with auto-renewal or custom SSL, and easily manage SSL certificates without manual server commands.
- Simplified Server Configuration: No need to deal with complex server-level settings with manual commands.
- Centralized Dashboard: Manage servers, applications, services, and other settings from one place.
Using a platform like ServerAvatar helps you save time and reduces the chances of configuration errors.
Safely Move a WordPress Site from Staging to Live Using ServerAvatar
When working on a WordPress website, it’s always safer to test changes in a staging environment before applying them to your live site. A staging environment is a separate copy of your website where you can experiment without affecting real users.
With ServerAvatar, creating and managing a staging site is simple and does not require manual file transfers or complex database handling.
How Staging Works in ServerAvatar
Instead of manually copying files or databases, ServerAvatar allows you to:
- Create a Staging Environment: You can generate a complete copy of your live application, including files and database, in just a few steps. This staging site is isolated from your production environment.
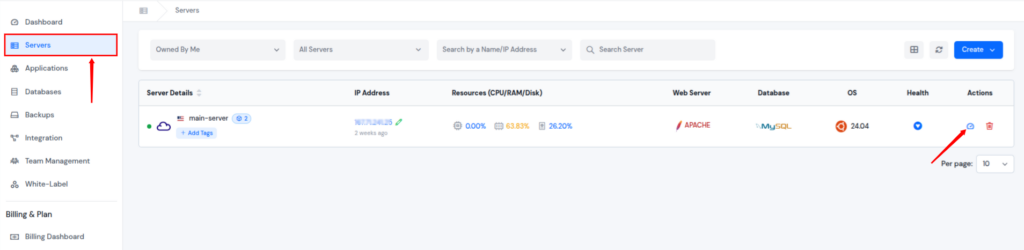
- Navigate to the server panel by clicking on the server dashboard icon.
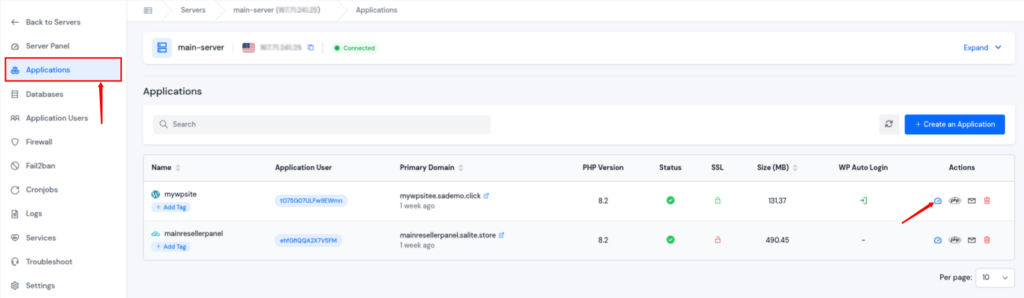
- Go to the Applications section and click on the application dashboard icon to navigate to the application panel.
- Click on the Staging Area section from the left sidebar, enter your staging area name, and fill in the further details.
- Click on the Create Staging Area button.
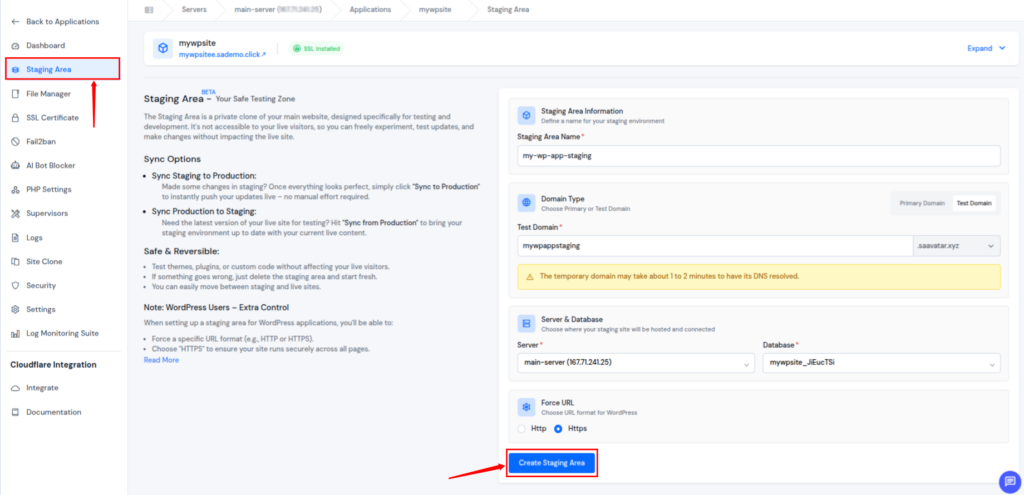
- You can see the staging area listed there once it is created.
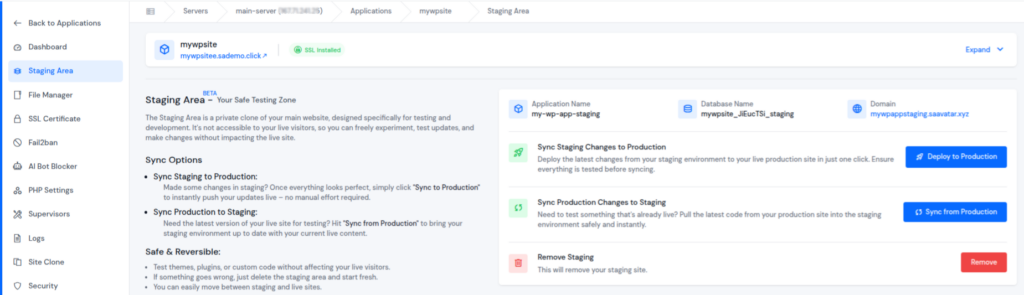
- Test Changes Safely: You can update plugins, modify themes, or test new features without impacting your live website.
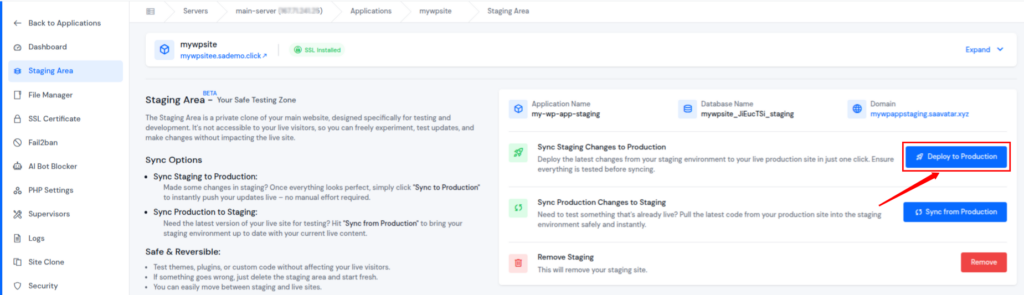
- Deploy Changes When Ready: Once your changes are tested, you can move them from staging to your live site. This process allows you to apply updates in a controlled way without affecting important live data.
- Simply click on the “Deploy to Production: button, and you’re done.
This approach reduces the risk of breaking your live site and helps ensure a smoother transition after migration.
Why Staging-to-Production Requires a Careful Approach
Moving changes from staging to production is not always as simple as copying everything over. In many cases, your live site continues to receive new data such as user activity, orders, or form submissions. If you overwrite your live site without considering these changes, you may lose important data.
That’s why it’s important to carefully decide what should be updated and what should remain untouched.
What You Should and Shouldn’t Move to Production
Before syncing your staging changes, review what has changed on your live site.
Safe to Move from Staging:
- Theme and design updates
- Plugin files and configurations
- New pages, posts, or media added during testing
- Layout or UI improvements
Avoid Overwriting on Live Site:
- User accounts and login data
- Comments or user-generated content
- eCommerce orders or transactions
- Form submissions or leads
- Any real-time data created after staging was set up
Being selective during this process helps prevent accidental data loss and ensures your live website continues to function properly.
Common Mistakes to Avoid After WordPress Migration
Even small mistakes after migration can lead to major issues. Here are some common pitfalls you should avoid:
- Forgetting to update DNS records properly: This can cause your domain to point to the old server.
- Installing SSL before DNS is fully propagated: This often results in certificate errors or failed validation.
- Ignoring mixed content issues: Your website may still load insecure resources even after SSL is installed.
- Overwriting live data during staging deployment: Pushing full database changes can delete recent user activity or transactions.
- Relying on default PHP mail instead of SMTP: This can lead to email delivery failures or messages going to spam.
- Not clearing cache after making changes: Old cached data may prevent updates from appearing correctly.

Best Practices for a Smooth Post-Migration Process
Following best practices can help you avoid most post-migration issues and ensure your website runs smoothly.
- Always use a staging environment before going live: Test all changes safely before applying them to your production site.
- Take a complete backup before making major changes: This ensures you can restore your website if anything goes wrong.
- Verify DNS changes before configuring SSL: Make sure your domain is pointing to the correct server.
- Use SMTP for reliable email delivery: Avoid relying on default mail functions.
- Monitor your website after migration: Check performance, security, and functionality regularly.
- Document important configurations: Keep track of DNS, SSL, and email settings for future reference.
Using a structured approach and the right tools can significantly reduce risks during and after migration.
Conclusion
Migrating a WordPress website doesn’t end once the files and database are moved. Post-migration issues related to SSL, DNS, and email are common but manageable with the right approach. By carefully checking configurations, allowing time for DNS propagation, and using reliable email setup methods like SMTP, you can ensure your website runs smoothly after migration. Using tools and platforms that simplify server management can further reduce complexity and help you maintain a stable and secure website environment.
FAQs
1. Why is my website showing “Not Secure” after migration?
This usually happens when the SSL certificate is not installed correctly or the site is still loading resources over HTTP.
2. How long does DNS propagation take after migration?
DNS propagation can take anywhere from a few minutes to 48 hours depending on the network and DNS provider.
3. Why are my WordPress emails not working after migration?
This is often due to missing SMTP configuration or incorrect DNS records like MX, SPF, or DKIM.
4. Should I use SMTP instead of PHP mail in WordPress?
SMTP is more reliable and improves email deliverability compared to the default PHP mail function.
5. Can I fix post-migration issues without technical knowledge?
Using managed platforms like ServerAvatar simplifies SSL, server, and application management without requiring advanced skills.