
WordPress spam bots are automated programs that flood your website with unwanted comments, fake registrations, and malicious login attempts. These pesky visitors can slow down your site, fill your database with junk, and even compromise your security. If you’re tired of dealing with hundreds of spam comments daily, Fail2Ban is your answer.
Fail2Ban is a powerful security tool that monitors your server logs and automatically blocks IP addresses that show suspicious behavior. Think of it as a bouncer for your website – it keeps the troublemakers out while letting genuine visitors in.
What Are WordPress Spam Bots?
Before we dive into the solution, let’s understand what we’re fighting against. WordPress spam bots are automated scripts that:
- Post irrelevant comments with suspicious links
- Try to register fake user accounts
- Attempt brute force attacks on your login page
- Submit contact forms with promotional content
- Crawl your site excessively, slowing it down
Example: You might see comments like “Great post! Check out my website about cheap electronics” on a blog about cooking recipes. That’s a spam bot at work.
Why Choose Fail2Ban Over Other Methods?
Many WordPress users rely on plugins like Akismet or Wordfence, and while these are good, Fail2Ban works at the server level. This means:
- Faster blocking: Spam bots get blocked before they even reach WordPress
- Lower server load: Less processing power wasted on spam requests
- Comprehensive protection: Guards against all types of attacks, not just WordPress-specific ones
- No plugin conflicts: Works independently of your WordPress setup
Prerequisites
Before we start, make sure you have:
- A VPS or dedicated server (shared hosting won’t work)
- Root or sudo access to your server
- Basic command line knowledge
- WordPress access logs enabled
With Using ServerAvatar:-
What is ServerAvatar
ServerAvatar is a powerful cloud server management panel that simplifies server and website management. It allows you to easily host PHP applications like WordPress, Laravel, and more on your VPS or cloud server, with or without technical skills.
ServerAvatar’s Fail2Ban feature helps protect your server from brute-force attacks and malicious login attempts. It works by monitoring server logs for suspicious activity—such as repeated failed login attempts—and automatically blocking the attacker’s IP address for a set period, reducing the risk of unauthorized access.
Connect to Your Server
Go to your ServerAvatar Dashboard
Open your server → Click on your application
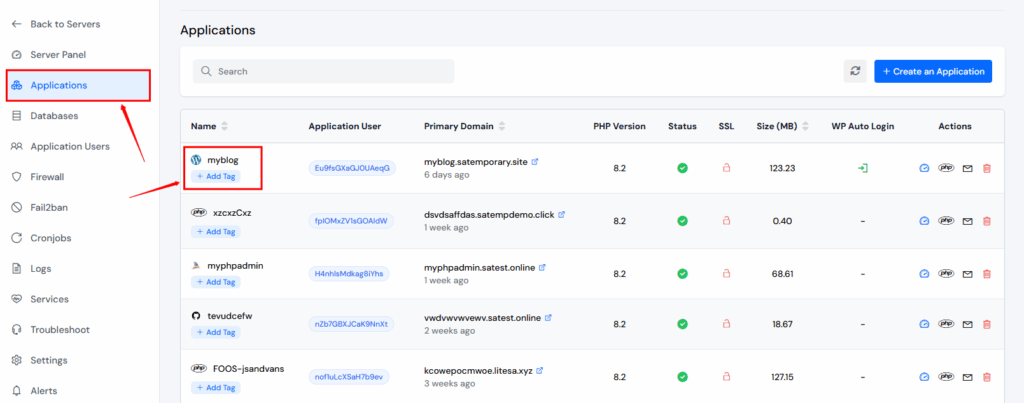
Navigate to Fail2Ban and click on it.
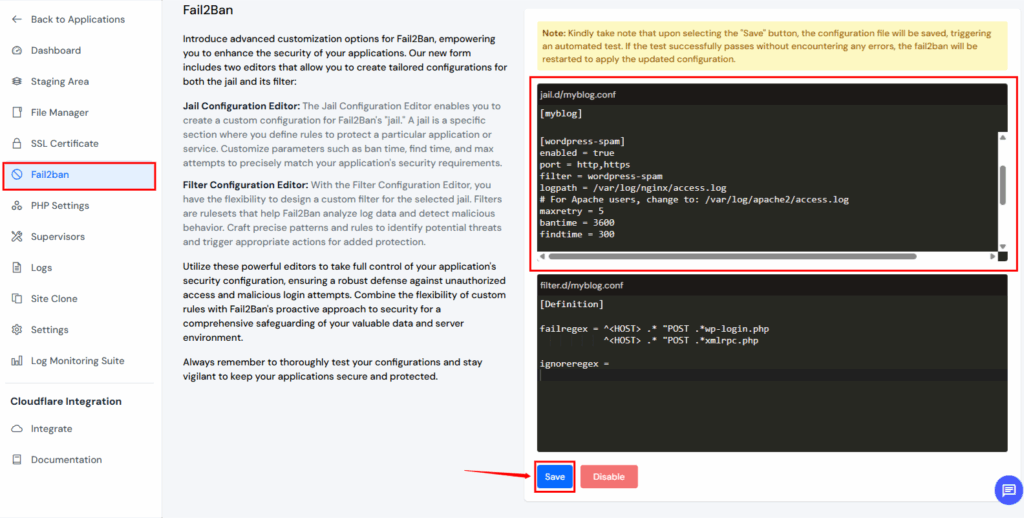
Add Code
[wordpress-spam]
enabled = true
port = http,https
filter = wordpress-spam
logpath = /var/log/nginx/access.log
# For Apache users, change to: /var/log/apache2/access.log
maxretry = 5
bantime = 3600
findtime = 300

[wordpress-bruteforce]
enabled = true
port = http,https
filter = wordpress-spam
logpath = /var/log/nginx/access.log
maxretry = 3
bantime = 86400
findtime = 600Configuration explained:
- maxretry: Number of attempts before banning (5 for spam, 3 for brute force)
- bantime: How long to ban in seconds (3600 = 1 hour, 86400 = 24 hours)
- findtime: Time window to count attempts (300 = 5 minutes)
Example scenario: If an IP makes 5 comment attempts within 5 minutes, it gets banned for 1 hour.
Step 1: Installing Fail2Ban
sudo apt update
sudo apt install fail2banOn CentOS/RHEL:
sudo yum install epel-release
sudo yum install fail2banOn Rocky Linux/AlmaLinux:
sudo dnf install epel-release
sudo dnf install fail2banAfter installation, start and enable Fail2Ban:
sudo systemctl start fail2ban
sudo systemctl enable fail2banStep 2: Understanding WordPress Log Files
WordPress generates different types of logs that Fail2Ban can monitor:
- Access logs: Show all requests to your site (usually in /var/log/nginx/access.log or /var/log/apache2/access.log)
- Error logs: Record PHP errors and failed requests
- WordPress debug logs: If WP_DEBUG is enabled
Example of a spam bot in access logs:
192.168.1.100 - - [28/Jul/2025:10:15:23] "POST /wp-comments-post.php HTTP/1.1" 200 1234
192.168.1.100 - - [28/Jul/2025:10:15:24] "POST /wp-comments-post.php HTTP/1.1" 200 1234
192.168.1.100 - - [28/Jul/2025:10:15:25] "POST /wp-comments-post.php HTTP/1.1" 200 1234Notice the same IP making rapid, repeated requests to the comment posting script.
Step 3: Creating WordPress-Specific Fail2Ban Filters
Now comes the important part – teaching Fail2Ban to recognize WordPress spam patterns.
Create a new filter file:
sudo nano /etc/fail2ban/filter.d/wordpress-spam.confAdd this content:
[Definition]
# Block IPs that make too many comment attempts
failregex = ^<HOST> .* "POST .*wp-comments-post\.php.*" .*$
^<HOST> .* "POST .*wp-login\.php.*" .*$
^<HOST> .* "GET .*wp-admin.*" 401 .*$
^<HOST> .* "POST .*xmlrpc\.php.*" .*$
# Ignore legitimate traffic
ignoreregex =
What this filter does:
- Monitors POST requests to wp-comments-post.php (comment submissions)
- Watches for failed login attempts to wp-login.php
- Catches unauthorized wp-admin access attempts
- Blocks xmlrpc.php abuse (often used by bots)
Step 4: Configuring the WordPress Jail
Create a jail configuration:
sudo nano /etc/fail2ban/jail.d/wordpress.confAdd this configuration:
[wordpress-spam]
enabled = true
port = http,https
filter = wordpress-spam
logpath = /var/log/nginx/access.log
# For Apache users, change to: /var/log/apache2/access.log
maxretry = 5
bantime = 3600
findtime = 300

[wordpress-bruteforce]
enabled = true
port = http,https
filter = wordpress-spam
logpath = /var/log/nginx/access.log
maxretry = 3
bantime = 86400
findtime = 600Step 5: Testing Your Configuration
Before going live, test your setup:
Check if Fail2Ban is running:
sudo fail2ban-client statusTest the WordPress filter:
sudo fail2ban-regex /var/log/nginx/access.log /etc/fail2ban/filter.d/wordpress-spam.confView active jails:
sudo fail2ban-client status wordpress-spamExample output:
Status for the jail: wordpress-spam
|- Filter
|  |- Currently failed: 2
|  |- Total failed:     15
|  `- File list:        /var/log/nginx/access.log
`- Actions
   |- Currently banned: 3
   |- Total banned:     8
   `- Banned IP list:   192.168.1.100 10.0.0.50 203.45.67.89
Step 6: Advanced Configuration Options
Custom Ban Actions
You can configure different actions when bots are detected:
[wordpress-spam]
enabled = true
filter = wordpress-spam
action = iptables-multiport[name=wordpress, port="http,https"]
sendmail[name=wordpress, dest=your-email@domain.com]This setup will:
- Block the IP using iptables
- Send you an email notification
Whitelist Important IPs
Prevent accidentally banning yourself:
sudo nano /etc/fail2ban/jail.localAdd:
[DEFAULT]
ignoreip = 127.0.0.1/8 192.168.1.0/24 your-office-ipExample: If your office IP is 203.45.67.89, add it to prevent lockouts during testing.
Geographic Blocking
Block entire countries known for spam:
[wordpress-geoblock]
enabled = true
filter = wordpress-spam
action = iptables-multiport[name=wordpress-geo, port="http,https"]
geoip-block[countries="CN RU"]Step 7: Monitoring and Maintenance
Check Banned IPs Regularly
sudo fail2ban-client status wordpress-spamUnban an IP if Needed
sudo fail2ban-client set wordpress-spam unbanip 192.168.1.100View Recent Bans
sudo tail -f /var/log/fail2ban.logExample log entry:
2025-07-28 10:30:15,123 fail2ban.actions: WARNING [wordpress-spam] Ban 192.168.1.100Log Rotation
Ensure your logs don’t fill up disk space:
sudo logrotate -f /etc/logrotate.d/fail2banReal-World Examples and Case Studies
Example 1: Comment Spam Attack
Scenario: A spam bot hits your blog with 50 comments in 2 minutes.
What happens:
- Fail2Ban detects multiple POST requests to wp-comments-post.php
- After 5 attempts in 5 minutes, the IP gets banned
- The bot can’t post more comments for the next hour
- Your database stays clean, and legitimate users aren’t affected
Example 2: Brute Force Login Attack
Scenario: Someone tries to guess your admin password.
Log entries you might see:
203.45.67.89 - - [28/Jul/2025:11:45:10] "POST /wp-login.php HTTP/1.1" 200 1234
203.45.67.89 - - [28/Jul/2025:11:45:12] "POST /wp-login.php HTTP/1.1" 200 1234
203.45.67.89 - - [28/Jul/2025:11:45:14] "POST /wp-login.php HTTP/1.1" 200 1234Fail2Ban response:
- Detects pattern after 3 failed attempts
- Bans the IP for 24 hours
- Prevents further login attempts
Troubleshooting Common Issues
Issue 1: Fail2Ban Not Starting
Problem: Service fails to start after configuration.
Solution:
# Check configuration syntax
sudo fail2ban-client -t

# View error logs
sudo journalctl -u fail2ban -fIssue 2: Legitimate Users Getting Banned
Problem: Real visitors are blocked accidentally.
Solutions:
- Increase maxretry values
- Add their IPs to ignoreip list
- Adjust findtime settings
Example fix:
maxretry = 8  # Instead of 5
findtime = 600 # 10 minutes instead of 5Issue 3: ServerAvatar-Specific Issues
Problem: Jails not working in ServerAvatar environment.
Solutions:
- Check if logs are in the correct location
- Verify ServerAvatar hasn’t overridden your settings
- Use ServerAvatar’s built-in templates instead of custom ones
Issue 4: High False Positive Rate
Problem: Too many legitimate users getting banned.
Solution – Refined filter:
[Definition]
# More specific patterns to reduce false positives
failregex = ^<HOST> .* "POST .*wp-comments-post\.php.*" 200 .*$
            ^<HOST> .* "POST .*wp-login\.php.*" (?:200|302) .*$
ignoreregex = ^<HOST> .* "POST .*wp-comments-post\.php.*" 200 .* ".*legitimate-user-agent.*"$
Performance Optimization Tip
Reduce Log Size
Large log files can slow down Fail2Ban:
# Compress old logs
sudo gzip /var/log/nginx/access.log.1

# Set up automatic compression
sudo nano /etc/logrotate.d/nginx
Use Efficient Regex
Optimize your filters for better performance:
# Faster regex (more specific)
failregex = ^<HOST> [^"]* "POST /wp-comments-post\.php
# Instead of: ^<HOST> .* "POST .*wp-comments-post\.php.*Security Best Practices
Layer Your Defense
Don’t rely on Fail2Ban alone:
- Use strong passwords for WordPress admin
- Enable two-factor authentication
- Keep WordPress updated
- Install security plugins like Wordfence as backup
- Hide wp-admin from unauthorized access
Regular Maintenance Schedule
- Weekly: Check banned IP lists
- Monthly: Review and update filter patterns
- Quarterly: Analyze attack trends and adjust settings
Backup Your Configuration
# Create backup
sudo cp -r /etc/fail2ban /home/backup/fail2ban-backup

# Restore if needed
sudo cp -r /home/backup/fail2ban-backup/* /etc/fail2ban/FAQ
What is Fail2Ban?
Fail2Ban is a server-level security tool that blocks IPs showing suspicious activity, such as spam or brute-force attacks.
Why use Fail2Ban for WordPress?
It blocks spam bots before they reach WordPress, reducing server load and improving security.
Can I use Fail2Ban on shared hosting?
No. You need VPS or dedicated hosting with root/sudo access.
Does ServerAvatar support Fail2Ban?
Yes. ServerAvatar offers a built-in Fail2Ban feature for easy configuration.
How does Fail2Ban detect spam bots?
It monitors server logs for suspicious patterns like repeated comment posts, failed logins, or xmlrpc abuse.
Conclusion
Setting up Fail2Ban to block WordPress spam bots is one of the most effective ways to protect your website. Whether you choose the manual configuration method or use ServerAvatar’s simplified approach, you’ll see immediate results in reduced spam and improved site performance.
Remember these key points:
- Start with conservative settings and adjust based on your site’s traffic
- Monitor the system regularly to prevent false positives
- Keep your filters updated as spam techniques evolve
- Use Fail2Ban as part of a comprehensive security strategy
The time invested in setting up Fail2Ban properly will save you countless hours of manual spam cleanup later. Your visitors will appreciate the faster loading times, and you’ll sleep better knowing your site is protected around the clock.
Final tip: Test your configuration on a staging site first, especially if you’re new to server administration. This prevents accidentally locking yourself out of your production site.
With Fail2Ban in place, you can focus on creating great content instead of fighting spam bots. Your WordPress site will be more secure, faster, and much more pleasant to manage.
Stop Wasting Time on Servers. Start Building Instead.
You didn’t start your project to babysit servers. Let ServerAvatar handle deployment, monitoring, and backups — so you can focus on growth.
Deploy WordPress, Laravel, N8N, and more in minutes. No DevOps required. No command line. No stress.
Trusted by 10,000+ developers and growing.