
Have you ever shared access to your WordPress website and then wondered, What if someone accidentally breaks something? I have been there, and trust me, it’s not a great feeling. That’s exactly why understanding WordPress user roles and permissions is so important. When you assign the right roles to the right people, you protect your website, avoid mistakes, and keep everything running smoothly.
In this guide, I will walk you through everything step by step in simple terms, with no technical headaches. By the end, you will feel confident managing users like a pro.
What Are WordPress User Roles?
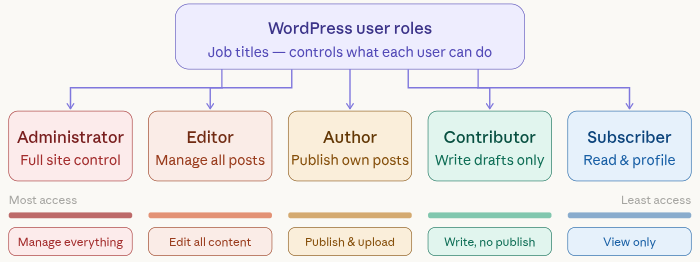
Think of WordPress user roles as job titles for your website. Each role comes with specific permissions, what a user can and cannot do.
For example:
- Some users can publish posts
- Others can only write drafts
- Some can manage the entire website
This system helps you stay organized and secure.
Why User Roles Matter for Your Website
Let me ask you something, would you let a new intern handle your company’s finances on day one? Probably not. The same applies here.
User roles matter because they:
- Protect your website from accidental changes
- Prevent unauthorized access
- Keep workflows smooth and organized
- Improve collaboration
Without proper role management, your site can quickly become chaotic.
Default WordPress User Roles Explained
WordPress comes with some default user roles. Each one has its own level of access. Here’s a quick overview:
- Super Admin
- Administrator
- Editor
- Author
- Contributor
- Subscriber
Let’s break them down one by one.
1. Super Admin Role: Network-Level Control (Multisite Only)
If you’re using WordPress Multisite, there’s one role above Administrator called the Super Admin.
Think of a Super Admin as the owner of an entire building, while Administrators are just managing individual apartments.
What a Super Admin can do:
- Manage all websites in the network
- Install and control themes and plugins across the network
- Add or remove sites
- Manage network-wide settings
- Assign or remove Administrators
What makes it different?
An Administrator only controls a single website, but a Super Admin controls the entire network of sites.
Important note:
This role doesn’t exist in a regular WordPress installation. You’ll only see it if Multisite is enabled.
Best practice:
Just like the Administrator role, keep Super Admin access extremely limited, ideally to yourself or a highly trusted developer.
2. Administrator Role: Full Control
Administrator is the most powerful role. If you’re the site owner, this is usually your role.
What they can do:
- Install and delete plugins
- Change themes
- Add or remove users
- Modify settings
Best practice:
Only give this role to people you fully trust. It’s like giving someone the master key.
3. Editor Role: Content Manager
An Editor is like a content manager in a company.
What they can do:
- Edit and publish all posts
- Manage other users’ content
- Moderate comments
They cannot:
- Change website settings
- Install plugins
This role is perfect for someone managing your blog or content team.
4. Author Role: Content Creator
Authors are your regular writers.
What they can do:
- Write, edit, and publish their own posts
- Upload media files
They cannot:
- Edit others’ posts
- Access site settings
This keeps things controlled while allowing creativity.
5. Contributor Role: Limited Writer
A Contributor is like a guest writer.
What they can do:
- Write posts
- Submit them for review
They cannot:
- Publish posts
- Upload media
This is great when you want to review content before it goes live.
6. Subscriber Role: Basic Access
Subscribers have the lowest level of access.
What they can do:
- Manage their profile
- Read content (especially on membership sites)
They cannot make any changes to your website.
WordPress User Roles Comparison Table
To make things easier to understand, here’s a quick comparison table of all WordPress user roles and what they can do. This will help you clearly see the differences in permissions at a glance.
| Role | Access Level | Can Manage Site Settings | Can Publish Content | Can Edit Others’ Content | Can Install Plugins/Themes | Best For |
| Super Admin | Full Network Access | Yes (Network-wide) | Yes | Yes | Yes (Network-wide) | Multisite network owners |
| Administrator | Full Site Access | Yes | Yes | Yes | Yes | Website owners / admins |
| Editor | High (Content) | No | Yes | Yes | No | Content managers |
| Author | Medium | No | Yes (Own only) | No | No | Regular content writers |
| Contributor | Limited | No | No | No | No | Guest writers / contributors |
| Subscriber | Very Limited | No | No | No | No | Basic users / members |
How to Add a New User in WordPress
Adding a user is super simple. Here’s how I usually do it:
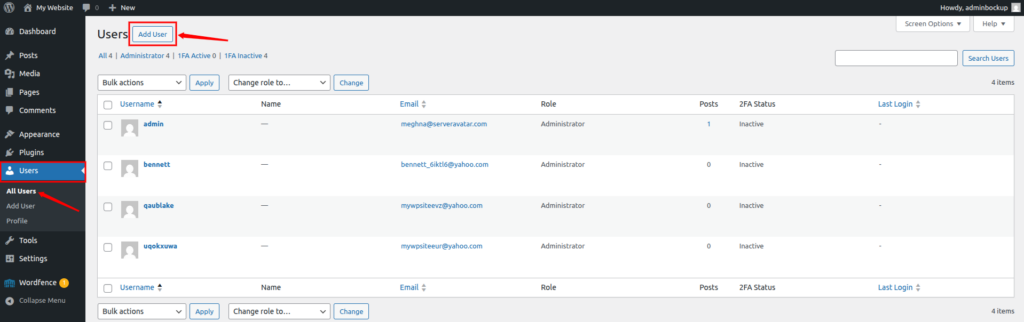
- Go to the WordPress Dashboard, and the Users section from the left sidebar.
- Click on the Add User option.
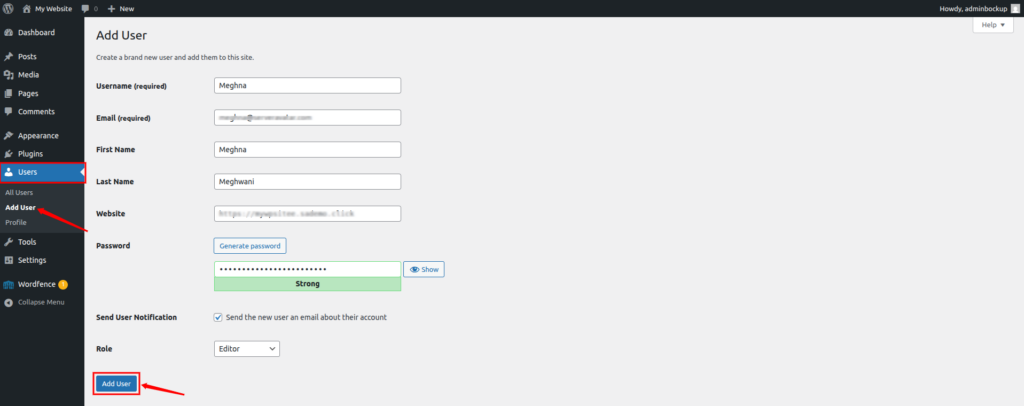
- Now, enter username, email, first name, last name, and website.
- Set a strong password.
- Select the checkbox if you want to notify the user via email about the role creation.
- Choose a user role as per your preferences
- Click on the Add User button.
That’s it! Just make sure you assign the correct role.
How to Assign or Change User Roles
Sometimes you need to update roles. Maybe a writer becomes an editor. Here’s how:
- Go to the WordPress Dashboard, and the Users section from the left sidebar.
- Click on the All Users section.
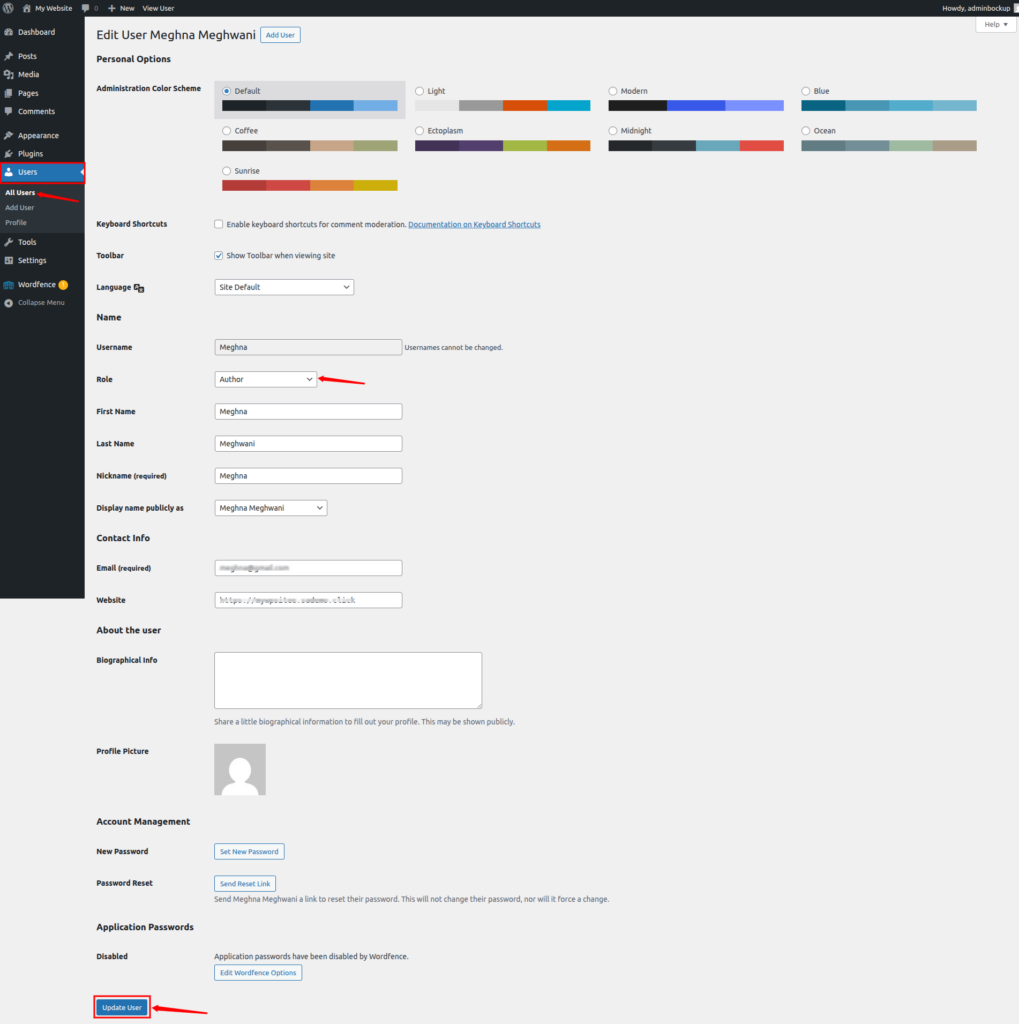
- Find the user you want to assign or change the role for, and click on the Edit button.
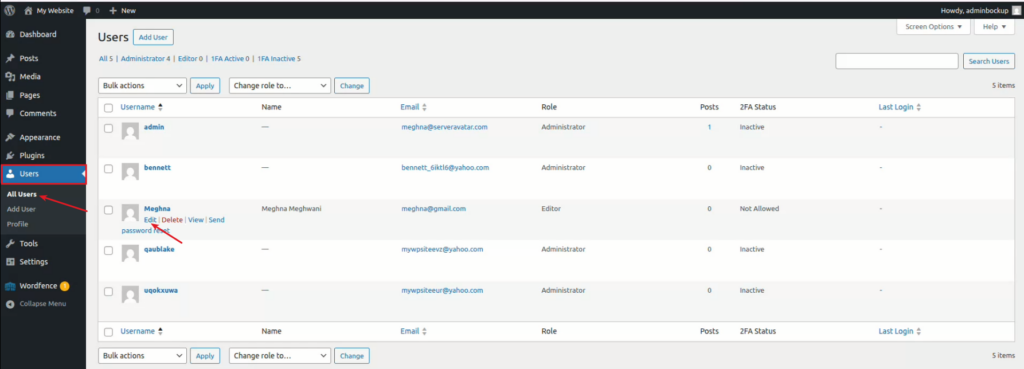
- Navigate to the Role section, and select a new role you want to assign to that user.
- Click on the Update User.
It takes less than a minute but can make a big difference.
When It Makes Sense to Use Custom User Roles
There are times when the default WordPress roles just don’t quite fit your needs. That’s when creating custom user roles becomes really useful.
Think about it, every website is different. Maybe you run an online store, a membership site, or a multi-author blog. In these cases, you might need more control over what each user can access.
So, when should you consider custom roles?
- When existing roles give too much or too little access
- When you want to limit specific actions (like editing only certain pages)
- When you have a growing team with clearly defined responsibilities
- When you need tighter security for sensitive areas
Why does this matter?
Because giving someone more access than they need can be risky, while giving too little can slow down your workflow. Custom roles help you strike the perfect balance.
How to Create, Modify, or Remove User Roles in WordPress
Managing user roles might sound technical, but it’s actually pretty straightforward, especially with the right tools. By default, WordPress doesn’t let you edit roles directly from the dashboard. But you can easily do this using plugins or manually.
In this section, I’ll walk you through two simple ways to manage user roles in WordPress, one using a plugin (which is the easiest option) and the other using manual code for more advanced control.
Both methods allow you to control who can access what on your website, helping you keep things organized and secure.
Method 1: Managing Roles with a Plugin
If you want a hassle-free experience, using a plugin is the best way to go. It simplifies everything by showing permissions in a clear and easy-to-understand format, reducing the chances of errors.
There are several plugins available, such as Members, Advanced Access Manager, User Role Editor, and WP User Manager. In this guide, we’ll use ‘User Role Editor.’ Let’s get started.
- Navigate to the Plugins >> Add Plugin
- Search for the User Role Editor plugin
- Install and activate the plugin

You can access this plugin by navigating to the Users >> User Role Editor section. Once you’re inside, you can easily:
- Create new roles
- Duplicate existing roles
- Add or remove specific permissions
- Delete roles that are no longer needed
The best part? Any changes you make are applied instantly, and you can always adjust them later if needed.
This method works especially well if you’re managing client websites, working with a content team, or running a growing business.
How to Add a New User Role Using a Plugin
Creating a new role is helpful when the default roles don’t quite match your requirements. Here’s how you can do it:
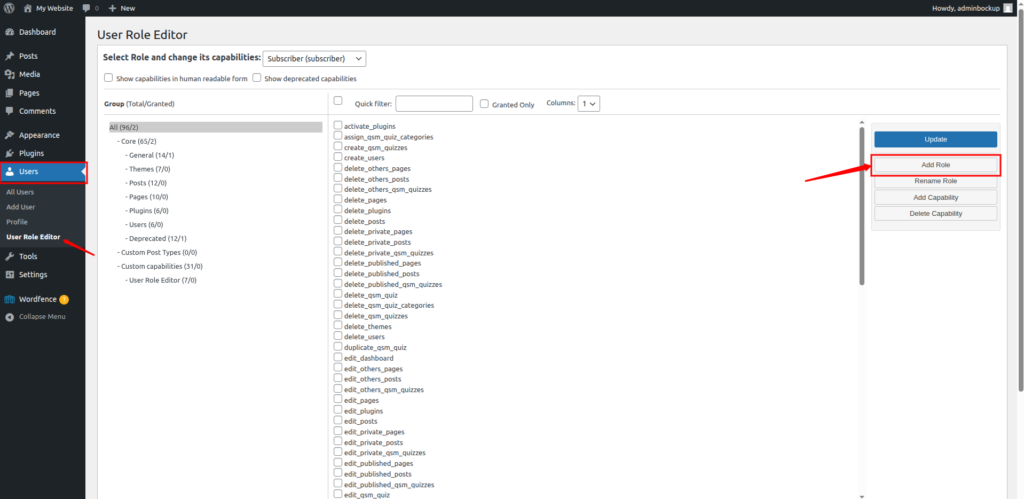
- Navigate to the Users >> User Role Editor section.
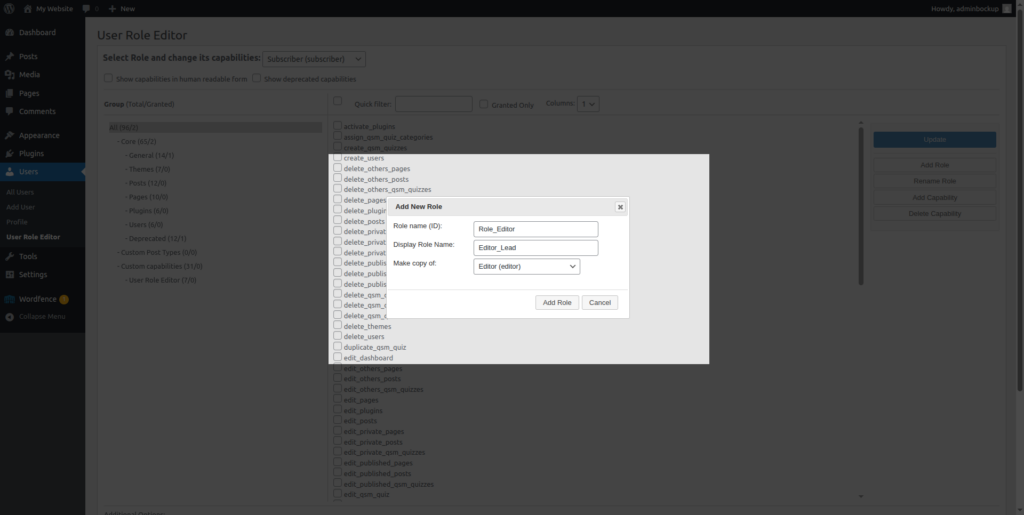
- Click on Add Role button
- Enter a unique role name and display name.
- Choose an existing role to copy permissions from (this saves time and reduces errors)
- Save your new role and fine-tune permissions if necessary
Pro tip:
Starting with a copy of an existing role is much safer than building everything from scratch.
How to Remove a User Role Using a Plugin
Cleaning up unused roles helps keep your website organized and secure. To delete a role:
- Navigate to the Users >> User Role Editor section.
- Click on the Delete Role button
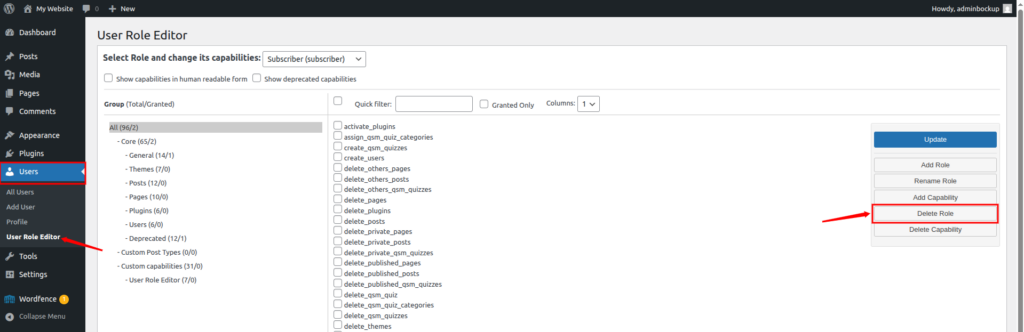
- Select the role you want to delete and click on the Delete Role button.
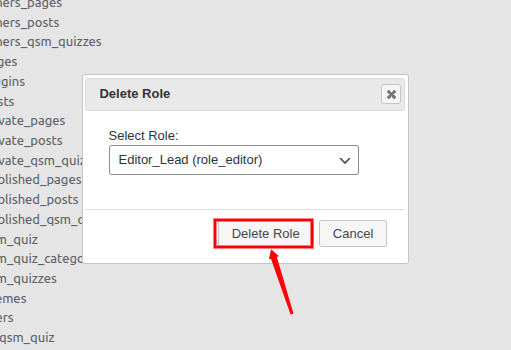
Before you delete anything, make sure that no users are currently assigned to that role. If they are, reassign them to another role first to avoid access issues.
Method 2: Managing Roles Manually with Code (For Advanced Users)
If you prefer full control, you can manage roles manually using code. However, this approach is best suited for developers or users comfortable working with PHP.
These changes are typically made in the functions.php file of your theme or through a custom plugin.
Creating a User Role with Code
To create a new role manually, WordPress provides the add_role() function. This allows you to define a role and assign specific permissions.
While this method gives you complete flexibility, it also requires a good understanding of how WordPress capabilities work.
Important tip:
Always test your code on a staging site before applying it to your live website.
Editing or Removing Permissions via Code
You can also adjust permissions for existing roles using functions like:
- add_cap() to grant permissions
- remove_cap() to restrict permissions
Even a small mistake here can cause serious issues, such as locking yourself out of the dashboard or exposing sensitive settings.
A Quick Word of Caution
When working with user roles, especially manually, remember that these changes directly affect real users.
So always:
- Test changes before going live
- Keep proper backups
- Document what you modify
- Avoid experimenting on your live website
Taking these precautions will save you from unnecessary headaches later.
Quick tip:
Always double-check permissions before saving changes. One small mistake can give users access you didn’t intend.
Smart Ways to Manage User Roles and Permissions
Over time, I’ve realized that good role management isn’t just about assigning permissions, it’s about maintaining control without creating confusion.
Here are some tips that can make a difference:
- Give only necessary access: Avoid the temptation to assign higher roles “just in case.” Keep permissions minimal.
- Review users regularly: People join and leave teams. Make it a habit to check user roles every few months.
- Limit admin accounts: Too many administrators increase the chances of accidental or harmful changes.
- Use reliable plugins: If you’re customizing roles, stick to well-maintained plugins to avoid security issues.
- Keep backups ready: Before making major changes, always have a backup. It’s your safety net.
Using Plugins for Advanced Role Management
Sometimes, default roles aren’t enough. That’s where plugins come in.
Popular options include:
- User Role Editor
- Members plugin
- Advanced Access Manager
With these tools, you can:
- Create custom roles
- Modify permissions
- Restrict specific actions
It’s like upgrading from a basic lock to a smart security system.
Common Mistakes to Avoid
I’ve seen many people make these mistakes, and they can be costly.
1. Giving Admin Access Too Freely
Not everyone needs full control.
2. Ignoring User Cleanup
Old accounts can become security risks.
3. Not Using Role-Based Access
Everyone shouldn’t have the same permissions.
4. Skipping Backups Before Changes
Always have a safety net.
Fixing Common Problems with WordPress User Roles
Sometimes things don’t work the way you expect, and user roles are no exception. Here are some of the common problems and tips on how you can handle them:
1. Users can’t access what they should
This usually happens when permissions are too restricted. Double-check the assigned role.
2. Users have too much access
If someone can do more than they should, review and adjust their role immediately.
3. Changes not applying properly
This can be caused by plugin conflicts or caching. Try clearing cache or disabling plugins one by one.
4. Missing roles or broken permissions
Sometimes updates or plugins can affect roles. Re-saving settings or using a role editor plugin can fix this.
5. Login or access errors
If a user suddenly can’t log in or access certain areas, reset their role or password.
Pro tip:
Whenever something feels off, start by reviewing roles and permissions, it’s often the root of the problem.

How to Audit and Monitor User Activity
Want to know who did what on your site? You should.
Ways to monitor activity:
- Use activity log plugins
- Track login attempts
- Review content changes
This helps you quickly spot suspicious behavior and take action.
Managing Your WordPress Site Made Easier with ServerAvatar
If you’re managing a WordPress website, handling users, permissions, backups, and overall server performance can quickly become overwhelming, especially as your website grows. That’s where ServerAvatar comes in.
ServerAvatar is a platform designed to simplify the hosting and management of servers and web applications. Whether you’re running a WordPress site, a PHP application, or even a Node.js project, it helps you handle everything from a single, easy-to-use dashboard without needing deep technical knowledge.
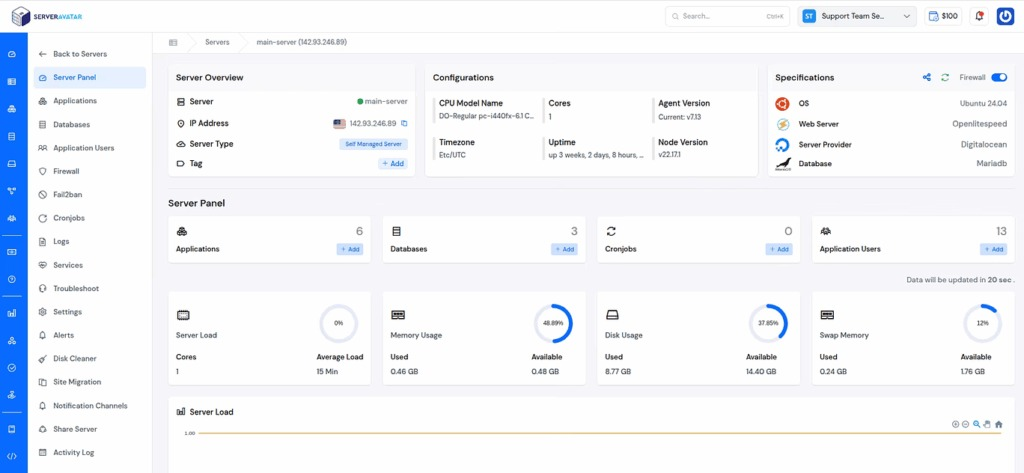
With ServerAvatar, you can:
- Deploy and manage PHP and Node.js applications effortlessly
- Deploy WordPress, Mautic, N8N, UptimeKuma, and many more popular applications with its one-click application installer
- Monitor server performance in real-time
- Set up automated backups to keep your data safe
- Manage databases, files, and services without complex commands
- Improve security with built-in features
- Manage all your servers and applications from a single dashboard
Instead of juggling between multiple tools and platforms or struggling with manual server management, ServerAvatar gives you a streamlined experience so you can focus more on your website and less on technical maintenance.
Final Thoughts
Managing user roles in WordPress isn’t just a technical task, it’s a smart way to protect your website, streamline teamwork, and avoid unnecessary risks. By assigning the right permissions to the right people, you create a secure and well-organized environment where everyone knows their responsibilities. Whether you’re using default roles, creating custom ones, or managing permissions with plugins or code, the key is to stay intentional and cautious. Combine proper role management with regular monitoring and backups, and you’ll have full control over your site without the stress of unexpected issues.
FAQs
1. What is the most important WordPress user role?
The Administrator role is the most powerful, as it has full control over the website. It should only be assigned to trusted users.
2. Can I create custom user roles in WordPress?
You can create custom roles using plugins like User Role Editor or by adding code manually for more advanced control.
3. How do I change a user’s role in WordPress?
Go to the Users section in your dashboard, edit the user, select a new role from the dropdown, and click “Update User.”
4. What happens if I assign the wrong user role?
Assigning the wrong role can either restrict access too much or give users more control than needed, which can lead to errors or security risks.
5. Are plugins safe for managing user roles?
As long as you use well-maintained and trusted plugins. They simplify role management and reduce the chances of mistakes.
6. How often should I review user roles?
It’s a good practice to review user roles every few months or whenever there are changes in your team.