Migrate WordPress from shared hosting to a reliable cloud server with ServerAvatar to boost your website’s performance, security, and scalability. In this blog, we’ll guide you through the best and easiest ways to manage the migration seamlessly.
Why Move from Shared Hosting to ServerAvatar?
Shared hosting often limits resources and performance. With ServerAvatar, you can host your WordPress site on a powerful cloud server (like DigitalOcean, Linode, AWS, or any VPS) and manage it easily using an intuitive control panel. It gives you more freedom, speed, and control, especially important for growing websites.
Here We Discuss Two Method Of Site Migration:-
1st Method: With WordPress Plugin Method
2nd Method: With Manual Method
1. With WordPress Plugin Method:
Here’s a list of widely used plugins for migrating WordPress websites:
- All-in-One WP Migration – Recognized for its user-friendly interface and easy drag-and-drop migration process.
- Duplicator – Ideal for complete website transfers, cloning, and creating backups.
- UpdraftPlus (Premium) – Primarily a backup tool, but the premium version enables seamless site migration.
- Migrate Guru – Built to efficiently manage large website transfers, and powered by the BlogVault infrastructure.
- WPvivid Backup Plugin – Provides a full suite of features for backing up, restoring, and migrating websites.
- BackupBuddy – A premium tool by iThemes offering complete website migration and robust backup management capabilities.
- Jetpack VaultPress Backup – Part of the Jetpack suite, this premium tool provides reliable backup and migration support.
- Super Backup & Clone – A paid plugin designed for easy site cloning and backup tasks.
Migrate Using the WP All-in-One Migration Plugin
This is a plugin-based, manual migration method suitable for users who are comfortable working inside the WordPress dashboard.
Step-by-Step Guide:
Follow the below steps for exporting your current WordPress Site that is hosted on your current server:
- Log in to WordPress Site Admin Panel:
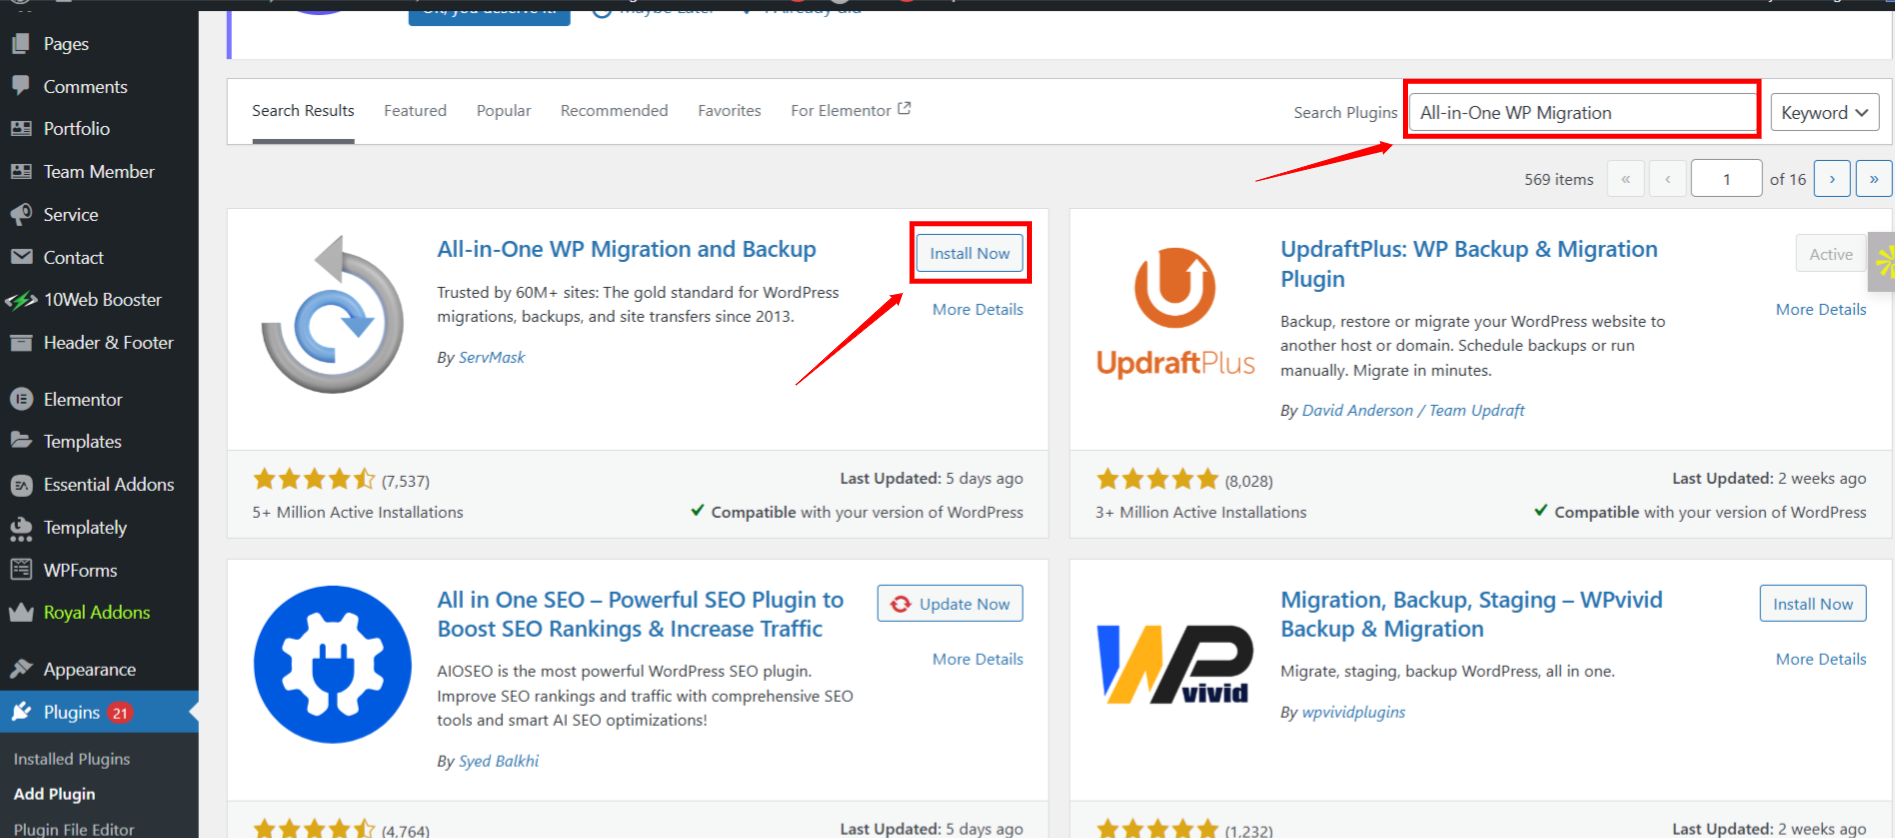
Use your current admin credentials to access the WordPress dashboard. - Install WP All-in-One Migration Plugin:
- Go to Plugins > Add New
- Search for “All-in-One WP Migration”
- Click Install Now, then Activate

Export Your Website:
- Navigate to All-in-One WP Migration > Export
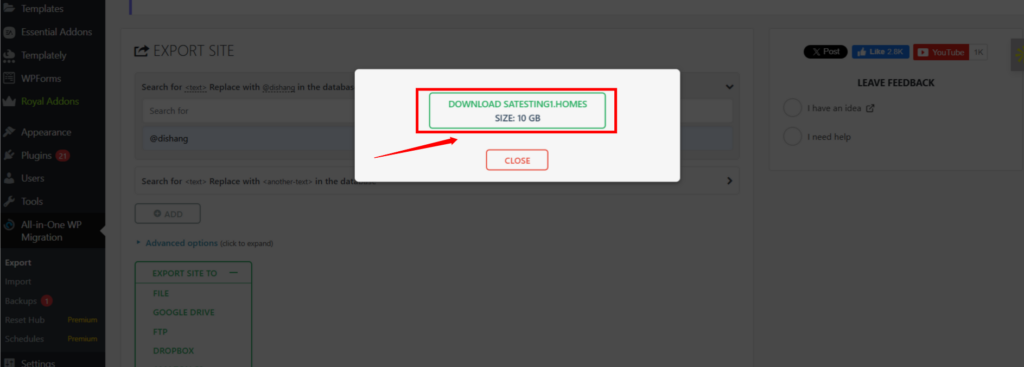
- Choose Export to File
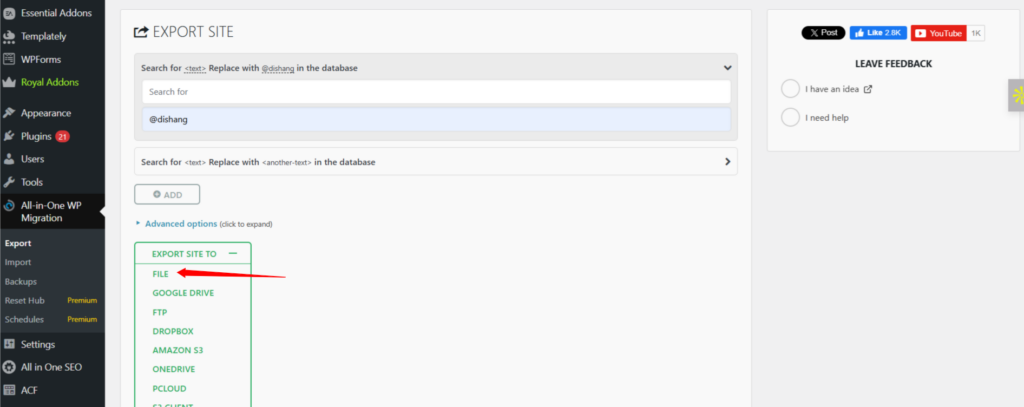
- Wait for the export to complete
- Download the export file to your computer
Follow the steps below on the server you want to migrate your WordPress Website:
I’m using ServerAvatar, the server and application management panel here, for further processing to migrate the WordPress website.
I already have the server connected to my ServerAvatar account. If you haven’t connected your server yet, refer to the ServerAvatar product documentation for connecting the server to ServerAvatar.
Let’s move further and follow the steps below:
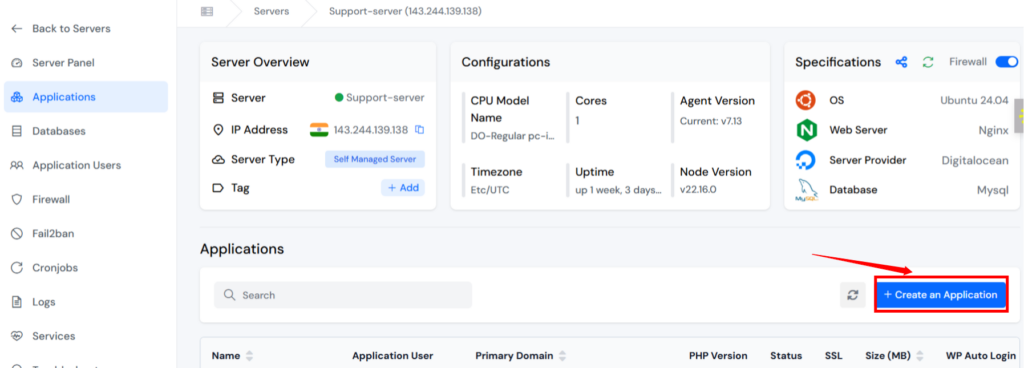
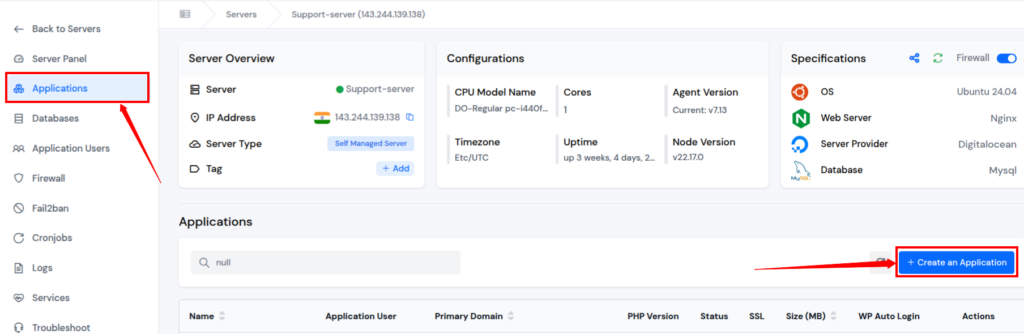
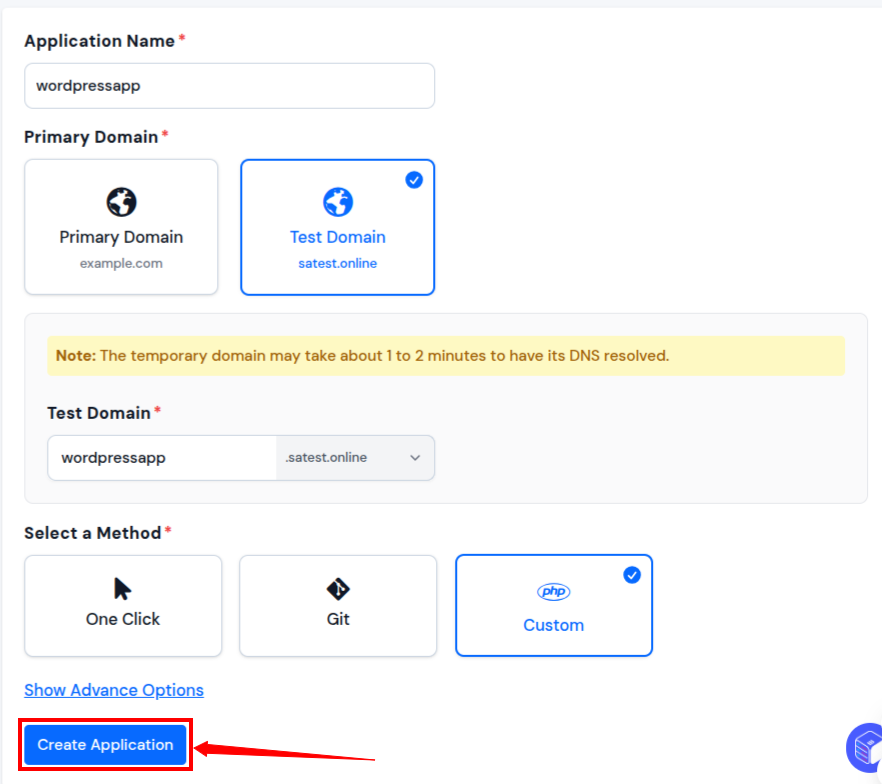
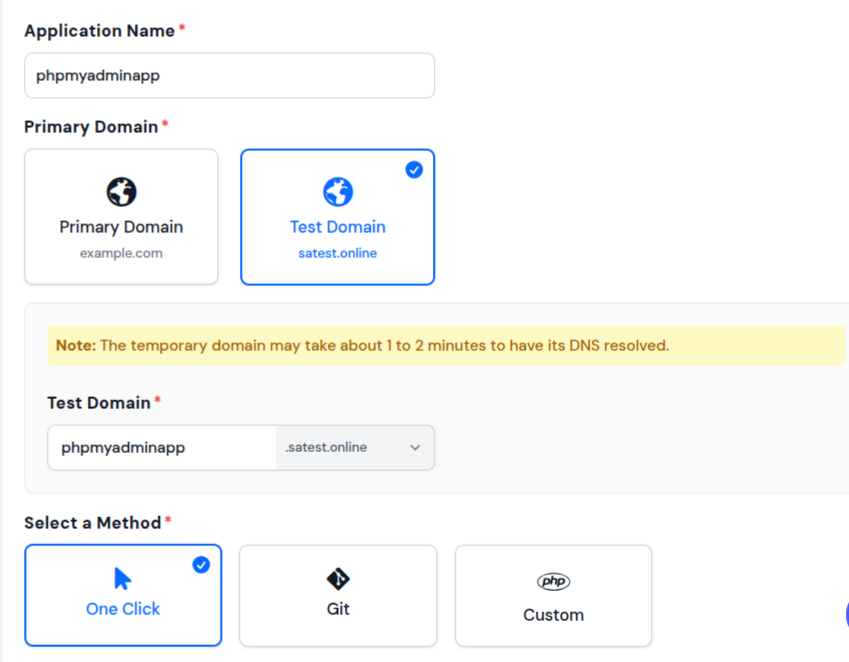
1) Create a new WordPress application:
- Log in to your ServerAvatar account
- Go to Applications > Create Application
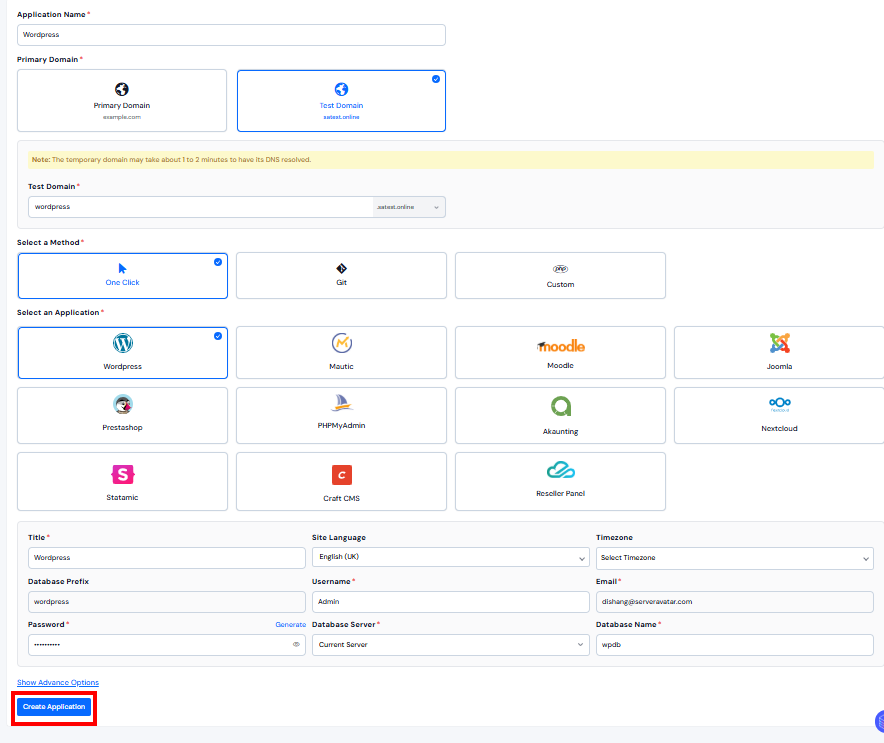
- Give the Name of the Application as per your requirements
- Select the domain from Primary Domain or Test Domain (provided by ServerAvatar) and give a domain name
- Select the installation method as a One-Click
- Select WordPress as an application
- Enter the required details for your WordPress Application as shown in the below given image.
- Click on the “Create Application” button. You application will be created within just a few minutes.
Log in to the WordPress application’s admin panel by using the credentials set during the installation process.
2) Install WP All-in-One Migration Plugin for WordPress application:
- Go to Plugins > Add New
- Search for “All-in-One WP Migration”
- Click Install Now, then Activate
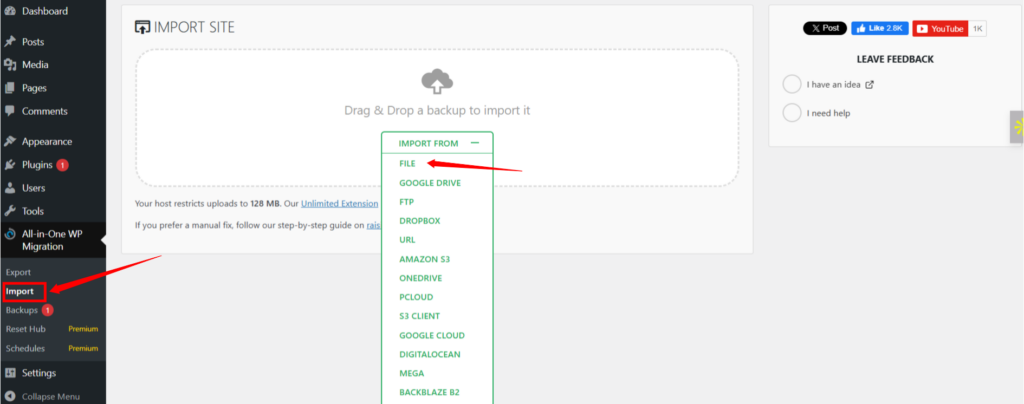
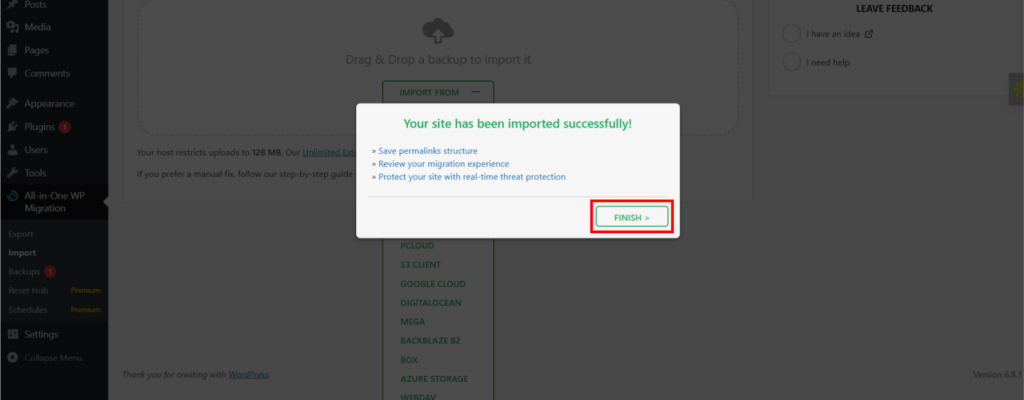
- Upload the previously exported file
- Wait for the process to finish
- Click on “Proceed” button when prompted to replace website data

3) Save Permalinks:
- Go to Settings > Permalinks
- Click Save Changes (without editing anything)
4) Check Everything:
- Visit your domain to ensure the site is loading properly
2. With Manual Method:
Step 1: Connect to the Source Server via SSH
- Use SSH command to access the server where your current WordPress website is hosted:
ssh your-username@source-server-ip- Replace your-username and source-server-ip with your actual username and server IP address.
Step 2: Navigate to your WordPress Directory
- Usually, WordPress is located at /var/www/html directory, but your path might be different based on your hosted application.
- Use the cd command to navigate to your WordPress directory.
cd [path of your WordPress directory]Step 3: Backup the WordPress Files
- Let’s now compress all the WordPress files into a single archive file using tar command, so creating the backup will be easy:
- I’m using the below command, as I’m compressing wordpress-files here.
tar -czvf wordpress-files.tar.gz .In the above command:
- tar: It is the command to archive the files.
- -c: Creates a new archive.
- -z: Compress the archive using gzip.
- -v: It is Verbose mode that lists files being archived.
- -f: It is the used as a File that specifies the name of the archive file to create
This creates a file called wordpress-files.tar.gz containing all files in the current directory (themes, plugins, uploads, etc.).
Step 4: Export the MySQL Database
- Use mysqldump command to export your WordPress database:
mysqldump -u db_user -p db_name > wp-database.sqlIn the above given command:
- Replace db_user with your database username
- Replace db_name with your WordPress database name
- Replace wp-database.sql with the file name you want to give that contains your database details
- You’ll be prompted to enter the database password
This command will generates wp-database.sql, that is a text file containing your entire database.
Step 5: Create a Custom PHP app using ServerAvatar:
- Log in to your ServerAvatar account. Follow the ServerAvatar product documentation for connecting your server to ServerAvatar.
- Navigate to the server dashboard and click on the “Applications” section.
- Click on the “Create Application”.
- Give the application name, select the domain for your application from Primary Domain or Test Domain (provided by ServerAvatar), and give a domain name.
- Select the installation method as CustomPHP, and click on the “Create Application” button.
Note: Read the complete doc on how to create the CustomPHP Application.
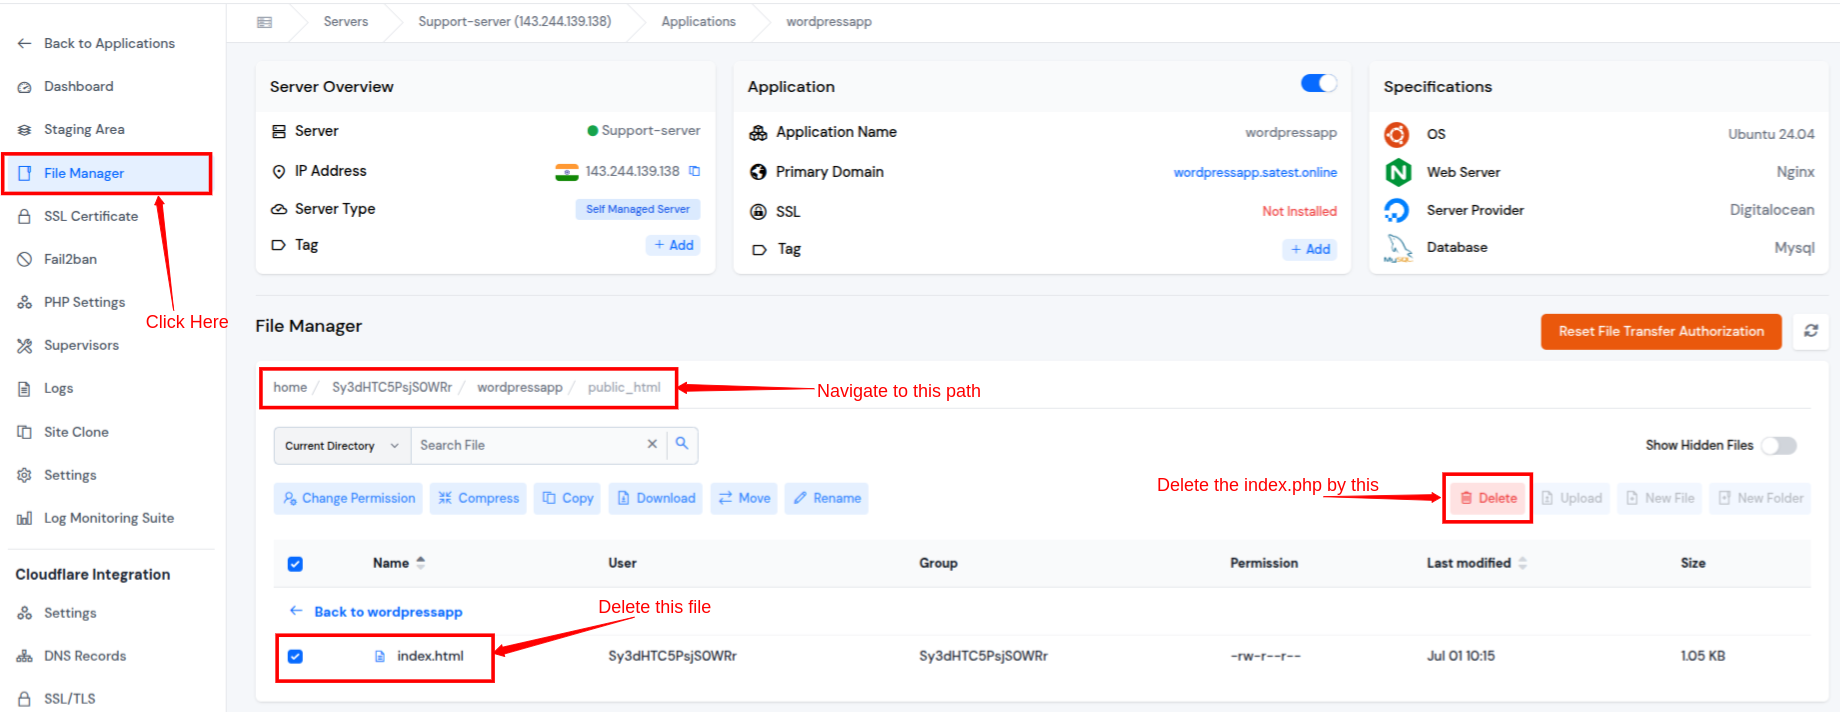
Step 6: Delete “index.html” file
- After creating the application, navigate to the application dashboard.
- Go to the “File Manager” from the left-hand sidebar. Inside the file manager, navigate to the “public_html” folder and delete the index.html file.
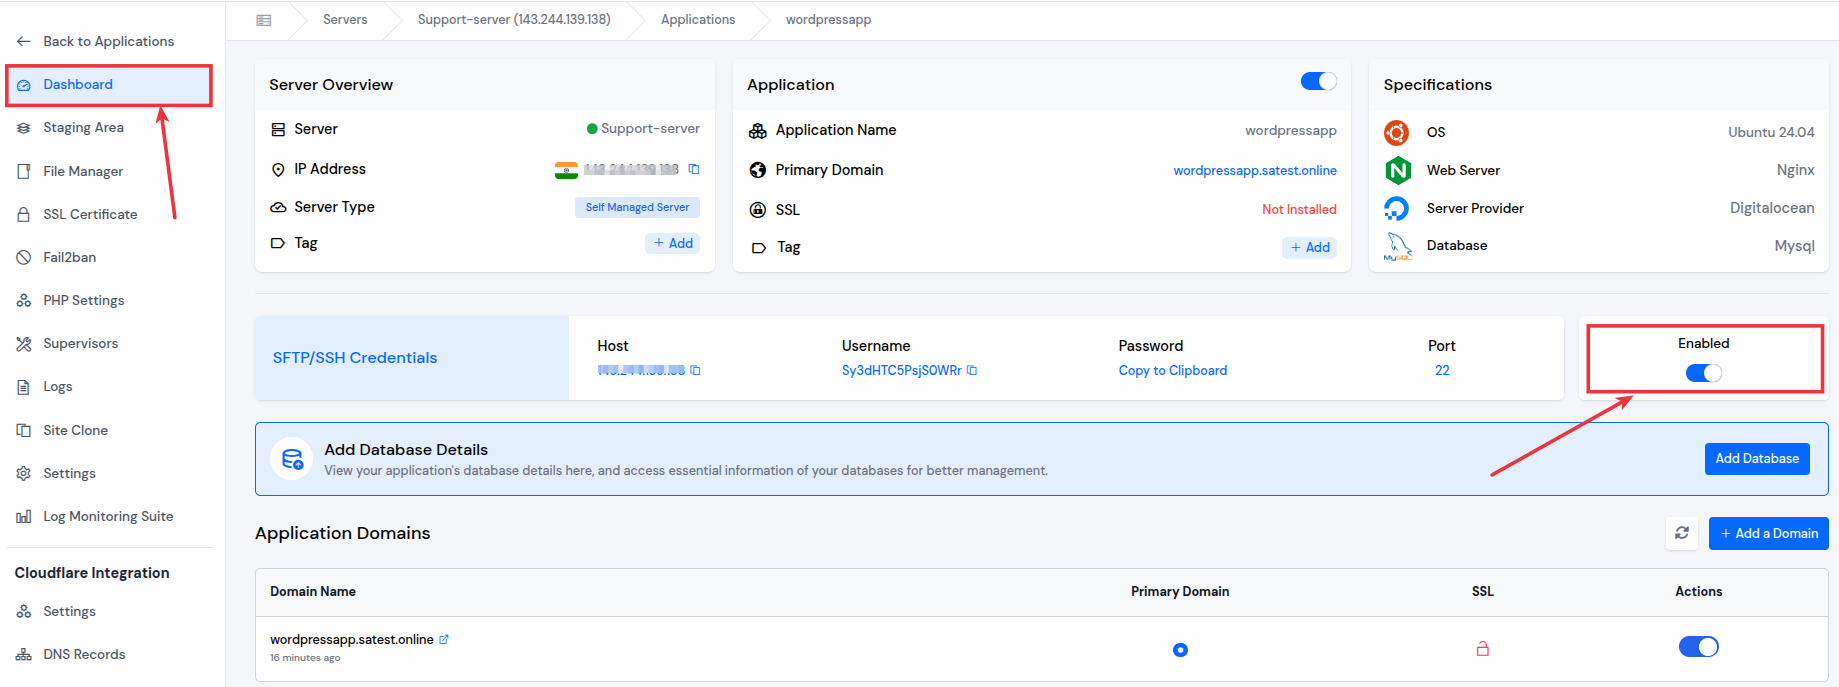
If you want to delete the “index.html” file through command line, follow the steps below:
- Navigate to the application dashboard and enable the “SFTP/SSH Credentials” for your application.
Login to your server by using this credentials and the command below.
ssh username@IP_addressEnter the username and IP address as mentioned in the panel.
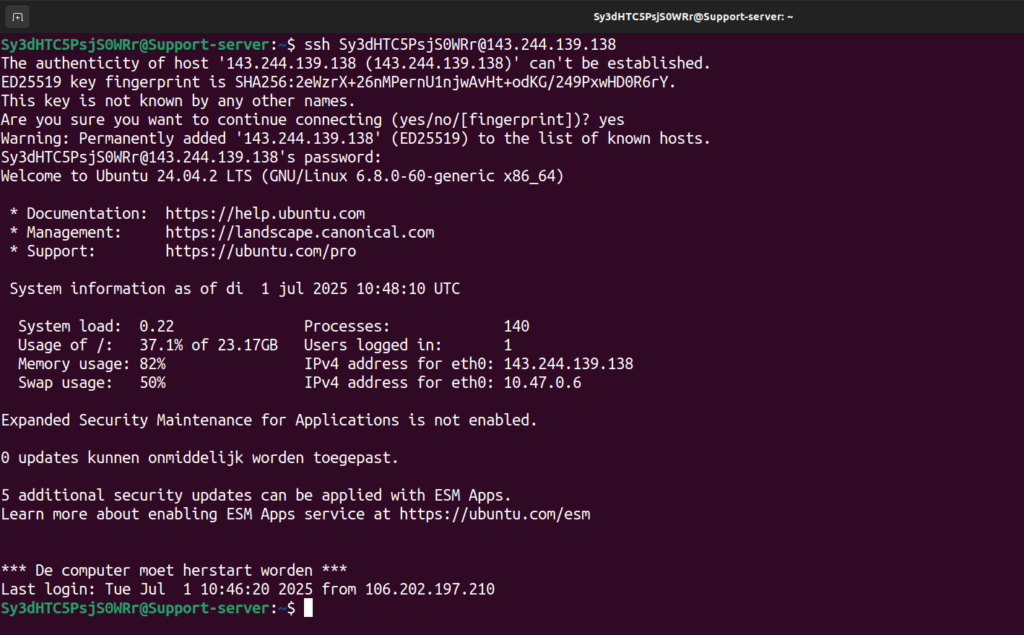
Navigate to the public_html directory of your application. Use cd command to navigate to the directory.
cd /yourapplicationname/public_html/ - Use ls command to list out the files of the directory.
- Use rm command to delete the index.html file.
rm index.html
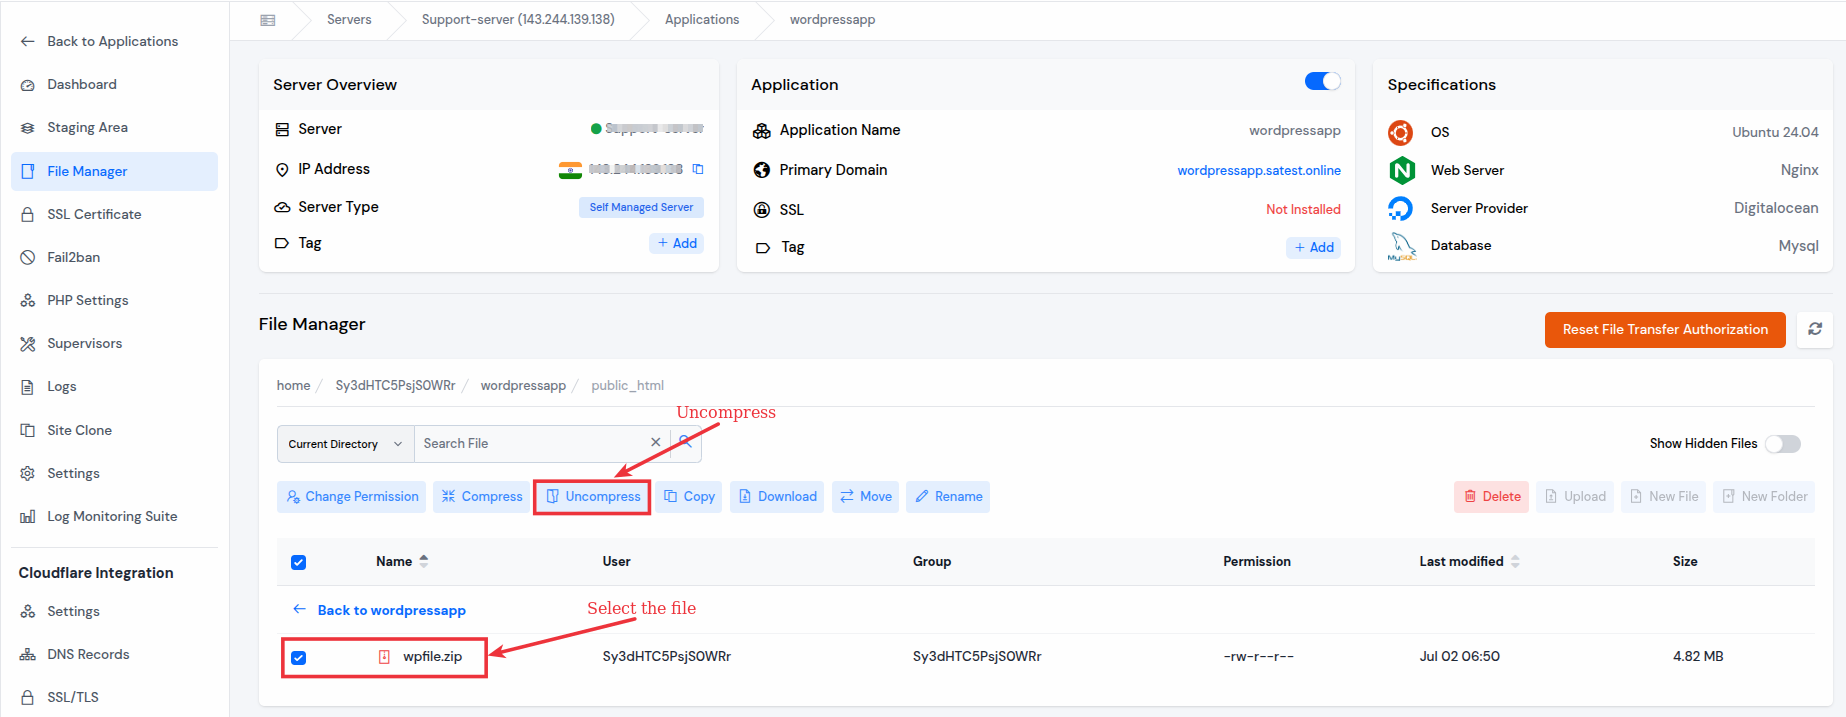
Step 7: Upload WordPress application’s zip file
- Upload your WordPress application’s zip of file via file manager in “public_html” directory.
Note: Don’t refresh the page or navigate to a different tab or section while your file is uploading.
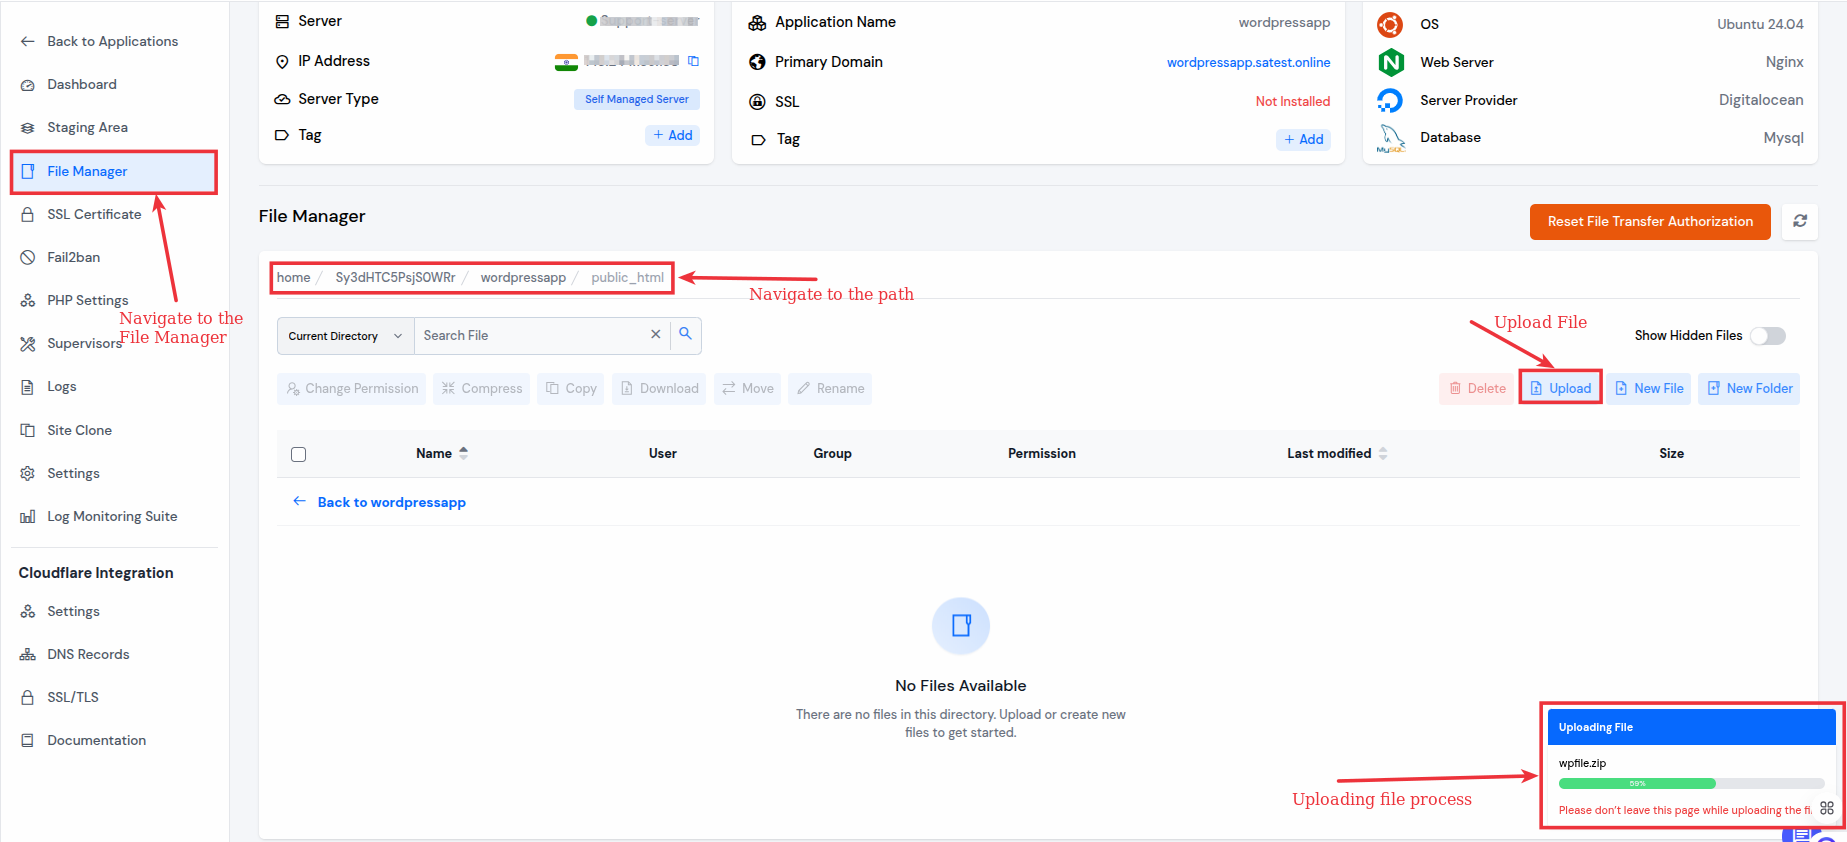
Extract the WordPress application’s zip file by selecting it and using “Uncompress” button.
If you want to upload your WordPress application’s zip file through command line, follow the steps below:
There will be two possible situations:
1) If your backup is stored on a local system:
- Use the below command:
rsync -avz /path/to/local/files/ username@remote_host:/home/appuser/applicationname/public_html/In the above command remote_host means the server ip of the local server that is connected to ServerAvatar.
2) If your backup is stored on another server:
- Use scp command to securely copy files to the new server:
scp wordpress-files.tar.gz wp-database.sql user@destination-server-ip:/home/user/- Replace user and destination-server-ip with your user and server IP address of your destination server.
- Use the below command to extract the files:
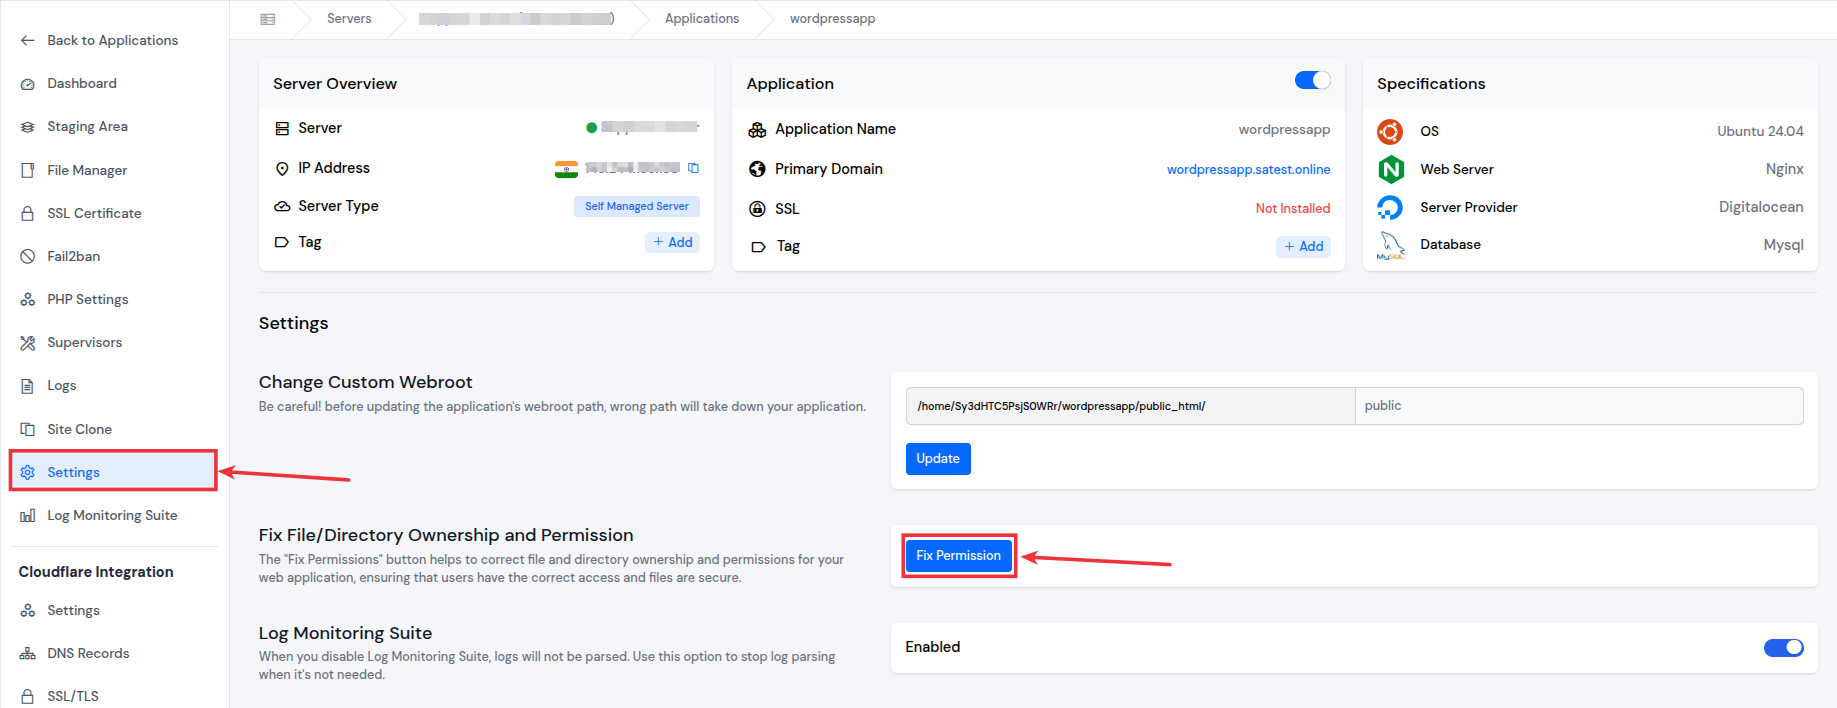
tar -xzvf filename.tar.gzStep 8: Fix Permission for Application
- Go to the “Settings” from the left-hand sidebar of the Application Panel. Click on the “Fix Permission” button for fixing the file and directory ownership and permission.
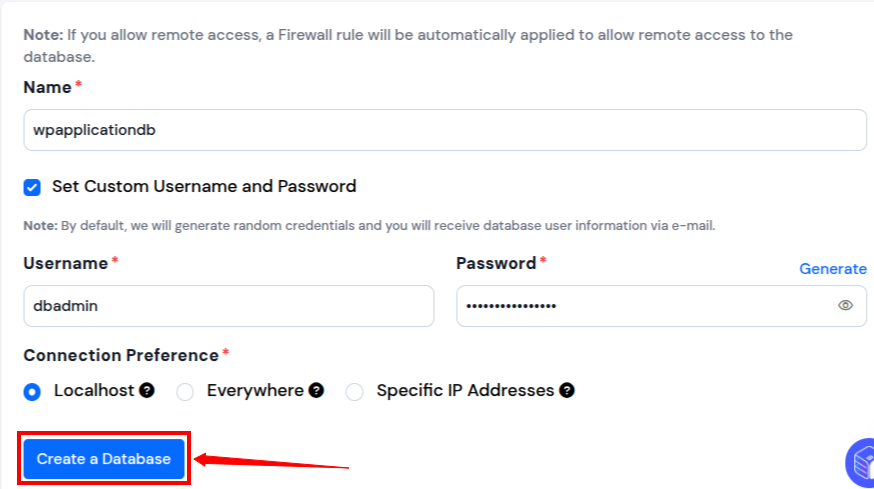
Step 9: Create a Database
- Navigate to the “Database” section in the server panel and create a new database for your application.
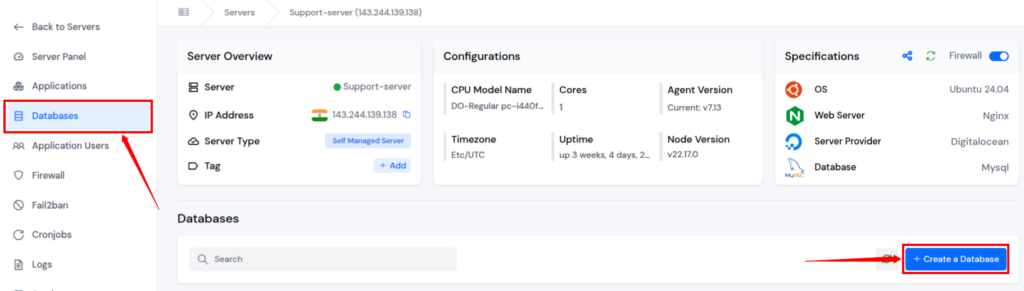
- Give your Database a name and click on the check box if you want to set your custom username and password.
- Select your connection preference. Click on the “Create a Database” button.
If you want to create a Database through command line, follow the steps below:
- Let’s open the MySQL using the root as a user:
mysql -u root -p- You will be prompted to enter the password.
- Once inside, run the following to create a database and a user:
CREATE DATABASE new_db_name;
CREATE USER 'new_user'@'localhost' IDENTIFIED BY 'your_password';
GRANT ALL PRIVILEGES ON new_db_name.* TO 'new_user'@'localhost';
FLUSH PRIVILEGES;
EXIT;- CREATE DATABASE: It will create a database
- CREATE USER: It will create a user for your database
- GRANT ALL PRIVILEGES: This will give all the permissions to the user for the database
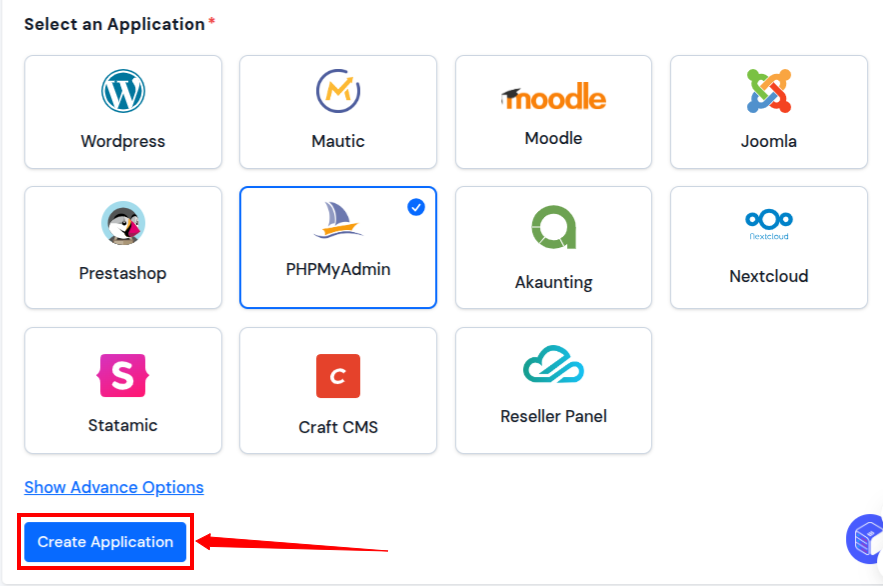
Step 10: Create a PHPMyAdmin
- Go to the server dashboard and create a phpMyAdmin application by clicking on “Create Application” and selecting One-Click as a method.
Step 11: Increase the upload limit of PHPMyAdmin
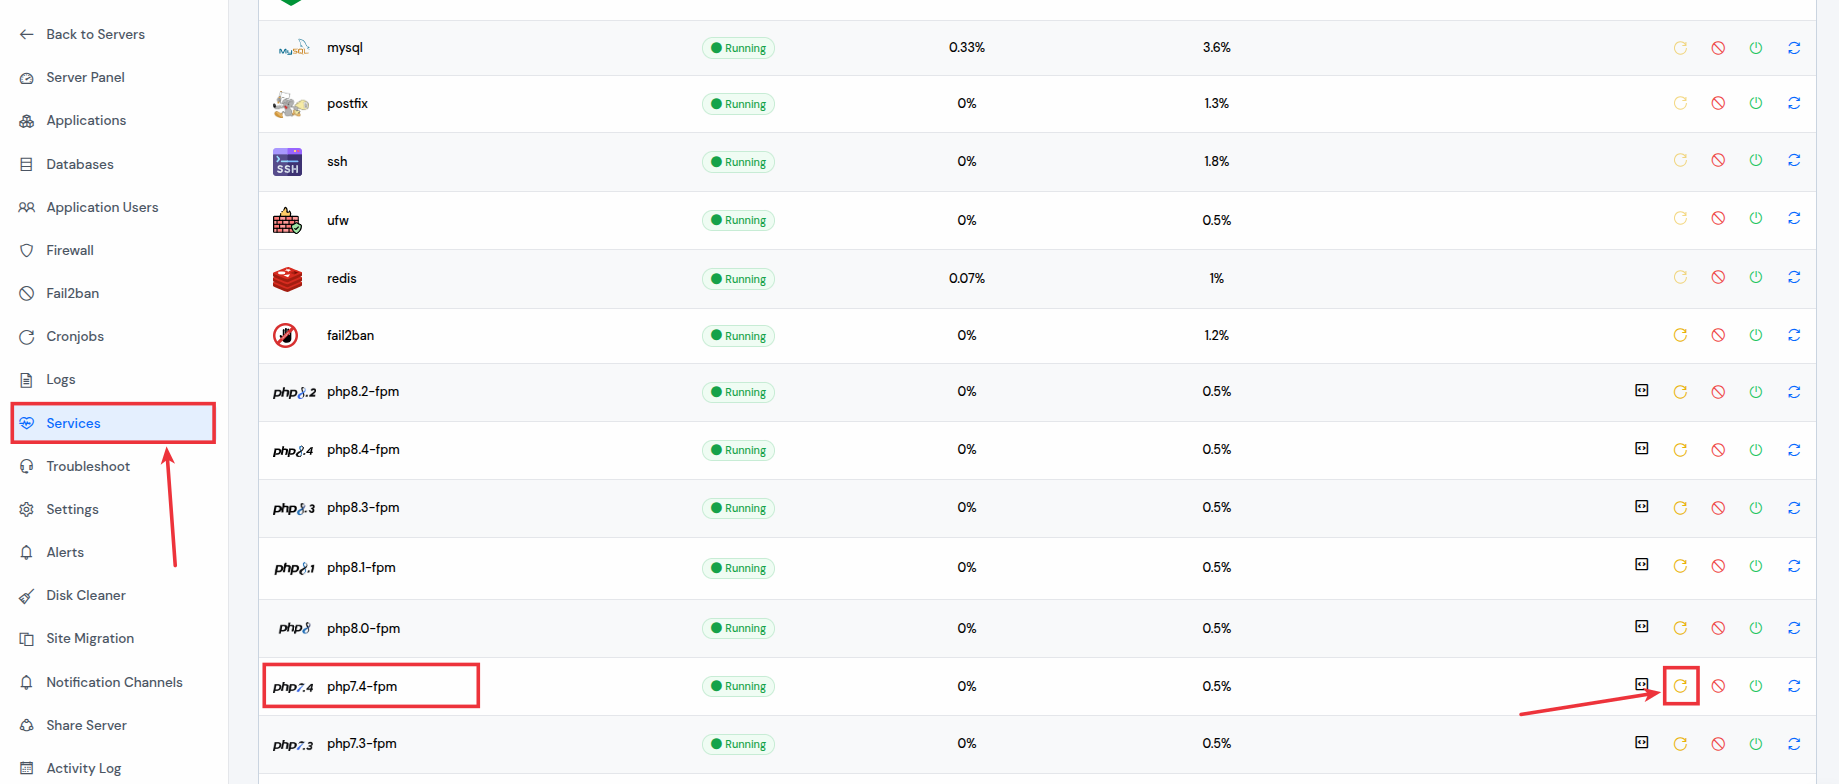
- Go to PHP Settings of PHPMyAdmin and increase the “upload_max_filesize” and “post_max_size” as per your DB .SQL backup file size
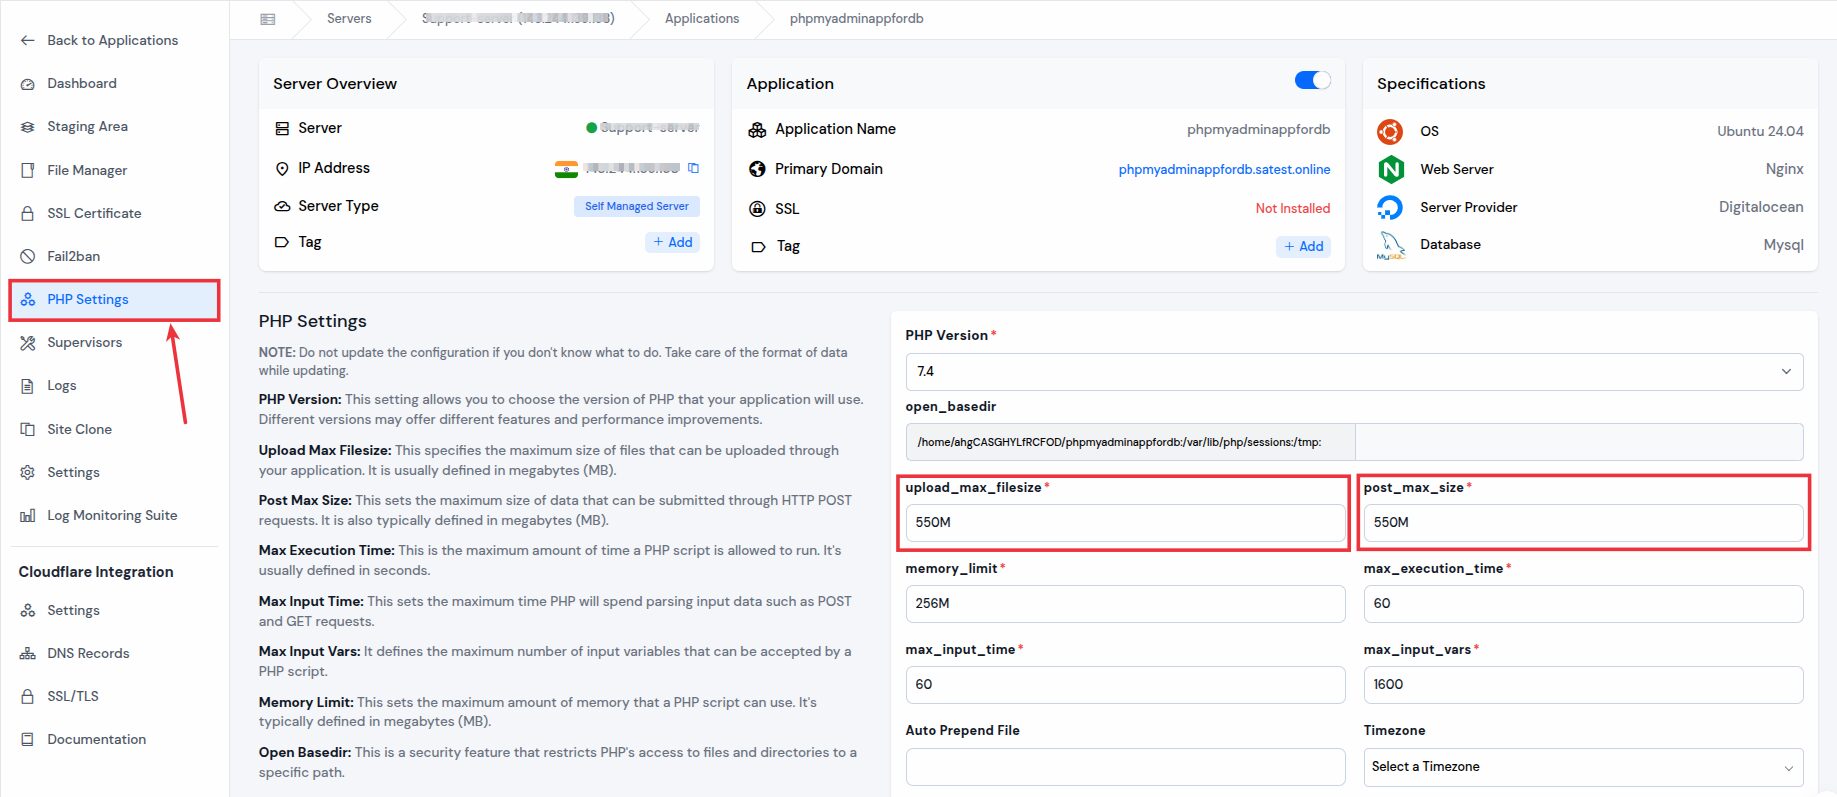
- Now, restart your PHP version service from the services section on the left-hand sidebar of the server panel.
Step 12: Upload WordPress database .sql file
- Now, open the PHPMyAdmin by navigating to the link of the application.
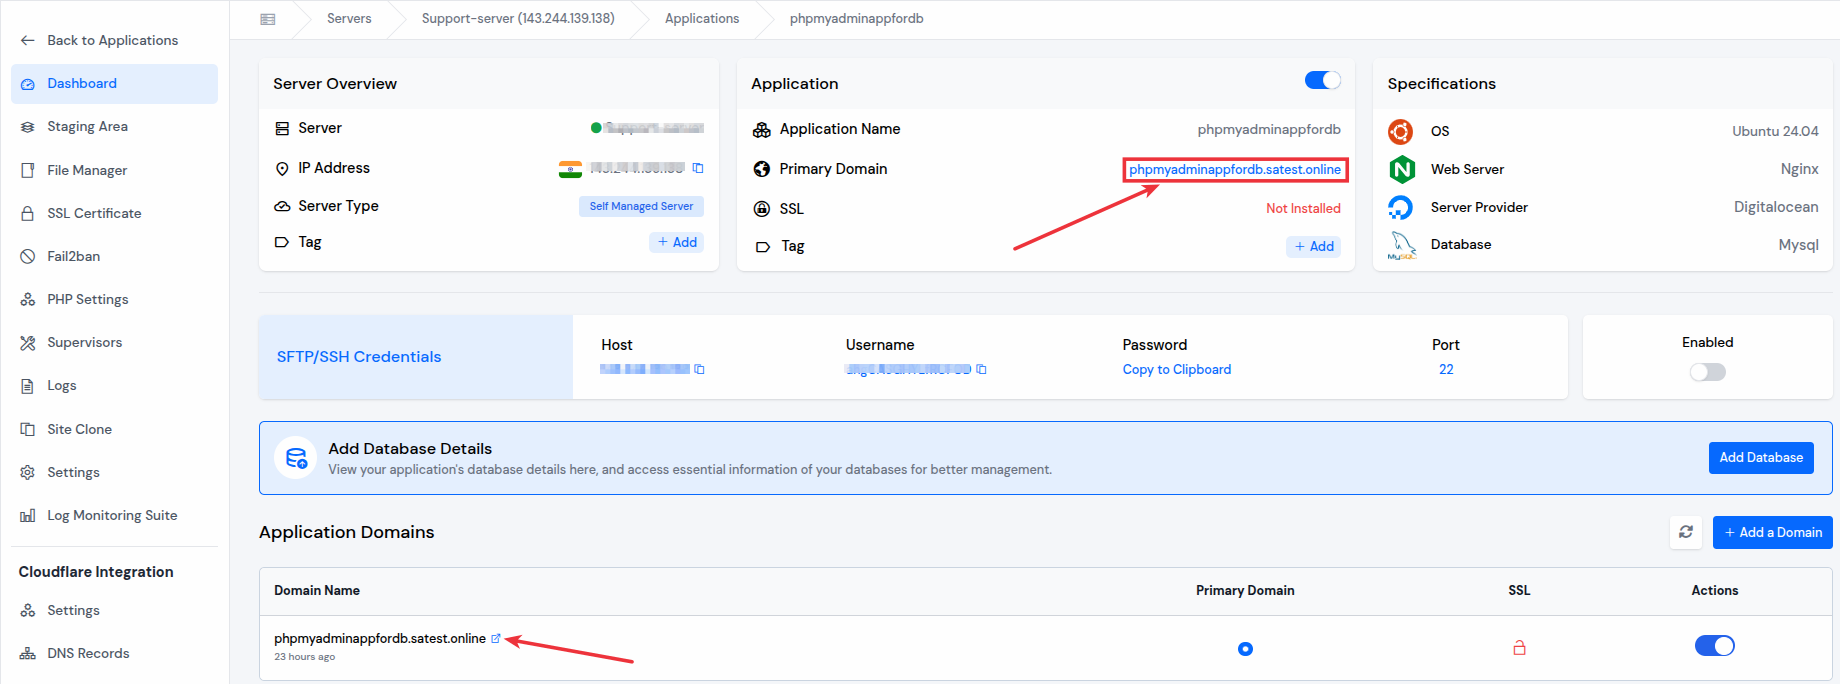
- Use the database credentials to login that you have set before while creating the application.
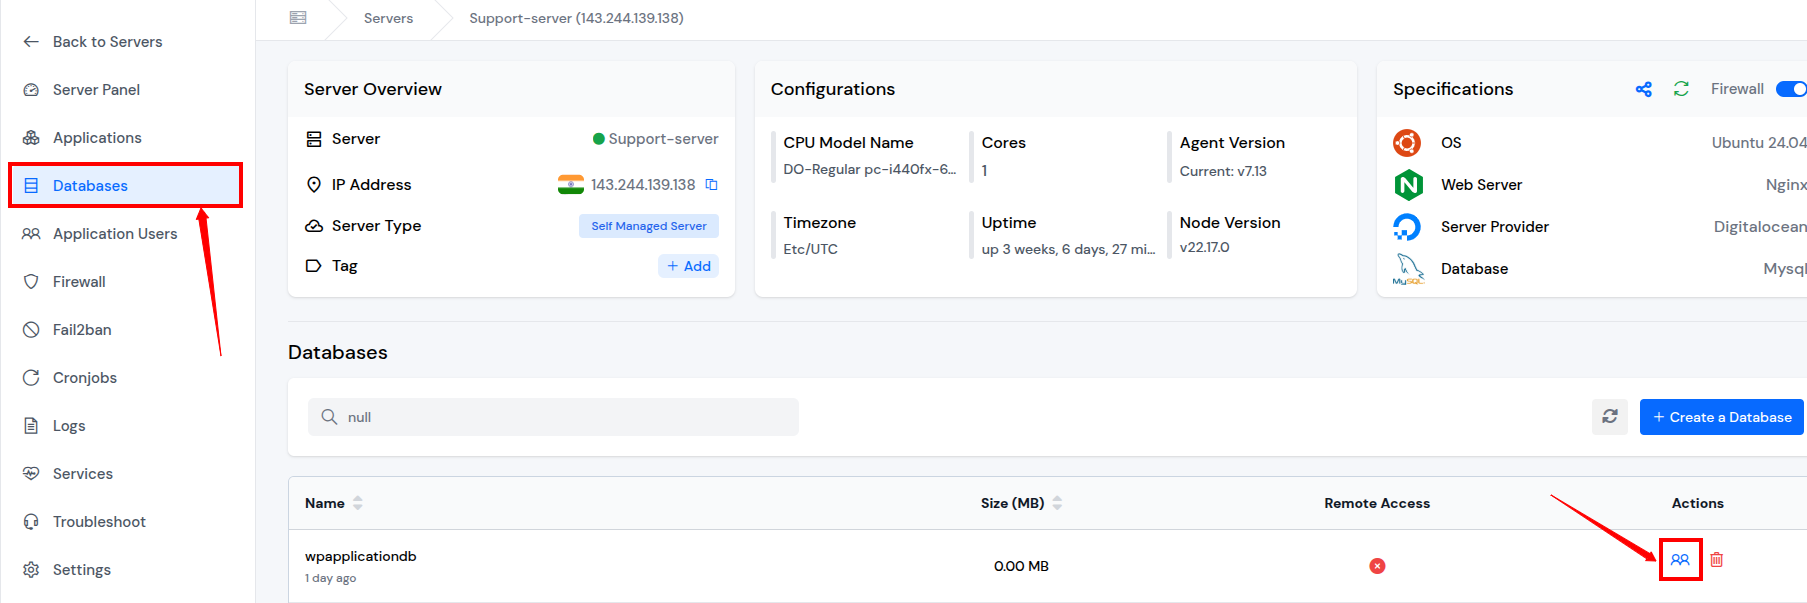
- Go to the “Database” section from the server panel and click on “manage users” icon next to your database as shown in the image below.
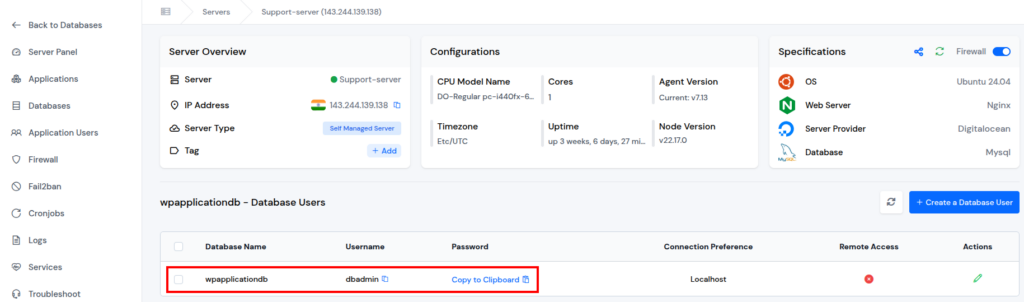
- Copy your database username and password from there as shown in the image below. Use the credentials to log in to the PHPMyAdmin.
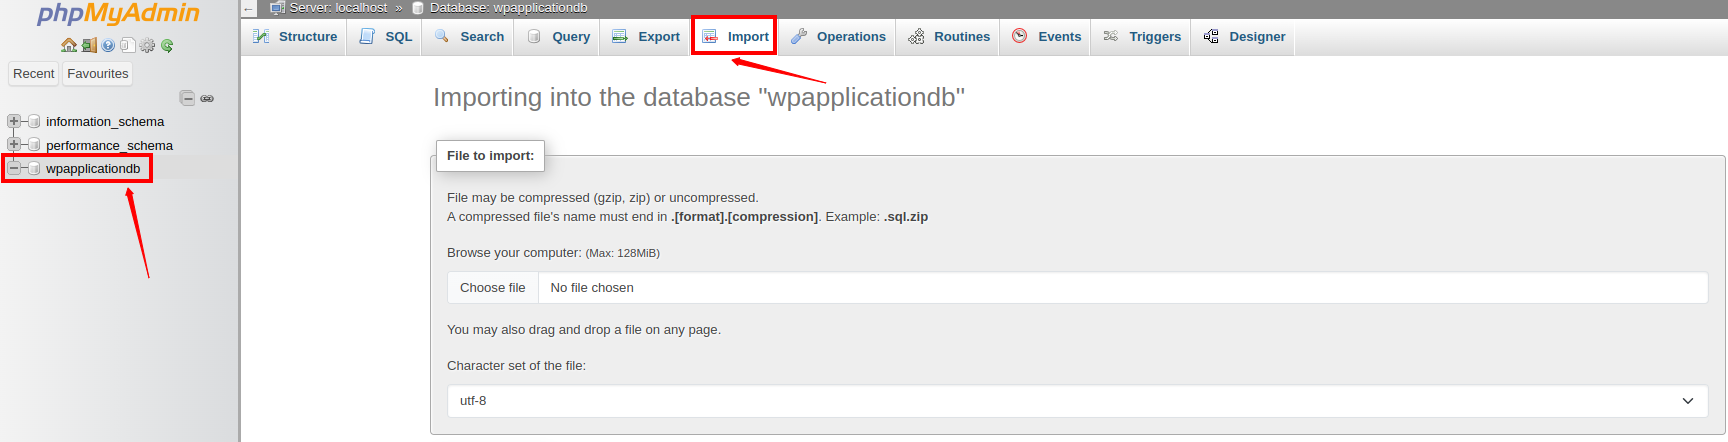
After logging in, select your database which previously created, and click on the “Import” option to upload your existing WordPress database .sql file.
Note: Read the complete doc on how to create the database, and PHPMyAdmin Application.
Step 13: Update wp-config.php file
- Edit your wp-config.php file to match the new database credentials.
- Navigate to the File Manager from application panel sidebar, go to the public_html directory and open the “wp-config.php” file to edit.
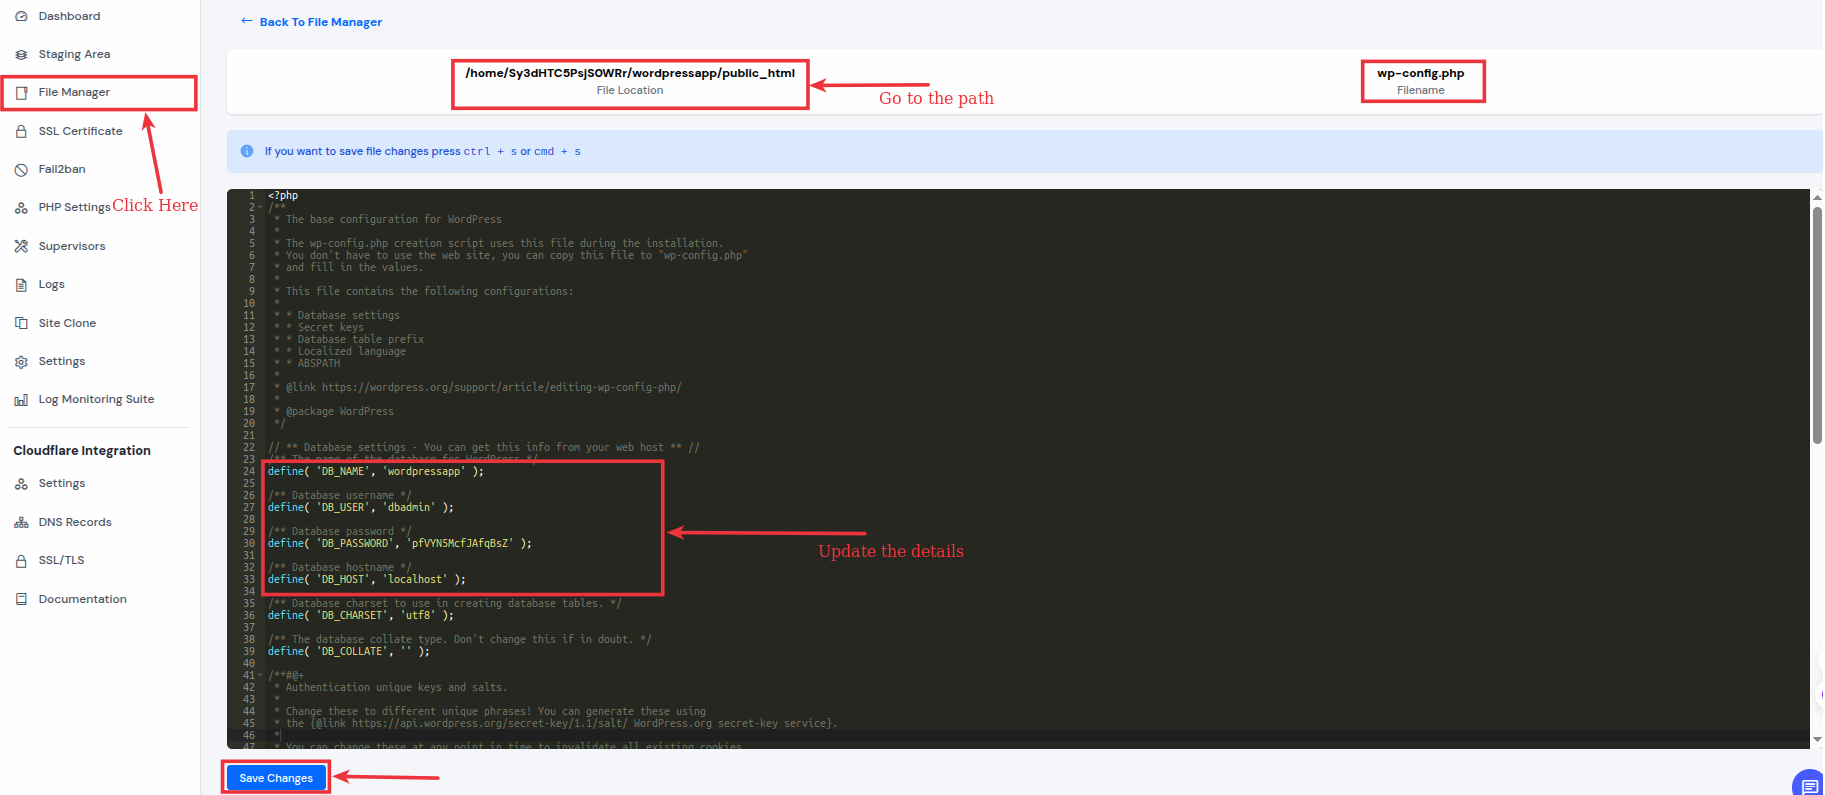
Update the following lines:
define('DB_NAME', 'new_db_name');
define('DB_USER', 'new_user');
define('DB_PASSWORD', 'your_password');
define( 'DB_HOST', 'your_host');- Enter your new database name at the place of new_db_name
- Enter your new database username at the place of new_user
- Enter your new database password at the place of your_password
- Enter your database host at the place of your_host
Click on the “Save Changes” button after updating the details.
Your WordPress site is now migrated with the manual method!
Open your domain or the www version of your domain in a browser to verify.
🚨 Note: Don’t hesitate to contact the ServerAvatar support team if you face any issues or troubles while migrating your application or if you have any queries: http://support.serveravatar.com/
- ServerAvatar support is available 24/7 through real-time chat to help you with any issues and provide assistance whenever you need it.
Conclusion
Migrating your WordPress website from shared hosting to a cloud server using ServerAvatar is a smart move for anyone looking to improve site performance, security, and scalability. Whether you choose the plugin-based method for simplicity or the manual method for full control, ServerAvatar makes the entire process seamless and beginner-friendly.
With an intuitive dashboard, one-click WordPress setup, and powerful server management tools, ServerAvatar takes the complexity out of hosting, so you can focus on growing your website, not managing servers.
Start your migration today and experience the speed, flexibility, and reliability of cloud hosting with ServerAvatar!