
Have you ever updated a website and suddenly something broke? A page didn’t load, a form stopped working, or worse, the entire site went down. Frustrating, right? This is exactly where a staging environment saves the day.
Think of a staging environment like a rehearsal before a live show. Actors don’t walk straight onto the main stage without practice. In the same way, your website changes shouldn’t go live without testing. A staging environment gives you a safe space to experiment, test updates, and fix issues before real users see them.
In this complete guide to setting up a staging environment, we’ll break everything down in simple terms. No confusing tech talk. No unnecessary complexity. Just clear, practical guidance anyone can understand.
What Is a Staging Environment?
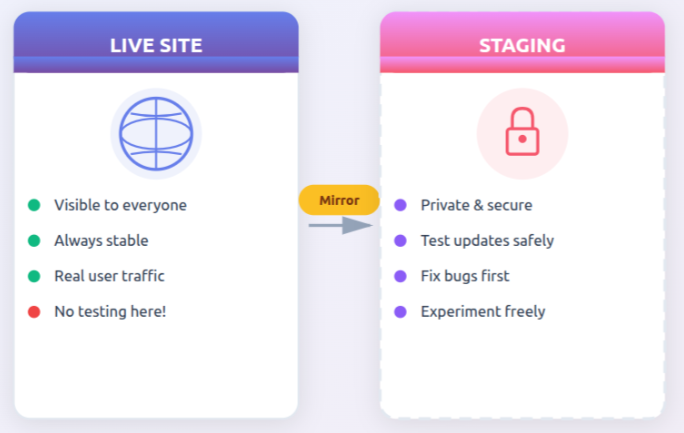
A staging environment is a safe, private version of your live website created specifically for testing. It mirrors your real site closely, but regular visitors can’t access it, so you’re free to make changes without risk.
You can use a staging environment to:
- Test updates: Check software or content updates before applying them live.
- Install new features: Try new tools or functionality without affecting users.
- Fix bugs: Identify and resolve issues in a controlled setup.
- Experiment with design changes: Preview layout or style updates safely.
Everything happens behind the scenes, keeping your live website stable and secure.
Why You Need a Staging Environment
Why take chances with your live website when a safer option exists? A staging environment gives you the freedom to test and improve your site without fear of things going wrong in front of users.
Here’s why a staging environment is important:
- Prevents downtime: Changes are tested first, so your live site stays online.
- Avoids costly mistakes: Errors are caught early, not after users notice them.
- Improves user experience: Only polished, tested updates reach visitors.
- Protects your data: Live data stays untouched during testing.
- Provides peace of mind: You can make changes confidently, knowing there’s a safety net.
Think of it like saving a draft before final submission. You review, edit, and perfect it first, then publish when it’s ready.
Staging vs Production vs Development
To manage a website smoothly, it helps to understand how different environments work together. Each one serves a clear purpose in the website lifecycle.
- Development environment: This is where ideas take shape and early development happens.
- Staging environment: A close replica of the live site used for final testing and review.
- Production environment: The live website that real users visit and interact with.
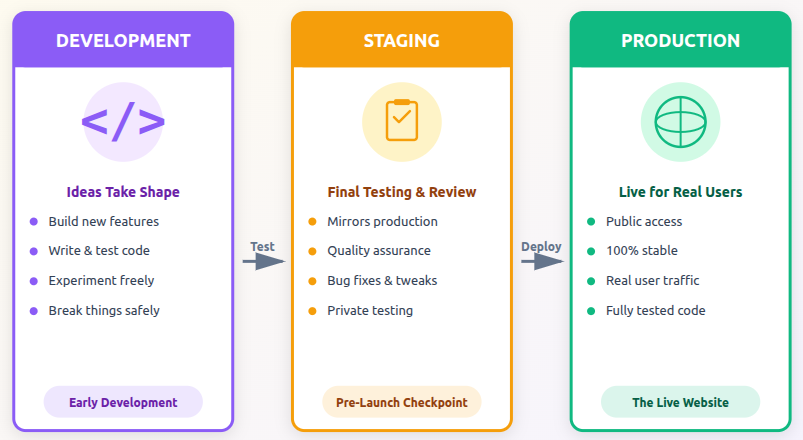
Each environment plays its own role, and skipping staging is like releasing a product without testing it first.
How a Staging Environment Works
A staging environment is created by making a close copy of your live website and placing it in a separate, private space. This allows you to work on changes without affecting real users or live data.
A staging environment usually:
- Copies your site files: Ensures the layout, code, and structure match the live site.
- Clones the database: Keeps content and settings consistent for accurate testing.
- Uses a similar server setup: Helps you see how changes will behave in real conditions.
You make updates in staging, test everything carefully, and once you’re confident, those changes are pushed to the live website.
Simple flow:
Live Site >> Staging >> Testing >> Live Deployment
Common Use Cases for Staging
Staging environments are useful whenever a change could impact how users experience your website.
People commonly use staging to:
- Update themes or designs: Preview visual changes before making them public.
- Test plugins or extensions: Ensure new tools work smoothly with your setup.
- Apply security patches: Verify updates don’t cause conflicts or errors.
- Run performance checks: Measure speed and stability under test conditions.
- Prepare major feature releases: Fine-tune big updates before launch.
If a change could affect users, it’s best tested in staging first.
Types of Staging Environments
Not all staging setups are the same. The right choice depends on your website’s size and needs.
Common staging types include:
- Subdomain staging: A separate URL like staging.yoursite.com for easy access.
- Subdirectory staging: A folder such as yoursite.com/staging within the same site.
- Separate server staging: A completely independent server for maximum isolation.
Subdomains work well for smaller sites, while larger or high-traffic projects often benefit from a separate server.
What You Need Before Setting Up Staging
A little preparation goes a long way when creating a staging environment.
Before you begin, make sure you have:
- Hosting panel access: To create and manage staging resources.
- A full backup of your live site: In case you need to restore anything.
- File and database credentials: For copying and configuring the site correctly.
- Basic site knowledge: Understanding your site structure helps avoid errors.
Being prepared saves time and reduces the chances of issues later on.
How ServerAvatar Makes Staging Easy
What is ServerAvatar?
ServerAvatar is a platform to simplify the hosting and management of servers and applications. It simplifies the process of deploying and managing PHP and Node.js based web applications on servers.
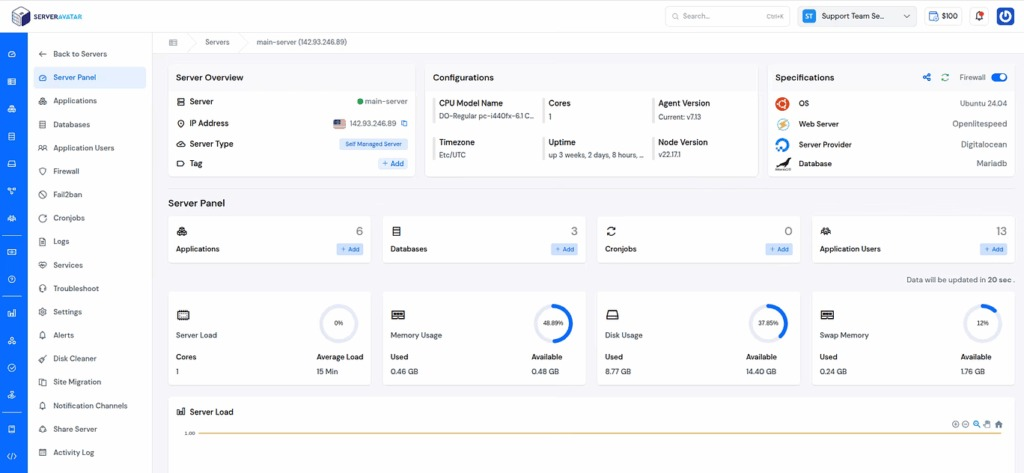
If you’re using ServerAvatar to host and manage your projects, you get a built-in staging environment feature called the Staging Area that’s designed to make testing updates easy, safe, and worry-free. Let’s break down how it works and why it’s a real game-changer for developers, designers, and site owners.
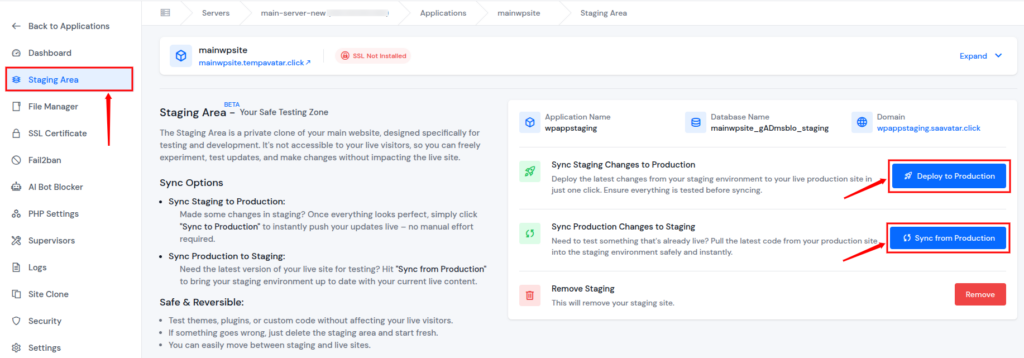
What Is the ServerAvatar Staging Area?
The ServerAvatar Staging Area is like a private sandbox for your live application. It creates a safe copy of your website where you can try out updates, tweak features, or configure settings without affecting your real, live production environment. Anything you try here stays here, until you’re ready to move it live.
Why This Matters
Imagine having two versions of your site:
- One that your real users interact with every day.
- Another place where you can test changes, make mistakes, and experiment freely, without stress.
That’s exactly what ServerAvatar’s staging area gives you. It’s like a rehearsal before opening night, where you can practice everything and only go live when it’s perfect.
Step-by-Step Guide to Setting Up a Staging Environment
Setting up a staging environment in ServerAvatar is simple and doesn’t require any complex configuration. You can create a safe testing space for your application in just a few clicks.
Follow these steps to access and create a staging environment in ServerAvatar:
- Login to ServerAvatar: Log in to your ServerAvatar account and open the server panel by clicking on the server dashboard icon.
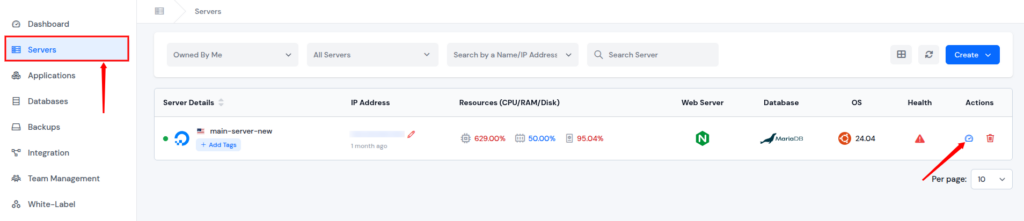
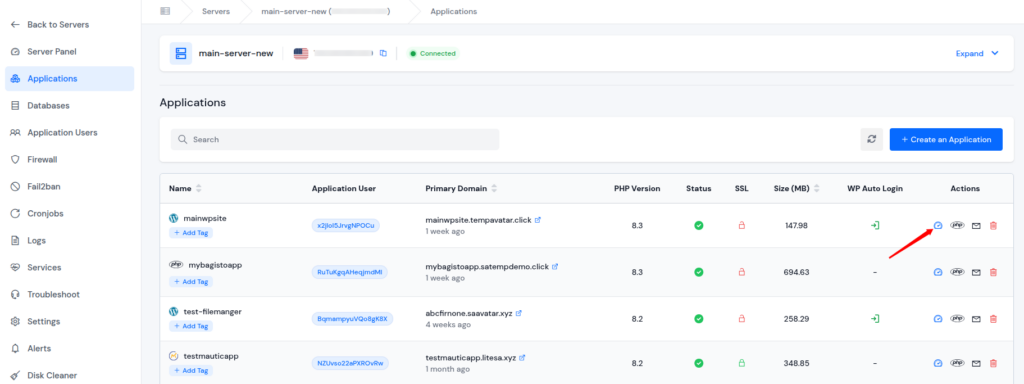
- Go to Applications: Click on the Applications section from the left sidebar, and navigate to the application panel by clicking on the application dashboard icon for the application you want to create a staging site.
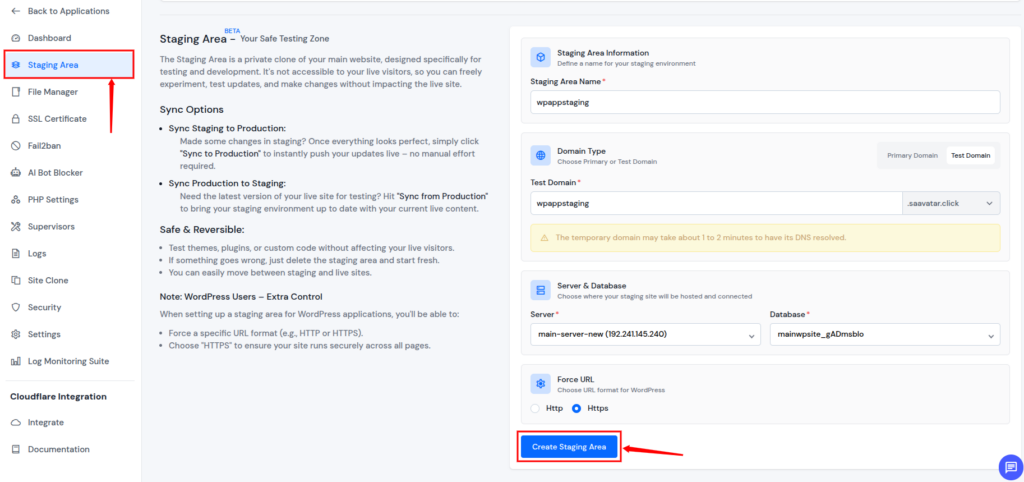
- Navigate to Staging Area: Click on the Staging Area option from the left sidebar to view staging settings.
- Create your staging site: Fill in the required details and click on Create Staging Area.
- Once completed, your staging environment will be ready to use.
Sync Your Changes: Two Ways
One of the best things about ServerAvatar’s staging area is how simple it makes moving things between environments:
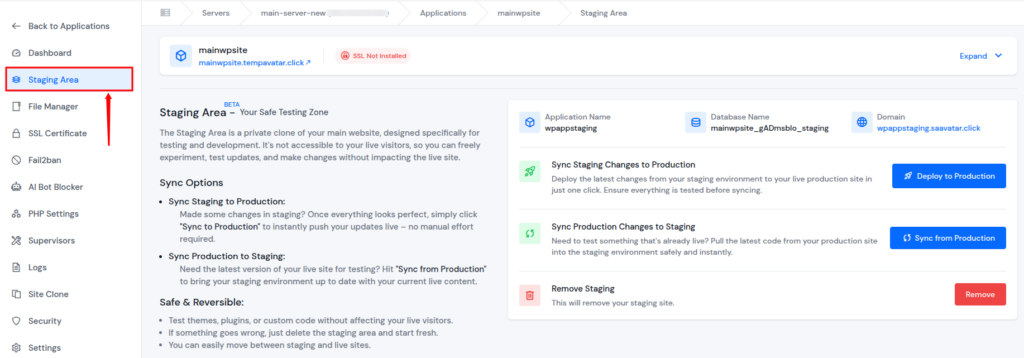
- Sync Staging to Production: When your changes are fully tested and ready for the real world, you can click Deploy to Production to push staging changes live, all with a single click.
- Sync Production to Staging: Need to refresh your staging environment with the latest live site data or code? You can pull production into staging anytime. Just be careful, this will overwrite any changes already in staging.
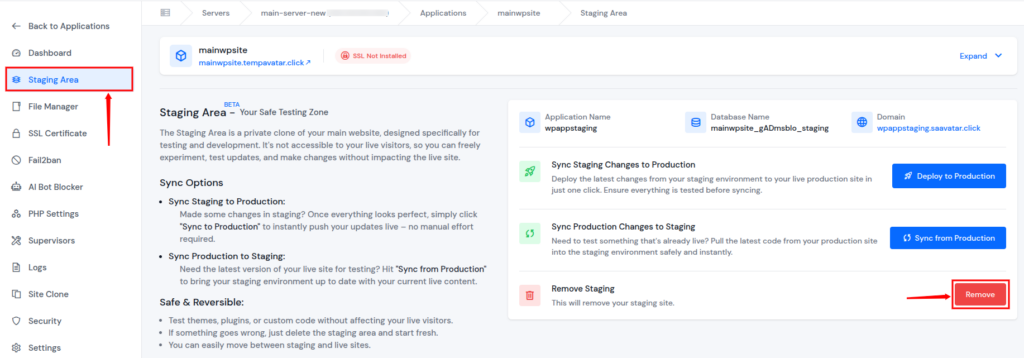
Removing the Staging Area
Don’t need the staging environment anymore? ServerAvatar lets you remove it easily with a Remove button, just confirm the deletion, and it’s gone.
How This Fits Into Your Workflow
Using the ServerAvatar staging area in your daily workflow helps you manage changes with confidence and control. It becomes a natural step before anything reaches your live site.
With ServerAvatar staging, you can:
- Test major updates first: Make sure everything works before pushing changes live.
- Experiment safely: Try new plugins, themes, or custom code without risk.
- Sync changes easily: Move updates from staging to production in a smooth, controlled way.
- Refresh staging anytime: Pull real production data when you need accurate testing.
Overall, staging acts as a quality check that protects your live website and removes the fear of launching updates.

Security Best Practices for Staging
Even though staging environments aren’t public, they still need strong protection to avoid misuse or data leaks.
Follow these security best practices:
- Use strong passwords: Prevent unauthorized access to staging sites.
- Limit access by IP: Allow only trusted locations when possible.
- Disable public sign-ups: Keep registrations closed on staging.
- Turn off payment systems: Avoid accidental transactions during testing.
Leaving a staging site unsecured is risky and can invite unwanted access.
Common Mistakes to Avoid
Staging environments are powerful, but only when used correctly. Some mistakes can reduce their effectiveness.
Avoid these common errors:
- Testing directly on the live site: This puts your users at risk.
- Not blocking search engines: Staging pages should never appear in search results.
- Using live API keys: This can cause real actions during testing.
- Skipping backups: Always have a restore point before changes.
- Ignoring final checks: Never push changes without testing one last time.
Staging helps prevent problems, but only if it’s used thoughtfully.
Best Practices for Long-Term Use
To get the most value from your staging environment, treat it as an ongoing part of your workflow rather than a one-time setup.
Best practices to follow:
- Keep staging updated: Match it closely with your live environment.
- Use it for every change: Even small updates deserve testing.
- Document your tests: Track what was tested and what changed.
- Clean it regularly: Remove unused files and outdated data.
- Make it a habit: Staging should be part of your standard process.
When used consistently, staging becomes one of the most reliable tools for maintaining a stable and secure website.
Conclusion
A staging environment plays a crucial role in keeping your website stable, secure, and user-friendly by allowing you to test changes before they go live. It acts as a safety net where updates, new features, and fixes can be reviewed without risking downtime or errors on your live site. With tools like ServerAvatar’s built-in Staging Area, this process becomes simple and efficient, fitting seamlessly into your workflow. By making staging a regular practice, you gain confidence in every release and ensure your visitors always experience a polished, reliable website.
FAQs
1. What is a staging environment used for?
A staging environment is used to test updates, features, and fixes in a private setup before applying them to a live website.
2. Is a staging environment necessary for small websites?
Even small websites benefit from staging because it helps prevent errors and downtime caused by untested changes.
3. Can a staging environment affect my live website?
When set up correctly, a staging environment is completely separate and does not impact the live site.
4. How does ServerAvatar simplify staging?
ServerAvatar offers a built-in Staging Area that allows you to create, test, sync, and remove staging sites with just a few clicks.
5. How often should I use a staging environment?
You should use a staging environment for every update, big or small, to ensure your live website stays stable and secure.