

Disk space doesn’t vanish, it accumulates. One day your server is fine; the next, find large files and directories in Linux to uncover what filled your storage.
This is one of the most common scenarios I encounter in day-to-day server management. And on Linux, unlike desktop operating systems, there’s no friendly animation telling you where space went. You have to find it yourself.
The good news: Linux ships with powerful built-in tools for exactly this. And there are lightweight third-party utilities that make the process much less painful. I’ve used these tools across dozens of servers, development boxes, production VPS instances, and everything in between. Some of them have saved me hours of detective work.
This guide walks you through how to find large files and directories in Linux, from quick one-liners to interactive analyzers, and explains the nuances that documentation rarely covers.
Why Disk Space Management Matters on Linux
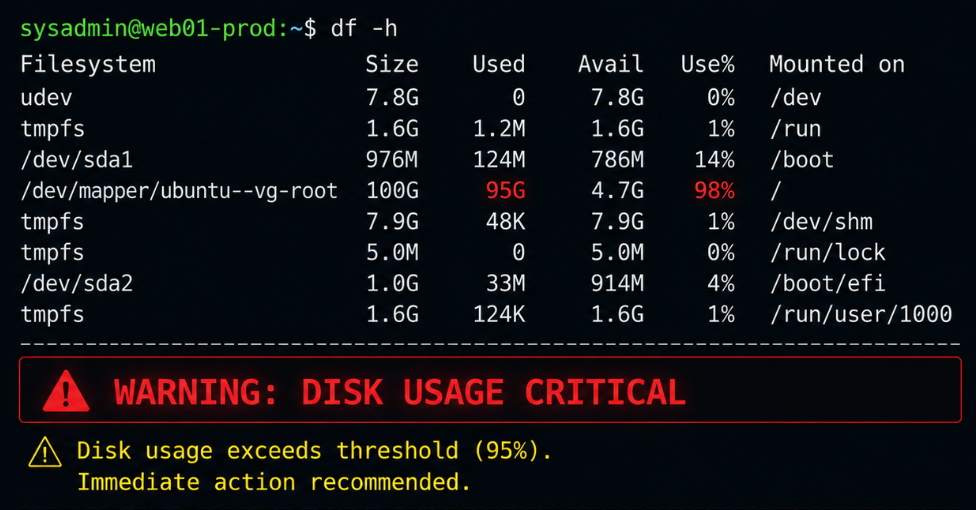
Running out of disk space can affect much more than file storage. A nearly full filesystem can prevent applications from writing data, break database operations, interrupt deployments, and cause system services to fail.
Common sources of unexpected disk usage include:
- Log files that continuously grow because of application errors or verbose logging.
Learn more about Linux logging, common log locations, and how log files are used in our guide to Linux logs.
- Database backups and snapshots that are never removed.
- Compressed backup archives such as
.rar,.zip, and.tarfiles can also consume significant storage when old copies are retained.
If you need to work with RAR archives on Linux, see our guide on How to Open, Extract and Create RAR Files in Linux.
- Container images and volumes left behind after testing.
- CI/CD build artifacts that accumulate over time.
- Package caches containing outdated packages.
- Temporary files created by applications and system processes.
- Old application releases that are no longer required.
- Backup jobs writing files to an unexpected location.
Why regular disk checks are important
A simple disk-space monitoring routine can help you:
- Detect storage problems before they become critical.
- Identify which filesystem is filling up.
- Find unusually large directories and files.
- Discover deleted files that are still consuming space.
- Prevent applications from failing because of insufficient storage.
- Keep production servers healthy and predictable.
Tip: Don’t wait until a filesystem reaches 100%. Investigate sustained usage above 80% and treat 90%+ as a warning that requires attention.
Check Overall Disk Usage First
Before searching for individual files, determine which filesystem is consuming the most space.
The df command provides a summary of disk usage for mounted filesystems.
df -hThe -h flag gives you human-readable output, gigabytes and megabytes instead of raw block counts.

You can also review the official GNU ‘df’ documentation for additional options such as
-i,-T, and-x.
Here’s what the output typically looks like:
Filesystem      Size  Used Avail Use% Mounted on
/dev/sda1       100G   78G   22G  78% /
/dev/sdb1       500G  450G   50G  90% /mnt/backup
tmpfs 2.0G 0 2.0G 0% /tmpPay particular attention to:
- Size: Total filesystem capacity.
- Used: Space currently occupied.
- Avail: Remaining available space.
- Use%: Percentage of the filesystem in use.
- Mounted on: Location where the filesystem is accessible.
In the example above, /mnt/backup is at 90%, making it the first location to investigate.
For more details about
df,du, and other filesystem utilities, see the GNU Coreutils documentation.
Check inode usage
Disk space isn’t the only resource that can run out. Linux filesystems also have a finite number of inodes, which store metadata about files.
Check inode consumption with:
df -iHere’s what the output typically looks like:

Inode exhaustion can occur when a server contains millions of small files, even when plenty of disk capacity remains.
For example:
- A server may have 100 GB of free disk space.
- But all available inodes may already be consumed.
- Creating a new file can then fail despite the available storage.
For a deeper explanation of what an inode stores, see the Linux ‘inode(7)’ manual page.
Understand How Linux Filesystems Use Disk Space
The numbers reported by df, du, and ls don’t always match exactly. Understanding why makes disk investigations much easier.
Linux filesystems generally allocate storage in fixed-size blocks.
For example, with a 4 KB block size:
- A 1-byte file can occupy approximately 4 KB.
- A 4 KB file can occupy approximately 4 KB.
- A 10 KB file may require approximately 12 KB of allocated space.
This means logical file size and allocated disk space are not always identical.
Filesystem-reserved space
Some filesystems reserve a portion of available storage for system operations.
This reserved capacity can help:
- Keep critical system processes running.
- Reduce fragmentation.
- Allow administrators to recover a system when normal users consume most available space.
As a result, the total reported by df may not exactly match the combined sizes shown by tools such as du.
Hard links can affect calculations
A hard link creates another directory entry pointing to the same underlying file data.
Because multiple filenames can reference the same data:
- Two filenames don’t necessarily mean two copies of the file.
- Disk usage calculations can become confusing when manually comparing file listings.
duandlsmay present information differently depending on how links are handled.
Finding the Largest Directories
The fastest way to get oriented inside a full partition is to see which subdirectories are the biggest. Navigate to the mount point and run:
du -sh *Here’s what the output typically looks like:
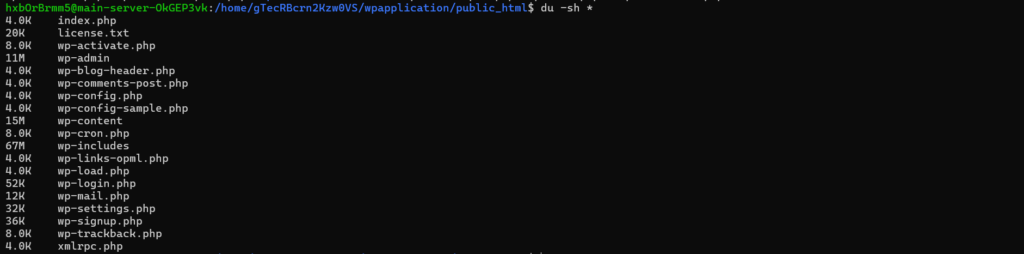
This summarizes each item in the current directory, files and directories both, and sorts them by size. The -s flag means “summarize,” so you get one number per item instead of every subdirectory broken out individually.
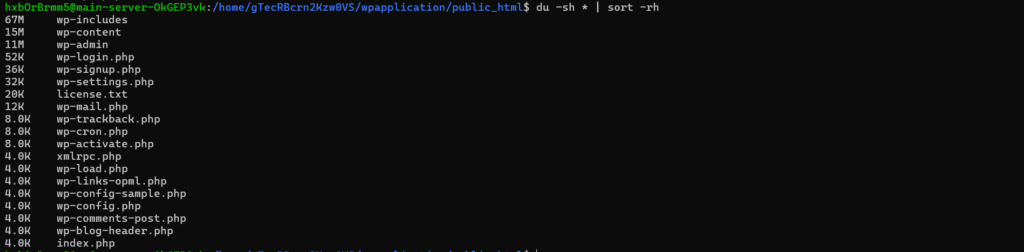
Pipe it through sort to get the largest ones at the top:
du -sh * | sort -rhHere’s what the output typically looks like:
Understanding the command
du: Reports disk usage.-s: Shows a summary for each item.-h: Uses human-readable units.sort: Sorts the output.-r: Reverses the sort order.-h: Understands values such as500Mand2G.
The * glob only matches items in the current directory. If you want to include hidden files (dotfiles), you need to explicitly handle those:
du -sh .[!.]* * | sort -rhThis is a pattern I use often when auditing web server directories, hidden files like .htaccess, .well-known, or dotfiles from configuration management tools sometimes accumulate more than you’d expect.
A variant that works from any location without changing directories:
du -sh --max-depth=1 /varThis is particularly useful for identifying whether /var is filling up because of:
/var/log/var/cache/var/www/var/lib- Application-specific directories
Note:
--max-depthis commonly available with GNUdu. On some non-GNU systems, the syntax may differ.
The official GNU ‘du’ documentation explains how
duestimates the space used by files and directories and documents options such as--summarizeand--threshold.
Find Large Individual Files
After identifying a large directory, the next step is to locate the files responsible for the disk usage.
The find command is one of the most useful tools for this task.
Find Files Above a Specific Size
For example, to find files larger than 500 MB under /home:
find /home -type f -size +500MYou can adjust the size threshold depending on your requirements:
find /var -type f -size +1GCommon size units include:
k: KilobytesM: MegabytesG: Gigabytes
Hide permission errors
If you’re scanning directories containing restricted files, you may see permission-denied messages.
You can suppress those messages:
find /home -type f -size +500M 2>/dev/nullThis only hides error output; it does not change what find searches.
If
findrepeatedly reports permission errors, understanding Linux ownership and file permissions can help you determine which files and directories you can safely inspect; see our guide to Linux file permissions.
Display File Sizes Alongside Names
A filename alone doesn’t tell you exactly how much storage it consumes. Use:
find /home -type f -size +100M -exec ls -lh {} \;The output includes:
- File permissions
- Owner
- Group
- File size
- Modification time
- File path
For example:
-rw-r--r-- 1 user user 1.4G Aug 19 10:20 /home/user/backup.tarShow only size and filename
For a more compact result:
find /home -type f -size +100M -exec ls -lh {} \; 2>/dev/null | awk '{print $5, $NF}'This produces output similar to:
1.4G /home/user/backup.tar
850M /home/user/database.sql
520M /home/user/archive.zipCreate a Quick Disk-Usage Shortcut
If you frequently investigate disk usage, create a shell alias.
Add this to ~/.bashrc:
alias big='du -ah --max-depth=1 . | sort -rh | head -20'Reload the shell configuration:
source ~/.bashrcNow run:
bigThis displays the largest items in the current directory.
Why this is useful
Instead of repeatedly typing a long pipeline, you can quickly check:
- Which directories are growing.
- Which files are unusually large.
- Where to begin cleanup.
Interactive Tools for Disk Usage Analysis
The command-line tools above are powerful, but they require you to know what you’re looking for. When you’re exploring an unfamiliar server or a directory with deep nesting, interactive tools get you answers faster.
ncdu: The Most Popular Interactive Analyzer
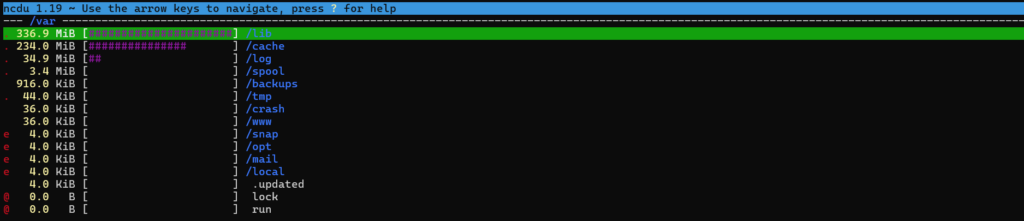
ncdu (NCurses Disk Usage) scans a directory and presents the results in a navigable text interface. Install it on Debian/Ubuntu with:
sudo apt install ncduThen run it against any path:
ncdu /varYou can then navigate through the directory tree using the keyboard.
Here’s what the output typically looks like:
Useful features
- Interactive directory navigation.
- Sorted disk usage information.
- Percentage-based usage indicators.
- Quick access to large directories.
- Ability to delete selected files with confirmation.
Typical workflow:
ncdu /var
   ↓
Select large directory
   ↓
Press Enter
   ↓
Inspect subdirectories
   ↓
Identify large files
   ↓
Clean up unnecessary dataCaution: Be careful when using deletion options on production servers. Always confirm that a file or directory is safe to remove.
gdu: Fast Scanner for Modern Systems
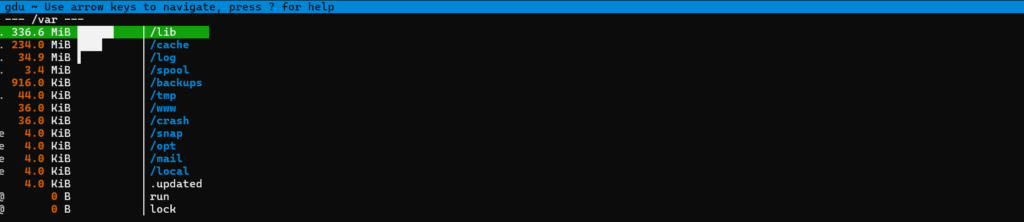
gdu (Go Disk Usage) is a newer tool written in Go, which means it’s fast, noticeably faster than ncdu on large directories. It also renders a visual bar chart in the terminal.
On Debian/Ubuntu:
sudo apt install gduRun it with:
gdu /varHere’s what the output typically looks like:
Why use gdu?
- Fast directory scanning.
- Interactive terminal interface.
- Visual usage indicators.
- Keyboard-based navigation.
- Useful for large filesystems.
godu: Simple and Straightforward
godu is another Go-based disk usage tool. Download the binary for your architecture from its GitHub releases page, make it executable, and drop it in your PATH.
godu /varIts interface focuses on keeping disk-usage information simple and easy to navigate.
It can be useful when you want:
- A lightweight disk analyzer.
- Sorted file and directory sizes.
- Keyboard navigation.
- Minimal terminal output.
dua: Aggregate Disk Usage Stats
dua (Disk Usage Analyzer) has two modes. The default shows aggregate space for directories:
duaOr specify a path:
dua /var/logIt also has an interactive mode:
dua interactiveThe interactive interface allows you to explore directories and identify potential cleanup candidates.
dua is useful for
- Directory-level disk analysis.
- Fast storage reporting.
- Interactive exploration.
- Finding large directories before cleanup.
Why df, du, and ls Can Show Different Numbers
One of the most confusing parts of Linux disk management is seeing different numbers from different commands.
For example:
df -hmight show significantly more used space than:
du -sh /There are several possible explanations.
Common causes include:
- Filesystem metadata.
- Reserved filesystem blocks.
- Hard links.
- Sparse files.
- Deleted files still held open by running processes.
- Differences between apparent size and allocated disk space.
- Filesystem-specific behavior.
Understanding these differences prevents unnecessary cleanup and helps you investigate the actual cause.
Sparse Files: Large Files That Use Little Disk Space
A sparse file contains regions that appear to contain data but don’t actually have corresponding disk blocks allocated.
Create a 5 GB sparse file:
truncate -s 5G /tmp/sparse-test.imgNow compare its apparent size with its allocated size:
ls -lh /tmp/sparse-test.imgYou may see:
5.0GBut:
du -h /tmp/sparse-test.imgmay show:
0Why does this happen?
ls reports the file’s apparent size, while du reports the amount of allocated filesystem space.
Sparse files are commonly used for:
- Virtual machine disk images.
- Database storage.
- Backup files.
- Disk images.
- Files that require preallocated logical space.
So a file that appears to be 100 GB doesn’t necessarily consume 100 GB of physical disk space.
Deleted Files Can Still Consume Disk Space
Another common Linux disk-space problem occurs when a file has been deleted but is still open by a running process.
For example:
- An application writes to
application.log. - The log becomes very large.
- Someone deletes the file with
rm. - The application still has the file open.
- The filename disappears.
- The disk blocks remain allocated.
dfcontinues reporting the used space.
This is commonly called a deleted-but-open file.
Find Deleted Files That Are Still Open
Use lsof to locate these files:
lsof +L1The +L1 option identifies open files whose link count has dropped below 1, which commonly indicates that the file has been deleted while a process still holds it open.
Here’s what the output typically looks like:

For the complete list of
lsofoptions, see the official ‘lsof’ manual page.
You can also filter the results:
lsof +L1 | grep usernameLook for:
- Process name.
- Process ID.
- File descriptor.
- File size.
- Deleted file path.
Common causes
Deleted-but-open files frequently occur with:
- Web servers.
- Application servers.
- Database services.
- Java applications.
- Logging services.
- Long-running background processes.
How to Free Space From Deleted-But-Open Files
The safest solution is usually to restart the process, if doing so is acceptable.
First identify the process:
lsof +L1Then, if appropriate, gracefully terminate it:
kill -15 <process_id>Once the process closes the file descriptor, the filesystem can reclaim the space.
Before stopping a process, you can identify and inspect active processes with tools such as
ps,top,htop, andatop; see our guide on checking running processes in Linux.
If you need to understand the available Linux process-management commands before terminating a process, see our guide on How to Kill a Running Process in Linux.
Another option: truncate the open file
In certain situations, you can release the space without restarting the application:
truncate -s 0 /proc/<process_id>/fd/<file_descriptor>However, this should be treated as an advanced operation. Before using it:
- Confirm the correct process.
- Confirm the correct file descriptor.
- Understand what application owns the file.
- Make sure removing its contents won’t cause data loss.
- Prefer a proper application-level log rotation mechanism when available.
Warning: Never blindly truncate files belonging to databases or critical applications. An incorrect operation can cause data loss or application problems.
Linux Disk Space Troubleshooting Workflow
When a Linux server starts running out of storage, follow a structured process rather than randomly deleting files.
Step 1: Check filesystem usage
df -hStep 2: Check inode usage
df -iStep 3: Identify large directories
du -sh * | sort -rhStep 4: Investigate the largest directory
du -h --max-depth=1 /var | sort -rhStep 5: Find large files
find /var -type f -size +500M -exec ls -lh {} \;Step 6: Check for deleted-but-open files
lsof +L1Step 7: Clean up safely
Consider removing or rotating:
- Old logs.
- Unnecessary backups.
- Unused application releases.
- Old package caches.
- Unused container images.
- Temporary files.
- Obsolete build artifacts.
Found a directory that is consuming a large amount of storage? Before deleting it, verify its contents and review our guide on how to delete large directories in Linux safely.
If the directory is no longer required, you can also learn how to remove directories in Linux using the appropriate command for empty and non-empty directories.
Step 8: Verify the result
After cleanup:
df -hCheck that the expected amount of storage has been recovered.

Quick Reference: Linux Disk Usage Commands at a Glance
| Command | Purpose | Best Use |
|---|---|---|
df -h | Shows filesystem capacity and usage | Quick storage health check |
df -i | Shows inode consumption | Finding inode exhaustion |
du -sh * | Summarizes items in a directory | Finding large directories |
du -sh * | sort -rh | Sorts items by size | Quickly locating space consumers |
find -size +N | Finds files above a size threshold | Locating large files |
ncdu | Interactive disk analyzer | Exploring directory trees |
gdu | Fast interactive disk analyzer | Large directory scans |
godu | Lightweight disk usage analyzer | Simple interactive analysis |
dua | Disk usage analyzer | Fast reporting and exploration |
lsof +L1 | Finds deleted files still held open | Investigating unexplained disk usage |
Key Takeaways
- Run
df -hfirst, always know the big picture before diving into individual files du -sh * | sort -rhfrom any directory gives you an instant ranking of the largest itemsfindwith-sizeflags is the most flexible tool for locating files above any thresholdncduandgduturn the terminal into a visual explorer, faster for complex directory trees- Filesystem block allocation means file sizes never add up exactly to
dfused space - Deleted-but-open files are a real cause of “mystery” disk usage,
lsof +L1finds them every time - Build a regular disk-audit habit, especially on servers with multiple users or applications
Conclusion
Finding large files and directories in Linux becomes much easier when you use the right commands in the right order. Start with df -h to identify the filesystem with high usage, then use du and find to locate the directories and files consuming the most space. For faster and interactive analysis, tools like ncdu, gdu, and dua can also help you explore disk usage efficiently.
Before deleting any files, always check whether they are required by the system, applications, backups, or logs. Issues such as deleted-but-open files, sparse files, and inode exhaustion can also cause unexpected disk usage. Regular disk-space checks, proper log management, and safe cleanup practices can help maintain sufficient storage and keep your Linux server stable and reliable.
Want simpler server management with built-in disk monitoring, automatic alerts, and a browser-based file manager? Check out ServerAvatar and see how it handles server health monitoring so you don’t have to.
FAQs
How do I find the largest file in a Linux directory?
Use find with a size threshold set high enough to isolate only the largest files: find /path -type f -size +1G -exec ls -lh {} \;. This finds every file over 1GB and lists it with its size. To sort the results by size, pipe through sort as well.
How can I identify the 10 largest directories on a Linux system?
Navigate to the target directory and run du -sh * | sort -rh | head -n 10. This summarizes each subdirectory’s size, sorts them largest-first, and displays the top 10. Adjust 10 to however many results you want.
Why is disk usage showing more used space than the files add up to?
Filesystem block allocation is the main cause. Files are stored in fixed-size blocks (typically 4KB), so even small files consume full blocks. Additionally, most filesystems reserve 5% of space for root-only use. Deleted-but-open files can also contribute to this discrepancy.
How can you locate deleted files that are still occupying disk space on Linux?
Run lsof +L1 , it helps identify deleted files whose disk blocks have not yet been released. The output can show the process using the file, its process ID, file descriptor, and the space that remains allocated. Once you identify the responsible process, restarting it gracefully will usually release the occupied storage. In specific situations, an open file can also be truncated through /proc, but this should only be done after confirming that doing so is safe.
Which tool is best for analyzing disk usage interactively?
ncdu is the most widely available and feature-complete interactive tool, it comes standard in most distro repositories and handles large directories well. gdu is faster on modern hardware and has a cleaner visual presentation. dua is excellent for aggregate reporting. Choose based on your specific need.
About the Author
Meghna Meghwani is a technical writer focused on Linux, Ubuntu, VPS hosting, server management, WordPress, PHP, Node.js, cloud hosting, and DevOps. She creates beginner-friendly tutorials, practical hosting guides, troubleshooting articles, and server security content designed to help developers and businesses manage applications and servers more efficiently.