
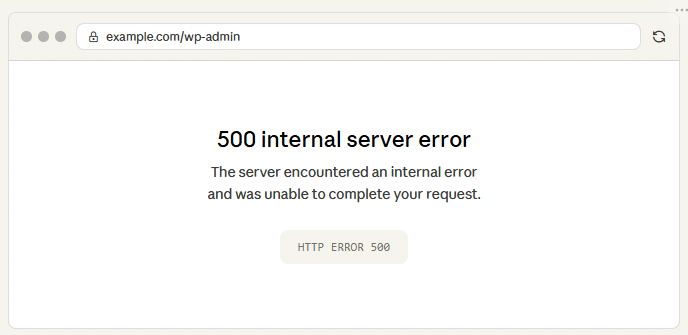
You refresh your WordPress site. Instead of your homepage, you get something along the lines of a WordPress 500 Internal Server Error. No explanation. No clue. Just a dead end. It happens to almost every WordPress site owner at some point, and the frustrating part is that the error tells you nothing specific. The server knows something broke, but it isn’t sharing.
Here’s the good news: it’s almost always fixable. I’ve run into this error on development environments, client sites, and production servers more times than I’d like to admit. In most cases, the root cause is one of a handful of predictable issues, and once you know where to look, you can track it down in minutes.
This guide walks you through every proven method to diagnose and fix the WordPress 500 Internal Server Error. We’ll go from the quickest checks to deeper troubleshooting steps, and I’ll tell you which ones tend to solve the problem most often based on real experience.
TL;DR
- Learn the most common reasons behind WordPress 500 errors and how to identify the actual issue.
- Clear your site and browser cache to quickly remove temporary error-related problems.
- Fix a corrupted
.htaccessfile to restore normal website functionality. - Increase the PHP memory limit to prevent crashes caused by resource-heavy scripts.
- Disable plugins one by one to find and fix the one causing the error.
- Switch to a default WordPress theme to check for theme-related conflicts.
- Re-upload WordPress core files to replace missing or damaged system files.
- Enable WordPress debug mode to uncover the exact cause of the error.
- Follow simple maintenance practices to reduce the chances of future 500 errors.
Quick Troubleshooting Flow
If you’re not sure where to start, follow this troubleshooting sequence. Most WordPress 500 Internal Server Errors are resolved within the first few steps.
| Steps | What to Check |
|---|---|
| Step 1 | Clear browser and WordPress cache |
| Step 2 | Repair the .htaccess file |
| Step 3 | Increase the PHP memory limit |
| Step 4 | Deactivate all plugins |
| Step 5 | Switch to a default WordPress theme |
| Step 6 | Re-upload WordPress core files |
| Step 7 | Enable WordPress debug mode |
| Step 8 | Check file and folder permissions |
| Step 9 | Contact your hosting provider |
Tip: Start with the first step and move down the list. There’s no need to try advanced fixes until you’ve ruled out the common causes.
What Is the WordPress 500 Internal Server Error?
The 500 Internal Server Error is an HTTP status code that means the web server encountered something unexpected and couldn’t fulfill your request. Unlike a 404 (page not found) or a 403 (forbidden), which tell you exactly where the problem is, a 500 error is deliberately vague.
Your server is essentially saying: “Something went wrong on my end, and I don’t have a specific error code to describe it.”
This error isn’t unique to WordPress, any website running on any platform can throw a 500 error. But in the WordPress context, it almost always means something in your PHP code, server configuration, or WordPress installation triggered a failure that the server couldn’t handle gracefully.
What Causes the WordPress 500 Internal Server Error?
Before jumping into fixes, it helps to understand what’s actually happening. The 500 error in WordPress is typically triggered by one of these issues:
- A corrupt or misconfigured .htaccess file: This is far and away the most common cause. The .htaccess file tells Apache how to handle redirects, permalinks, and security rules. Even a small syntax error in that file can bring your entire site down.
- Exhausted PHP memory limit: WordPress runs on PHP, and every script has a ceiling for how much memory it can use. If a plugin, theme, or custom script pushes past that limit, the server kills the process and throws a 500 error.
- Problematic plugins or plugin conflicts: Some plugins are poorly coded, and others just don’t play well together. A single bad plugin, or a combination of two that clash, is a frequent trigger.
- Corrupt WordPress theme: Themes contain PHP code too. If the active theme has a fatal error in its functions.php or another core theme file, the site can crash with a 500 error.
- Corrupt WordPress core files: Sometimes file transfer issues during updates, migrations, or manual edits can corrupt the core WordPress files in wp-admin or wp-includes.
- Incorrect file or folder permissions: WordPress needs certain files to be readable and certain folders to be writable. If permissions get changed accidentally (say, during a server tweak or an FTP batch operation), things break.
- Server-side issues: In some cases, the problem originates on the server itself: a misconfigured php.ini, a PHP version conflict, or a timeout setting that’s too aggressive.
On managed hosting platforms like ServerAvatar, many of these server-level settings can be adjusted from the control panel without touching configuration files directly, which saves a lot of time when you’re debugging under pressure.
Common Causes of the WordPress 500 Internal Server Error
| Causes | Difficulty | Estimated Fix Time |
|---|---|---|
Corrupt .htaccess file | Easy | 2–5 minutes |
| Browser or WordPress cache | Easy | 1–2 minutes |
| PHP memory limit exhausted | Easy | 2–5 minutes |
| Plugin conflict | Medium | 5–10 minutes |
| Theme conflict | Medium | 5–10 minutes |
| Corrupt WordPress core files | Medium | 10–15 minutes |
| Incorrect file permissions | Medium | 5–10 minutes |
| Server configuration issues | Advanced | Depends on hosting provider |
Most WordPress 500 Internal Server Errors are caused by a corrupted
.htaccessfile, exhausted PHP memory, or a plugin conflict. That’s why this guide starts with those fixes before moving to advanced troubleshooting.
Fixing the WordPress 500 Internal Server Error: Step-by-Step
Work through these steps in order. Most of the time, one of the first few fixes resolves the issue.
Step 1: Clear Your Browser and WordPress Cache
Before touching any files, rule out the simplest explanation: your browser or a caching layer might be serving a cached error page.
Method 1: Clear Browser Cache
- Open browser settings (e.g., Chrome >> Settings >> Privacy & Security)
- Click on Clear browsing data
- Remove cached images and files
- Reload your website
Method 2: Clear WordPress Cache
- Log in to your WordPress dashboard
- Open your caching plugin (if installed), such as:
- WP Super Cache
- W3 Total Cache
- LiteSpeed Cache
- Click on “Clear Cache” or “Purge All Cache”
Method 3: Clear Cache Using ServerAvatar
If you want a faster option, you can clear the cache directly from ServerAvatar’s dashboard using the WordPress Toolkit:
- Open your application panel in ServerAvatar dashboard.
- Navigate to WordPress Toolkit for your application from the sidebar.
- Go to the Performance section.
- Click Flush Cache.
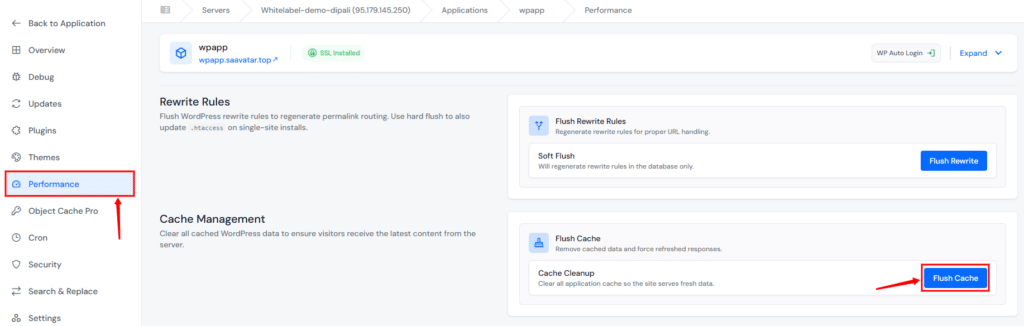
This clears the server-side cache without needing to log into WordPress at all, useful when the admin area is inaccessible due to the 500 error itself.
After Clearing Cache
- Deactivate plugins one by one until you identify the plugin causing the problem.
- If the site loads normally, the problem is likely cached data
Step 2: Repair a Corrupt .htaccess File
This is the fix that resolves the problem roughly half the time in my experience. The .htaccess file is a hidden server configuration file that WordPress uses to handle permalinks, redirects, and security rules.
Method 1: Regenerate .htaccess from WordPress admin
If you can access the WordPress admin area, the fastest fix is to have WordPress regenerate the file automatically:
- Go to Settings >> Permalinks in your WordPress dashboard.
- Don’t change anything, just click Save Changes.
- WordPress will overwrite your .htaccess file with a clean, correct version.
Check your site. If it’s back up, you’re done.
Method 2: Using FTP
- Connect to your server using an FTP client (like FileZilla).
- Navigate to your site’s root directory.
- Rename
.htaccessto.htaccess_old. - Create a new empty file named
.htaccess. - Paste in the rewrite rules above and upload.
Method 3: Using ServerAvatar File Manager
If you can’t access the admin area, you can fix this over FTP or directly from your ServerAvatar dashboard.
- Open your WordPress application panel from ServerAvatar dashboard.
- Navigate to the File Manager from left sidebar of the application panel, this opens file manager right inside ServerAvatar, no FTP client needed.
- Enable the toggle button to show hidden files
- Navigate to the
public_html>>.htaccess, rename it to.htaccess_old - Create a new file by clicking on the New File button
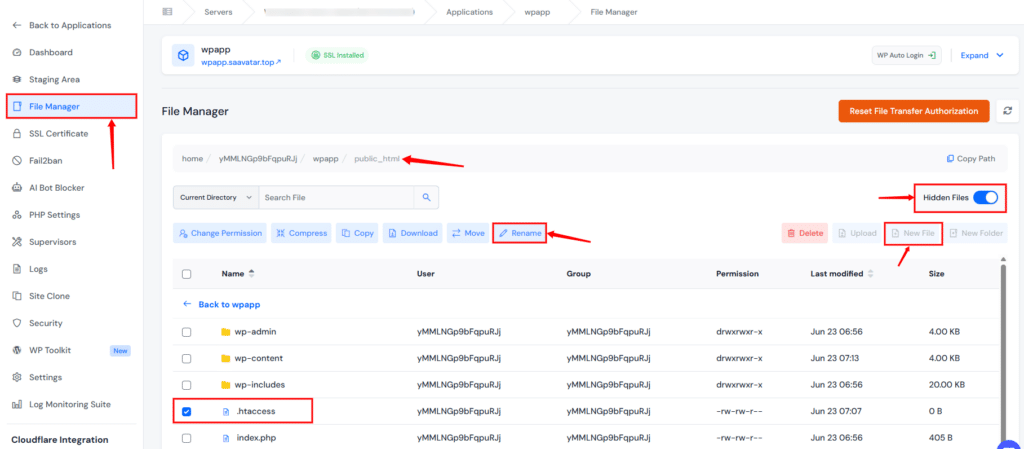
- Name it
.htaccessand open it for editing. - Paste in the default WordPress rewrite rules, as mentioned below:
# BEGIN WordPress

<IfModule mod_rewrite.c>
RewriteEngine On
RewriteBase /
RewriteRule ^index.php$ - [L]
RewriteCond %{REQUEST_FILENAME} !-f
RewriteCond %{REQUEST_FILENAME} !-d
RewriteRule . /index.php [L]
</IfModule>

# END WordPress- Save the file and close it.
Visit your site. If the 500 error is gone, the old .htaccess was the culprit.
Step 3: Increase the PHP Memory Limit
If repairing .htaccess didn’t solve it, the next most common cause is WordPress hitting its PHP memory ceiling. When a PHP script consumes more memory than allowed, the server terminates it and serves a 500 error instead of your site.
Method 1: Increase the PHP memory limit using wp-config.php (Manual Method):
- Connect to your server via FTP or the File Manager.
- Find the
wp-config.phpfile in your WordPress root directory, it’s in the same folder as.htaccess. - Download a copy of it as a backup.
- Open wp-config.php for editing and look for a line near the bottom that says something like
/* That's all, stop editing! Happy publishing. */. - Add this line just above that comment:
define( 'WP_MEMORY_LIMIT', '256M' );- Save the file and re-upload it if needed.
- Refresh your site. In many cases, this is enough to bring the site back.
- If you’re still seeing the error, try bumping it to 512M:
define( 'WP_MEMORY_LIMIT', '512M' );Method 2: Increase the PHP memory limit using ServerAvatar (Recommended, No File Editing Required)
If you are using ServerAvatar, you can increase the PHP memory limit directly from the dashboard without touching any files:
- Log in to your ServerAvatar dashboard, and open your WordPress application panel.
- Click PHP Settings section from the left sidebar.
- Find the Memory Limit option and increase it to
256Mor512M. - Click Update Settings.
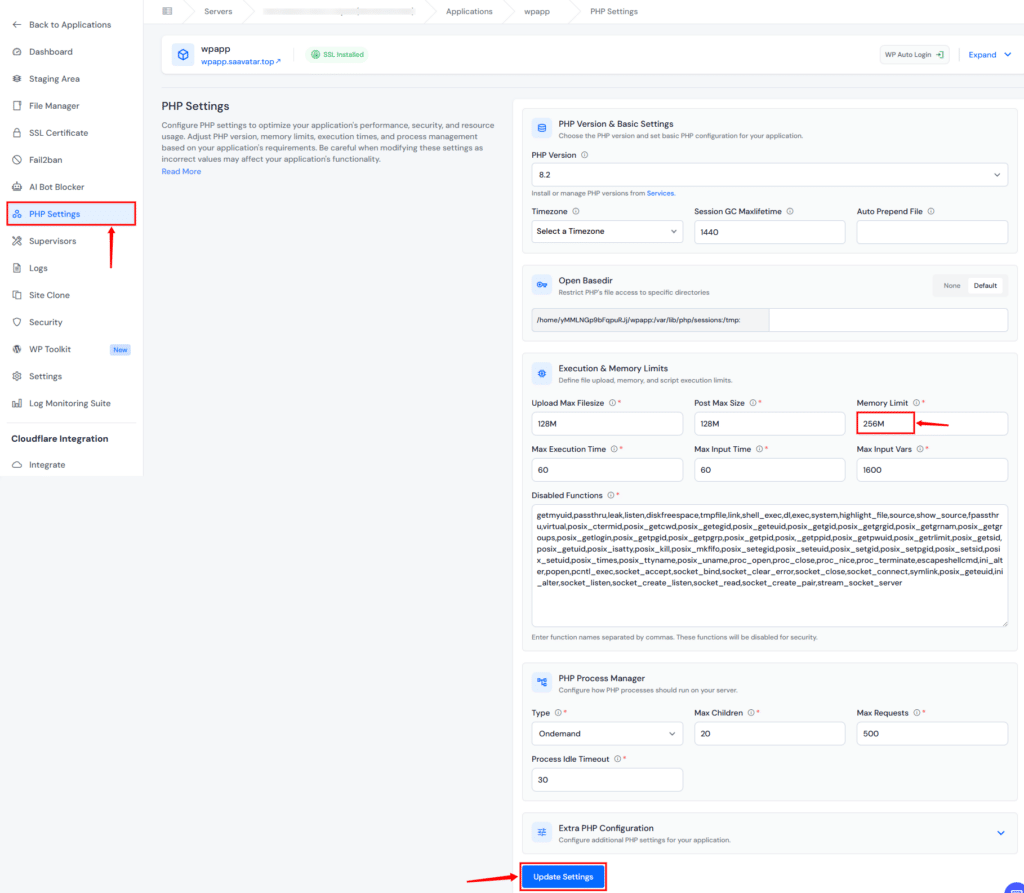
This takes effect immediately, no file editing, no FTP, no downtime.
A note from my experience: if increasing the memory limit fixes the problem, you’ve addressed the symptom, not the cause. Something in your setup is consuming more memory than it should, almost always a plugin. Disable plugins individually to identify the one consuming excessive resources before it causes the error again.
Step 4: Deactivate All Plugins
If increasing the memory limit didn’t help, or if the error comes back shortly after fixing it, a plugin is almost certainly the problem. The tricky part is that you might not know which one.
Method 1: If you can access the WordPress admin area:
- Go to Plugins >> Installed Plugins.
- Select all plugins using the checkbox at the top.
- From the “Bulk Actions” dropdown, choose Deactivate and click Apply.
- Your site should come back if a plugin was to blame.
- Now reactivate plugins one at a time, refreshing the site after each one.
- When the 500 error reappears, you’ve found the culprit.
- Leave that plugin off and check whether it has an update, if it does, update it. If it doesn’t, consider replacing it with an alternative.
Method 2: Using FTP (Alternative Method)
- Connect to your server via FTP or File Manager.
- Navigate to
/wp-content/. - Find the
pluginsfolder and rename it toplugins.deactivated. - WordPress will look for its plugins folder and, not finding it, will automatically deactivate everything. Your site should come back up.
- Once the site is working, rename the folder back to
plugins, your plugins will be restored but remain deactivated. Then reactivate them one by one through the WordPress admin as described above.
This approach has saved me more times than I can count, especially on client sites where someone installed a plugin from an unreliable source.
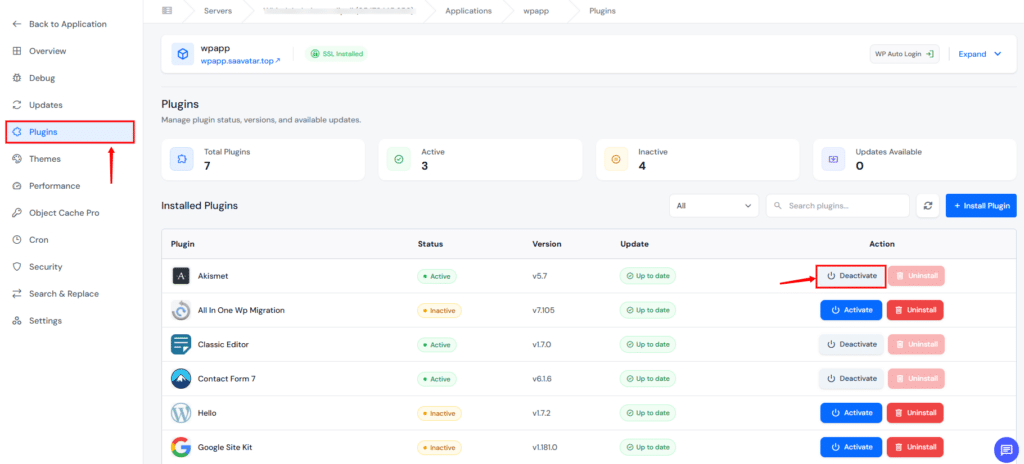
Method 3: Using ServerAvatar WordPress Toolkit (Recommended, No Admin Access Needed)
ServerAvatar’s WordPress Toolkit lets you deactivate plugins directly from the dashboard:
- Log in to the ServerAvatar dashboard, navigate to your WordPress application panel.
- Click WordPress Toolkit from left sidebar.
- Go to the Plugins section, you’ll see a list of all installed plugins with their names, versions, and status.
- Click Deactivate next to each plugin, one by one, refreshing your site after each deactivation to identify the problematic one.
You can also use the Search bar to quickly find a specific plugin, and use the status filter to show only active plugins.
Step 5: Switch to a Default WordPress Theme
In some cases, the issue may be caused by your theme rather than a plugin. This is less common, but it happens, especially after a theme update that introduced a bug or a custom code change that went wrong.
Method 1: If you can access the WordPress admin area:
- Go to Appearance >> Themes.
- If you have a default WordPress theme installed (like Twenty Twenty-Six, Twenty Twenty-Five, or similar), click Activate on it.
- If you don’t have a default theme installed, click Add New and install one, WordPress’s default themes are free and reliable.
Check your site. If the error is gone, your previous theme was the problem.
Method 2: Using FTP (Alternative Method):
- Connect to your server via FTP.
- Navigate to
/wp-content/themes/. - Download your current theme folder to your computer as a backup.
- Delete the theme folder from the server (the backup is on your computer, so nothing is lost).
- WordPress will automatically fall back to a default theme if one is available on the server, or you can download a default theme from
wordpress.org/themes, unzip it, and upload it to/wp-content/themes/. - Once the site is back up, you can investigate what went wrong with your previous theme.
- Often it’s a conflict in the theme’s
functions.phpfile, sometimes from custom code someone added.
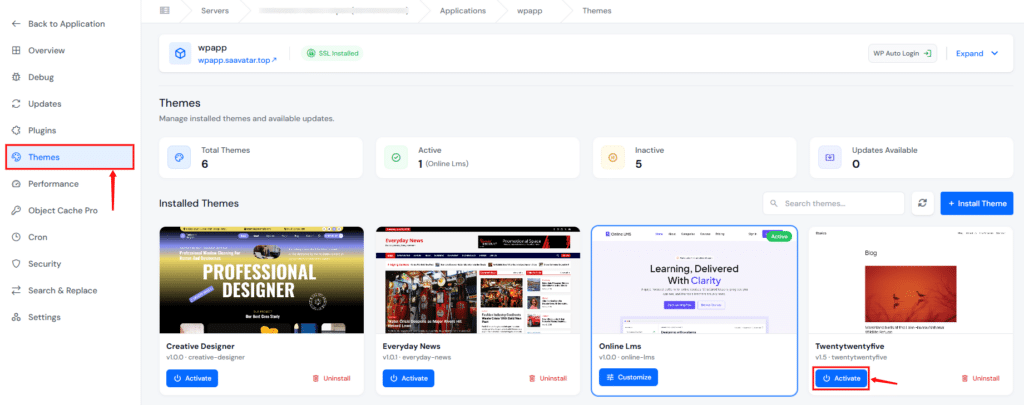
Method 3: Using ServerAvatar WordPress Toolkit (No Admin Access Needed)
If you can’t access the WordPress admin area, ServerAvatar’s WordPress Toolkit lets you switch themes directly from the dashboard:
- Log in to the ServerAvatar account, and navigate to your WordPress application panel.
- Click WordPress Toolkit from left sidebar.
- Go to the Themes section, you’ll see a list of all installed themes with preview images, names, and versions.
- Find a default WordPress theme (like Twenty Twenty-Six) and click Activate.
- If no default theme is installed, click Install Theme, search for a default theme, and install it first.
- Refresh your site to check if the error is resolved.
Step 6: Re-Upload WordPress Core Files
If none of the above steps worked, the WordPress core files themselves might be corrupted. This can happen after a failed update, an interrupted file transfer, or a migration that didn’t complete properly.
This step is safe, it will not touch your content, posts, pages, plugins, or themes. It only replaces the default WordPress system files.
- Download the latest WordPress from wordpress.org, click “Download WordPress” and save the zip file to your system.
Method 1: Using FTP (Manual Method)
- Unzip the downloaded file. Inside, you’ll see a
wordpressfolder. - Connect to your server via FTP.
- Navigate to your site’s root directory.
- Upload all files from the
wordpressfolder, choosing Overwrite for all existing files. - Let the upload complete fully.
This step replaces files in wp-admin and wp-includes but leaves wp-content entirely alone, your plugins, themes, uploads, and content are untouched.
Method 2: Using ServerAvatar File Manager (Recommended)
- Log in to your ServerAvatar account, and navigate to your WordPress application panel.
- Click on the File Manager from the left sidebar.
- Navigate to your site’s root directory.
- First, take a backup. Then navigate to
wp-admin/andwp-includes/and delete the files inside those folders only. Do not delete thewp-content/folder, that contains your themes, plugins, and uploads. - Upload the zip file that we have downloaded from WordPress using the Upload button.
- Once uploaded, uncompress the ZIP file by entering the root directory.
Once done, refresh your site. If core file corruption was the issue, the site should come back online.
Step 7: Enable Debug Mode to Find the Exact Cause
At this point, if the error is still there, you need more information. WordPress has a built-in debugging system that writes detailed error logs, these logs tell you exactly which file and which line is causing the problem.
Method 1: Using wp-config.php (Manual Method)
- Connect to your server via FTP or File Manager.
- Open
wp-config.phpin your site’s root directory. - Find the section where you added the
WP_MEMORY_LIMITline earlier. - Add below given lines above the
/* That's all, stop editing! */comment:
define( 'WP_DEBUG', true );
define( 'WP_DEBUG_LOG', true );
define( 'WP_DEBUG_DISPLAY', false );Here’s what each line does:
WP_DEBUG, true – turns on WordPress’s internal error reporting.WP_DEBUG_LOG, true – writes errors to a log file at/wp-content/debug.log`.WP_DEBUG_DISPLAY, false – hides error messages from visitors (you don’t want your users seeing PHP errors).- Save and re-upload the file if needed.
- Refresh your site, the 500 error may persist, but the log file is being written.
Now check the log file:
- Connect to your server via FTP.
- Navigate to
/wp-content/. - Open the file named
debug.log.
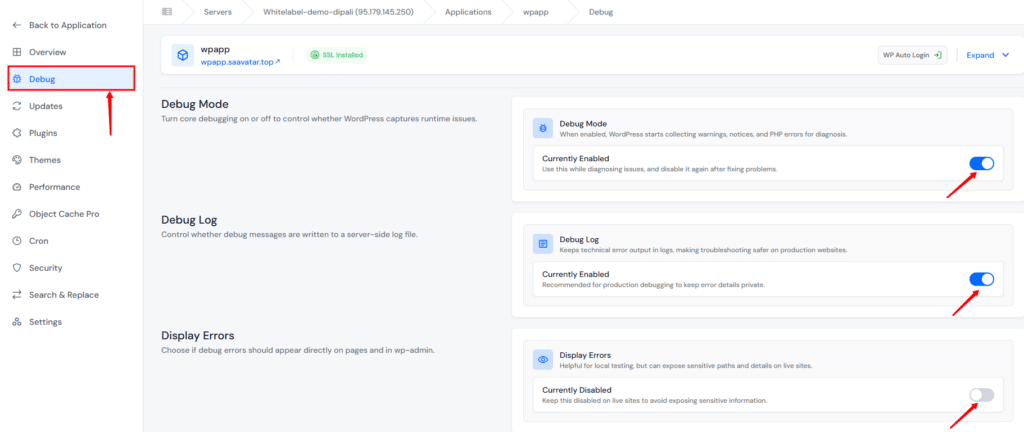
Method 2: Enable WordPress debug mode using ServerAvatar WordPress Toolkit (Easiest Method)
ServerAvatar lets you enable WordPress debug mode directly from the dashboard with toggle switches, no file editing required:
- Log in to the ServerAvatar dashboard, and navigate to your WordPress application panel.
- Navigate to the WordPress Toolkit section from the left sidebar.
- Go to the Debug section.
- Toggle the following options:
- Debug Mode: On (turns on WordPress internal error reporting)
- Debug Log: On (writes errors to
/wp-content/debug.log) - Display Errors: Off (hides PHP errors from visitors)
That’s it, the settings take effect immediately without editing any files.
- To view the debug log,
- go to File Manager
- Navigate to
/wp-content/ - Open
debug.log
Reading the Debug Log
- In ServerAvatar, open File Manager and navigate to
/wp-content/. - Open the file named
debug.log
The log shows the specific PHP error: which file, which function, and which line caused the crash. With that information, you can search for a targeted fix or share it with a developer.
Once you’ve identified and fixed the problem, go back to the WordPress Toolkit Debug tab and toggle Debug Mode to Off, or remove the three lines from wp-config.php.
If the errors point to a specific plugin or theme file, deactivate or replace that component. If the errors are in WordPress core files, re-upload the core files as described.
Step 8: Check File and Folder Permissions
Incorrect file permissions are an underappreciated cause of 500 errors. WordPress needs certain files to be readable and certain directories to be writable.
If permissions get changed, say, during a server migration or a bulk chmod, things can break in non-obvious ways.
The standard, safe permission settings for WordPress are:
| File/Folder | Recommended Permission |
|---|---|
| wp-config.php | 440 or 400 (read-only for owner/group) |
| .htaccess | 644 |
| wp-content/ | 755 |
| wp-admin/ | 755 |
| wp-includes/ | 755 |
| All PHP files in wp-admin and wp-includes | 644 |
| Individual plugin and theme folders | 755 |
To check and change permissions in most FTP clients, right-click a file or folder and look for “Permissions” or “CHMOD”
In ServerAvatar File Manager, just select the file and use “Change Permissions” button given in the menu.
Be cautious with wp-config.php: setting it to 777 (fully readable and writable by everyone) is a security risk and can actually cause errors. Stick to 440 or 400.
Step 9: Contact Hosting Provider
If you’ve worked through all the steps above and the site is still showing a 500 error, it’s time to loop in your hosting provider. There may be a server-level issue that’s outside what WordPress can control.
Before you reach out, collect a few things that will help their support team:
- Your debug.log contents
- The approximate time the error started
- Any recent changes you made to the site (plugin update, theme change, manual edits, server changes)
A good hosting provider will check server error logs, PHP configuration, and any server-side issues that might be invisible from inside WordPress.
ServerAvatar Support
ServerAvatar offers 24/7 support via live chat, ticketing system directly from support panel.
If your site is hosted on ServerAvatar and you’re stuck at this step, reach out anytime, the team can inspect server-level PHP-FPM logs, Apache/Nginx error logs, and resource usage metrics to pinpoint issues that WordPress debug mode alone can’t reveal.

Preventing the WordPress 500 Internal Server Error
Once you’ve got the site back, a little maintenance discipline goes a long way toward keeping the 500 error from coming back.
- Keep WordPress, plugins, and themes updated: Most updates include bug fixes and compatibility improvements. Before updating anything on a production site, test it on a staging environment first. This is one of the handiest features of platforms like ServerAvatar’s staging environment, which lets you clone your site and test changes before pushing them live.
- Only install plugins from trusted sources: The WordPress plugin repository is moderated, and premium plugins from established developers tend to be better maintained. Avoid plugins that haven’t been updated in over a year or that have poor reviews.
- Set a reasonable PHP memory limit: Don’t set it artificially low, but also don’t set it absurdly high. 256M is a good baseline for most WordPress sites. If you routinely hit the ceiling, that’s a sign something is wrong with a plugin or theme, address the root cause, not just the symptom.
- Monitor your error logs: Enable WordPress debug mode briefly every few months, check the debug.log, and close it again. Even if nothing is broken, glancing at the log once in a while surfaces warnings that might become problems later.
Conclusion
The WordPress 500 Internal Server Error is intimidating at first because of how little it tells you. But as you’ve seen in this guide, the actual causes are almost always one of a small set of predictable issues, and every single one has a fix.
Start with the quick wins, move through the systematic steps, and if all else fails, let the debug log show you exactly where the problem is. You don’t need to be a server administrator to work through this, you just need to know which file to look at next.
If you’d rather skip the manual troubleshooting and want a hosting environment that handles PHP configuration, server-level error logs, staging environments, and one-click application management for you, ServerAvatar is worth exploring.
FAQs
Can a 500 error fix itself?
A 500 error usually doesn’t fix itself. It may temporarily disappear if caused by server overload or caching, but the real issue still exists.
Will fixing the 500 error delete my content?
No, fixing a 500 error does not remove any content. Your posts, pages, themes, and plugins stay safe.
I increased the PHP memory limit and the site works now, but the error came back. What’s happening?
If increasing PHP memory works but the error returns, the real cause is still there. Most likely, a plugin or theme is using too many resources.
Should I give WordPress debug mode a permanent place in my setup?
No, Debug mode should not stay on a live site. It can expose errors and affect performance. Use it only for troubleshooting.
My site shows a 500 error only in the WordPress admin area, but the frontend works fine. What should I do?
If the error appears only in the admin area, it’s usually due to a plugin or theme conflict. Try disabling plugins or switching the theme.
Key Takeaways
- The WordPress 500 Internal Server Error is almost always caused by one of a few common issues: a corrupt .htaccess file, exhausted PHP memory, a bad plugin, or a theme conflict.
- Start with the quickest fixes, clearing cache and regenerating
.htaccess, before moving to deeper troubleshooting. - If you increase the PHP memory limit and it works, keep looking for the real cause: usually a plugin consuming too many resources.
- Enable WordPress debug mode to get specific error details instead of guessing.
- Prevention is simpler than cure: keep everything updated, use trusted plugins, and use a hosting environment that handles server-level configuration for you.
- Managed hosting platforms like ServerAvatar give you server logs, PHP configuration, staging environments, and one-click debugging tools that make diagnosing 500 errors significantly faster.
Related Articles
- Common WordPress Errors and How to Fix Them
- Complete Guide to Setting Up a Staging Environment
- Optimize WordPress Performance with Rewrite Rules & Cache
- How to Enable Debug Mode, Debug Logs, and Display Errors in WordPress
About the Author
Meghna Meghwani is a technical writer focused on Linux, Ubuntu, VPS hosting, server management, WordPress, PHP, Node.js, cloud hosting, and DevOps. She creates beginner-friendly tutorials, practical hosting guides, troubleshooting articles, and server security content designed to help developers and businesses manage applications and servers more efficiently.