Are you looking to effortlessly install and host N8N application to start automating your workflows without the hassle of complex setups or coding? Look no further. In this comprehensive guide, we’ll walk you through installing n8n on a VPS using ServerAvatar’s one click setup. Whether you’re a beginner or someone who wants to save time on deployment, this tutorial will help you get n8n running smoothly in just minutes.
What is N8N?
Imagine building powerful workflows just like Zapier, but hosted on your own server and more number of integrations. That’s precisely what N8N (short for “n8n.io”) enables you to do. It’s an open-source workflow automation software that connects with hundreds of applications and services. You can think of it as a self-installed alternative to well-known solutions like Zapier and Integromat, but with endless flexibility and autonomy.
N8N is suited for developers and technical users who require automation with business logic. Its ability to include features such as JavaScript functions, branching, as well as webhook triggers, makes it a great tool for any person automating business processes, marketing funnels, or data pipelines. Self-hosting it not only spares you from a subscription fee, but it also allows you complete ownership of your data.
Why Choose ServerAvatar for Hosting?
ServerAvatar is like having a sysadmin in your pocket. It streamlines the process of managing VPS servers from complex command line tools to a simple and clean looking dashboard. If you’re a developer, a business owner, or a marketer, ServerAvatar makes it a breeze to deploy, manage, and scale apps such as N8N.
Rather than spend hours configuring Nginx, SSL, firewall rules, monitoring and so on manually, ServerAvatar takes care of the process for you. With a click, you get app management, server metrics, backups, SSL certificates and even cron jobs.
So, when you combine N8N’s automation power with ServerAvatar’s ease of deployment, you’ve got a perfect combo for a rock solid self-hosted automation setup.
Pre-Requisites for Hosting N8N
- A VPS or cloud server from providers like DigitalOcean, AWS, Linode, Vultr, etc.
- At least 2 GB of RAM on the server.
- Minimum 40 GB of storage space available.
- A fresh server setup (recommended to avoid software conflicts).
- Ubuntu version 20.04, 22.04, or 24.04 installed on the server.
- Port 43210 must be open for ServerAvatar to connect properly.
- A domain or subdomain for your N8N app (optional but recommended).
- An active ServerAvatar account (free or paid).
Getting Started With ServerAvatar to Host N8N Application
Signing Up and Logging In
Start by heading over to ServerAvatar.com and creating an account. It takes just a few minutes, and you’ll land on a clean dashboard after verification. If you’re new, you might get a free trial, which is perfect for testing out the hosting process.
Connect Your Fresh Server with ServerAvatar
After signing in to your ServerAvatar dashboard, the next step is to connect your server. This is where ServerAvatar really shines and simplifies the entire setup process for you.
Instead of requiring you to manually install web server packages, configure firewalls, or set up users and permissions, ServerAvatar automates all of it. You just need to provide your server’s IP address and root login credentials (or SSH key). Upon submission, ServerAvatar securely establishes a connection to your server and automatically installs all required software such as NGINX or Apache, PHP, MySQL, and others.
This is a huge time saver for those who aren’t very familiar with command-line tasks or server configuration. In a matter of minutes, your server is configured to be the optimal place to host applications, websites or services, this makes ServerAvatar a developer-friendly tool due to it’s simplicity and ease of use for both developers and business owners
News: You can now purchase servers directly from the ServerAvatar panel. Check out how to purchase and connect our Manage Server in one step via ServerAvatar.
Follow this documentation for connecting your server with ServerAvatar panel with custom method. You can also follow the respective docs for connecting your servers from Amazon Lightsail, Vultr, DigitalOcean, Hetzner, and Linode. ServerAvatar provides easy integration with all of them.
Note: While selecting the tech stack, make sure to choose the tech stack as the Node stack(MERN stack), as N8N supports only this stack.
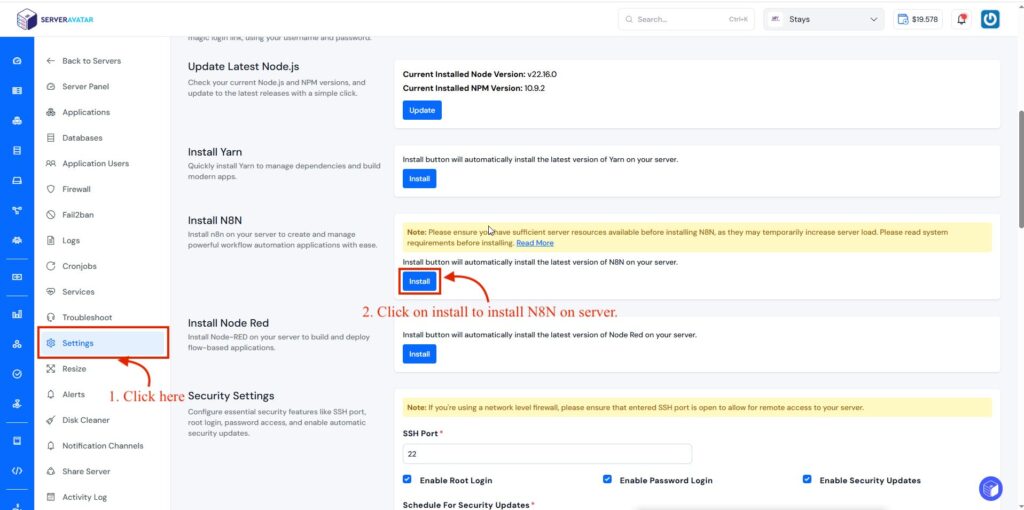
Install N8N on Your Server
Once you’ve connected your server to ServerAvatar, the first step is to install the N8N on your server.
To do this, navigate to the server settings as shown in the image below. From there, you’ll find the option to install N8N. Simply click on it, and ServerAvatar will begin installing latest version of N8N on your server.
The process typically takes just a few minutes. Once completed, N8N will be successfully installed on your server.
How to Host n8n Application Using ServerAvatar
Now, we will crate the application for the n8n. so, that anyone can access it, follow these steps to setup and deploy n8n.
- Navigate to the Applications section from the ServerAvatar dashboard.
- Click on the Create Application button.
- Enter a name for your application, such as “Test n8n Hosting”.
- Select the primary domain where you want to host your n8n application. You can use your own domain or choose a temporary domain provided by ServerAvatar for testing.
- Choose the One-Click Installation method.
- From the list of available applications, select n8n.
- Click on Create Application to begin the installation process.
- Wait for 3 to 4 minutes while ServerAvatar handles the setup, including downloading dependencies, configuring the environment, and installing the application.
- Once the setup is complete, you will see a success message.
- Click the URL link shown on the success screen to open and verify your n8n instance in a new browser tab.

📘 For More Help
Read this documentation for a detailed step-by-step guide with images and explanations:
👉 Click here to view the full guide on creating an n8n application in ServerAvatar
Automating n8n in the Background with ServerAvatar
When you install the n8n automation tool through ServerAvatar, the platform doesn’t just deploy the app, it also makes sure it runs reliably in the background without you needing to manage anything manually. This is done using a tool called PM2.
PM2 is like a smart assistant that keeps any process alive and healthy. It Keeps n8n running in the background even after you close your terminal or restart your server and also automatically restarts n8n if it crashes due to an error or unexpected issue. It logs all activity and errors, so you can view what’s happening at any time.
Normally, you would need to manually install PM2, configure it, and run commands to manage your app. But with ServerAvatar:
- PM2 is automatically installed and configured for you when you deploy n8n.
- Your n8n instance starts immediately in the background with zero manual input.
- You can monitor logs directly from the ServerAvatar panel and no command line required.
So, you don’t have to touch the terminal or deal with any code, ServerAvatar handles everything for you.

Secure Your N8N with SSL.
Running your N8N instance without SSL means your data is vulnerable. Information like API keys, login credentials, and webhook data can be intercepted easily if you’re using plain HTTP. Modern browsers also flag such connections as “Not Secure,” reducing trust and potentially breaking features that rely on a secure connection.
Thankfully, securing your N8N app is simple with ServerAvatar.
ServerAvatar provides a seamless, one-click solution to install SSL on your N8N instance and no server login or technical configuration required. You can choose to use the Auto Installer, which sets up a free Let’s Encrypt SSL certificate and automatically handles renewals, or go the manual route by uploading your own certificate and private key. Everything is managed through the ServerAvatar dashboard.
No need to touch NGINX files or run terminal commands, it’s all at your fingertips. Whether you’re a beginner or an advanced user, securing N8N with SSL using ServerAvatar is fast, reliable, and hassle-free.
Let ServerAvatar handle the heavy lifting, so you can focus on building powerful automations with N8N.
📘 Read our complete step-by-step docs for:
- Installing SSL using the Auto Installer
- Attaching a Manual SSL Certificate from your dashboard
💡 Tip:
If you’re managing your domain through Cloudflare and you’ve enabled the proxy (orange cloud) for your domain, make sure to follow the special Cloudflare SSL installation guide included in the docs to avoid conflicts or certificate errors.

ServerAvatar Log Monitoring Suite for N8N
ServerAvatar provides a powerful Log Monitoring Suite that helps you monitor everything happening on your server and applications, from basic request logs to traffic stats, performance, and error tracking, all in one place, and without writing a single command.
Whether you’re debugging an app, tracking traffic spikes, or watching for unexpected behaviour, ServerAvatar gives you the tools to monitor and act quickly.

Key Security Features ServerAvatar Provides:
- One-Click SSL Installation
Easily secure your N8N instance with HTTPS using the Auto SSL Installer. It sets up Let’s Encrypt certificates and handles renewals automatically without any terminal commands. NGINX configurations. - Manual SSL Certificate Support
Prefer using your own SSL certificate? Upload and install custom SSL by the ServerAvatar SSL installation feature for your site. - Secure Firewall & IP Blocking
ServerAvatar includes integrated firewall controls that let you block unwanted IPs and manage access rules for ports and services, helping reduce attack vectors. - SSH Key Management
Improve server login security by managing SSH keys right from the dashboard. Disable password login and allow access only via secure keys. - Fail2Ban Integration
Automatically bans suspicious IPs that attempt brute-force logins or access restricted areas. This helps prevent unauthorized access and bots. - Malware Scanning & Security Updates
ServerAvatar regularly checks for potential threats and ensures your server software is up-to-date with the latest security patches. - SFTP User Management
Create secure SFTP-only users for limited access to specific application files or folders, great for teams and clients. - Automatic Backups
Even if something goes wrong, you’re covered. ServerAvatar supports daily automatic backups to secure locations (local or remote).
Benefits of Hosting N8N Yourself
Cost Savings Over SaaS
The pricing of cloud based automation tools can skyrocket. Zapier, for example, charges hundreds per month for complex workflows. With N8N:
- You pay only for your VPS (as low as $5/month)
- No usage limits on workflows or executions
- One-time setup, infinite scalability
For freelancers, startups, or agencies, this is a game-changer.
Full Control and Customization
Self-hosting means no black boxes. You own:
- Where data is stored
- Who accesses it
- How often it’s backed up
You can also:
- Write custom nodes
- Integrate niche APIs
- Extend functionality beyond SaaS limitations
Need compliance with GDPR, HIPAA, or internal IT policies? Hosting N8N yourself ticks all the boxes.
Extra Tips and Best Practices
Keep Your Server Up to Date
Keep your server’s operating system and all of its software, up-to-date with security fixes to keep it secure and running smoothly.
Back Up Your Workflows
Your n8n workflows are valuable, so make sure you’re backing them up regularly. A good backup plan for your MongoDB database and n8n configurations can save you a lot of trouble if something goes wrong.
Keep an Eye on Server Performance
Pay attention to things like memory usage, CPU load, and storage space. Staying on top of your server’s health can help you avoid unexpected issues and downtime.
Use Your Own Domain
Running n8n on a custom domain not only looks more professional but also makes it easier for you (and your team) to access and manage your automation setup.
Try Out Integrations
n8n works with tons of apps and services. Spend some time exploring different integrations — you might be surprised how many tasks you can automate with just a few clicks.
Wrapping Up
With ServerAvatar easy one click set-up, hosting and automating with n8n have never been so easy. This guide has taken you through every steps like from choosing a VPS, linking it to ServerAvatar, installing n8n and protecting it with SSL, without the need for arcane tricks or Python wizardry.
If you’re a developer, a business owner, or even want to automate your home this configuration enables you to concentrate on developing workflows rather than maintaining infrastructure. Combining serverAvatar’s management power with the automation wonders of n8n will enable you automate tasks to optimize processes and expand, rather than scramble to keep up.
Begin your automation journey today and empower your business with increased productivity!