According to Statista research, cloud computing generates around 400 billion in revenue in 2021, showing no signs of slowing down. So it is clear that the usage of cloud computing is continuously increasing over time.
The cloud service market is mainly divided into three models, which are –
- Encompassing infrastructure
- Platforms
- And Software
The most demanding segment in cloud computing is Infrastructure-as-a-service (IaaS), providing access to a computing platform for application development.
Linode is one of the most prominent IaaS providers available in the market.
This guide covers everything you need to know about Linode as a cloud provider. This guide will make it easier to host websites on cloud and make changes in servers as required. We will cover all the important actions you can perform on your Linode cloud platform.
Let’s start with the basics, considering you have no experience with cloud platforms. However, if you are an expert, you can jump to the topics or only read the topics you desire.
What is Linode?
Linode, a cloud hosting provider founded in 2003, provides virtual private servers (VPS), storage, and on-premise networking solutions. It is used by individuals and business owners, including developers, small businesses, and enterprise customers.
Due to Linode’s infrastructure and flexible pricing, it is famous for those who need versatile and scalable cloud hosting solutions. Linode allows you to choose from various hardware configurations and operating systems to meet your specific needs.
Linode pricing options are very flexible. It offers a “pay as you go” payment option, which means you only pay for the computing resources you use.
Here is the Linode usage statistic graph showing the total number of sites in 1 million that use Linode.
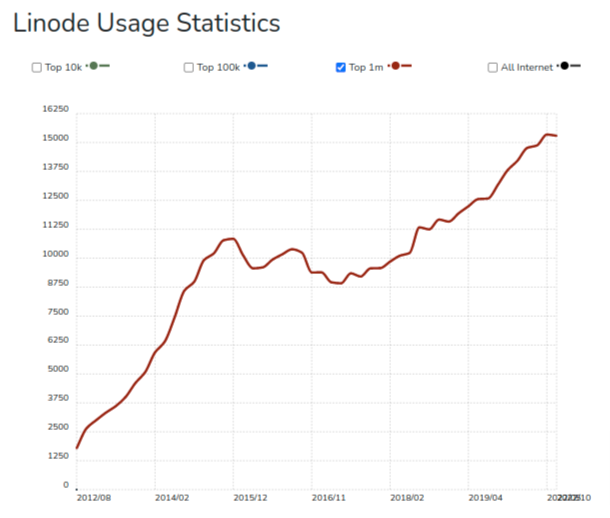
Linode has more than 10 data centres, and is trusted by 800,000 agencies all around the globe.
Different types of Linode cloud instances
Linode provides different types of cloud instances (Linodes types) that suit an individual’s business requirements.
Here are the different types of Servers you can create in Linode.
Dedicated CPU
A dedicated CPU is recommended for a full-duty workload where consistent performance is essential. Dedicated CPUs do not share their computing power with other instances, allowing you to utilize their total computing power.
However, we do not suggest using full computing power. You can set a CPU usage threshold limit of 50-60% to avoid any trouble during an instant traffic spike.
In Linode, Choosing a dedicated CPU plan results in accessing server monitoring graphs that help you identify server-level issues and other security events.
Shared CPU
A shared CPU plan is an excellent and cost-effective option for small businesses and startups with light to average workloads and don’t require a dedicated server with its own massive dedicated processing power. With a shared CPU plan, users can access a shared pool of cores/vCPUs on the same server, providing them access to a level of power and performance that’s usually sufficient enough for their needs.
For businesses looking to get the most out of their resources while not having to commit a large amount of funds that an individual or dedicated server would require, a shared CPU plan is a great option. It provides small businesses and startups with the capability for workloads that require a bit more processing power, without the need for investing in expensive or unnecessary server infrastructure.
High Memory
High Memory is optimized for in-memory databases and caches. If your business requires fast access to data by sorting it in system RAM instead of on disk, memory-optimised instances are a perfect choice.
These instances are ideal when you need RAM without increasing storage and vCPUs, providing customized solutions for businesses. This plan uses dedicated CPU cores.
GPU
GPU (Graphics Processing Unit) is a plan designed for large data processing tasks that include rendering graphics and images. It uses parallel processing in which multiple cores run at the same time parallelly.
How to Create a Server in Linode
The process of creating a server on Linod is straightforward. All types of Linode servers are created under the same creation process.
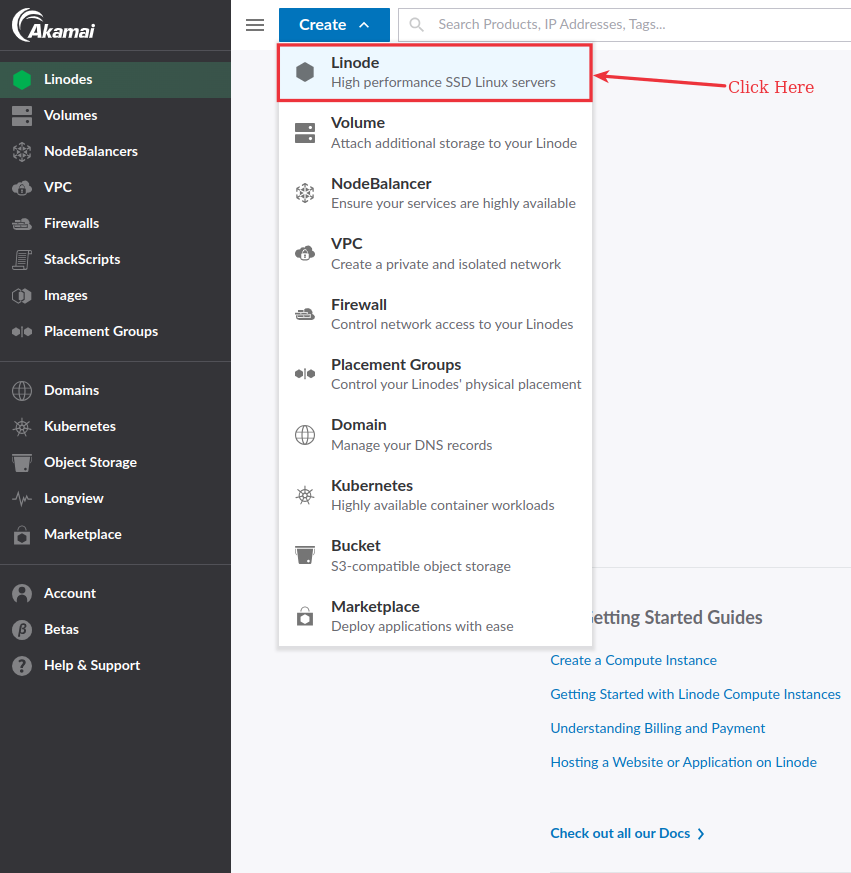
To create a high-performance SSD Linux server, log in to your Linode account, click the Create button at the top left of the screen, and select Linode from the dropdown menu.
You can now see the server creation wizard with multiple sections on your screen. Let’s understand each section step-by-step.
Step 1. Select a Region
It is recommended to select a location that is close to your users. It helps reduce latency time and positively impacts website loading time as well.
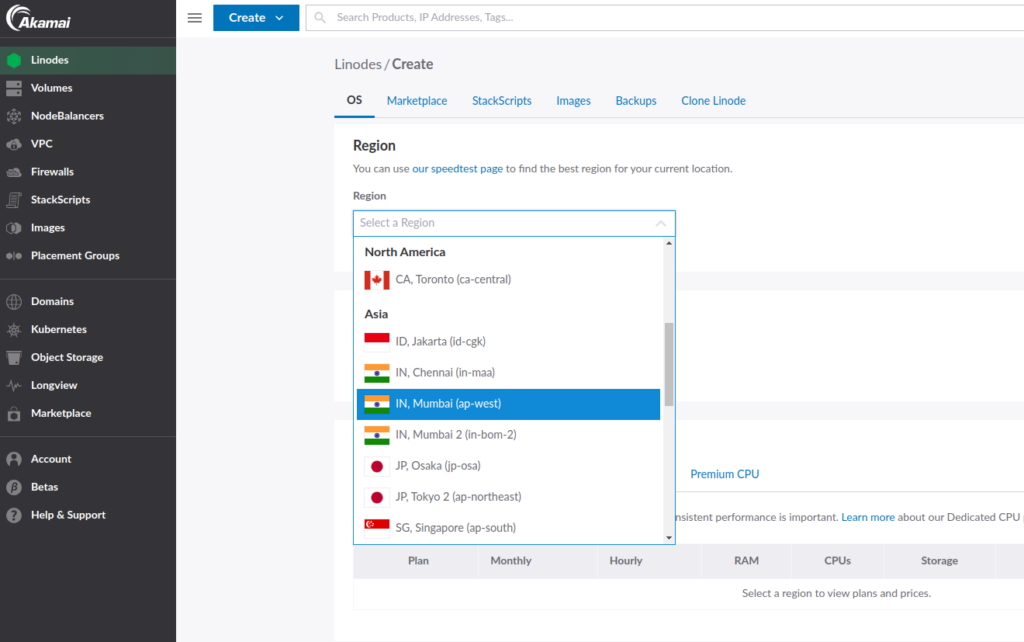
Use the speedtest page to find the best location to host your Linode Compute instance.
Step 2. Choose a Distribution (Distros)
A Distribution can refer to the different versions of Linux-based operating systems that support various use cases.
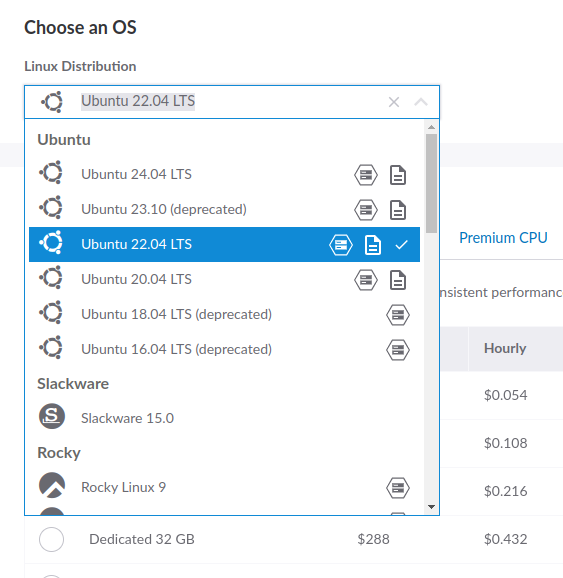
All distributions are built on Linux. One of the popular distributions is Ubuntu, the preferred OS for Software development and deployment of code. Arch is popular for extensive customization and total control over your system.
Choose an image (Operating System) that is suitable for your needs.
Note: If you want to manage your Linode server with ServerAvatar, select Ubuntu 20.04 or 22.04 as your operating system.
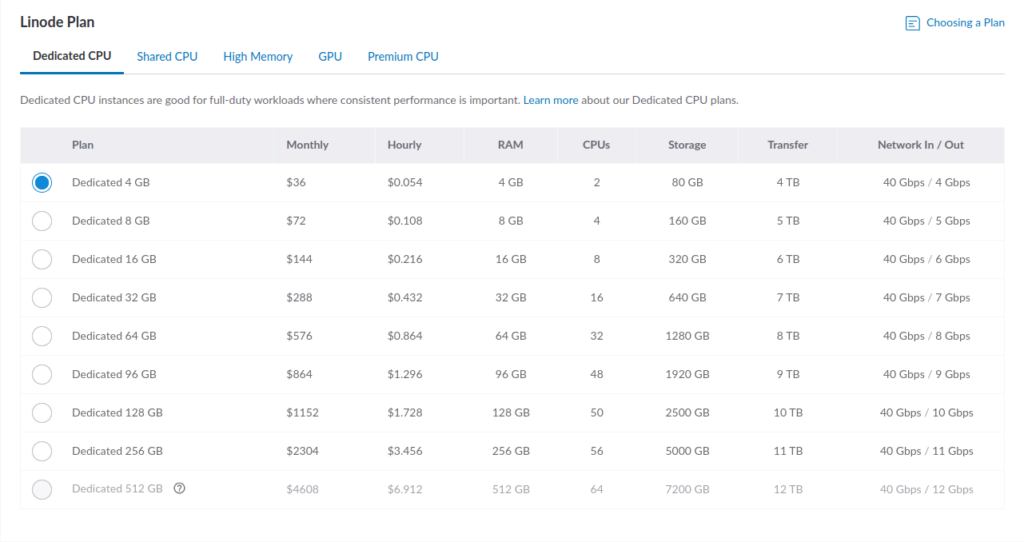
Step 3. Select Linode Plan
Selecting a server Plan varies from one business to another. There are more than 25 plans to choose from.
Server Types include:
Dedicated CPU
- Recommended for hassle-free workloads and consistent performance
- 4 GB – 512 GB memory, 2 – 64 Dedicated vCPUs, 80 GB – 7200 GB Storage
- Starting at $30/month ($0.045/hour)
Shared CPU
- Good for medium-duty workloads, and are a good mix of resources and price
- 1 GB – 192 GB memory, 1 – 32 Shared vCPU Core, 25 GB – 2840 GB Storage
- Starting at $5/month ( $0.0075/hour)
High Memory
- Optimized for memory-intensive applications. Best for a memory in-caching system
- 24 GB – 300 GB memory, 2 – 16 Dedicated vCPUs, 20 GB – 340 GB Storage
- Starting at $60/month ($0.09/hour)
GPU (Graphics Processing Unit)
- Accelerate highly specific applications like machine learning, AI, and video transcoding
- 32 GB – 128 GB memory, 8 – 24 Dedicated vCPUs, 640 GB – 2560 GB Storage
- Starting at $1000/month ($1.50/hour)
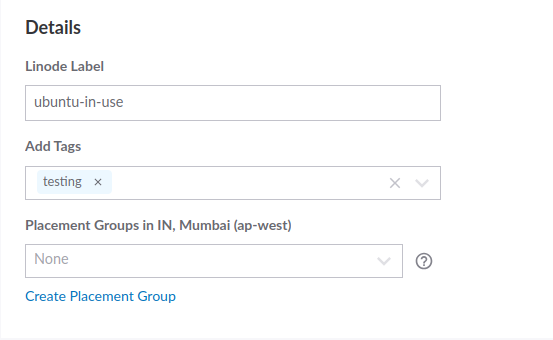
Step 4. Enter Linode Label and Tags
Adding Labels and tags helps identify your resources efficiently. You can use them to group your resources and access and manage resources using the Linode Manager. It can also help track your Linode usage and performance.
Placement Groups: This option lets you keep your Linodes close together by grouping them to improve performance, or distribute them for high-availability configurations.
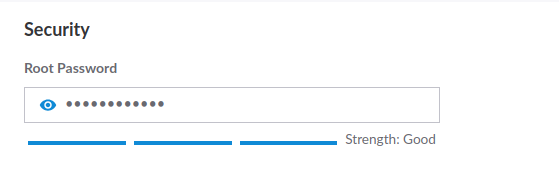
Step 5. Enter Root Password
A root password is an administrative password for your Linux server. It can be used to perform root-level tasks.
Step 6. Add an SSH Key
SSH key is used for remote operating system access, remote file transfer, and network management.
You can access the public key from your system using the [ cat ~/.ssh/id_rsa.pub ] command or generate an ssh key using a simple command.

Step 7. Attach a VLAN (Virtual Local Area Network)
VLANs are currently available in specific locations in Linode. It can be used to enable virtual private networks in the cloud.
It helps to reduce latency for latency-sensitive applications and enables you to add two Linode servers on the same VLAN with extra security.

IPAM (IP Address Management) is a methodology to enable end-to-end planning, deploying, and managing IP address infrastructure.
IPAM requires the use of the IP/netmask format, as shown in the above image.
Step 8. Add-ons
It is optional, but it is recommended to add a special add-on to your server to assist with management and organization.
Add-ons include a backup of your server and provide plans for Daily, Weekly, Biweekly, and Manual snapshots.

Enabling a Private IP allows your server to communicate with other servers in the same data center in Linode.
Step 9. Final Summary
Check all the details that you filled up on the above sections.

Click the Create Linode button, and your instance (server) will be ready to rock in a minute.
If you want to manage your Linode effortlessly with ServerAvatar, simply use the Direct Method to connect your server with ServerAvatar by following the steps below:
- Log in to your ServerAvatar account and click on the Create button, then select Server from the dropdown.
- Select the Direct Method for the server connection.
- Enter your preferred Server Name.
- Select a Tech Stack (Apache, Nginx, OpenLiteSpeed, or Node Stack).
- Choose a Database (MySQL, MariaDB, or MongoDB).
- Enable the toggle to install the latest LTS version of Node.js if desired.
- Select a Management plan and click on Connect Now.
- Copy the displayed command, then log in to your server via SSH and execute it as the root user.
- The server connection process will begin in your ServerAvatar account after executing the command.
Linode Overview and information
Once you create your Linode, you will have total control over your Linode. The Linode summary section page shows a general overview and the current status of your Linode.
To check the Linode Overview, navigate to the Linode cloud manager and click the Linode label link given in the first column of the Linode list.

As you can see in the below image, the Linode summary section helps you to easily manage and monitor the Linode.
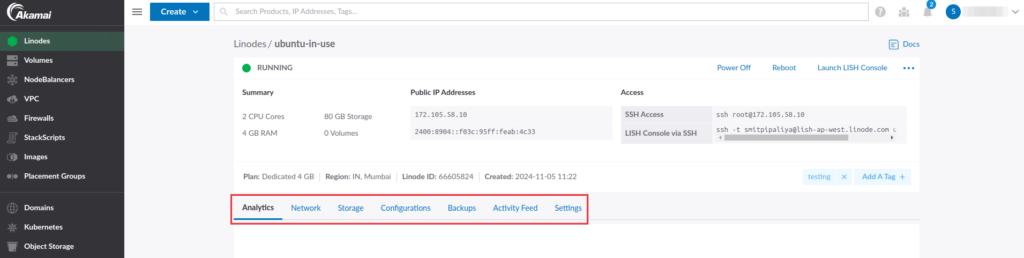
It gives you information that is quickly accessed at a time of emergency. If you want to Reboot your Linode, you can easily do it using just one click. Additionally, it gives information about billings and server usage statistics.
Note: The charges are calculated hourly.
It’s a central point of your account to access and manage your Linode actions without any hassle. Using statistics, you can plan for future usage, avoid unexpected charges, and streamline your experience.
Linode Resource Usage Monitoring
Server monitoring is a crucial part when it comes to detecting any performance issues before it affect the end user. It also helps to improve the efficiency of your server by checking the CPU or RAM usage currently and historically over time.
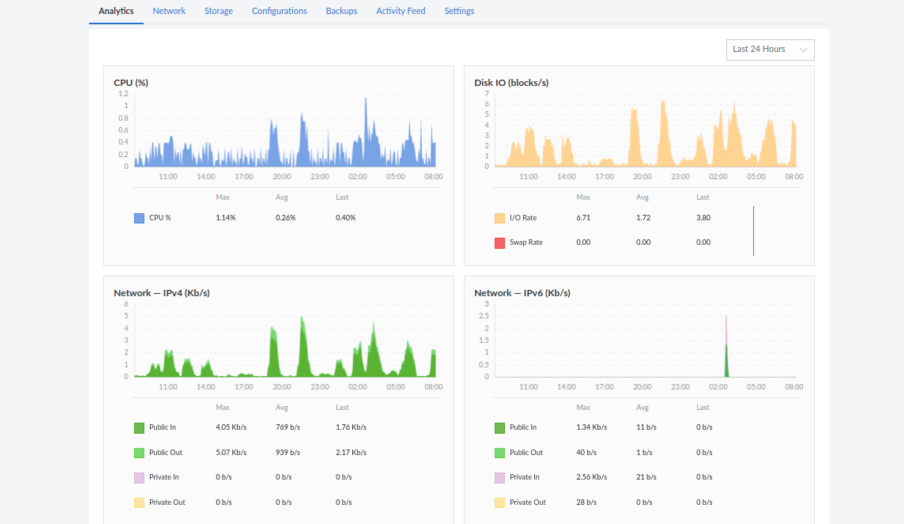
Linode provides the following graphs to monitor your system-level matrices.
- CPU Usage
- Disc IO
- Network-IPv4
- Network-IPv6
The above four matrices help you identify your server resources using appropriate graphs. To access the Linode monitoring graph of your specific Linode (server), navigate to Linode Cloud Manager and click on the link for the particular Compute Instance.
You’ll see the Linode summary section with a graph like the following image.
1. CPU Usage (in %)
CPU Usage is the actual computing power usage of your server. The CPU Usage graph allows administrators to monitor the usage of CPU used by system components and users, presented in a percentage format and an easy-to-understand interface.
Each of your CPU cores is capable of 100% utilization. Let’s say you have two CPU cores; the total max utilization will be 200%. But only in some cases, which means a shared server does not allow you to use full computing power to show the same graph and utilizations as a dedicated server.
The CPU usage graph looks like the following image.
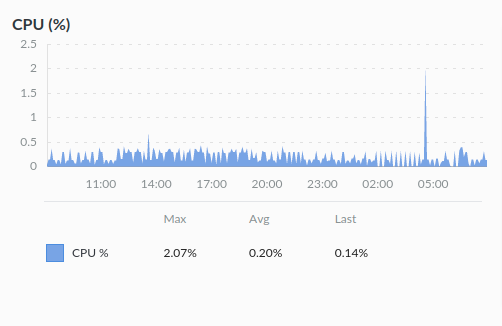
The X-axis represents the time depending upon the interval period you selected.
Y-axis represents the CPU in percentage.
Note: If you are a ServerAvatar user, you don’t need to manually calculate the CPU usage for multiple cores. ServerAvatar will automatically display the percentage of CPU usage based on the number of cores you have on your server.
2. IPv4 network traffic
The IPv4 network traffic graph shows the amount of incoming and outgoing bandwidth/network traffic your server is using.
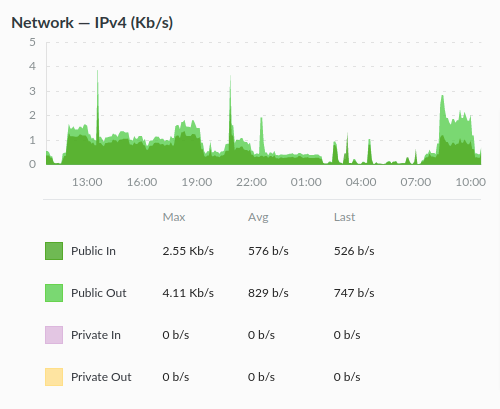
As you can see in the above graph, the X-axis represents the Time, and the Y-axis represents the total amount of network traffic in bytes or bits per second.
Let’s discuss four different aspects of IPv4 network traffic:
- Public in: This shows the total number of incoming traffic from the internet to your public IPv4 address. For example, if someone visits your site hosted on the server, their device will send a request to the server using the public IPv4 address.
- Public out: This shows the total number of outgoing traffic from the server via the public IPv4 address. In this case, the server responds to the request from the visitor’s device and sends website data.
- Private in: This represents the total incoming traffic from private IP addresses associated with Linode.
- Private out: This indicates the total outgoing traffic from private IP addresses associated with Linode.
3. IPv6 network traffic
This is the latest protocol in use due to the growing number of devices on the internet. IPv6 uses 128-bit addresses. Similar to IPv4 network graphs, the IPv6 graph for Inbound and Outbound matrices displays the total amount of incoming and outgoing traffic for IPv6 addresses associated with Linode.
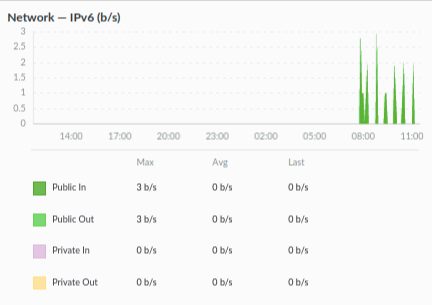
Both IPv4 and IPv6 network graphs are valuable for monitoring network traffic and also identifying potential issues happening on the server.
4. Disc I/O
It refers to the process of reading data from the storage device (hard drive, SSD) or writing data to the storage device. The Disc I/O graph is measured in blocks per second, where a block is the data storage unit used to organize and store data on a hard drive or SSD-like storage device.
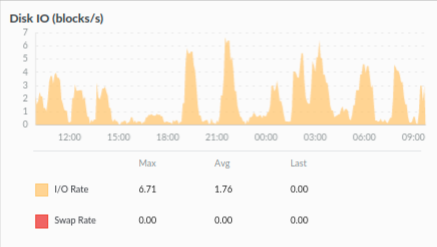
The two performance metrics in the Disc I/O graph are the following:
- I/O Rate: I/O rate measured in input/output operations per second. It indicates the rate at which data is being transferred from and to the disc. A high I/O rate suggests that the disc is heavily used and needs to be optimized.
- Swap Rate: The swap rate is measured in kilobytes per second (KB/s). The swap rate refers to the amount of data transferred between the disk’s swap space and the system’s RAM. Swap memory is the temporary memory stored on the disk that is used when a system’s memory (RAM) is full.
How to use LISH console in Linode
The LISH console (Linode shell) provides direct access to your Linode. You can use the LISH console for troubleshooting and recovery purposes.
Both LISH console and SSH are methods for accessing a Linode remotely, although some key differences between LISH console and SSH are:
- Unlike SSH, LISH is a web-based terminal access service that operates through a web browser.
- LISH uses your Linode account credentials for login, while SSH uses SSH credentials.
- LISH can be accessed directly from your cloud manager, while SSH can be accessed from anywhere using SSH credentials.
- You can run any commands and programs on your VPS through SSH access, while LISH has some limited command capabilities.
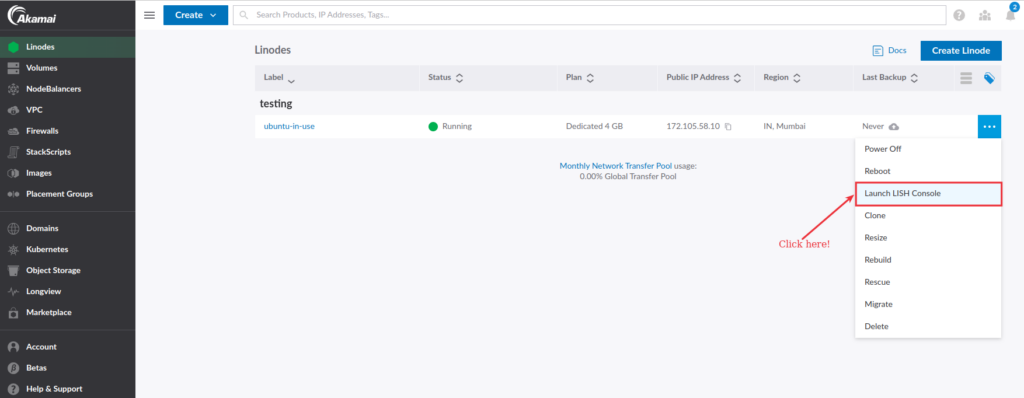
To access the Linode shell for your specific Linode, click on the three-dot icon next to your Linode and select the Launch LISH Console from the dropdown menu, as shown in the image below.
You will see the console area as shown in the image below.
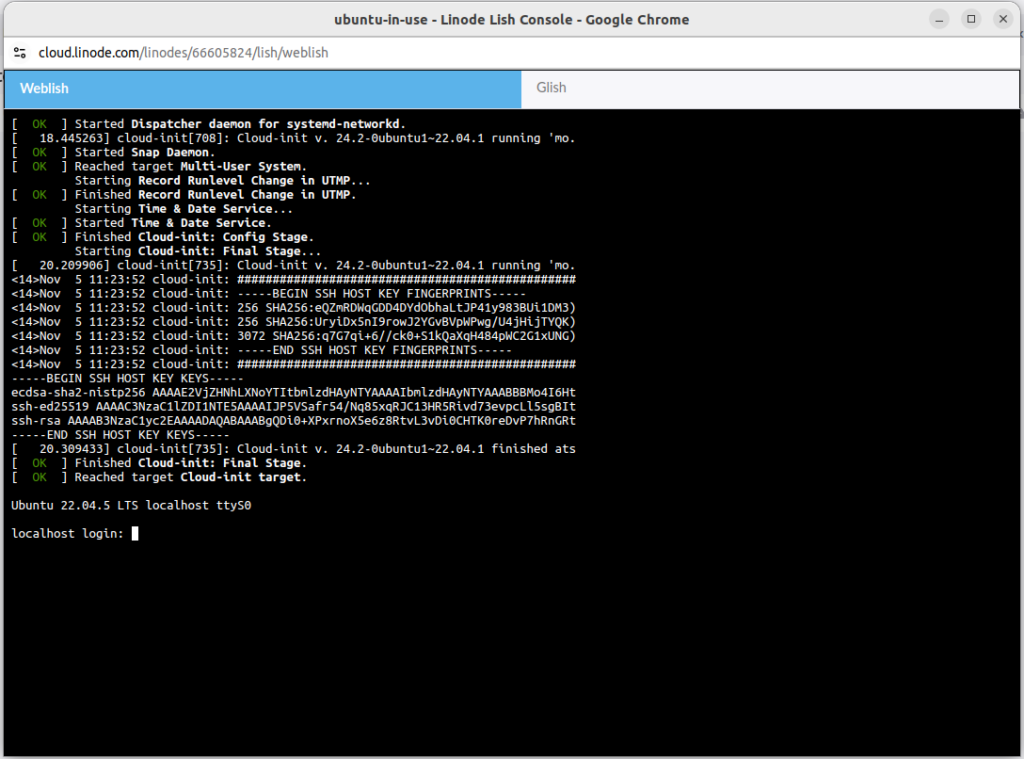
You can log in to your console with the username “root“ and the password you set up while creating an account.
It is not recommended to use the LISH console for regular purposes or for performing automated tasks.
Access Linode via SSH
Accessing your Linode via SSH provides a flexible and secure way to access the Linode internal shell. One of the main advantages of SSH compared to LISH is that you can access your Linode from anywhere.
You can use SSH regularly or perform more advanced tasks like automating, transferring data, etc.
To find the SSH credentials of your Linode, go to your Linode cloud manager and select the appropriate Linode by clicking on the Linode label link.
You’ll see the SSH Access credentials in the Linode summary section, as shown in the image below.
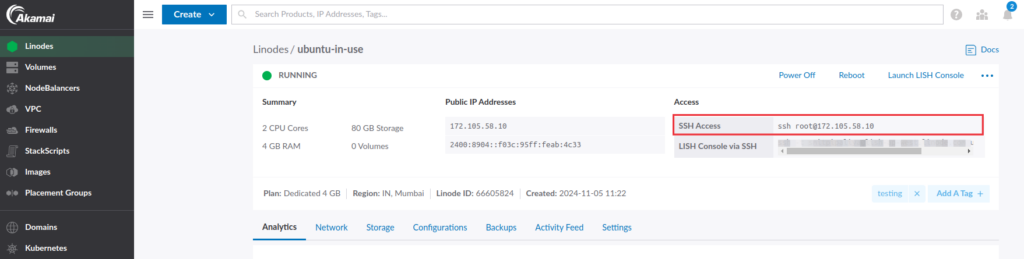
If you are using Linux or Mac, paste the command as shown in the above image into the terminal. If you are a Windows user, use PuTTY.
You will be prompted to enter the password that you created during the Linode creation process.
You can reset the root password on your Linode in case you forgot the password.
Restart or Reboot a Linode
It is not necessary to restart your Linode, but there are several reasons why you might consider doing so, including:
- Software updates
- Configuration changes
- Security reasons
- Troubleshooting
- Performance improvement, etc.
It is recommended to notify your users or customers about the planned restart and take a snapshot of your Linode before rebooting.
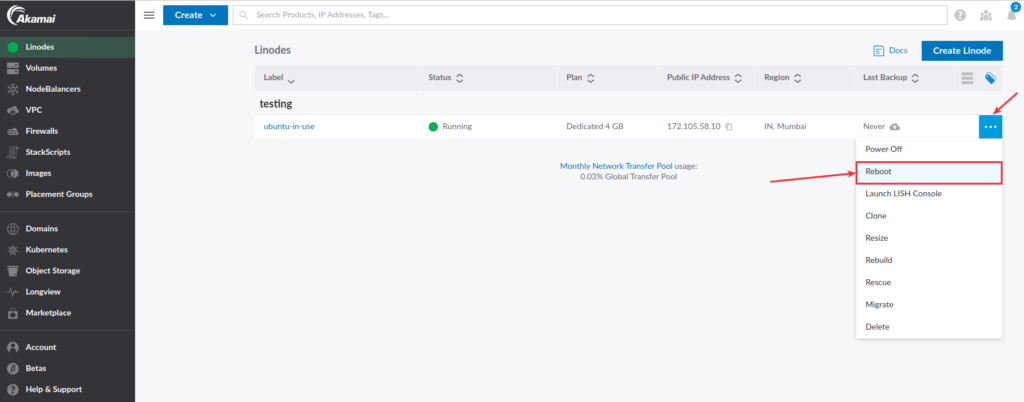
Linode allows you to easily restart your server when it is required. The process is straightforward.
You will see the list of Linodes on the screen. Click the Three dot icon next to the specific Linode instance and click on the Reboot option as shown in the image below.
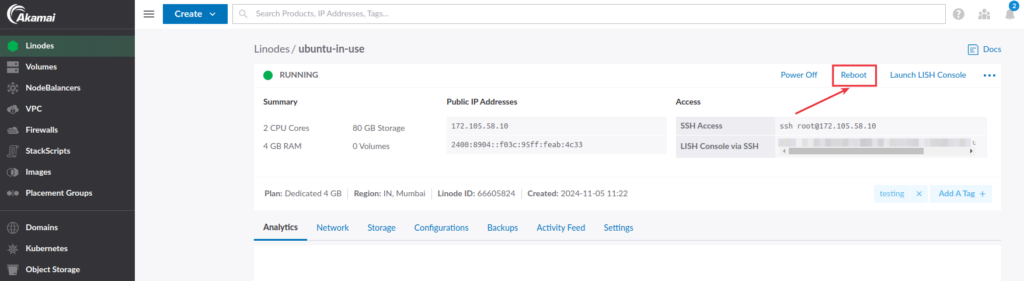
Alternatively, you can find the Reboot link from the summary section, as shown in the image below.
Note: Rebooting the server results stops all the running processes.
Pro Tip: It is recommended to restart your server periodically. You can restart your server every week too. It is good practice and helps to maintain optimal performance.
Resize (Scale) a Linode server
Resizing your Linode refers to upgrading or downgrading your Linode Plan and resources, which directly links to your usage capacity.
It might be possible that you’re not using your Linode as much as you expected, and it is necessary to downgrade the Linode plan and pay only for the resources you actually use.
Unlike other cloud hosting services, Linode allows for both temporary and permanent upgrades and downgrades.
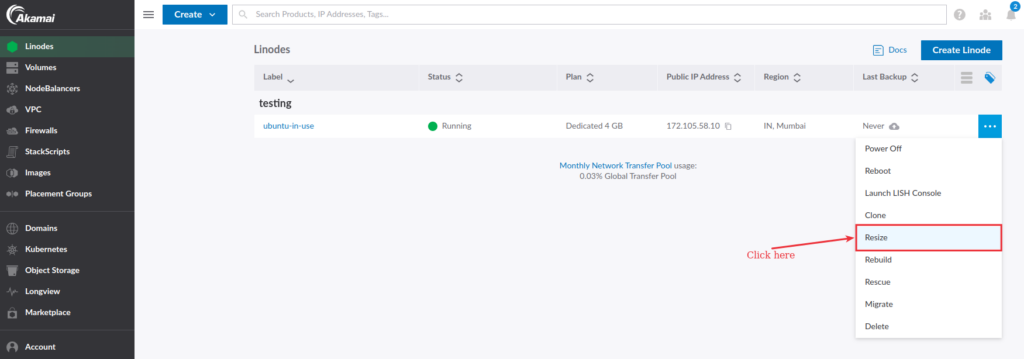
To resize your Linode, go to your cloud manager, click the three-dot icon next to your specific Linode, and select the Resize option from the dropdown menu.
On the next screen:
- Select a Linode plan as per your requirements.
- Enable the Auto Upgrade Disc option to avoid running out of storage space in the future.
- Enter your Linode name to confirm the resizing process.
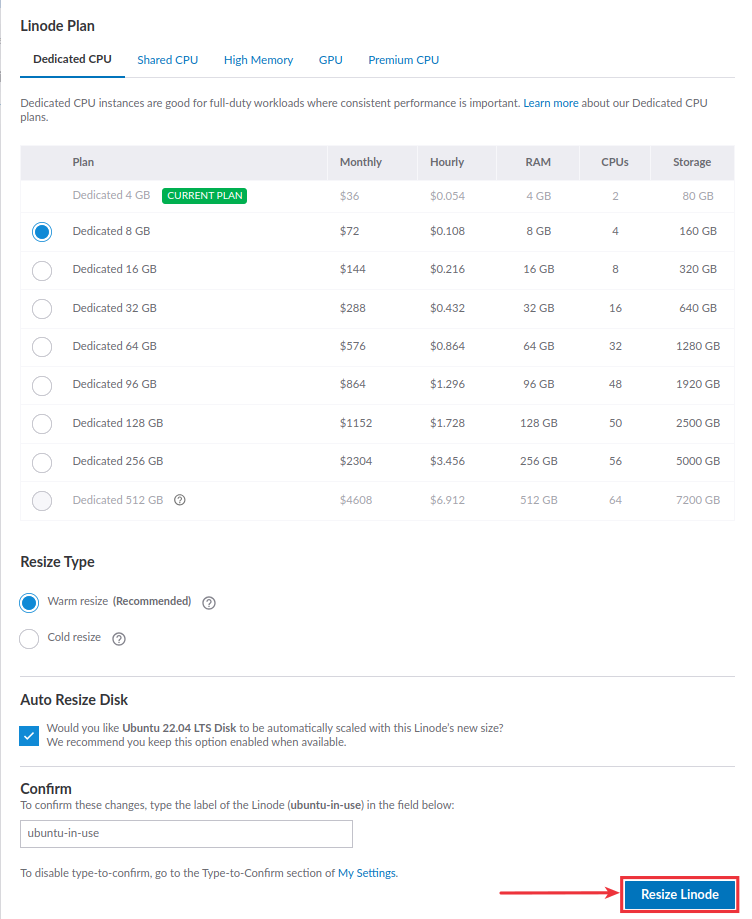
Click the Resize Linode button once you have completed the fields.
Create a Backup plan for Linode Server
It is recommended to set up automatic backups for your Linode disc regularly to prevent unexpected disasters. Backup plans are charged separately and can be added to your monthly bills.
You’ll be charged 20% of the cost of your Linode plan; for example, a $20 Linode plan takes an additional $5 monthly charge.
To create a backup of your Linode, go to your Linode summary section, click on the Backups tab, and then click the Enable Backup button. You’ll see the screen as shown in the image below.
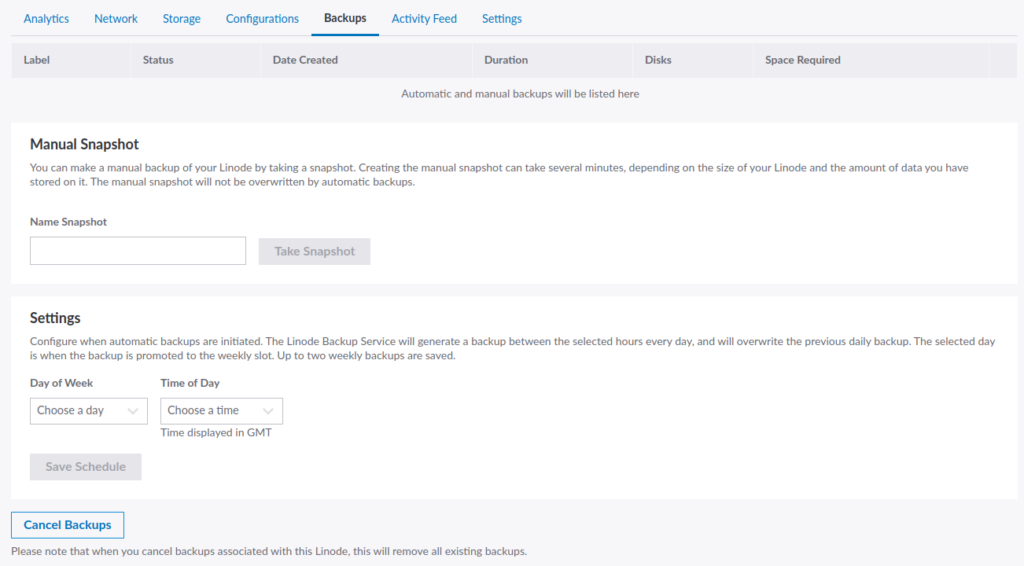
As you can see, there are two subcategories on this screen, including:
- Manual Snapshot/Backup: Create a manual backup of your Linode by entering the Snapshot name in the Name Snapshot field. This manual backup will not be overwritten or affected by automatic backups. However, creating a new manual snapshot will remove any existing backups.
- Settings: Automate your Linode backup process by selecting the Day of the Week and Time of Day in the appropriate fields. Note that this will overwrite the previous daily backup, and up to two weekly backups are saved.
All the backups will be displayed on the screen, as shown in the previous image. If you cancel your backup plan, all the existing backups associated with this Linode will be deleted.
Create Linode instance Snapshot
Creating a backup of your Linode is essential to preventing event failure related to Linode instances. It is also beneficial for data protection, testing, and development purposes.
A Linode snapshot can be used to create a backup of your Linode’s data and configuration.
To create a snapshot, go to your Linode cloud manager, select the Linode Instance from the list, and navigate to the Backup tab, as shown in the image below.
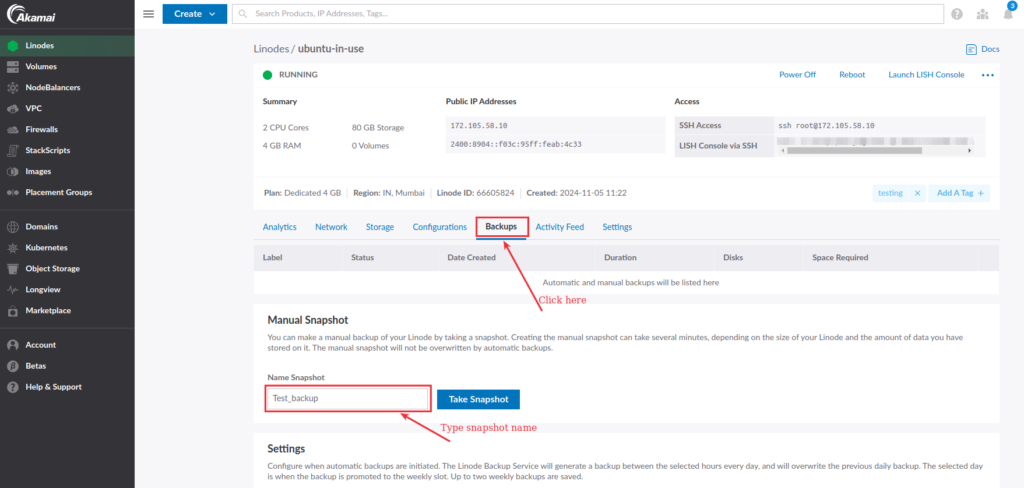
Note that: Linode stores only one snapshot for a compute instance. Creating a new snapshot will overwrites the existing snapshot.
Enter the snapshot name in the Manual snapshot field and click on the Take Snapshot button. It creates an instant snapshot of your Linode instance.
Create and manage Firewalls for Linode Cloud Instance
Firewall plays a vital role when it comes to the security of your network. It protects your Linode from malicious activities and prevents unauthorized users from accessing your private network.
There are 65535 ports available on any Linux server, and various services on the internet that we install on our server operate on different ports. For example, SSH runs on port 22, DNS service runs on port 53, HTTPS runs on port 443, and many more.
You need to open several necessary firewall rules to secure your website. Linode offers some of the most used predefined rules you can add to your cloud firewall with one click. It includes SSH(22), HTTP(80) and MySQL(3306) ports and more.
Create Linode firewall rules
To create Linode firewall rules, go to your Linode Cloud Manager and select Firewalls from the panel’s sidebar menu.
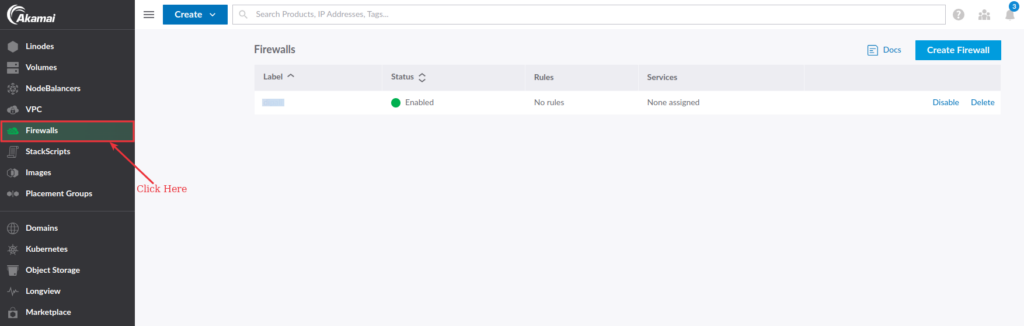
Rules are separated into two sections, which are:
Inbound Rules
Inbound rules define which IP addresses, ports, and protocols are allowed to connect to the Linode-protected network. It controls the incoming traffic that is allowed to reach the system. For example, setting up port 80 on your Linode results in allowing all incoming web traffic.
To create an inbound firewall rule for your Linode, click the Add an Inbound Rule button.
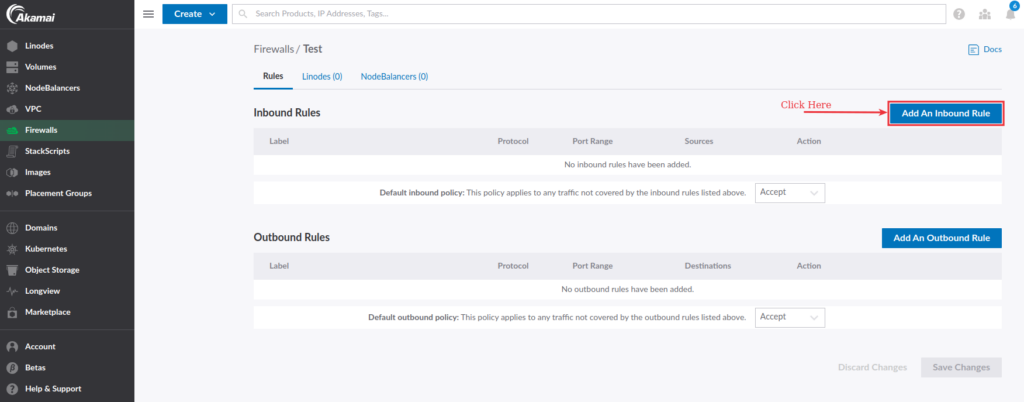
You will see the form as displayed in the following image.
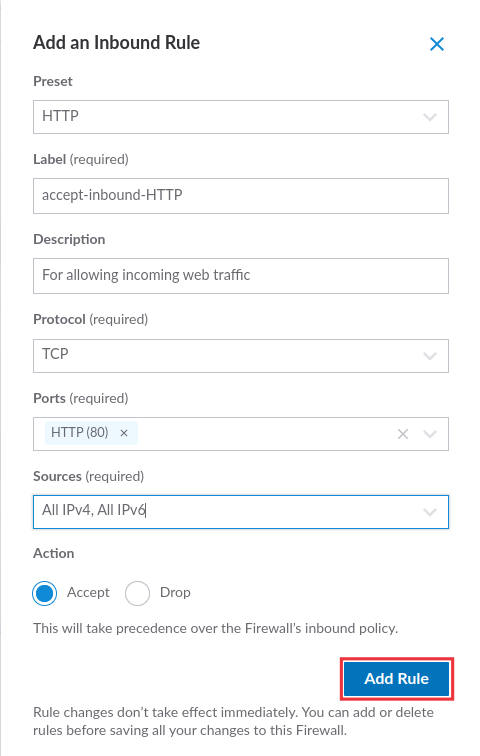
- Preset: Select a firewall rule from the useful predefined firewall rules (optional).
- Label: Add a label as an identifier of your Linode firewall rule (optional).
- Description: Enter a description for your Linode firewall rule (optional).
- Protocol: Select a transport layer protocol for your firewall rule. UDP is the recommended choice for a transport layer protocol.
- Ports: You can select from the list of common predefined ports or select the custom port range configuration option. Note that you can add up to 15 ports to a single cloud firewall rule, which is required only for TCP and UDP protocols.
- Sources: Select from a list of available sources that limit incoming connections to specific IP address/addresses or to the selected internet protocol.
- Action: You can allow or drop/deny traffic based on the firewall rule you create. For example, you can create a firewall rule with a Drop action that blocks incoming traffic from a specific IP address on port 80.
Outbound rules
Outbound rules control the outgoing traffic that is allowed to reach the external network. For example, XYZ company has set up outbound rules in its firewall that block outgoing traffic to the IP addresses of social media websites.
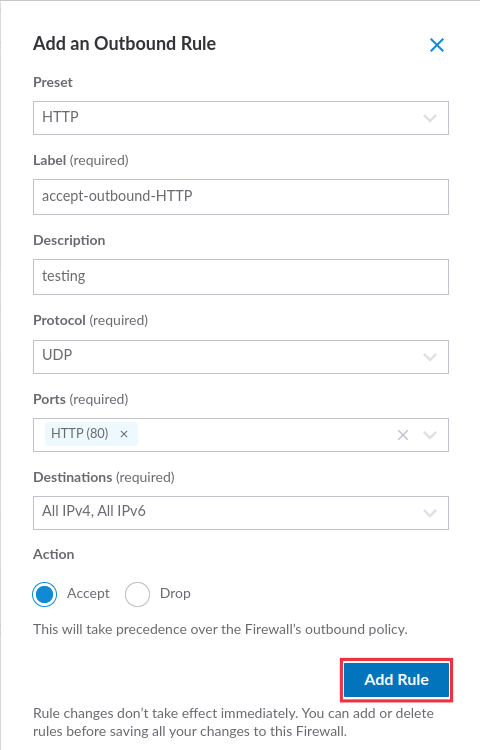
As we select sources for the Inbound firewall rule, you can Select Destinations that limit the outgoing connection to specific IP address/addresses or the selected internet protocol.
Additionally, you can edit your created firewall rule as required.
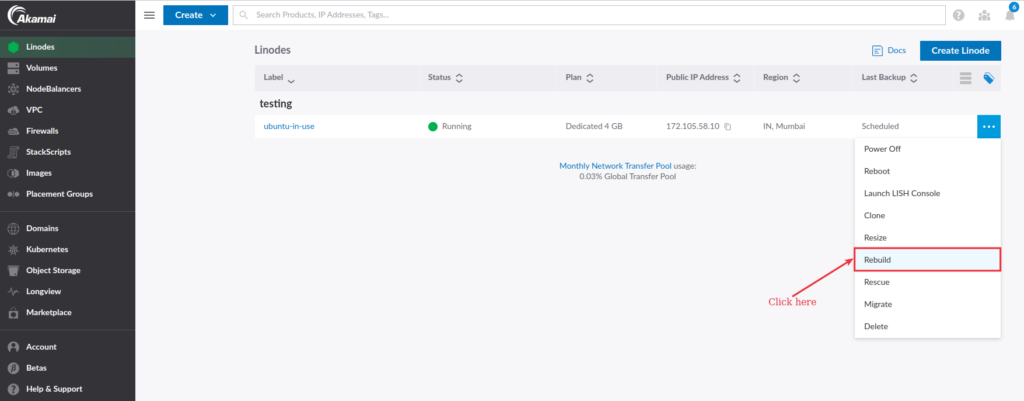
Rebuild a Linode Server
The process of Rebuilding a Linode creates a new Linode with the same configuration as an existing one. Many of us need clarification about what happens when rebuilding a Linode. Here are the points that help you understand the basics.
- The existing Linode will be deleted with all your data, files, and installed software.
- A new Linode will be created with the same configuration as the previous one, allowing you to retain the same Linode plan.
- Backups of the previous original Linode will not be affected.
- Rebuild a Linode to help update your server with the latest security patches. It can also help you resolve issues regarding updates. It can also be helpful if you want to change your operating system’s distribution (image) or version. For example, upgrade your operating system from Ubuntu 18.04 to Ubuntu 20.04.
To rebuild a Linode, go to your Linode cloud manager and click the three-dot icon next to the Linode you wish to rebuild.
Now, complete the details to create a new Linode. You will need to provide the following information:
- Select whether you want to deploy the Linode on a new image, or you can select community StackScript or an account StackScript. StackScript automates the process during the deployment of the new Linode.
- Choose an image or StackScript from the dropdown menu.
- Set the root password.
- Add your SSH key and enter the name of your existing Linode.
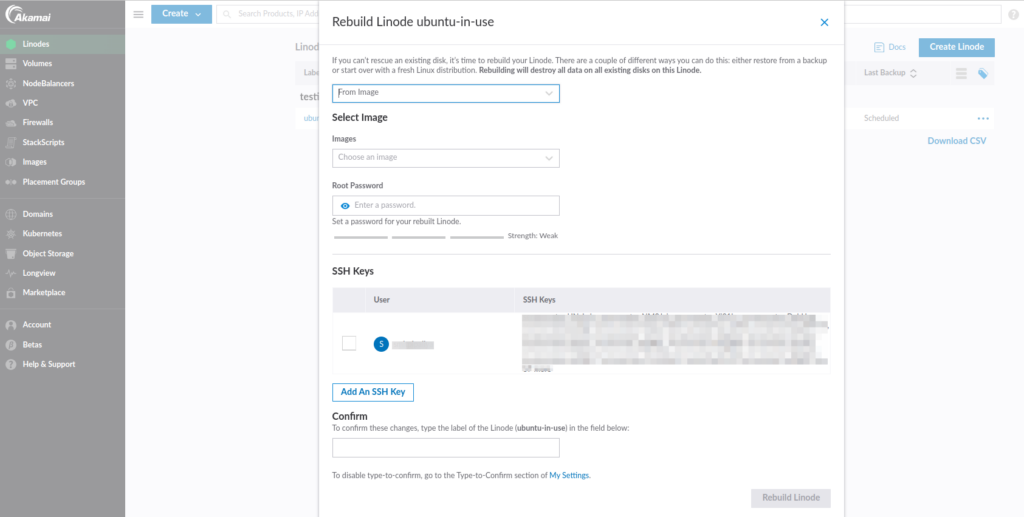
Click the Rebuild Linode button and the new Linode will be deployed in a minute or two.
Delete a Linode cloud instance
If you don’t need your server anymore, you can delete it with just a few clicks. Before deleting the Linode, ensure that the data associated with the Linode you want to delete is not currently in use.
In case you want that data, be sure to create a snapshot of your Linode before deleting it.
To delete a Linode, navigate to the Linode cloud manager, click the three-dot dropdown icon, and click the Delete option.
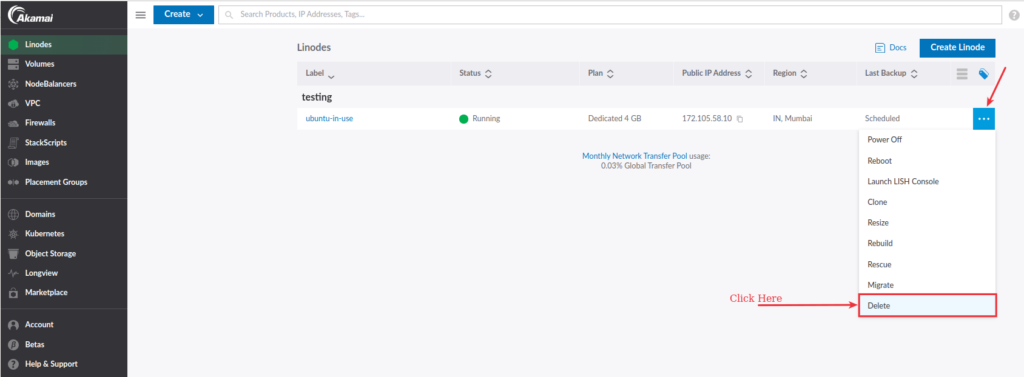
It will finally ask you, “Are you sure you want to delete this server”. Click OK to finalize the deletion process. Your server will be deleted within seconds.
How to Manage DNS for Domain in Linode
If you plan to host a website on a Linode instance, you will need to manage the DNS of your domain. You can select any DNS provider as long as you are pointing the A record to the correct IP address, which is the IP address of your Linode server.
The best choice to manage DNS would be through Cloudflare. However, if you do not want to use Cloudflare or any other DNS provider, you can manage your domain’s DNS records using Linode’s DNS service.
Note: DNS management is free in Linode.
To start managing your DNS with Linode, set the following nameservers in your domain name settings.
- ns1.Linode.com
- ns2.Linode.com
- ns3.Linode.com
- ns4.Linode.com
- ns5.Linode.com
Once you set these nameservers in your domain name, you can start managing your DNS records on Linode.
Add domain to Linode DNS manager
Managing DNS allows you to control how your domain name resolves. It transfers your domain names into IP addresses that web browsers use to access web pages. You can transfer your domain to a new web host through DNS management.
You can manage your domains by going to the Domains tab from the Linode cloud manager.
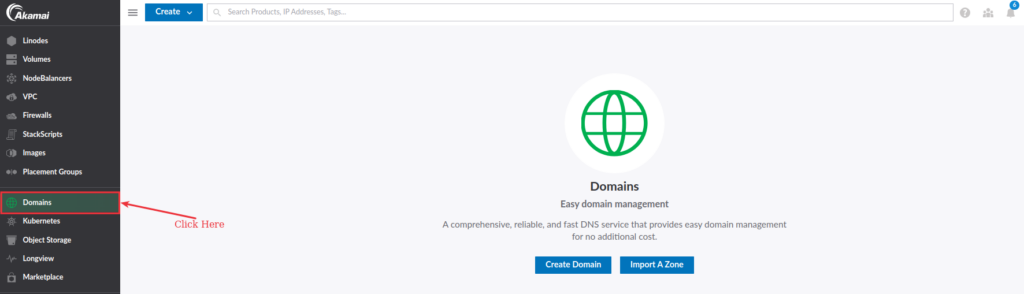
Here you will see the list of all domains with created date and time. You can add a new domain to DNS management by clicking the Create Domain button.
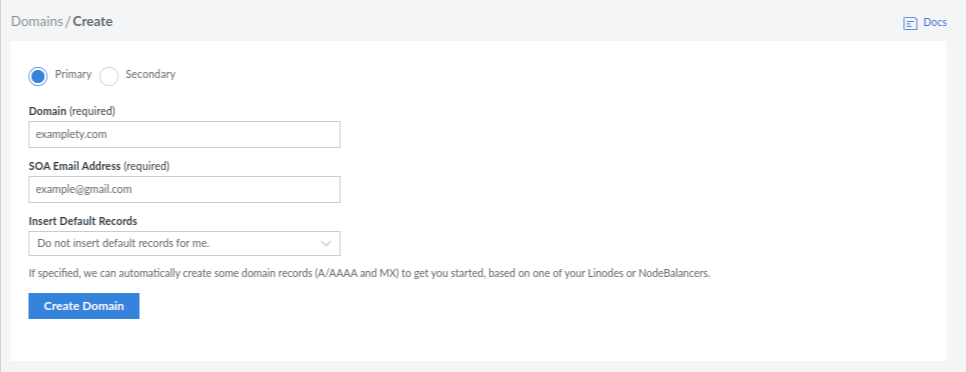
Here you have to provide the following information:
1) Zone Type: The primary zone type is the authoritative source for a domain’s DNS record. Selecting the primary zone type allows you to create and manage all the necessary DNS records required for the domain to function properly.
On the other hand, a Secondary zone is a read-only copy of a primary zone and is typically used for redundancy and load balancing.
2) Domain: Enter your registered domain name. You can add Domain and Subdomain.
Manage PHP/WordPress website on Linode server
As you can see, we have discussed all the features provided by Linode to manage multiple types of servers. But how can you manage your PHP website on a Linode server?
Let’s see how to host multiple PHP websites on your Linode server without technical knowledge of Linux.
Here are a few options:
- Hire a system administrator to host and manage websites on a server. (Expensive)
- Create a server with a pre-installed application. (No Management capabilities)
- Use a remote server management panel. (Easy and Recommended)
Let’s understand the pros and cons of all the methods.
1. Hire a System administrator
Once you create a server from any cloud service provider, you might hire a freelancer to configure your server and host applications on it. An experienced system administrator typically charges between $50-$100 for the initial configuration of your server.
The real problem comes when you need assistance with server issues, want to host more sites, or make changes. The server administrator might charge every time you get help from them. And in the end, it will be a costly process.
Additionally, you will have to share your server’s root password with someone you may not know well, which can be a security concern.
2. Create a Server with the Pre-installed Applications
Linode provides a marketplace with various pre-configured applications that you can deploy within a minute. This marketplace includes popular open-source applications such as WordPress, and NextCloud, as well as DevOps tools such as Kubernetes, GitLab, Jenkins, and more.
The marketplace makes it easy to start new applications without manually configuring and installing them from scratch.
To find this option, click on the Create Linode option from the sidebar and navigate to the Marketplace tab, as shown in the image below.
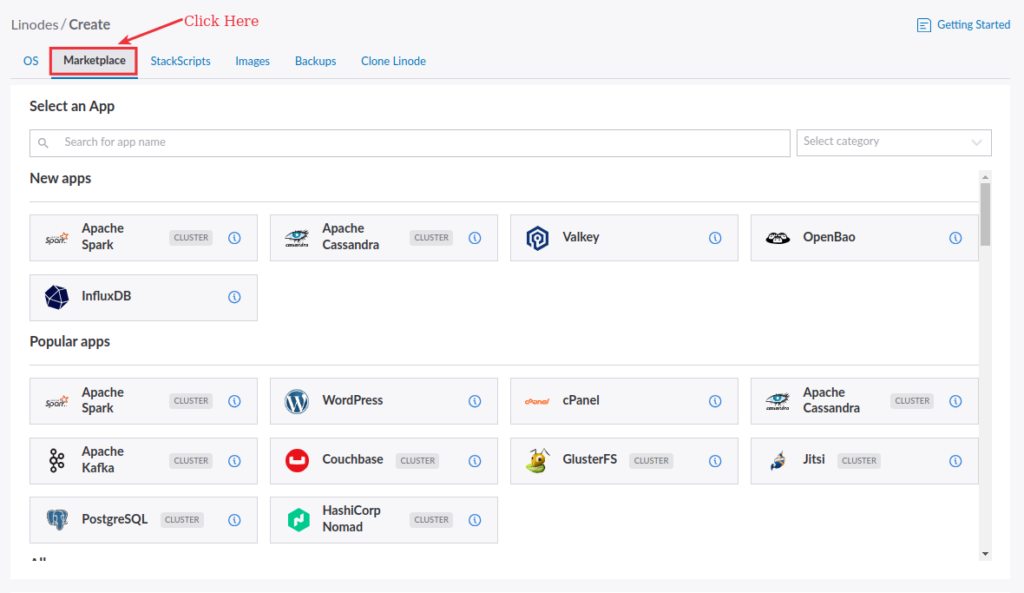
The problem you face using marketplace applications is you may not have full control over the configuration, or it may not provide the level of customization that you need for your specific use cases. Apart from that, the cost associated with deploying pre-configured applications is unexpected.
It is essential to carefully consider your specific needs and requirements before deploying the pre-configured applications.
It’s 2025, and you shouldn’t have to settle for that. To address all the changes related to configuration, the learning curve, and support problems, we have a third method available. Note that this method was not feasible six years ago.
3. Use a remote server management panel
A remote server management panel costs you 90% less than having a system administrator to perform the initial configuration. Here are some capabilities that any remote server management panel will provide.
- Instant, Automated and Optimized configuration
- Host multiple sites on a single server
- Easy-to-use Web Application to manage sites on your server
- No/Negligible learning curve required
- Clone websites, Create Staging Areas, and set up Demo environments
- Migrate sites automatically, instantly
- File manager to manage files of your sites
- Get support for server-level errors
- Get Managed Hosting Experience with Linode Integration
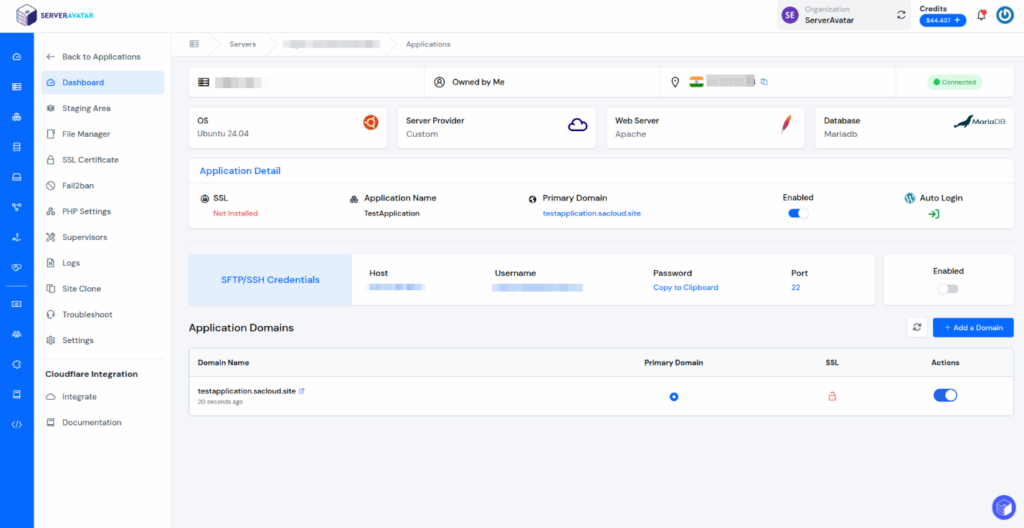
In short, you do not have to hire a person to host your sites on a Linode server. It is as easy as managing websites on a managed hosting service. Here are some screenshots of a ServerAvatar panel, a remote server management panel.
The below attached is an application management panel. Here you can manage domains for your sites, use Auto Deploy to auto-install applications, and manage staging areas, files, SSL certificates, PHP settings, backups, and much more.
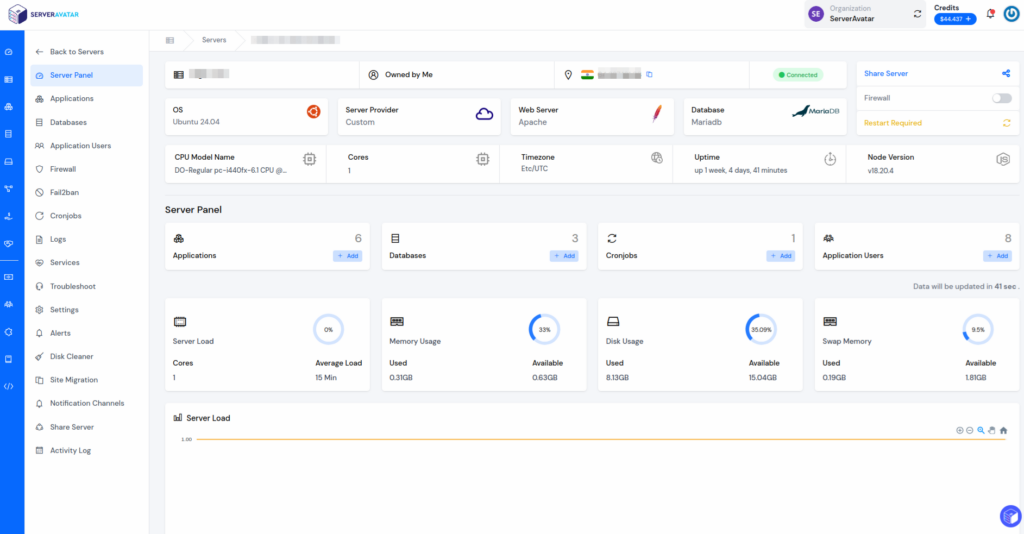
The below image is a server management panel where you can manage and monitor your server. You can manage things like Applications/sites, Databases, Firewall Settings, Server Alerts, migrations, and a lot more.

You can try ServerAvatar’s free plan. To get started with a fresh Linode server with the Ubuntu 20.04, 22.04, or 24.04 operating system, follow the steps below to initiate the setup process for ServerAvatar.
Here are the three ways to automatically configure your server with ServerAvatar.
1. Connect a server using a direct method:
- Login/Register to ServerAvatar account, then click the Create button from the right side of the screen and select Server from the dropdown menu.
- Select Direct Method for the server connection.
- Enter your preferred Server Name.
- Select a Tech Stack based on your needs (Apache, Nginx, OpenLiteSpeed, or Node Stack).
- Select a Database: MySQL, MariaDB, or MongoDB.
- Enable the toggle if you want to install the latest LTS version of node.js on your server.
- Select a Management plan and click the Connect Now button.
- You’ll see the command on your screen. Login to your server via SSH and execute that command as a root user.
- The server connection process will begin in your ServerAvatar account after executing the command.
2. Connect a server using integration:
- Login/Register to your ServerAvatar account, navigate to the Integration tab from the sidebar of the panel, and select Cloud Platform from the dropdown menu.
- Select a cloud platform you want to link with ServerAvatar.
- A popup form will appear, enter details to link your cloud provider account.
- The integration method is different based on the cloud provider you select.
3. Connect a server using commands:
Once you create a server as per your requirements, connect to your server using an SSH connection and execute the below three commands as a root user in your server console area.
wget https://srvr.so/install
chmod +x install
./install
It will ask if you want to configure your server with Apache, Nginx, or OpenLiteSpeed. You can select according to your requirements and hit enter. After that, It will check if the server is ready for installation.
After the installation starts, It will provide you with a link to your server management panel. The complete initial configuration will be over in 6-7 minutes, and you will be able to manage your servers and sites using a panel as displayed in the below image.
FAQ
What is Linode, and why should I choose it for my cloud hosting needs?
Linode is a top cloud infrastructure provider, especially popular among developers for its ease of use, cost-effective pricing, and reliable performance. It allows you to host websites, manage applications, and customize your cloud server settings with flexibility.
What are the benefits of using IaaS (Infrastructure-as-a-Service) on Linode?
IaaS allows you to access virtualized computing resources on Linode for application development, hosting, and data storage. With Linode’s IaaS, you get full control over your server environment, which you can customize according to your project’s needs.
How do I create a new Linode instance?
To create a new Linode, go to the Linode Cloud Manager, select your preferred configuration, choose an image or StackScript, and set a root password. You can also add an SSH key for secure access. Click the “Create Linode” button, and your instance will be ready in minutes.
What happens when I rebuild my Linode server?
Rebuilding a Linode will delete all existing data and software on that instance, but it keeps the same configuration and plan. Rebuilding is useful when you need to update your OS version or install the latest security patches.
How can I manage DNS for my domain on Linode?
You can use Linode’s DNS Manager to set up and manage DNS records for your domains. To do this, add Linode’s nameservers to your domain settings. Alternatively, Cloudflare can be used if you prefer an external DNS provider.