
Updating WordPress plugins might seem like a simple click-and-done task. But if you’ve ever experienced a broken website after an update, you know it’s not always that easy. When you try to safely update WordPress plugins, it’s important to follow the right approach. So, how do you update plugins safely without risking your website?
In this guide, I’ll walk you through everything you need to know in a simple, practical way, no technical background required.
Why Updating WordPress Plugins is Important
Plugins are the backbone of your WordPress website. They add features, improve functionality, and enhance user experience.

But outdated plugins can:
- Exposing your site to security risks: Outdated plugins may contain vulnerabilities that hackers can easily exploit.
- Slow down performance: Older versions may not be optimized, causing your website to load slower.
- Cause compatibility issues: Plugins may stop working properly with updated themes or WordPress core.
Developers regularly release updates to fix bugs and improve security. Ignoring them is like leaving your doors unlocked.
Risks of Updating Plugins Without Precautions
Updating plugins without preparation can sometimes do more harm than good. A simple update can unexpectedly disrupt your website if not handled carefully. That’s why it’s important to follow a safe process instead of rushing.
- Website crashes or white screen errors: A faulty update can make your site completely inaccessible.
- Features stop working: Certain functionalities may break if the update conflicts with other components.
- Theme conflicts: Updated plugins might not align well with your current theme setup.
- Data loss in worst cases: Critical data can be lost if something goes seriously wrong during the update.
That’s why blindly clicking “Update All” is never a good idea.
When Should You Update Plugins?
Updating at the right time helps you avoid unnecessary risks. Planning your updates ensures minimal disruption to your visitors and business operations.
Best times to update:
- During low traffic hours: Fewer visitors mean less impact if something goes wrong.
- After checking compatibility: Ensures the update won’t conflict with your setup.
- When backups are ready: Gives you a fallback option if needed.
Avoid updating:
- Right before a big campaign or launch: Any issue can affect your results.
- Without testing: Skipping testing increases the chances of unexpected problems.
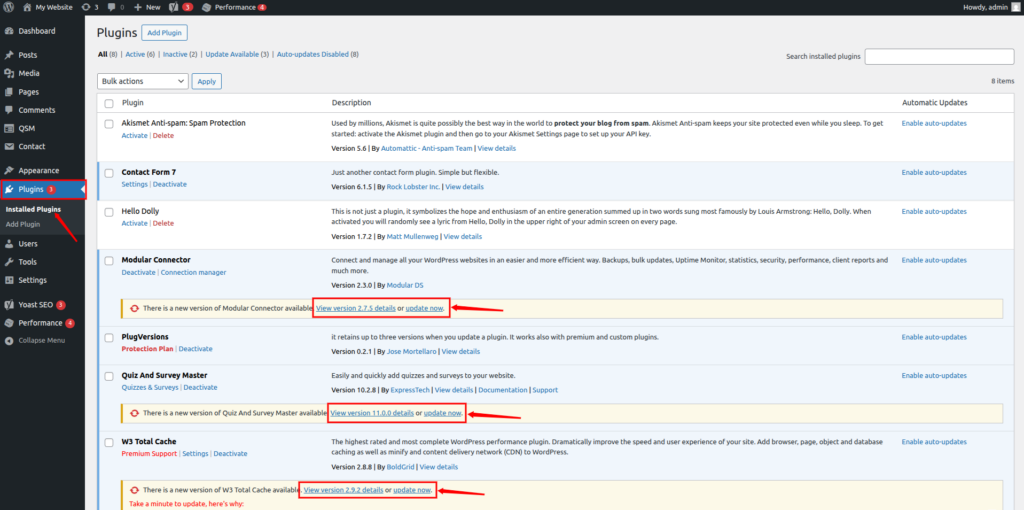
How Do You Know When Plugins Need an Update?
WordPress does a great job of letting you know when your plugins are outdated. You don’t have to guess, it shows clear signals right inside your dashboard.
Here’s what you’ll notice:
- A small notification badge next to the Plugins menu in the sidebar
- A reminder on the Dashboard >> Updates page
- A highlighted update message below specific plugins in the Installed Plugins list
When you see any of these alerts, it means updates are available. But hold on, don’t rush to click “Update” immediately.
Let’s go step by step and explore the safest ways to update your plugins based on your comfort level and website importance.
Pre-Update Checklist
Before updating plugins, it’s important to prepare your website properly. A quick checklist can help you avoid common issues and ensure a smooth update process. Think of it as your safety routine before making changes.
- Backup your website: Ensures you can restore your site if anything goes wrong.
- Check plugin compatibility: Confirms the plugin works with your current setup.
- Read update changelog: Helps you understand what changes are included.
- Ensure WordPress core is updated: Keeps everything aligned and compatible.
- Disable caching temporarily: Prevents outdated content from showing after updates.
Think of this as your safety gear before starting the process.
Backup Your Website Before Updating
Taking a backup before updating plugins is one of the smartest decisions you can make. It acts as a safety net, allowing you to restore your site quickly if something breaks. Without a backup, even a small issue can turn into a major problem.
What Should You Backup?
- Website database: Stores all your content, settings, and important data.
- WordPress files (themes, plugins, uploads): Includes design, functionality, and media files.
ServerAvatar Users:
If you’re using ServerAvatar, taking a backup is quick and beginner-friendly:
- Log in to your ServerAvatar account
- Navigate to the Backups section
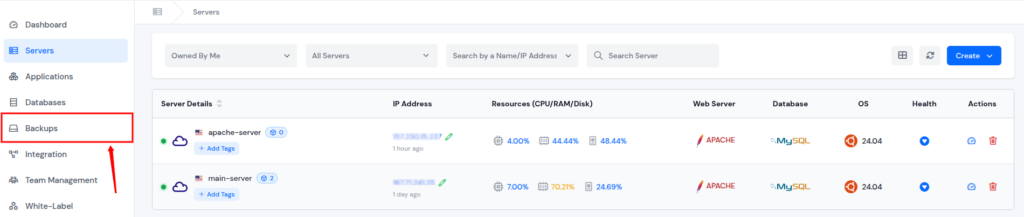
- Use the Instant Backup feature to take an instant backup of your application database and file system.
- Fill in the details and create an instant backup in just one click.
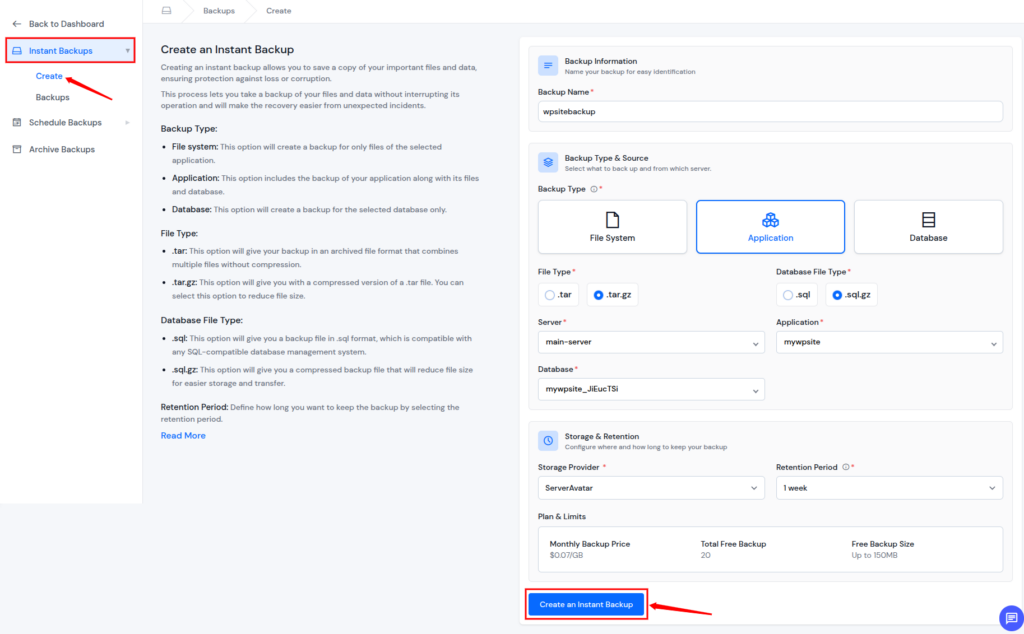
- This ensures your data is secure before making any changes.
Other Users:
If you’re not using ServerAvatar, there are still multiple ways to secure your data. These methods ensure you have a recovery option before making any changes.
- Install plugins like:
- UpdraftPlus: A popular plugin for easy scheduled backups.
- Duplicator: Helps you create full website copies for restoration.
- BackupBuddy: Provides complete backup and restore functionality.
- Take manual backups: Allows you to download files and databases directly.
What is ServerAvatar?
Before we move ahead, let’s quickly understand ServerAvatar, especially if you’re new to it.
ServerAvatar is a powerful platform that simplifies server and application management. It allows you to deploy and manage WordPress, PHP, and Node.js applications without needing deep technical knowledge.
How ServerAvatar Simplifies WordPress Deployment & Management
Building a website is one thing, but hosting and managing servers and applications can feel overwhelming. That’s where ServerAvatar helps. Instead of handling complex server setups, you get a clean and user-friendly dashboard where everything is managed in one place.
Key Benefits of ServerAvatar
- One-click Application installation: Launch popular applications such as WordPress, Mautic, Moodle, Uptimekuma, n8n, etc., quickly without manual setup.
- Centralized management dashboard: Manage everything from one simple interface.
- Redis caching for speed: Boost performance by storing frequently used data.
- Strong security features (SSL, firewall, Fail2Ban, AI Bot Blocker, etc): Keep your website protected.
- Easy scalability as your site grows: Upgrade resources with managed servers as your traffic increases.
Why It’s Useful for Plugin Updates
ServerAvatar provides tools that reduce risks and give you better control over your website. This ensures smoother updates without unnecessary stress.
- Providing easy backup options: Lets you create backups quickly before updates.
- Offering file management tools: Helps you manage and update plugin files easily.
- Supporting staging environments: Allows you to test updates before going live.
So even if something goes wrong, the ServerAvatar technical support team is available 24/7 to assist you and resolve your issues.
Different Methods to Update Plugins
There are multiple ways to update WordPress plugins depending on your comfort level and situation. Choosing the right method helps reduce risks and ensures better control over the process. Below mentioned are methods to update WordPress plugins.
Method 1: Update Plugins Manually via WordPress Dashboard (Best for Beginners)
This is the easiest and safest method for most website owners.
Follow these steps:
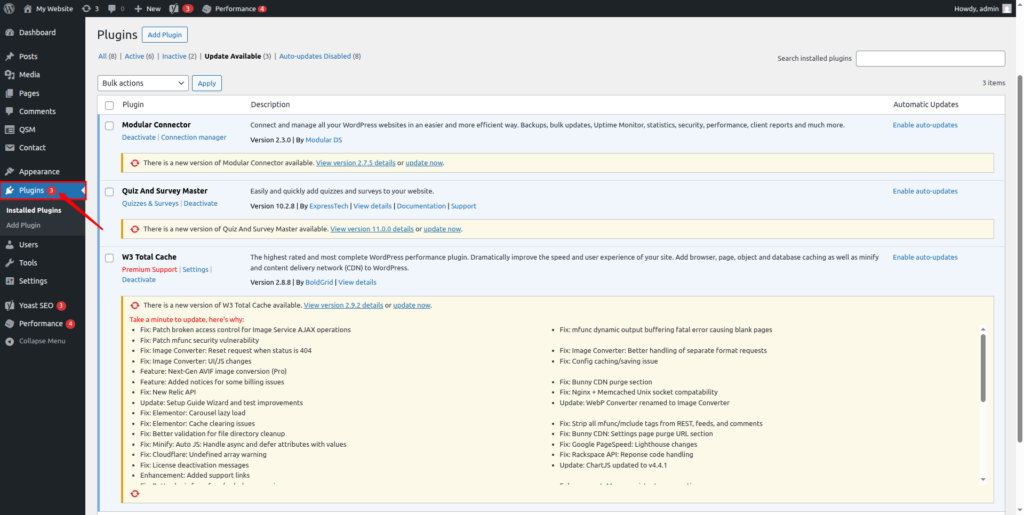
- Log in to your WordPress admin Dashboard
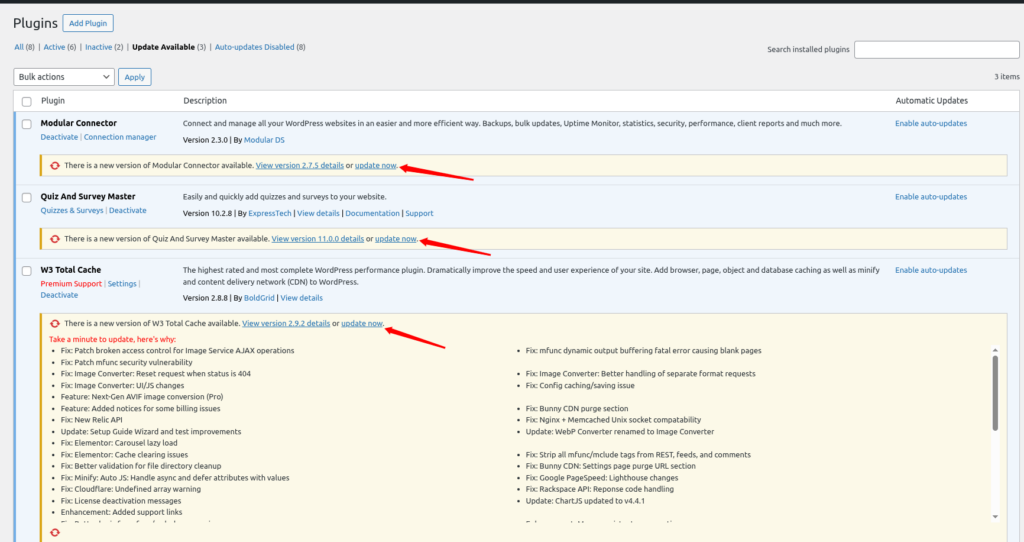
- Go to Plugins >> Installed Plugins section
- Check out for the plugins that show an update notification
- Click on “View version details” to understand what’s changing
- Hit the “Update Now” button
- Wait until the update finishes successfully before moving to the next plugin
Why this method works best:
Updating plugins one at a time helps you quickly identify which plugin caused an issue (if anything goes wrong).
Pro Tip: Always Take a Backup Before Updating.
Method 2: Bulk Update WordPress Plugins (Quick but Risky)
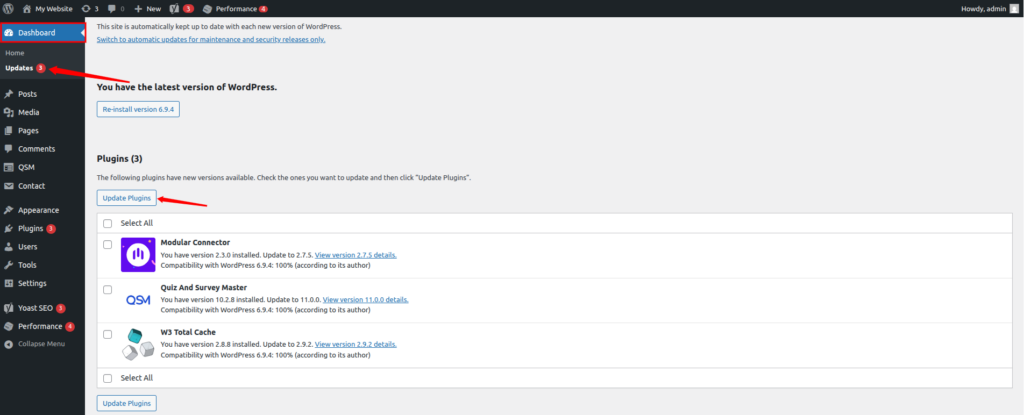
If you’re short on time, WordPress allows you to update multiple plugins at once.
Steps to bulk update plugins:
- Go to Plugins >> Installed Plugins
- Select the plugins you want to update
- From the Bulk Actions dropdown, choose Update
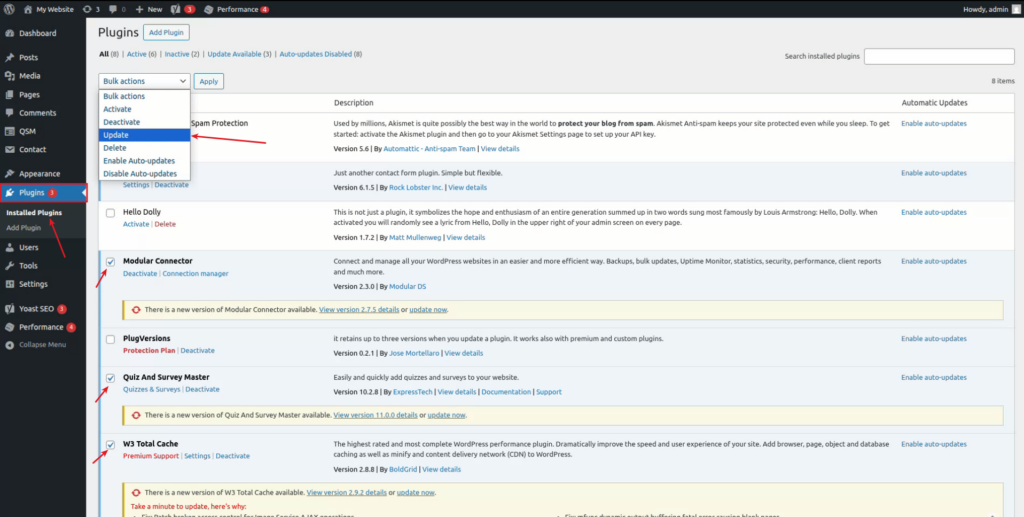
- Click Apply button
Important note: This method is faster but comes with a downside, if something breaks, it’s harder to identify which plugin caused the issue.
Only use this approach if:
- You’ve already created a backup
- You trust the plugins you’re updating
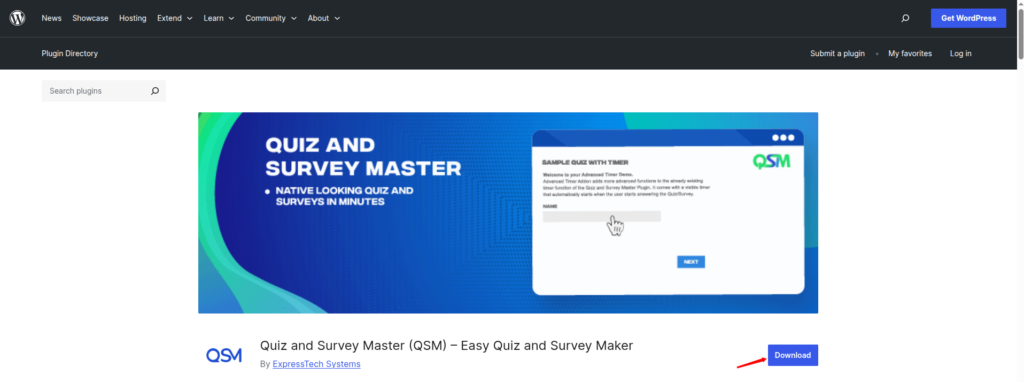
Method 3: Manually Update Plugins via FTP (Advanced Users)
If your website becomes inaccessible due to a faulty plugin, you can update it manually using FTP (File Transfer Protocol). This method gives you full control but requires some technical knowledge.
Here’s how to do it:
- Download the latest version of the plugin as a .zip file from the official source.
- For example, I’m downloading the Quiz and Survey Master (QSM) plugin as a .zip file.
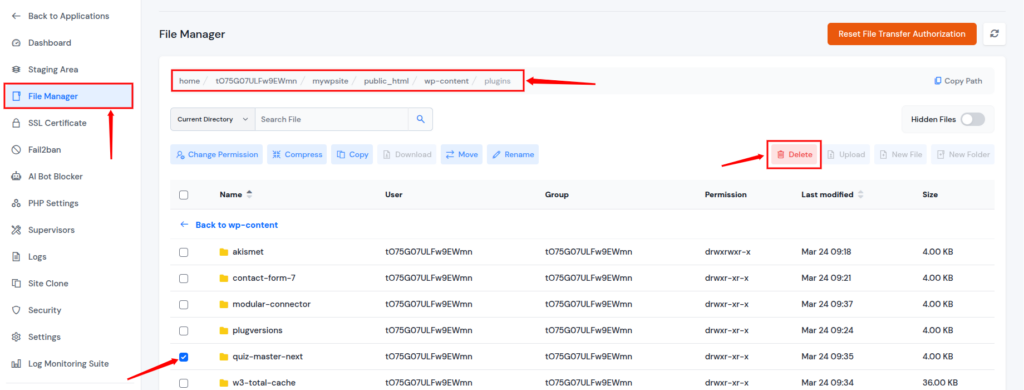
ServerAvatar Users:
- Log in to your ServerAvatar account, and click on the server dashboard icon.

- Navigate to the Applications section and click on your wordpress application dashboard icon.

- Navigate to the File Manager section from the left sidebar.
- Go to the public_html >> wp-content >> plugins folder.
- Find the plugin folder you want to update and delete it by selecting it and clicking on the Delete button.
- Now, upload the new plugin folder from your system to the same directory that we have previously downloaded.
- Click on the Upload button, select the zip file, and upload it.
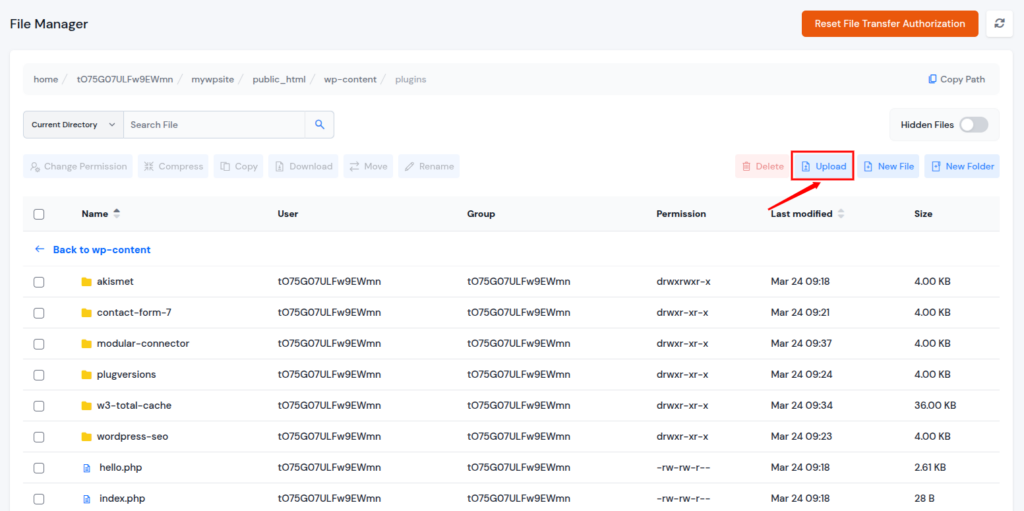
- Once it is uploaded, select the zip file and Uncompress it by using the given button.
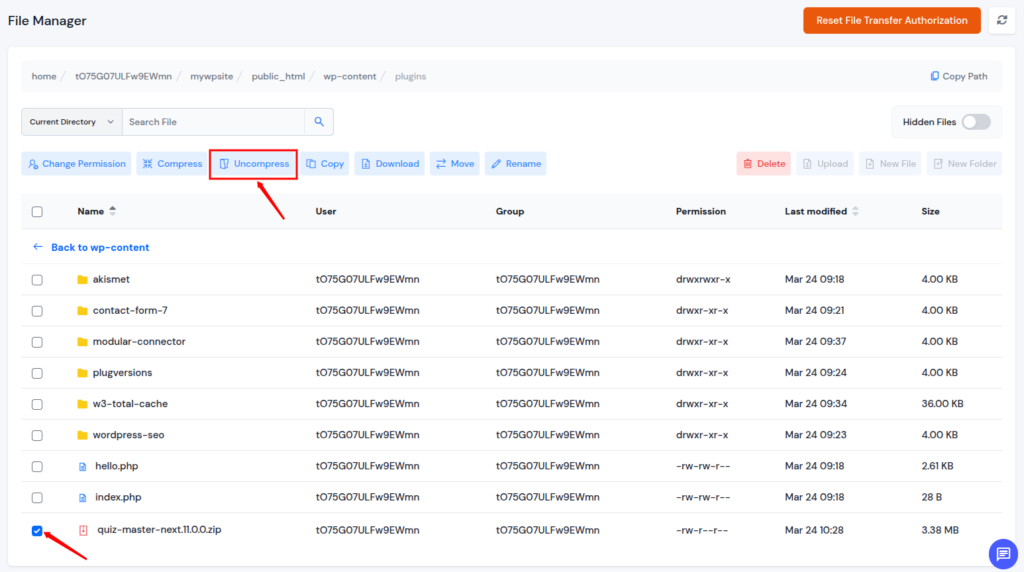
- Enter the file path shown in the image below for the file you want to set, and click the Extract button.

- Now, log in back to WordPress, navigate to the Plugins >> Installed Plugins section, and check for the plugin version as it is updated.
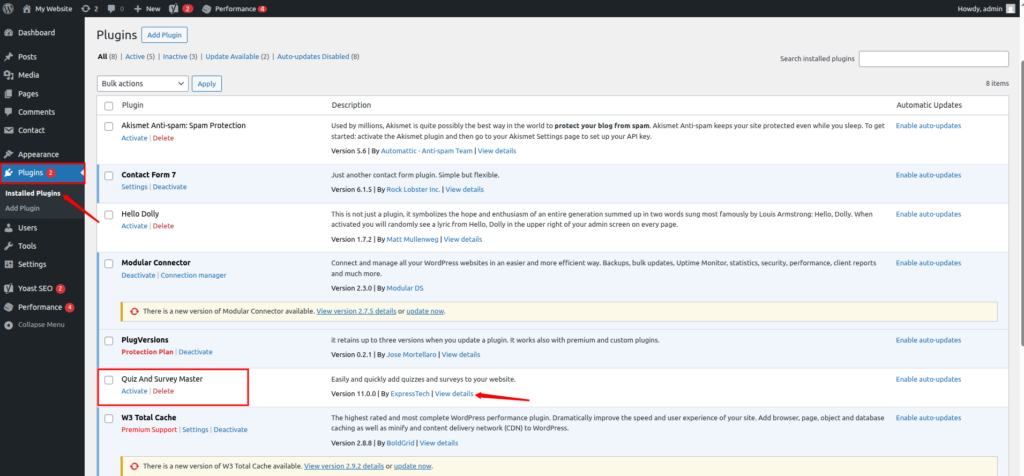
- That’s it! Your plugin is updated.
Other Users:
- Download the latest version of the plugin as a .zip file from the official source
- Extract the file on your computer
- Now, connect it with your server using FTP client such as FileZilla
- Navigate to the public_html >> wp-content >> plugins directory
- Locate the plugin folder you want to update and delete it
- Upload the new plugin folder from your system to the same directory
- Log back into WordPress and check if the plugin is working properly
When should you use this method?
Some update methods are designed for specific situations. Knowing when to use them can help you handle issues more effectively.
- When your dashboard is not accessible: Use alternative methods like FTP or file manager.
- When a plugin update fails: Manual updates can help fix incomplete updates.
- When a plugin causes a site crash: Advanced methods help you regain control.
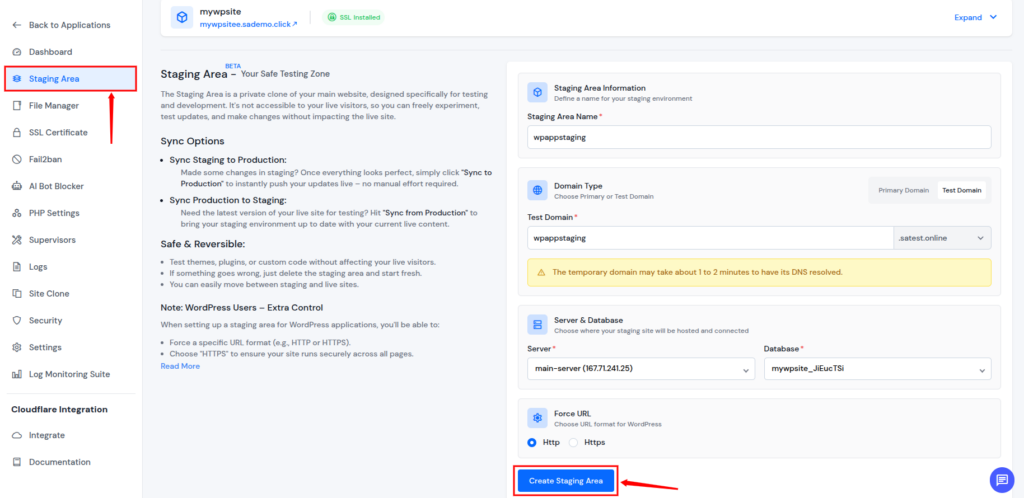
Test Updates in a Staging Environment
If you want to be extra safe, use a staging site. A staging site is like a clone of your website where you can test changes without affecting your live site.
ServerAvatar Users:
- Log in to your ServerAvatar account, and click on the server dashboard icon.
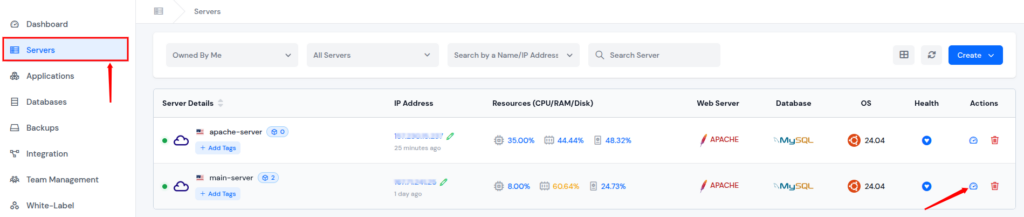
- Navigate to the Applications section and click on your wordpress application dashboard icon.
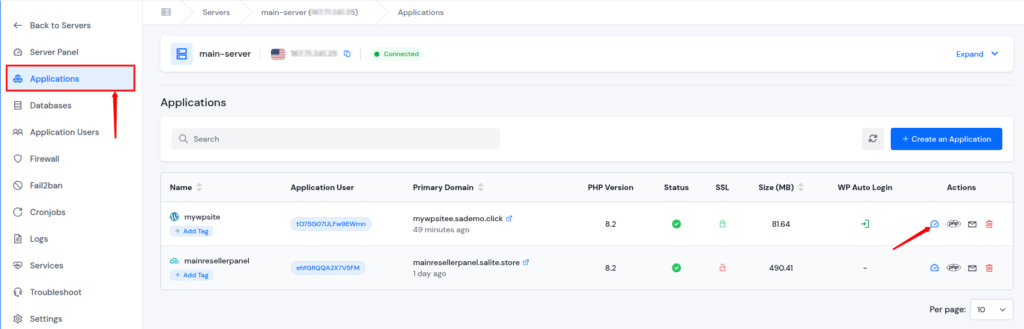
- Navigate to the Staging Area section from the left sidebar.
- Fill up the details and Click on the Create Staging Area button.
Other Users:
If you don’t have built-in staging tools, you can still create a safe testing environment. These methods allow you to experiment without affecting your live site.
- Use hosting staging tools: Many hosting providers offer easy staging setups.
- Use plugins for staging: Plugins can create a clone of your site for testing.
- Create a manual clone of your website: Duplicate your site manually for safe testing.
Why it matters:
Using a staging environment can save you from major issues. It allow you to test changes before applying on live site.
- Detect issues before they go live: Identify problems early without affecting users.
- Test compatibility: Ensure plugins work well together.
- Avoid downtime: Prevent your live site from breaking.
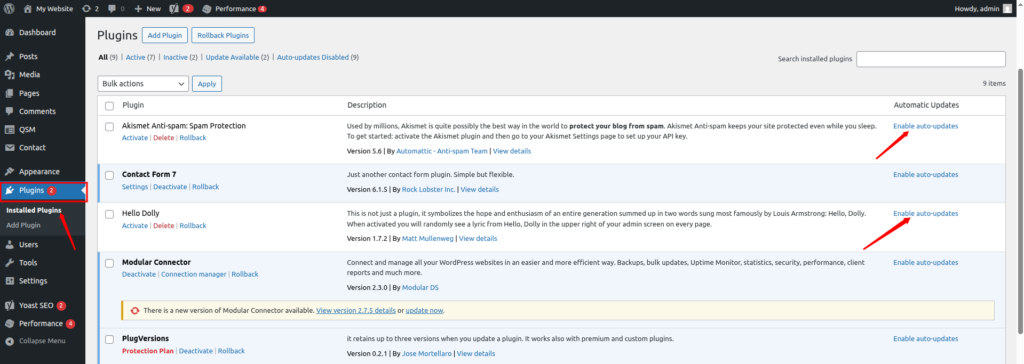
How to Enable Automatic Plugin Updates
WordPress also allows you to turn on auto-updates for plugins.
To enable auto-updates:
- Navigate to the Plugins >> Installed Plugins section
- Click on the Enable auto-updates next to the plugin for the plugin you want to enable auto-updates.
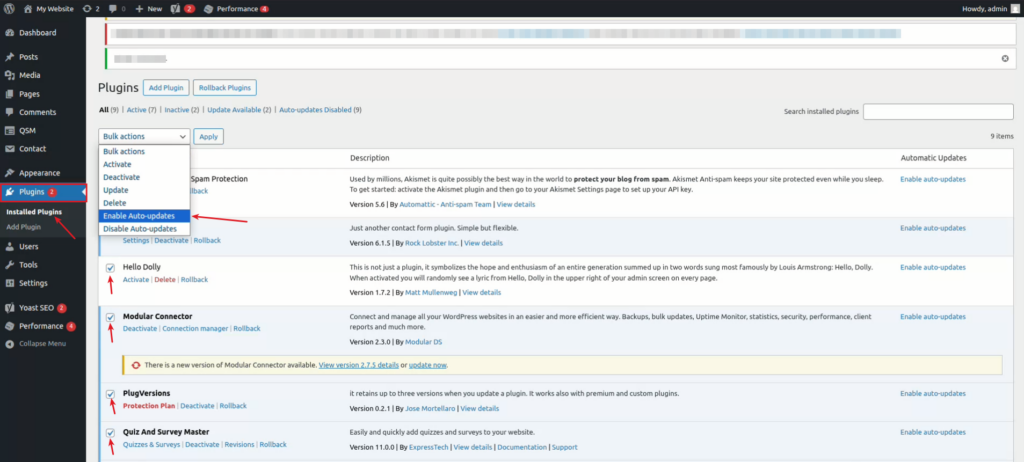
To enable for multiple plugins:
- Select multiple plugins
- Choose Enable Auto-updates from Bulk Actions
- Click on the Apply
But Here’s the Catch…
Automatic updates may seem convenient, but they come with risks. They don’t check compatibility before applying changes, which can lead to unexpected issues.
- Updates go live instantly: Changes are applied without manual review.
- No warning if something breaks: Issues can appear suddenly.
- Recovery can be difficult: Fixing problems may take extra time and effort.
What to Do After Updating Plugins
Once updates are complete, your job isn’t over yet. Testing ensures everything is working properly and your users don’t face any issues.
- Test your website thoroughly: Check different pages and features.
- Check mobile responsiveness: Ensure your site works well on all devices.
- Review key functionalities: Verify forms, buttons, and important features.
- Monitor loading speed: Make sure performance hasn’t dropped.
How to Undo a Plugin Update (If Something Goes Wrong)
Even with precautions, things can sometimes break. The good news? You can roll things back.
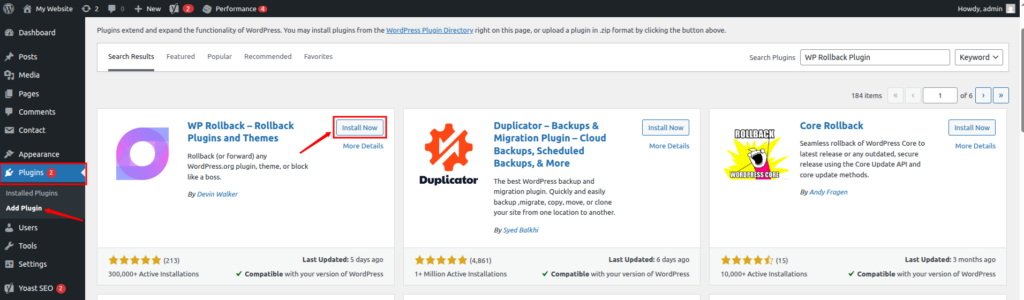
Option 1: Use a Plugin Rollback Tool
You can easily revert to a previous plugin version using a rollback plugin.
Steps:
- Install and activate a rollback plugin, as I’m using WP Rollback Plugin here.
- Install and activate the plugin.
- Now, navigate to the Plugins >> Installed Plugins section, and click on the Rollback option under the affected plugin.

- Select an earlier version and click on the Rollback button.
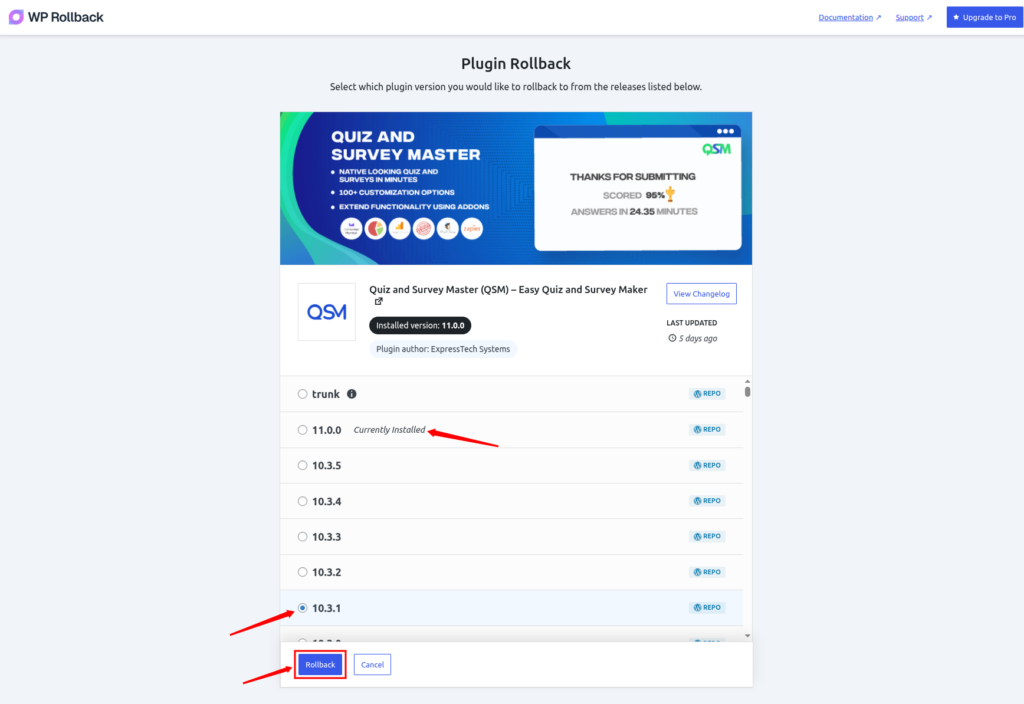
- This option works best for plugins available in the official WordPress repository.
Option 2: Deactivate the Problematic Plugin
- Go to Plugins > Installed Plugins
- Click Deactivate under the plugin that is causing issues
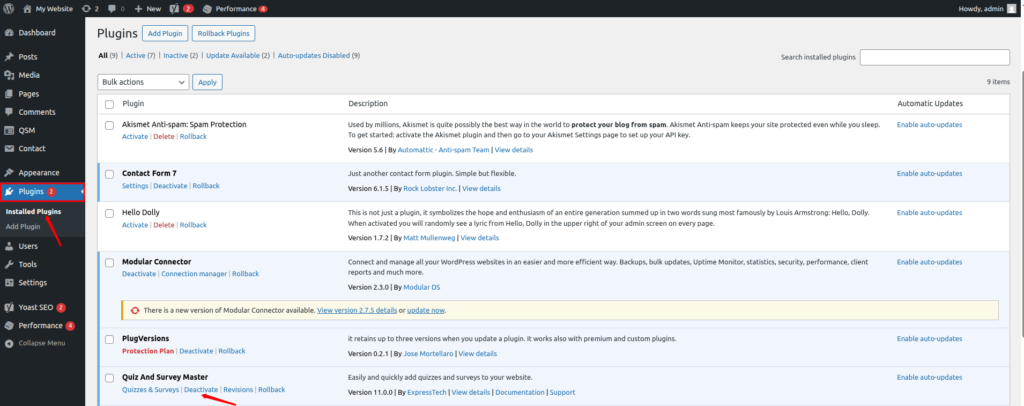
- This immediately stops the problem and restores stability.
Option 3: Disable Plugin via File
- If you’re locked out of your dashboard:
ServerAvatar Users:
- Log in to your ServerAvatar account, and click on the server dashboard icon.

- Navigate to the Applications section and click on your wordpress application dashboard icon.

- Navigate to the File Manager section from the left sidebar.
- Go to the public_html >> wp-content >> plugins folder.
- Select the plugin folder and rename it by clicking on the Rename button. (for example: plugin-name-disabled)
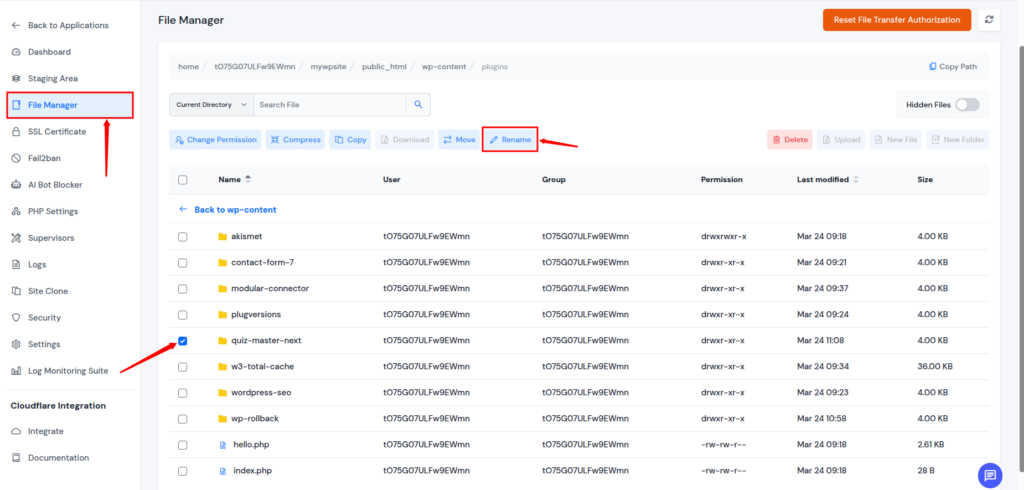
- This will automatically disable the plugin without needing dashboard access.
Other Users:
- Connect to your server via FTP
- Navigate to the public_html >> wp-content >> plugins directory
- Rename the plugin folder (for example: plugin-name-disabled)
- This automatically disables the plugin without needing dashboard access.
How to Fix Issues After Plugin Update
If something goes wrong after an update, don’t panic. There are simple steps you can take to fix the issue and restore your website.
- Restore backup: Quickly bring your site back to its previous state.
- Deactivate the problematic plugin: Stop the issue by disabling the plugin.
- Check error logs: Identify the root cause of the problem.
- Contact plugin support: Get help from the plugin developers.
Best Practices for Safe Plugin Updates
Following good habits can help you avoid most plugin-related issues. A consistent approach ensures your website stays secure and stable.
- Update regularly, not randomly: Keep your site updated in a planned way.
- Keep plugins minimal: Fewer plugins reduce the risk of conflicts.
- Delete unused plugins: Remove unnecessary plugins to improve security.
- Use trusted plugins only: Reliable plugins are less likely to cause issues.
- Enable automatic updates cautiously: Use auto-updates only when appropriate.
Common Mistakes to Avoid
Many users make mistakes that lead to problems. Avoiding these can save you time and effort.
- Updating without backup: Leaves you with no recovery option.
- Ignoring plugin compatibility: Can cause conflicts and errors.
- Using too many plugins: Increases complexity and risk.
- Updating everything at once: Makes troubleshooting difficult.
- Not testing after update: Problems may go unnoticed.

Tools to Help You Manage Plugin Updates
Using the right tools can make plugin management much easier. They help automate tasks and reduce manual effort.
- Backup plugins: Ensure your data is always protected.
- Staging tools: Allow safe testing before going live.
- Management dashboards: Simplify overall website control.
- Security plugins: Protect your site from vulnerabilities.
Conclusion
Updating WordPress plugins is more than just routine maintenance, it’s essential for keeping your website secure, fast, and fully functional. While updates can sometimes cause issues, following a careful approach, like taking backups, testing changes, and updating plugins one at a time, can help you avoid most problems. Whether you’re managing your site manually or using tools like ServerAvatar, staying consistent and cautious ensures your website runs smoothly without unexpected disruptions.
FAQs
1. How often should I update WordPress plugins?
You should check for plugin updates at least once a week and apply them after taking a backup and reviewing compatibility.
2. Is it safe to update all plugins at once?
It’s not recommended, as updating all plugins together makes it difficult to identify which one caused an issue if something breaks.
3. What should I do if a plugin update breaks my website?
You can restore your backup, deactivate the problematic plugin, or roll back to a previous version to fix the issue quickly.
4. Can outdated plugins affect my website’s security?
Outdated plugins can contain vulnerabilities that hackers may exploit, making regular updates essential for security.
5. Should I enable automatic updates for plugins?
Auto-updates can save time, but they should be used carefully since they don’t test compatibility before applying changes.