

Imagine deploying your React app with zero command-line knowledge, just a few clicks and you’re live. That’s exactly what ServerAvatar brings to the table. In today’s fast-paced digital world, building beautiful interfaces with React is only half the battle. Hosting your creation efficiently and securely is equally critical. And for many, the command line can be intimidating or simply inconvenient. This guide walks you through the entire process on how to host a React app using only ServerAvatar’s GUI and how to integrate automated CI/CD workflows without ever touching the terminal.
For solo developers, freelancers, and small startups, the less time spent fiddling with deployment scripts, the better. ServerAvatar was built with simplicity in mind. It strips away the complexity of managing a server and replaces it with a user-friendly control panel. Combine this with React’s component-driven architecture, and you have the recipe for streamlined web development and hosting.
What makes this even better? The inclusion of CI/CD pipelines. CI/CD (Continuous Integration/Continuous Deployment) ensures that every code update automatically deploys to your server, bug fixes, new features, or updates are pushed live instantly, reducing downtime and manual errors.
So, whether you’re a designer dabbling in frontend development or a non-tech founder launching a startup, this guide is for you. Let’s break down the entire journey into easy-to-follow steps: from preparing your React build to setting up auto-deployment through GitHub, all without the terminal.
By the end of this guide, you’ll be comfortably launching your React app on ServerAvatar with a fully automated workflow and a polished live site. Let’s dive right into the foundations.
What is ServerAvatar?
Think of ServerAvatar as your personal server assistant. It simplifies managing cloud servers (like DigitalOcean, AWS, or Vultr) so you can host web apps with zero sysadmin experience. ServerAvatar removes the need for deep backend knowledge, offering a visual interface for managing apps, domains, databases, SSL, and even backups.
It’s basically a bridge between raw cloud infrastructure and everyday users. You get the performance of a VPS but the ease of shared hosting. From Node.js apps to static websites and CMS platforms, ServerAvatar can handle it all. More importantly, it supports one-click installations, graphical file management, and automatic SSL certificates, all from the dashboard.
In this guide, we’ll use it to host a React app, a static single-page app that typically requires a simple web server like Nginx to serve files from a build folder. ServerAvatar makes deploying this kind of project effortless, even for beginners.
What is a React App?
React is a JavaScript library for building dynamic user interfaces, maintained by Facebook and widely adopted across the web. Unlike traditional web pages, a React app loads once and dynamically updates the UI without refreshing the page. This makes it lightning-fast and great for modern web apps.
When you build a React app using npm run build, it outputs a folder of static files like HTML, CSS, JS that can be served from any web server. These files are stored in a build/ directory and act just like a static website.
No databases. No dynamic server logic. Just static files with blazing-fast performance. With ServerAvatar’s user interface, all the steps to deploy or host become manageable even for non-technical users.
Why Avoid the Command Line?
Let’s be honest, most tutorials on hosting or deployment assume you’re comfortable with the command line. But what if you’re not? Maybe you’re a designer, a product manager, or just someone who dont’t hsve knowledge of coomand line. That’s where GUI-based deployment comes in.
Avoiding the CLI (Command Line Interface) doesn’t mean sacrificing power, it just means reducing friction. ServerAvatar empowers you to manage complex server tasks from a visual dashboard. This makes hosting more accessible, faster, and frankly, less error-prone. One wrong command on a terminal could crash your server. With a GUI, you get confirmations, undo options, and intuitive feedback.
Hosting your React app without CLI means:
- Less room for mistakes
- No need to memorize commands
- Easier onboarding for team members
Plus, when it comes to CI/CD, ServerAvatar integrates with GitHub and other platforms using webhooks and GUI triggers. No need to configure scripts or write YAML pipelines. It’s all about making deployment feel as easy as dragging and dropping files.
Hosting from GitHub, GitLab, or Bitbucket and Works with Both Public and Private Repos
ServerAvatar makes it incredibly easy to host your React application directly from your Git repositories whether you’re using GitHub, GitLab, or Bitbucket. The platform supports both public and private repositories, allowing you to securely connect your codebase without touching a single line of terminal commands.
Once connected through the intuitive dashboard, ServerAvatar automatically pulls your code, installs dependencies, builds the project, and serves the final static files from the correct directory. Whether you’re working on a personal project or managing a client’s private repo, everything is handled through a simple graphical interface.
Even better, this setup pairs perfectly with auto-deployment. Every time you push changes to your selected branch, ServerAvatar can automatically rebuild and redeploy your app giving you a smooth, hands-off CI/CD experience.
Step-By-Step Guide To Hosting With ServerAvatar
Prepare your application
Before deploying your React application to any environment like development, staging, testing, or production. Once your application ready for the deployment, push your local codebase to a remote Git repository. This repository can be private or public, depending on your project’s needs.You can use the your favourite version control platform such as GitHub, Bitbucket, or GitLab. ServerAvatar provides the direct integration of the this 3 version control system. So, you can easily pull your private repository and make it live for user. This helps you manage your code effectively, collaborate with team members, and deploy the app from a centralized and secure location.
If you are hosting a private repository, you will need to integrate your version control platform account with ServerAvatar to authorize access. However, if your code is hosted in a public repository, there is no need to integrate your account. ServerAvatar can directly access the public repository without any authentication.
Make sure to connect the GitHub account that contains your application’s private repository. This integration is required to:
- Deploy your application directly from GitHub,
- Enable building a CI/CD pipeline, which is one of the most advanced features ServerAvatar offers.
With this integration, you won’t need to use the command line for deployment, everything can be managed seamlessly through the ServerAvatar dashboard.

In this blog post, we will proceed with hosting a Githubprivate repository. However, you are free to host a public one if that suits your needs better. I already have a private repository for a simple React To-Do application, but you can use your own React app stored in a private repository.
Once it’s in GitHub, your app is ready to be deployed!
Note: If you’re hosting a private repository and looking to integrate your version control platform account whether it’s GitHub, GitLab, or Bitbucket. Please refer to the respective documentation for each integration.
Sign Up For ServerAvatar
Before you can deploy anything, you need a ServerAvatar account. The signup process is straightforward and doesn’t require any technical background.
- Visit ServerAvatar.com and click on the “Get Started” or “Sign Up” button.
- Fill in your name, email, and password.
- Verify your email address through the confirmation link sent to your inbox.
- Once logged in, you’ll land on your dashboard, where you can start managing servers.
Why is this important? ServerAvatar becomes your central control panel for all your apps and servers. Whether you’re hosting a single blog or multiple client websites, everything is handled here. You don’t need to remember any Linux commands or hire a developer to make basic changes.
ServerAvatar also offers a free trial, so you can explore most of its features before deciding on a paid plan. Depending on your needs, you can scale later, whether it’s one app or a dozen.
Connect Or Purchase A Server
To host your application, you need an actual server, think of it as the “home” where your app lives online. With ServerAvatar, you have two flexible options:
- Purchase a server directly from ServerAvatar based on your preferred configuration.
- Connect your own server from any third-party cloud provider, as long as it meets the required prerequisites.
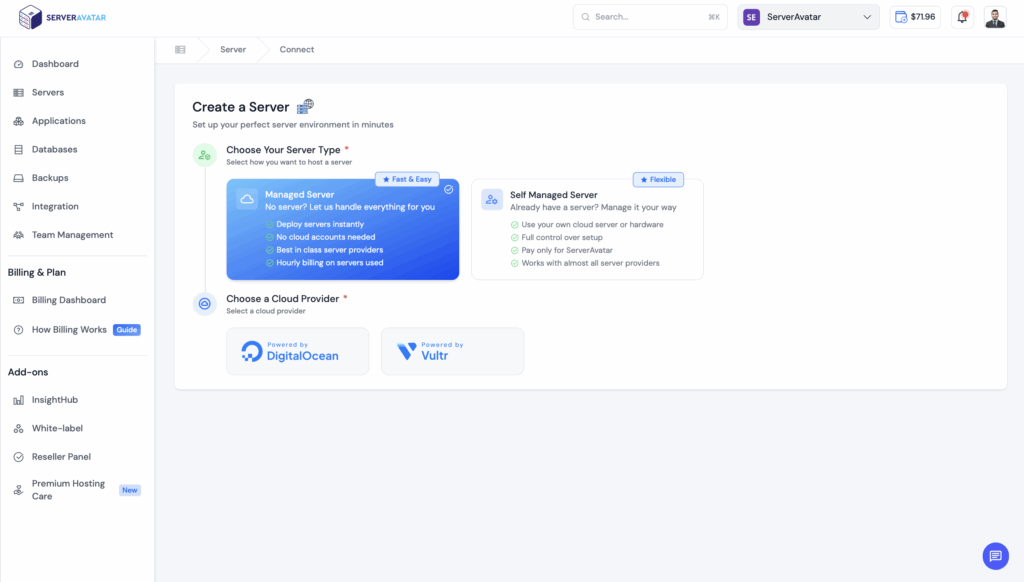
Important: Whether you’re purchasing a server through ServerAvatar or connecting your own, make sure to select the Node.js tech stack. This is the required environment to properly host applications built with the React.js.
NOTE: If you are connecting your own server, make sure it meets all the prerequisites specified by ServerAvatar. Read our attached docs on purchase server directly from serverAvatar and connect your server.

Create new Application For Deployment
Once your server is ready and your GitHub account is integrated, the next step is to create an application in ServerAvatar to host your project.
Now, we will crate the application for the n8n. so, that anyone can access it, follow these steps to setup and deploy react app.
- Navigate to the Applications section from the ServerAvatar dashboard.
- Click on the Create Application button.
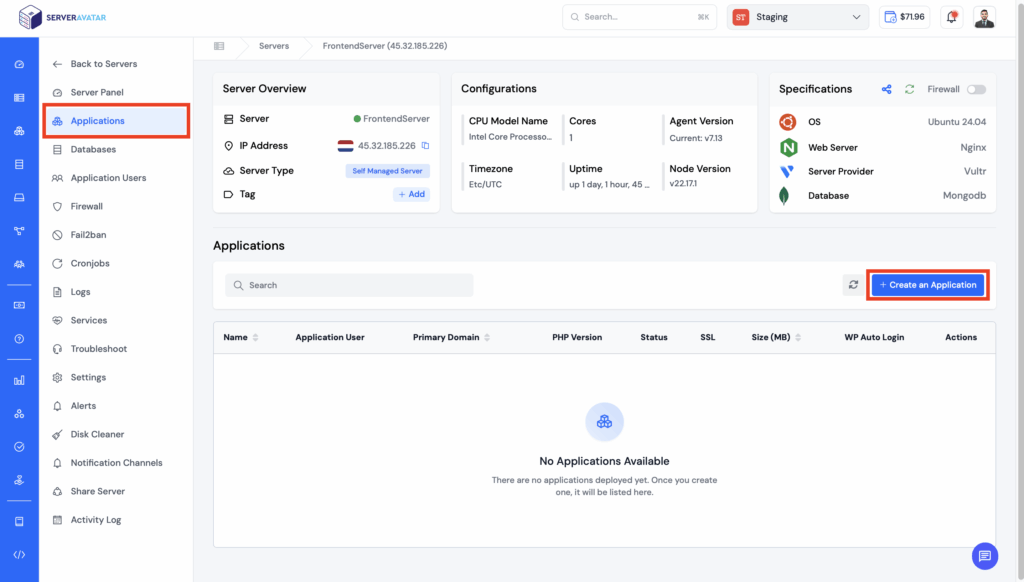
- Enter a name for your application, such as “ReactApp”.
- Next, choose the domain to host your React application—either a Primary Domain or a Test Domain:
- Primary Domain: The main domain users will use to access your live website.
- Test Domain: A staging/development domain provided by ServerAvatar, requiring no manual setup and ideal for testing.
- Choose the method as the “Git”.
- Select the service provider where your repository is hosted. For this blog post, we’ll use GitHub as the service provider since our React Todo app is stored in a private GitHub repository.
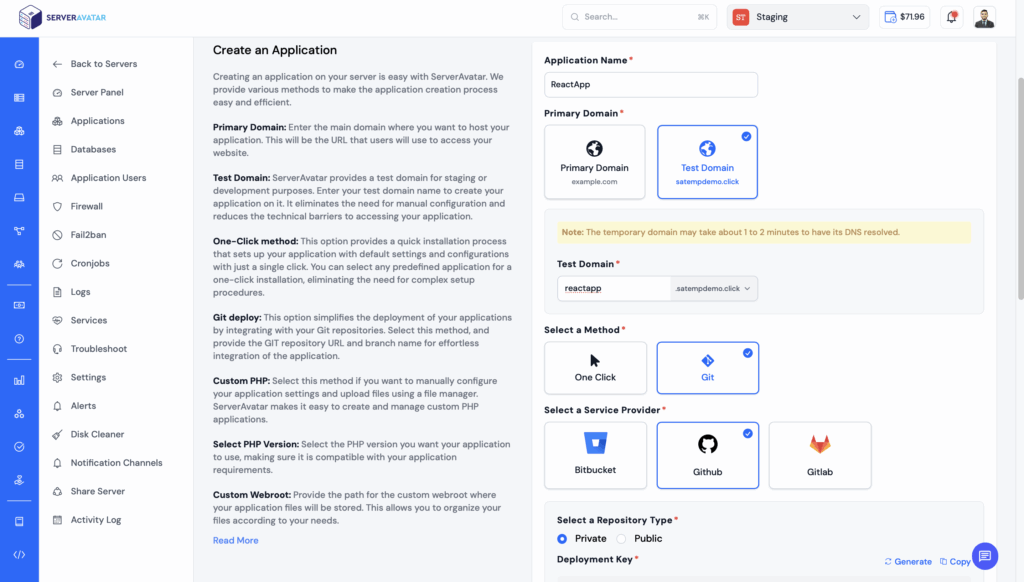
- Since we are working with a private repository, choose “Private” as the repository type. This ensures that ServerAvatar will securely access your code from a private source.
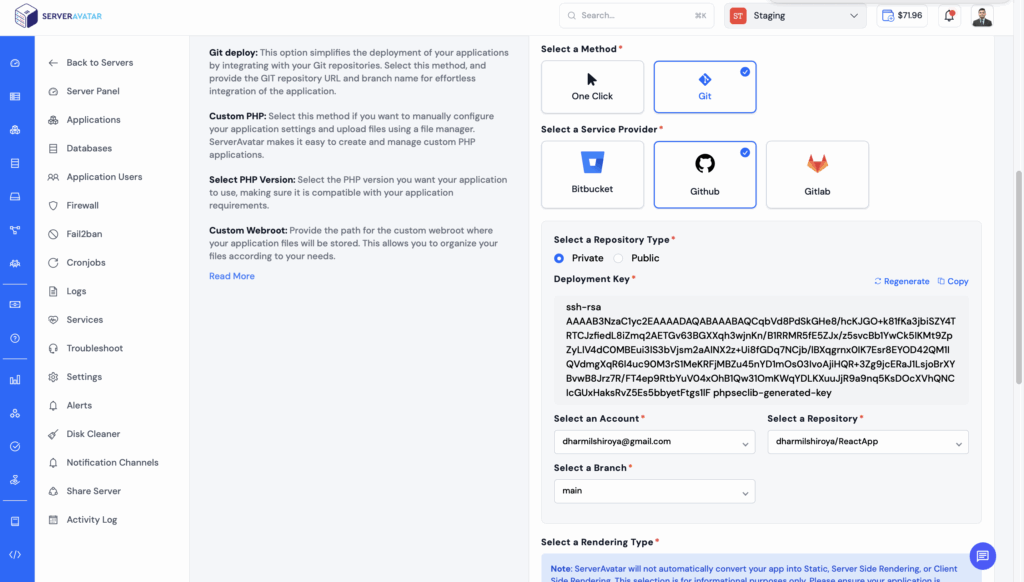
- To allow ServerAvatar to fetch code from your private GitHub repository, you need to generate a deployment key:
- Click on the “Generate/Regenerate” button as shown in the interface.
- A unique public SSH key will be generated.
- Copy this key and go to your GitHub repository.
- Navigate to:
Repository Settings → Deploy Keys → Add Deploy Key. - Paste the generated key, give it a recognizable title (e.g., “ServerAvatar Deploy Key”).
- Click “Add Key” to complete the process.
- Choose the GitHub (or other supported platform) account where your repository is hosted. This account must be connected to ServerAvatar to fetch the repositories list.
- Choose the repository name.
- Choose the branch you want to deploy — usually main or master, or any development/staging branch.
Note: You can always change the branch later if needed after deployment.
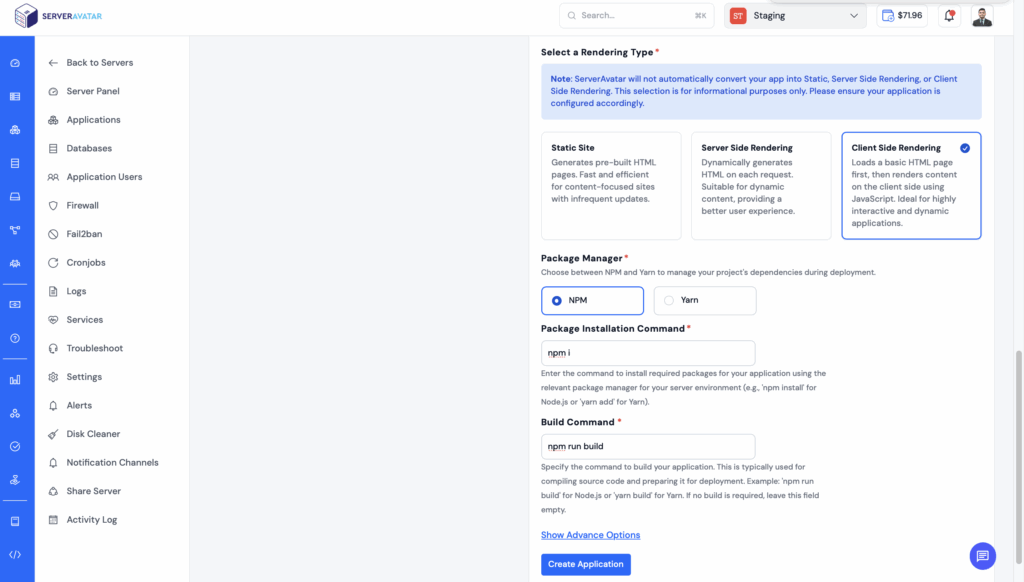
- Select Client-side Rendering (CSR) as the rendering type, since your application is a standard React app. This means the React code will run entirely on the browser, with no server-side rendering involved.
- Select the packet manager from the NPM and Yarn.
- Provide the package installation command to install the necessary dependencies to run your application using the relevant package manager for your server environment (e.g., ‘npm install’ for Node.js or ‘yarn add’ for Yarn).
- Specify the command to build your application. This is typically used for compiling source code and preparing it for deployment. Example: ‘npm run build’ for Node.js or ‘yarn build’ for Yarn. If no build is required, leave this field empty.
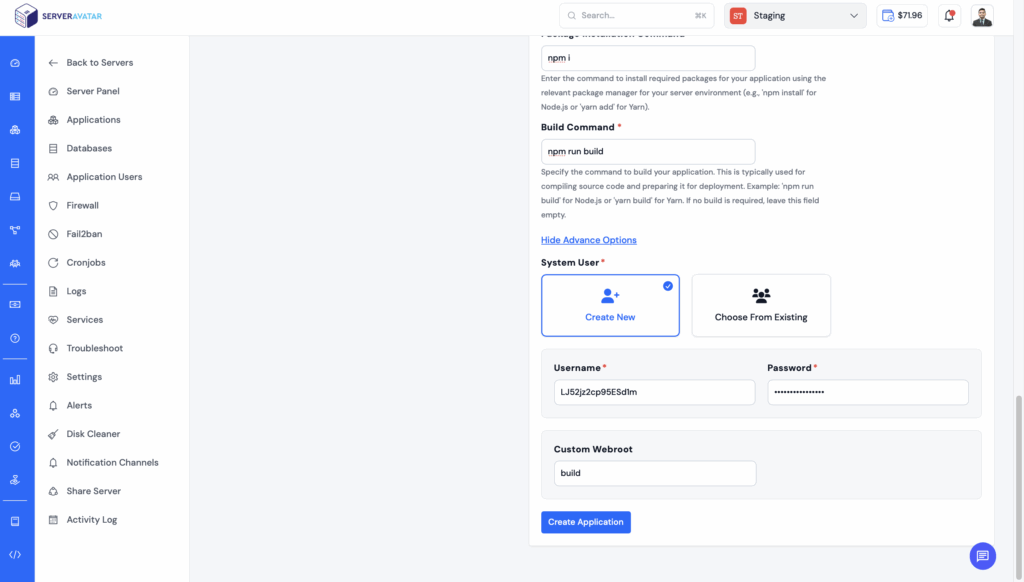
- To configure additional deployment settings, click on the “Show Advanced Options” button. In this section, you can either select an existing system user or create a new one.
Recommendation: It’s best practice to create a dedicated system user for each application you deploy. This improves security, makes application management easier, and isolates user-level access for each app. - Since you are deploying a React application, the index.html file are typically located inside the build folder.
Click on create application once you have successfully provided all information required to create application. It will take few minutes to install all the dependencies and create build file.
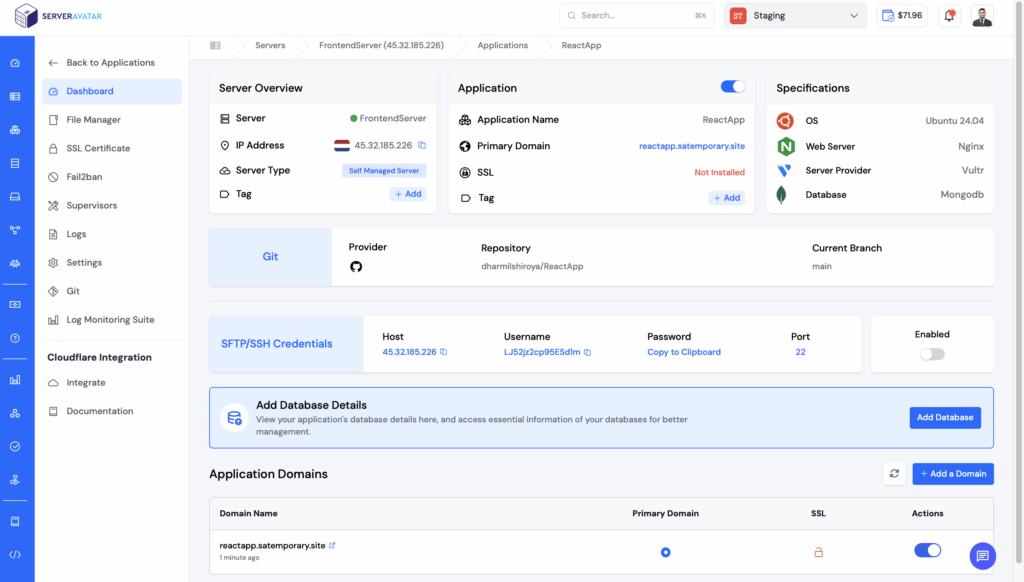
Once the application is successfully hosted your application is deployed successfully. You can check by visiting primary domain.
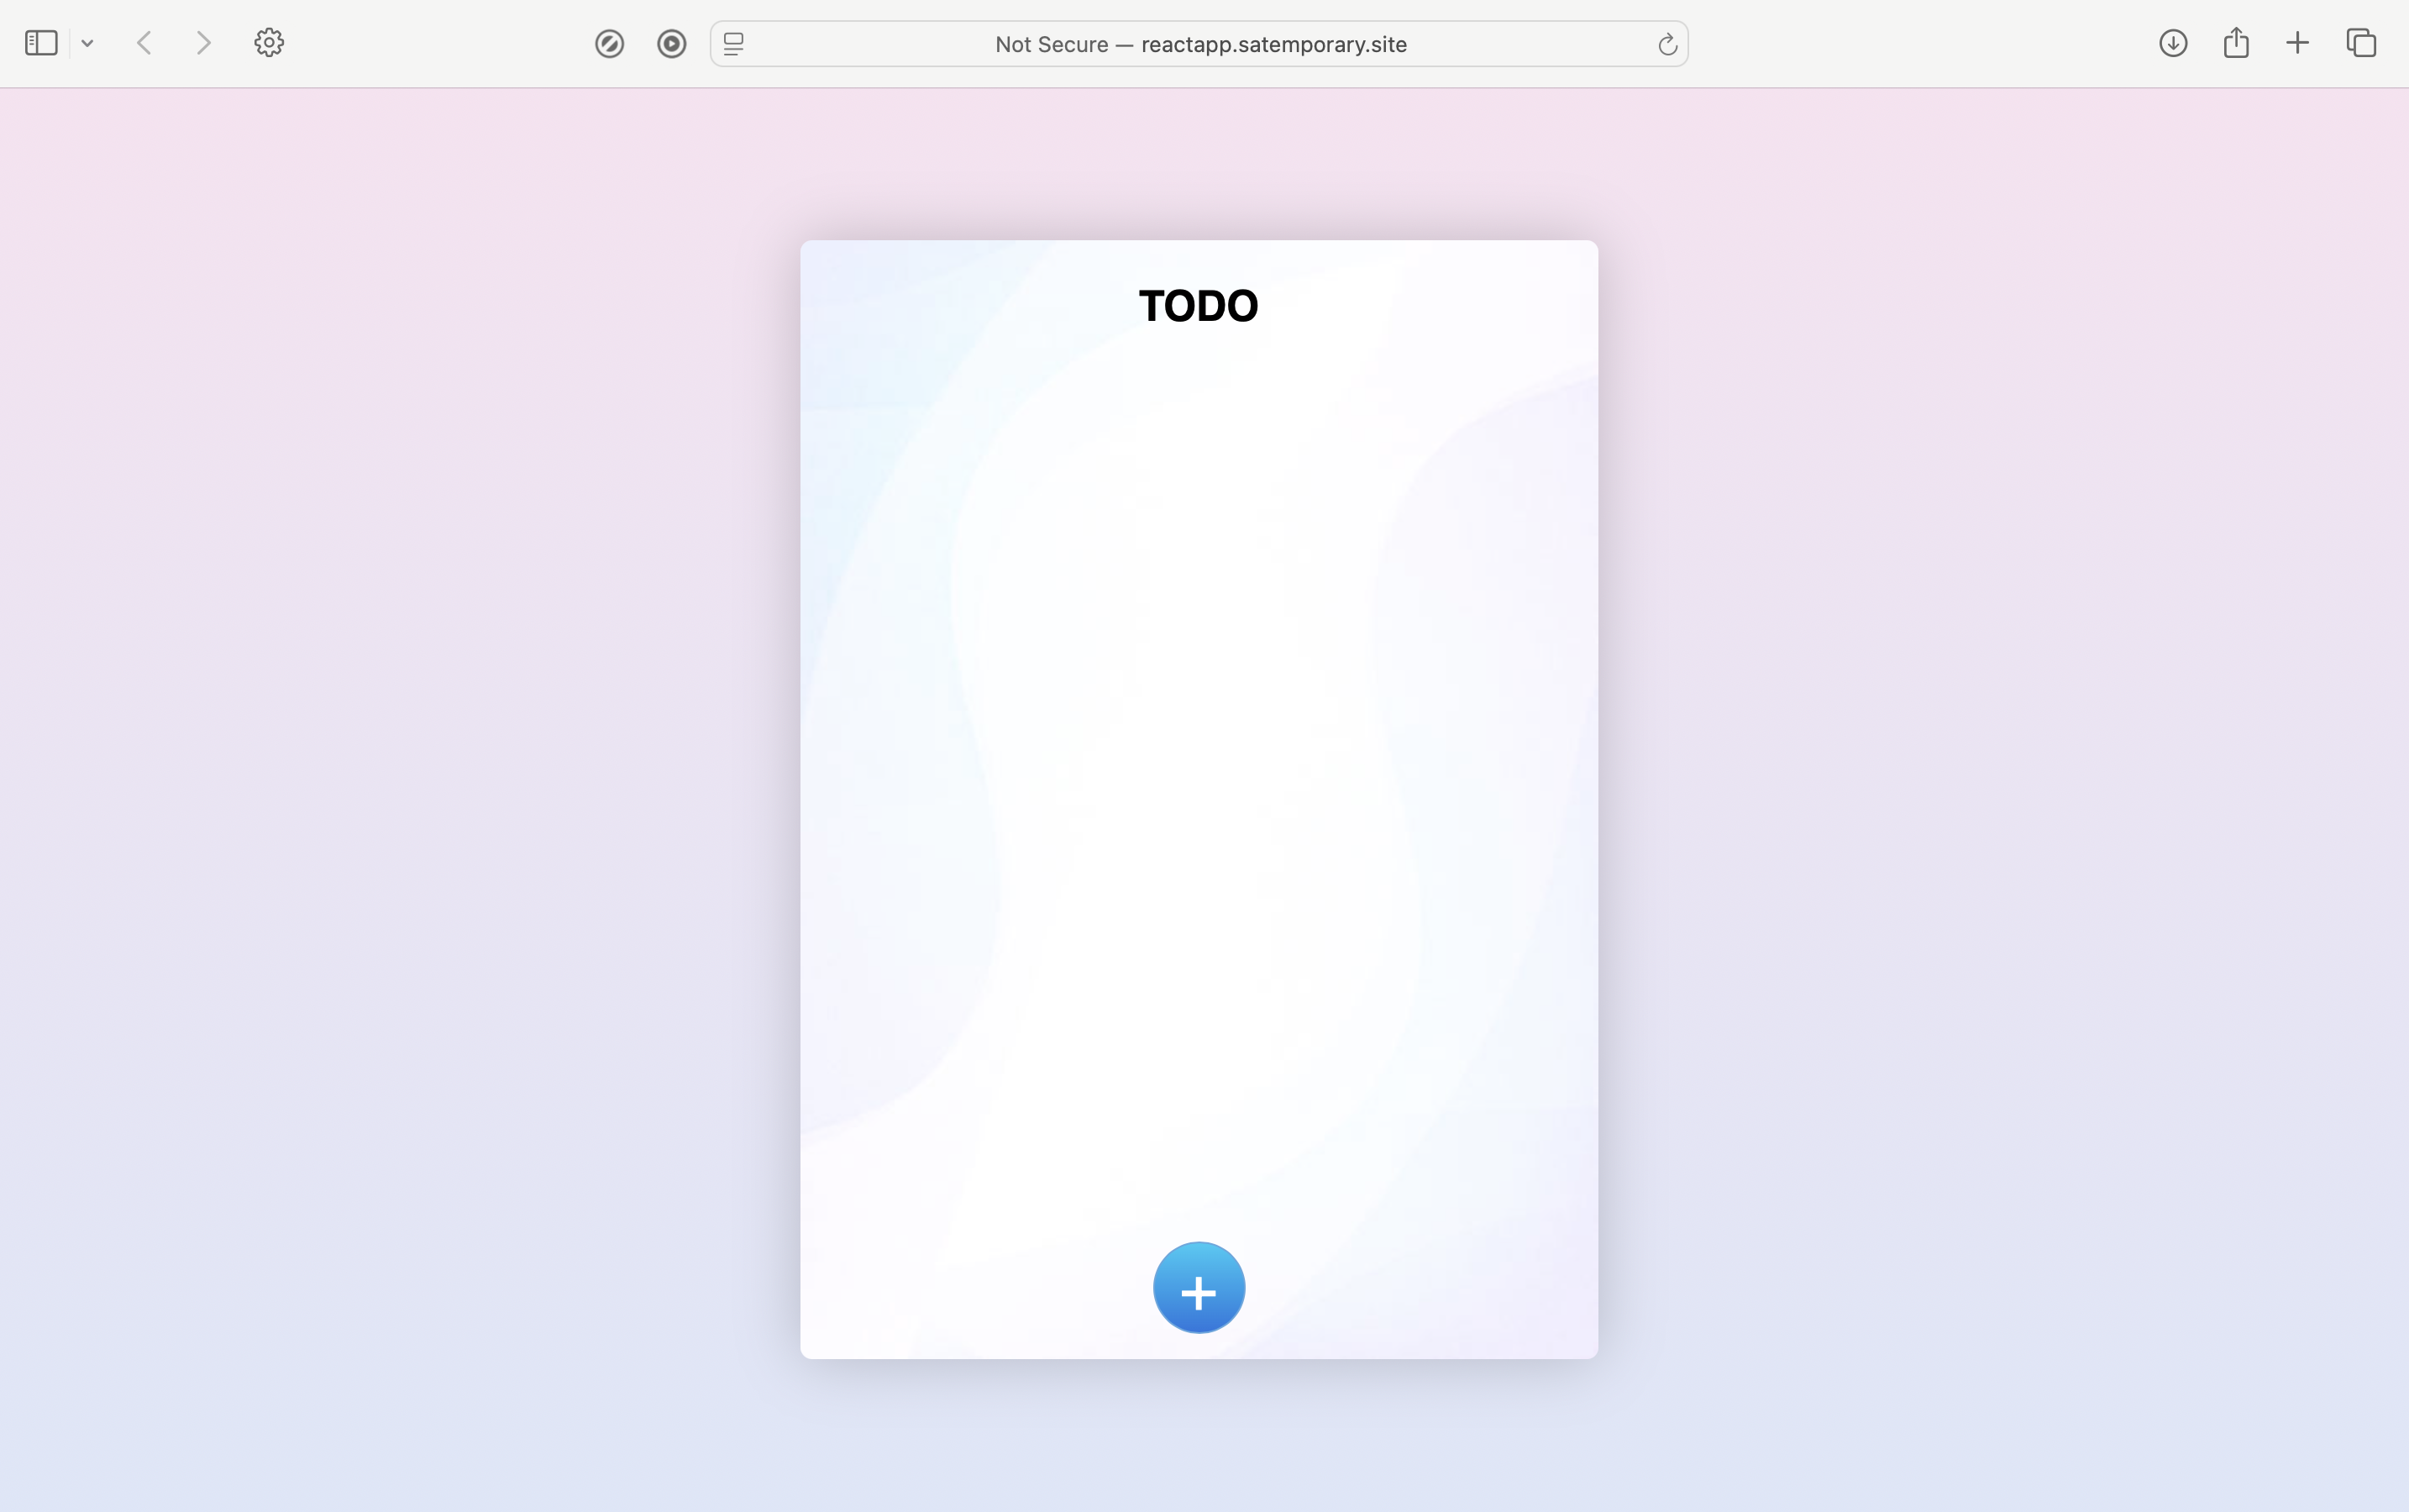
We have successfully hosted react app of the To-Do List . Congratulations🥳.
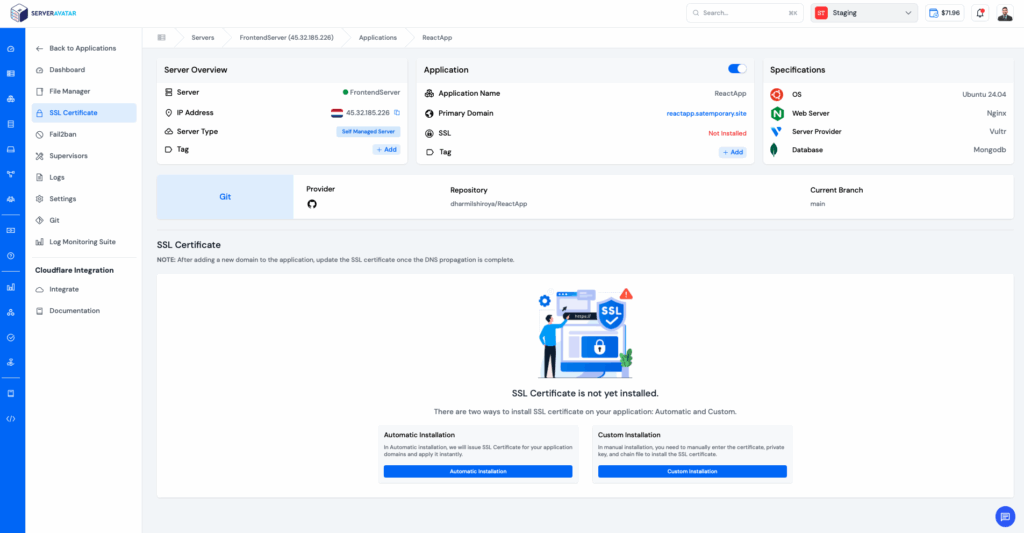
Secure Your application With SSL
Running your application without SSL means your data is vulnerable. Information like API keys, login credentials, and webhook data can be intercepted easily if you’re using plain HTTP. Modern browsers also flag such connections as “Not Secure,” reducing trust and potentially breaking features that rely on a secure connection.
Thankfully, securing your app is simple with ServerAvatar.
ServerAvatar provides a seamless, one-click solution to install SSL on your application and no server login or technical configuration required. You can choose to use the Auto Installer, which sets up a free Let’s Encrypt SSL certificate and automatically handles renewals, or go the manual route by uploading your own certificate and private key. Everything is managed through the ServerAvatar dashboard.
No need to touch NGINX files or run terminal commands, it’s all at your fingertips. Whether you’re a beginner or an advanced user, securing your application with SSL using ServerAvatar is fast, reliable, and hassle-free.
Let ServerAvatar handle the heavy lifting, so you can focus on building your application.
Read our complete step-by-step docs for:
- Installing SSL using the Auto Installer
- Attaching a Manual SSL Certificate from your dashboard
Tip:
If you’re managing your domain through Cloudflare and you’ve enabled the proxy (orange cloud) for your domain, make sure to follow the special Cloudflare SSL installation guide included in the docs to avoid conflicts or certificate errors.
Building CI/CD pipeline
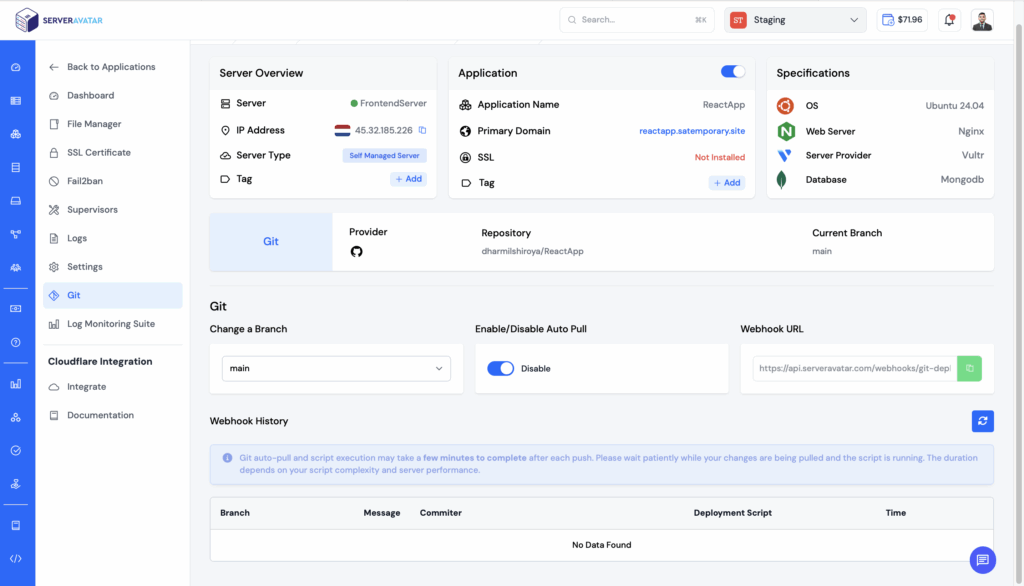
ServerAvatar makes building a CI/CD pipeline easy and efficient by offering native integration with popular version control platforms like GitHub, GitLab, and Bitbucket. Once you connect your repository and select the desired branch, ServerAvatar automates the deployment process by pulling the latest changes every time you push new code. You can configure custom build commands such as npm install and npm run build to ensure your application is built properly after each update. It also allows you to define a custom webroot path like /build for React apps, so the server knows exactly where to serve your app from. Environment variables can be set directly in the dashboard, making it easy to manage sensitive configuration settings. ServerAvatar also provides detailed build logs to help you troubleshoot any issues during deployment. This built-in CI/CD functionality eliminates the need for third-party deployment tools, reduces downtime, and ensures a faster and more reliable development-to-production workflow.
To enable the CI/CD pipeline for your Git-based application, ServerAvatar removes the complexity of writing deployment scripts. You don’t need to write or configure anything manually—just toggle the CI/CD switch from the ServerAvatar dashboard. Once enabled, you’ll be given a webhook URL. Simply go to your repository’s Settings → Webhooks, and add the webhook provided by ServerAvatar. After that, every time you push changes to your repository, ServerAvatar will automatically detect the update and deploy it to your live server. You can even switch branches or make other deployment changes—all without touching the command line.
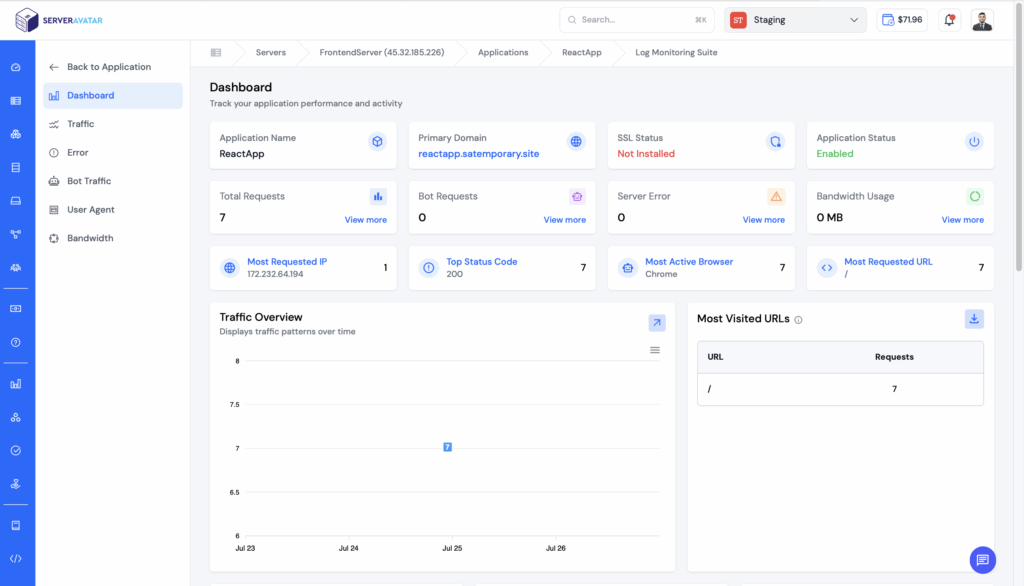
ServerAvatar Log Monitoring Suite
ServerAvatar provides a powerful Log Monitoring Suite that helps you monitor everything happening on your server and applications, from basic request logs to traffic stats, performance, and error tracking, all in one place, and without writing a single command.
Whether you’re debugging an app, tracking traffic spikes, or watching for unexpected behaviour, ServerAvatar gives you the tools to monitor and act quickly.
FAQ
Can I deploy a React app using ServerAvatar without using the command line?
Yes! ServerAvatar allows you to deploy a React app using a fully graphical interface. You can connect your GitHub, GitLab, or Bitbucket repository, configure build settings, and manage your app — all from the ServerAvatar dashboard, without touching the terminal.
Does ServerAvatar support private repositories for deployment?
Absolutely. ServerAvatar supports both public and private repositories. For private repositories, you’ll need to generate and add a deploy key to your repo, which is a simple copy-paste process handled through the dashboard.
How does ServerAvatar handle CI/CD for React apps?
ServerAvatar offers a no-code CI/CD pipeline. Once enabled, every time you push code to your connected branch, ServerAvatar will automatically pull, build, and deploy your app. All it requires is adding a webhook URL to your repository’s settings.
Can I change the deployment branch later?
Yes. You can change the branch anytime from the application settings in the ServerAvatar dashboard without affecting the rest of your setup.
Does ServerAvatar provide monitoring tools for my app and server?
Yes. ServerAvatar comes with a Log Monitoring Suite that tracks requests, performance, errors, and server activity—all visually, no coding required.
Conclusion
With ServerAvatar hosting the any of the reactjs based repositor have never been so easy. This guide has taken you through every steps like from choosing a VPS, linking it to ServerAvatar, hosting the react to-do application with automatic SSL installation and building ci/cd pipeline without touching command line.
If you’re a developer, a business owner, or even want to automate hosting and CI/CD pipeline then this configuration enables you to concentrate on developing applications rather than maintaining infrastructure.
Begin your automation journey today and empower your business with increased productivity!