
Install WordPress the smart way by starting with the right foundation. Imagine if you were building your dream home, would you rent a tiny room or buy a plot and design it your way? The same logic applies when launching a website. Shared hosting is like a rented room, while a VPS (Virtual Private Server) is your personal plot of land with more power and more flexibility.
If you’ve selected VPS to host your WordPress website, you’ve made a smart move. But after getting it, setting it up can feel like solving a puzzle blindfolded. Don’t worry. This step-by-step, beginner-friendly guide will show you how to install WordPress quickly on a VPS, no tech wizardry needed.
Let’s break it all down in the simplest possible way
What is VPS and Why to Use It for WordPress?
A Virtual Private Server (VPS) is like having your own dedicated space, resources, and control, unlike shared hosting where you’re packed in with many other users.
Benefits of using VPS for WordPress:
- More control over settings and configurations
- Better performance and speed
- Enhanced security
- Scalable resources as your website grows
Prerequisites Before Installation:
Before dive in, here is what you need:
- A VPS server (We will use Ubuntu here)
- Root or sudo access of VPS
- A domain name (optional but preferred)
- Basic knowledge of copy-pasting commands
Tip: If you want to avoid all the technical hassle, tools like ServerAvatar can automate the whole process of install WordPress in minutes.
Choose the Right VPS Provider
Your journey begins with picking a reliable VPS hosting provider. You can pick VPS from any custom VPS provider that you prefer. However, some popular names include:
You can start with the smallest plan if you’re new, you can always upgrade your VPS to a bigger plan later. Always look for providers that offer snapshot feature, good uptime, and data centers near your audience.
Accessing Your VPS Using SSH
Once your VPS is set up, you’ll receive an IP address, username, and password. You can use SSH for connecting:
- PuTTY (for Windows)
- Terminal (for Mac/Linux)
Command:
ssh root@your_server_ip

Enter the password and you’re in!

Installing a LAMP or LEMP Stack
To run WordPress, you need either:
- LAMP: Linux + Apache + MySQL + PHP
- LEMP: Linux + Nginx + MySQL + PHP
I’m moving forward with the LAMP stack here. Let’s see the step by step process to install LAMP stack in Ubuntu system:
apt update
apt install apache2 mysql-server php libapache2-mod-php php-mysql -y
This command will install LAMP stack in your ubuntu system.

Want to use Nginx instead of Apache? Change the Apache with Nginx and adjust accordingly.
apt update
apt install nginx mysql-server php libapache2-mod-php php-mysql -y
Using ServerAvatar:
It is very easy and user-friendly process to install LAMP or LEMP stack using ServerAvatar. Follow the steps below:
Using Managed Server:
- Select your server type as a “Managed Server” (You can directly create a server as per your requirements on DigitalOcean or Vultr by ServerAvatar, no need to add your own custom VPS from any cloud provider)
- Select your preferred cloud provider
- Enter your required server name
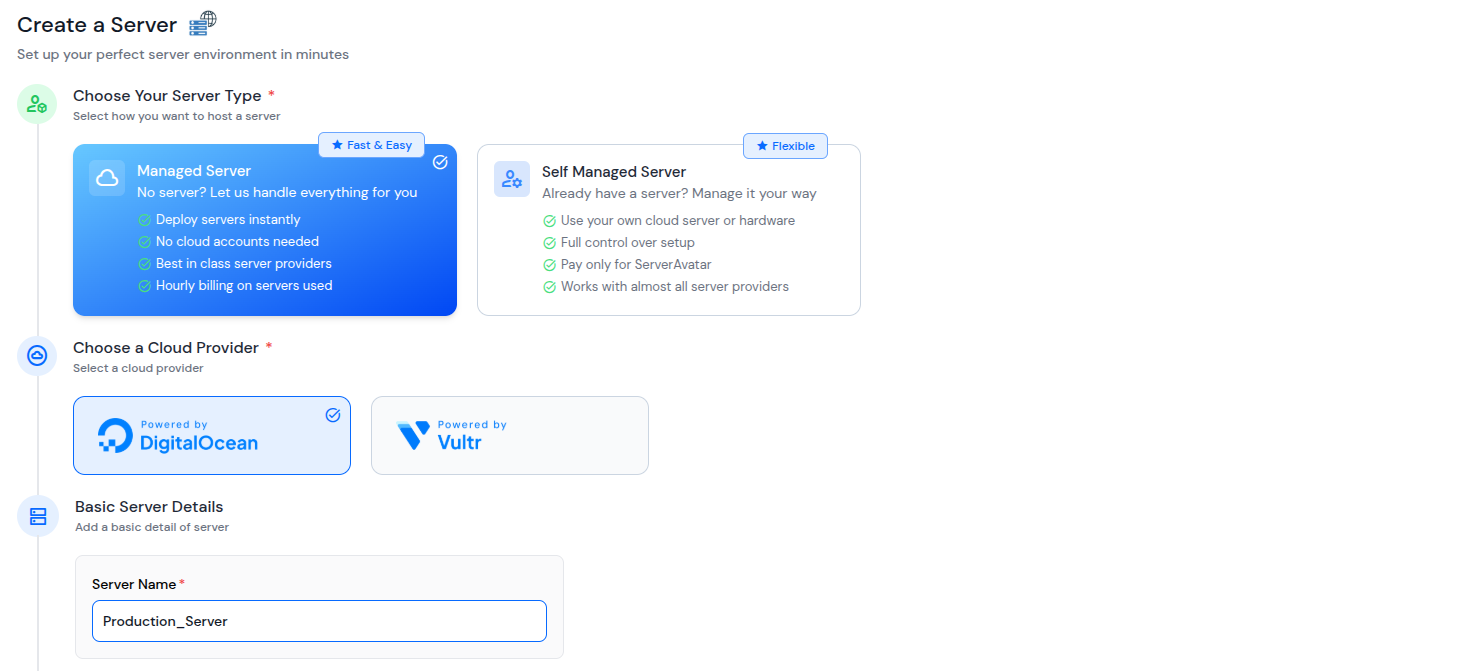
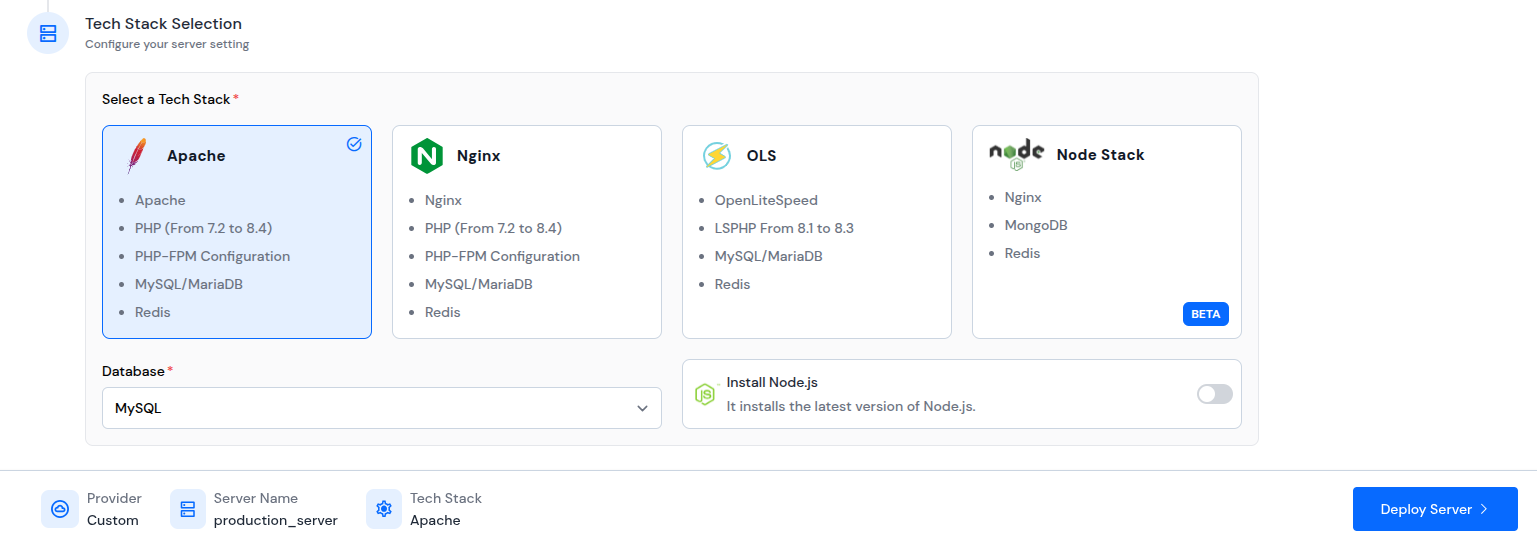
- Select your preferred tech stack, operating system, and database
- Select your server location and instance type
- Click on the “Deploy Server” button
It will take about 10-15 minutes to complete the server deployment and setup
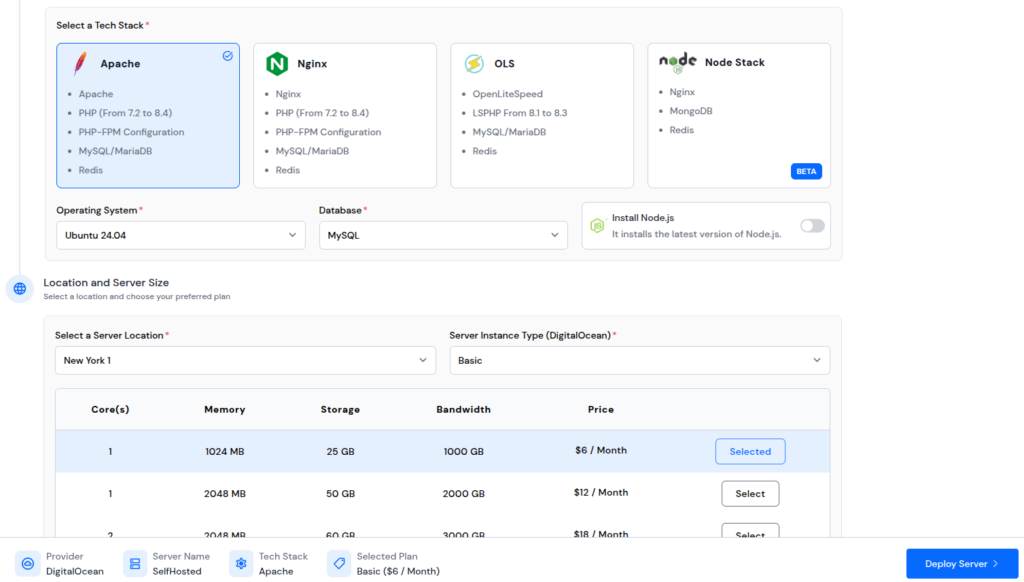
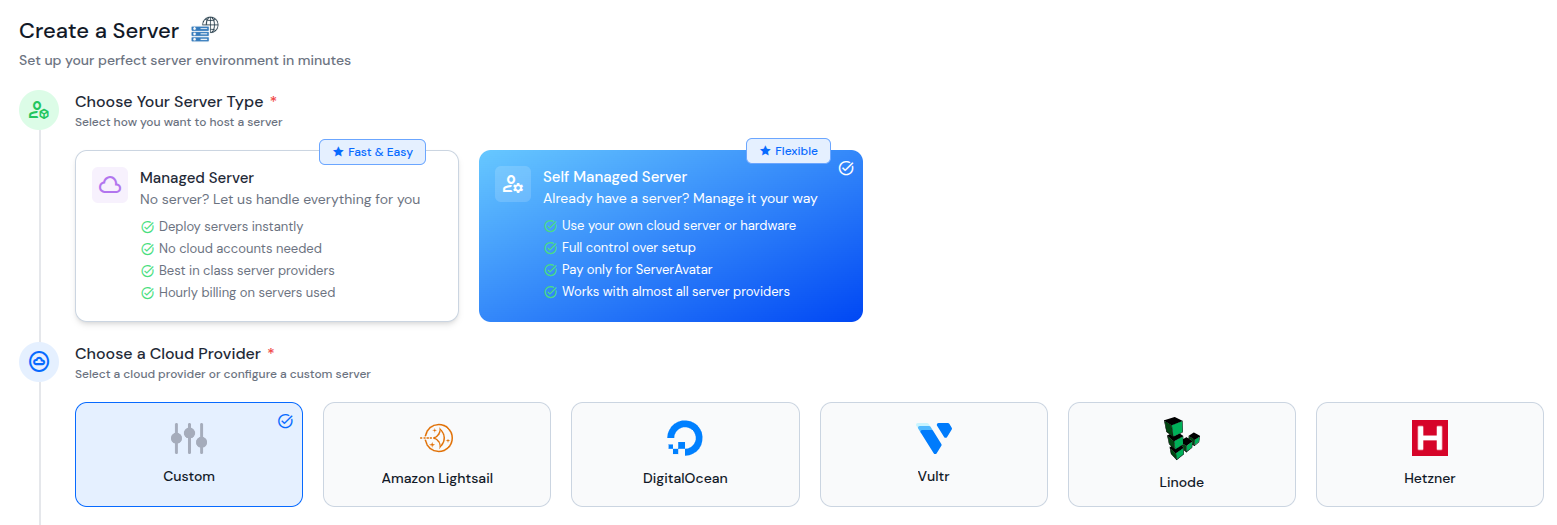
Using Self-Managed Server:
- Select your server type as a “Self Managed Server” (you can connect your own custom VPS from any cloud provider with ServerAvatar by using this option)
- Select your preferred cloud provider from given options
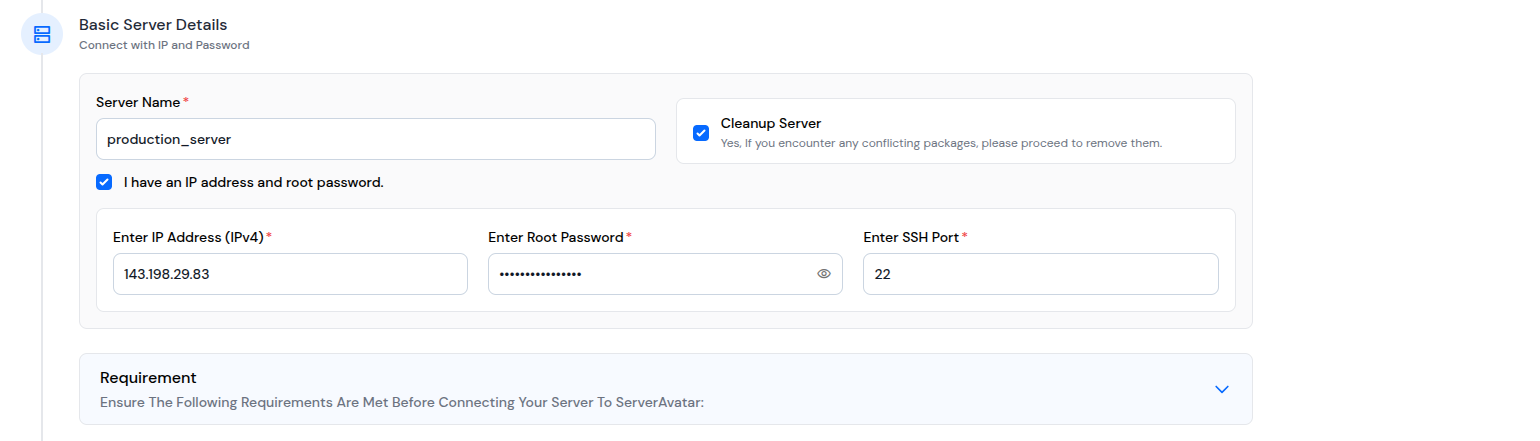
Enter basic details of your server such as server name, IP address, root password, and SSH port (if you don’t have the IP address and root password, ServerAvatar will provide you the script to run in your server to connect your server with ServerAvatar)
- Select your preferred tech stack as I’m selecting here Apache
- Select your preferred database
- Click on the “Deploy Server” button
ServerAvatar will automatically install the LAMP stack
Creating a MySQL Database for WordPress Application
Log in to MySQL:
mysql -u root -pEnter your password for root user.
Create a database and a user:
CREATE DATABASE wordpressdb;
CREATE USER 'dbuser'@'localhost' IDENTIFIED BY 'your_password';
GRANT ALL PRIVILEGES ON wordpress_db.* TO 'wp_user'@'localhost';
FLUSH PRIVILEGES;
EXIT;- Enter your preferred database name at place of “wordpressdb”
- Enter your preferred username at the place of “dbuser” for creating a new user
- Enter your preferred password for user at the place of “your_password”
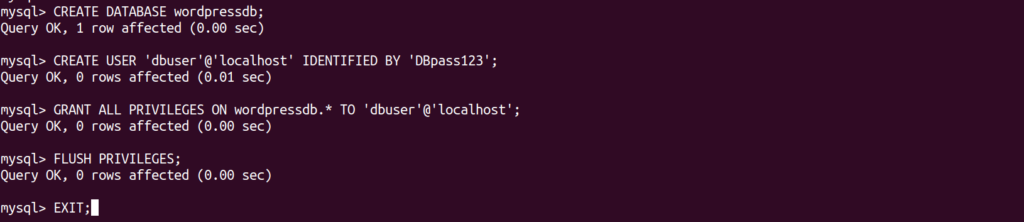
Keep these credentials safe as you will need them later.
Note: While using the ServerAvatar for creating and managing your server and applications, there is no need to create a separate database for your WordPress application. However, when you create a new WordPress application with ServerAvatar’s one-click application deploy method, the database will be created automatically.
We will see more about this while following the guide.
Downloading and Configuring WordPress Application
Navigate to your web root directory:
- Generally, the webroot directory is located at “/var/www/html” path, but it might be different in your case.
- Use “cd” command to navigate to your directory path
cd [your web root directory for WordPress Application]
Let’s now download and unzip the latest version of WordPress file:
- Use the below mentioned command to download the latest WordPress file
wget https://wordpress.org/latest.tar.gz
Now, extract the contents of a .tar.gz file that is a compressed archive. Use the below command, that will extract the contents of tar.gz file, in which “-x” stands for “extract”, it will showing you the progress of extraction (because of -v), and it will decompress it with gzip (because of -z).
tar -xvzf latest.tar.gz

Move all the files and directories inside the WordPress folder to the current directory that is “/var/www/html”.
mv wordpress/* .
Let’s remove the zip file from WordPress directory.
rm -rf wordpress latest.tar.gz
Rename the sample config file:
cp wp-config-sample.php wp-config.php
- Now, open the config file of WordPress to insert the database details that we have created:
- We will use nano command to open the file and edit at the same time.
nano wp-config.php
Find out the field that includes the database details as mentioned below and insert your database details in the wp-config file:
define('DB_NAME', 'wordpress_db');
define('DB_USER', 'wp_user');
define('DB_PASSWORD', 'your_password');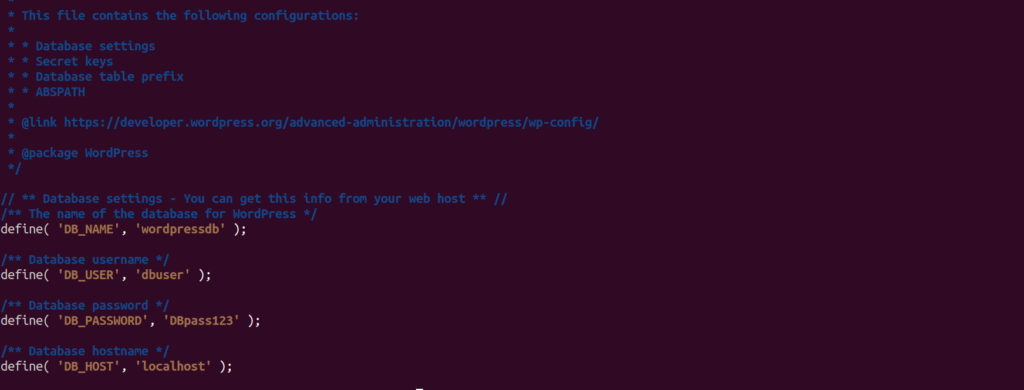
Save the file and exit by using “Ctrl+X” key and “Y” for yes to the confirmation popup to save the file.
Setting File Permissions
- Check out for “index.html” file in your “/var/www/html” directory. If it is exist there remove the file by using “rm” command.
sudo rm /var/www/html/index.html
- Another important thing is to give the right permission to the application so it will work smoothly.
- Use the below commands to give the ownership and modification permission correctly.
chown -R www-data:www-data /var/www/html
chmod -R 755 /var/www/html
This will ensures your application can manage files without compromising security.

Finalizing WordPress Installation via Browser
- Now it is the time to check the WordPress application. Let’s not delay and open the browser and enter the server IP address to check out if the application is installed properly or not:
http://your_server_ip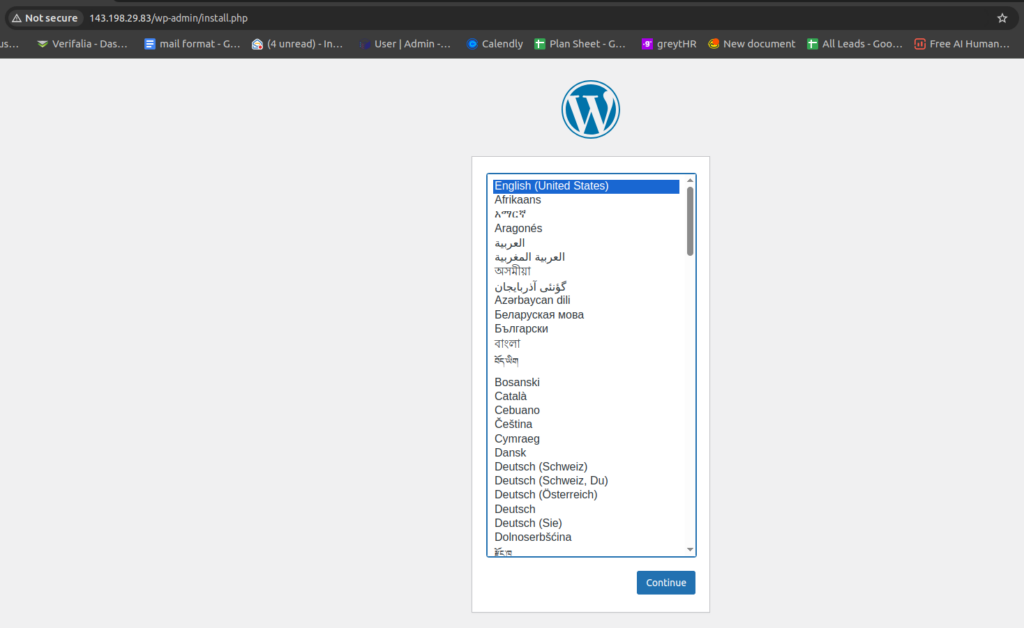
Complete the further process by selecting your preferred language, set your site title, give a username, password, and email id.
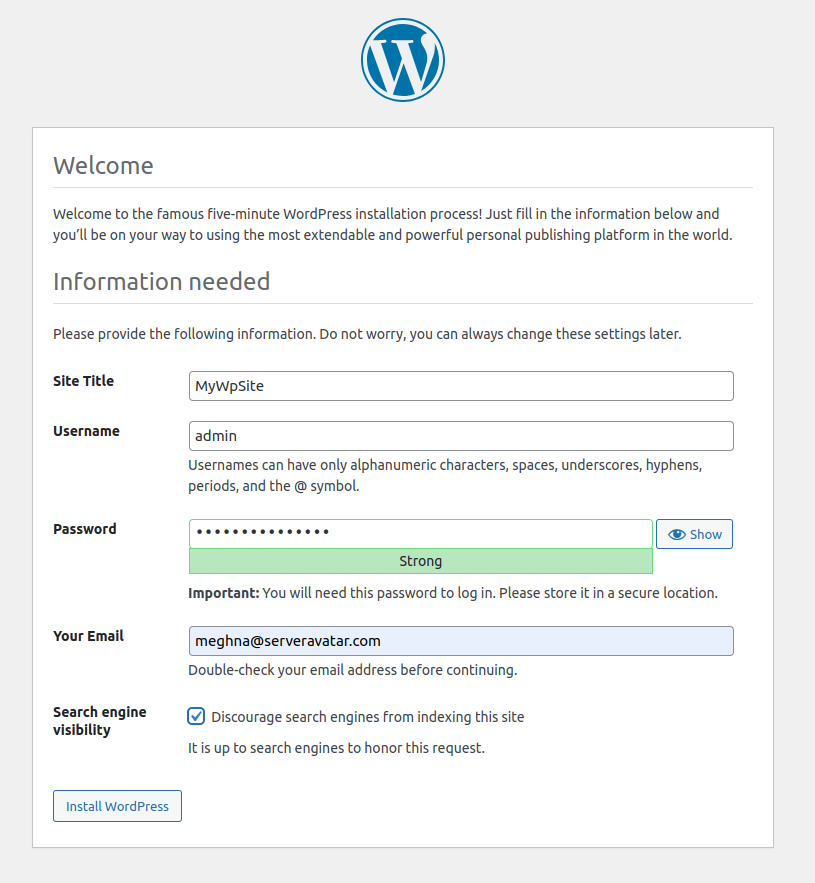
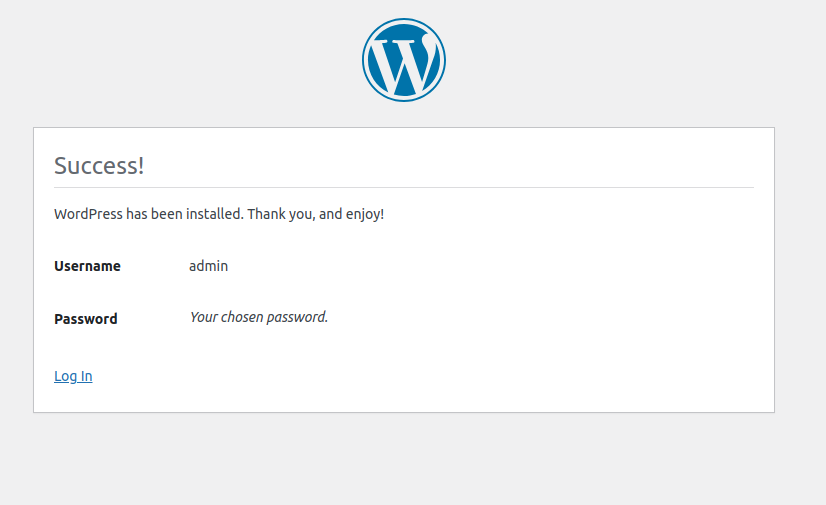
After filling out the details, click on the “Install WordPress” button, and you’re done!
Using ServerAvatar:
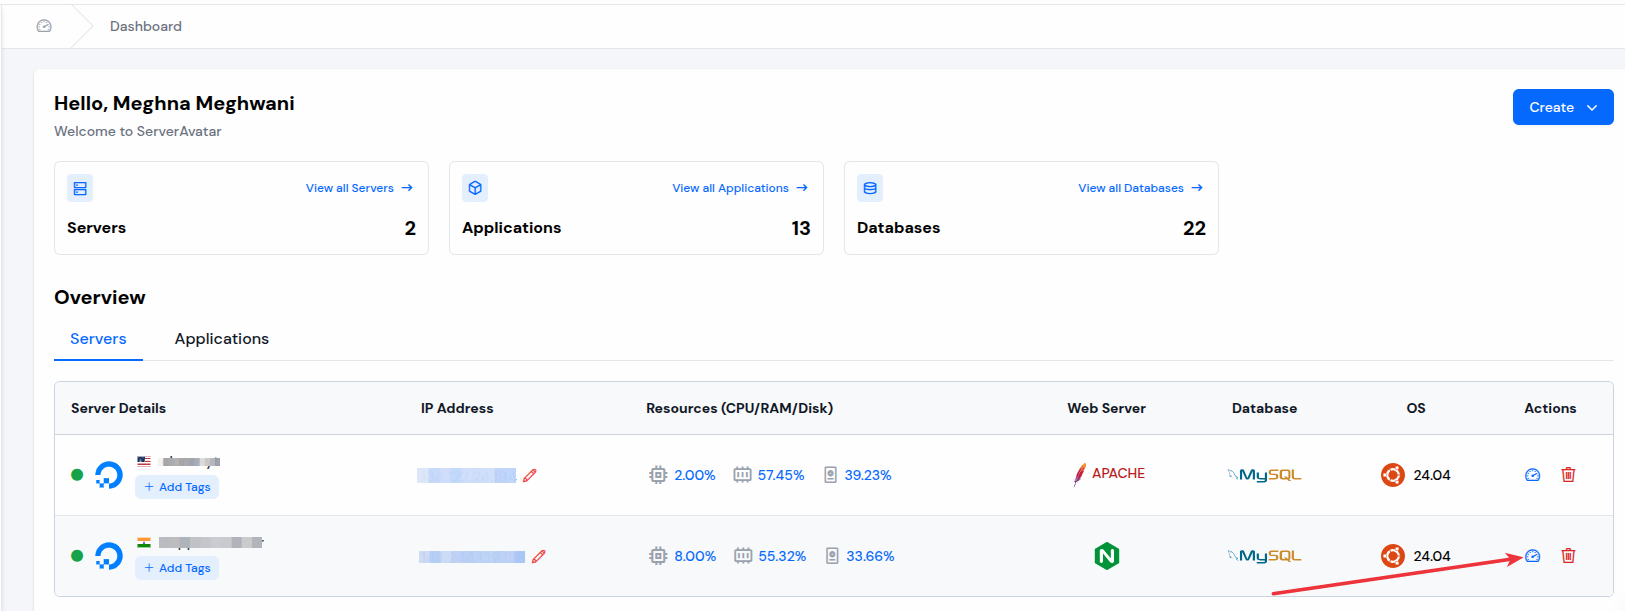
- Click on “Server Dashboard” icon for the server you want to host your WordPress application.
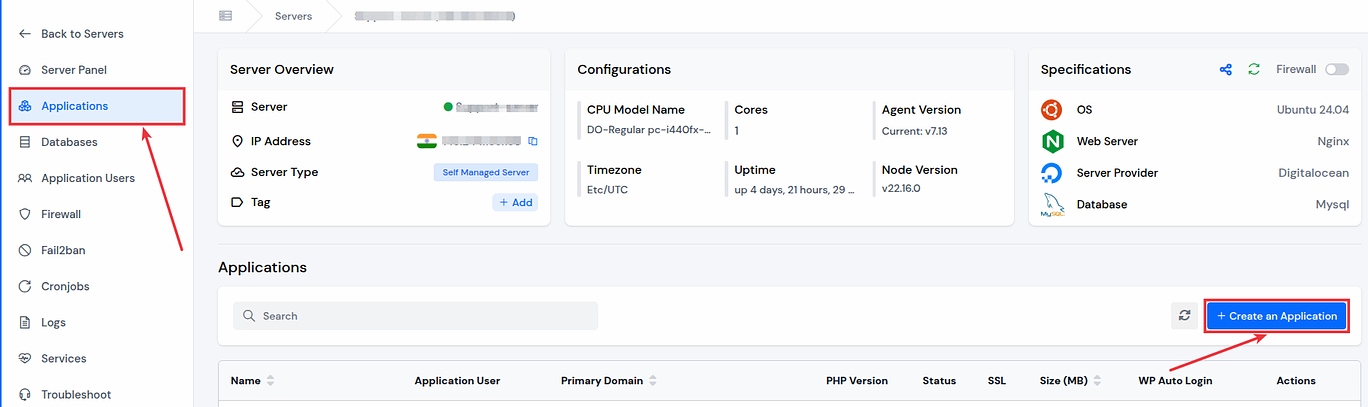
Once you’re inside your Server panel, click on “Applications” tab from the left side bar. Then click on “Create an Application” button.
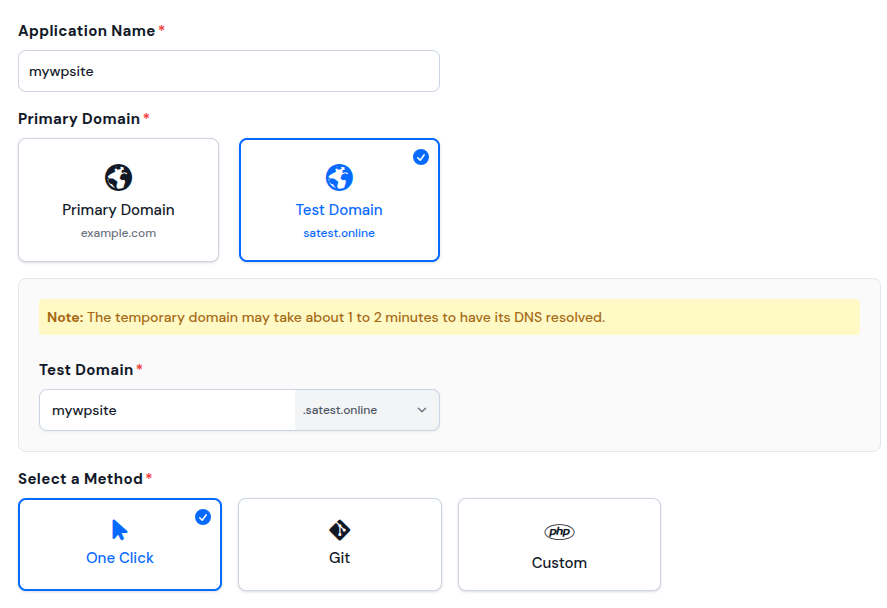
Fill out the form for creating the application:
- Enter your application name
- Select the domain from primary and test domain (as ServerAvatar providing test domains to create application without your own domain)
- Enter the domain name
- Select the method as “One Click”
- Select the “WordPress” application from the given options
- Fill out the application related details such as title, username, email, etc. as given
- Click on the “Create Application” button
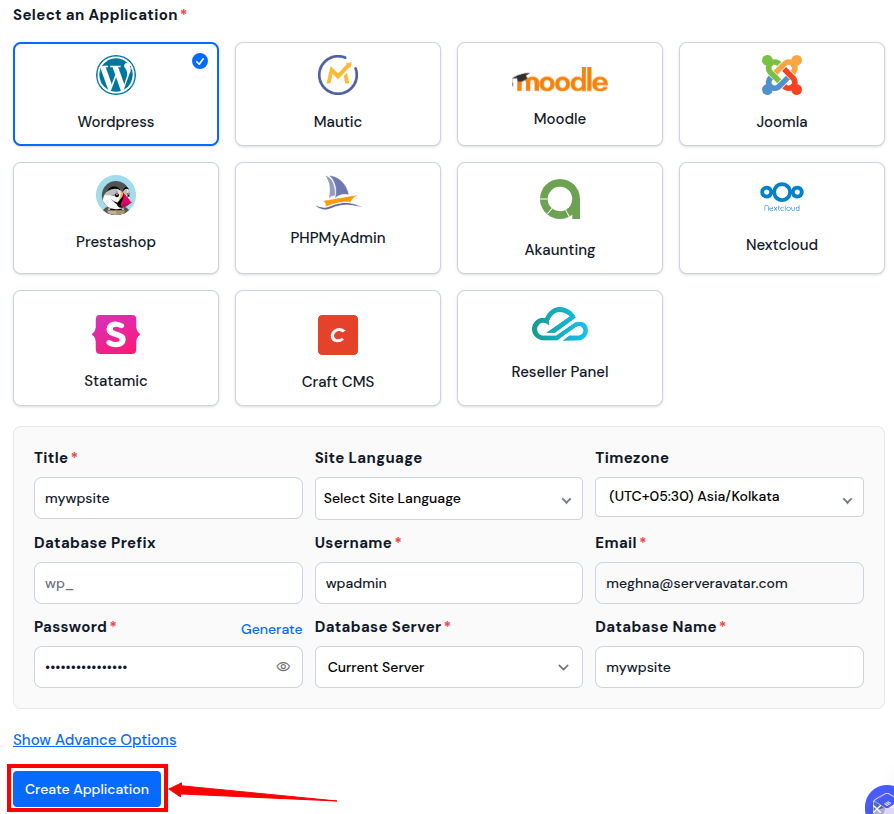
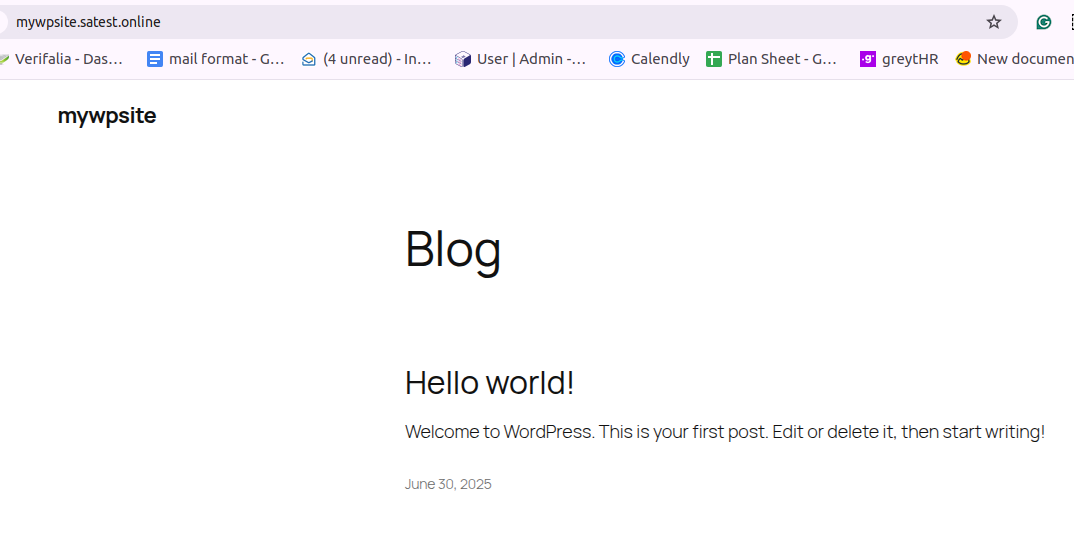
- That’s it, your application is created successfully. You can check it by opening the application URL provided to you.

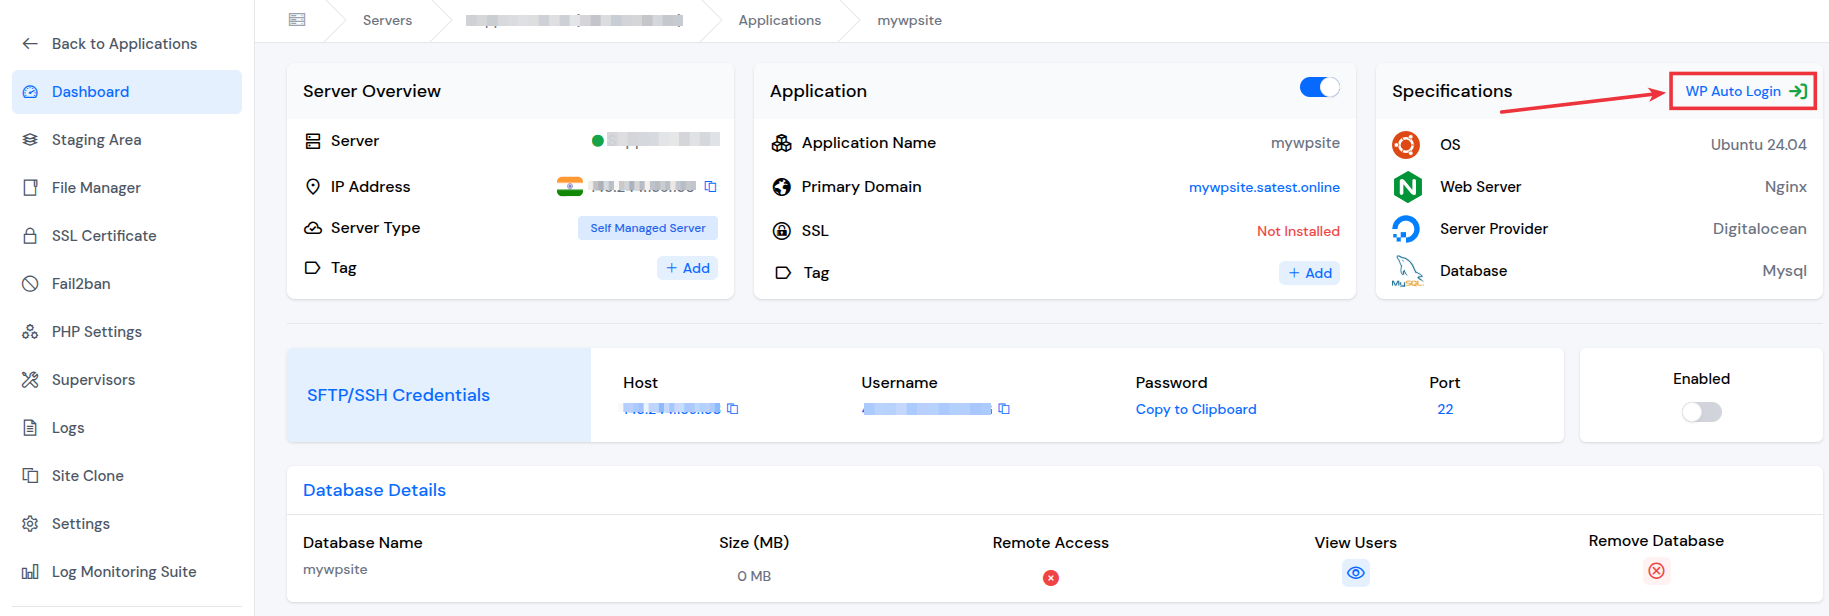
To navigate to the WordPress admin login, simply click on the “WP Auto Login” button from ServerAvatar panel.
Securing Your WordPress Site
Nowadays, security is mandatory, not optional.
Here are some basic tips for securing your WordPress site:
- Don’t use “admin” as your username
- Install a security plugin like Wordfence
- Keep themes, plugins, and WordPress itself updated
- Disable XML-RPC if you don’t use it
- Use Fail2Ban and UFW Firewall, security services to secure your VPS, and with ServerAvatar, it is very easy to enable and set up the security services like Firewall and Fail2Ban.
Installing SSL Certificate
An SSL certificate is mandatory as it encrypts your website traffic. You can use an free SSL certificate from Let’s Encrypt SSL. Let’s see step-by-step process:
Install Certbot:
apt install certbot python3-certbot-apache -y
certbot --apache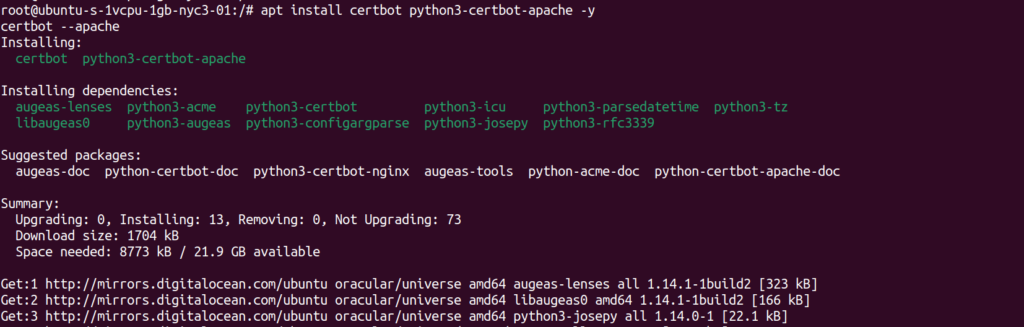
After following these provided commands, your site will switch to HTTPS.
Adding a Domain to Your VPS
Now, update DNS settings to point your domain to the IP address of your VPS. You can do this through your domain registrar such as GoDaddy, Namecheap, etc.
Next step is to configure Apache:
nano /etc/apache2/sites-available/yourdomain.conf
Add a virtual host configuration and enable the site
A Virtual Host configuration file in Apache on Ubuntu is a file that tells Apache how to serve a specific website or application. It defines settings like, domain name or IP address for the site, document root (where your website files are stored), Log file locations, etc.
Example: Basic Virtual Host Configuration File
<VirtualHost *:80>
    ServerAdmin meghna@serveravatar.com
    ServerName mywpsite.com
    ServerAlias www.mywpsite.com
    DocumentRoot /var/www/html

    <Directory /var/www/html>
        Options Indexes FollowSymLinks
        AllowOverride All
        Require all granted
    </Directory>

    ErrorLog ${APACHE_LOG_DIR}/error.log
    CustomLog ${APACHE_LOG_DIR}/access.log combined
</VirtualHost>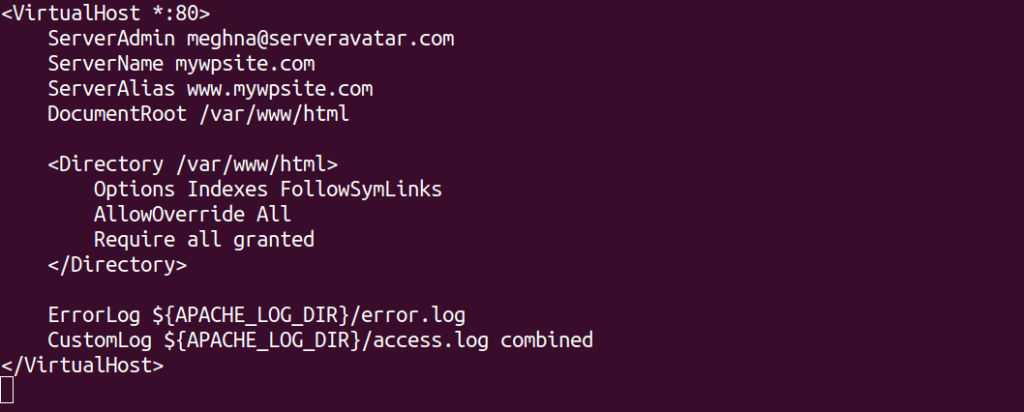
Save the file by “Ctrl+X” and entering “Y” while popping up the confirmation.
- ServerAdmin: Specifies the email address of the person that is responsible for the website. This is usually shown in error pages so users can contact you if something goes wrong.
- ServerName: Defines the main domain name for the website. Apache uses this to match incoming requests to the right site.
- ServerAlias: Lists other domain names or subdomains that should point to the same website.
- DocumentRoot: Tells Apache where your website files (like HTML, PHP, WordPress) are located on the server.
It’s time to now enable the site by using the command below:
a2ensite yourdomain.conf
systemctl reload apache2
SSL Installation using ServerAvatar:
- Navigate to SSL Certificate section from the application panel of ServerAvatar.
- Click on the “Automatic Installation” button under the SSL Certificate section.
- If you want to install a custom SSL certificate, select the Custom Installation button and enter your SSL Certificate and Private Key to install custom SSL.
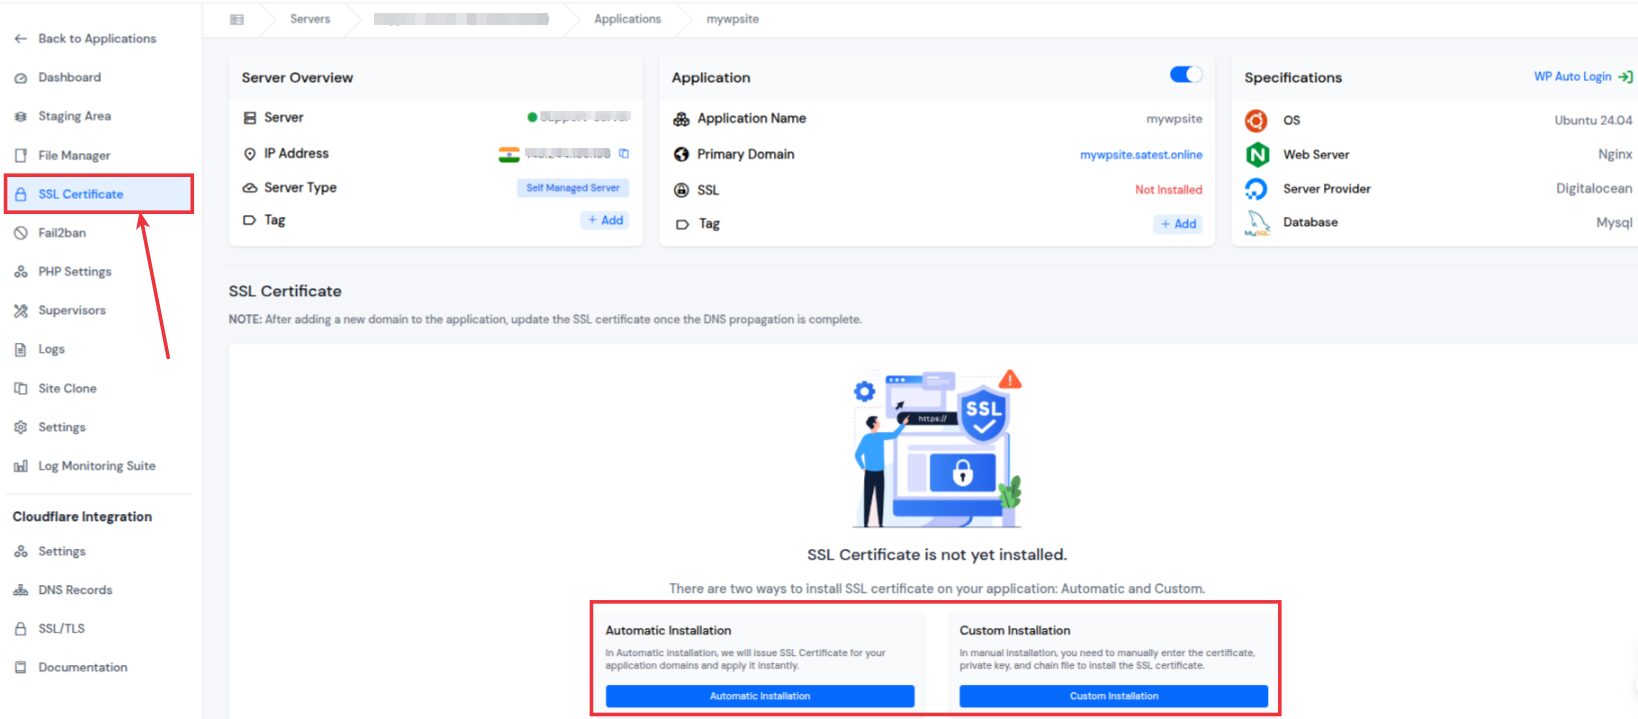
That’s it, ServerAvatar sets up the certificate. Automatic SSL will renew automatically. If you select the automatic installation option, no more manual certificate installations needed, no more expiration headaches. It just works and auto renews.
Optimizing WordPress for Speed
A fast site is a must nowadays!
Speed Tips:
- Use LiteSpeed Cache or WP Rocket plugin to improve the speed of your site
- Optimize images with Smush
- Use a CDN like Cloudflare
- Minimize plugins and use a lightweight theme
Setting Up Automatic Backups
Backups are lifesavers. You can use the plugins like UpdraftPlus from WordPress to enable the backups for your applications. Set schedules weekly or daily for your application, depending on your site activity.
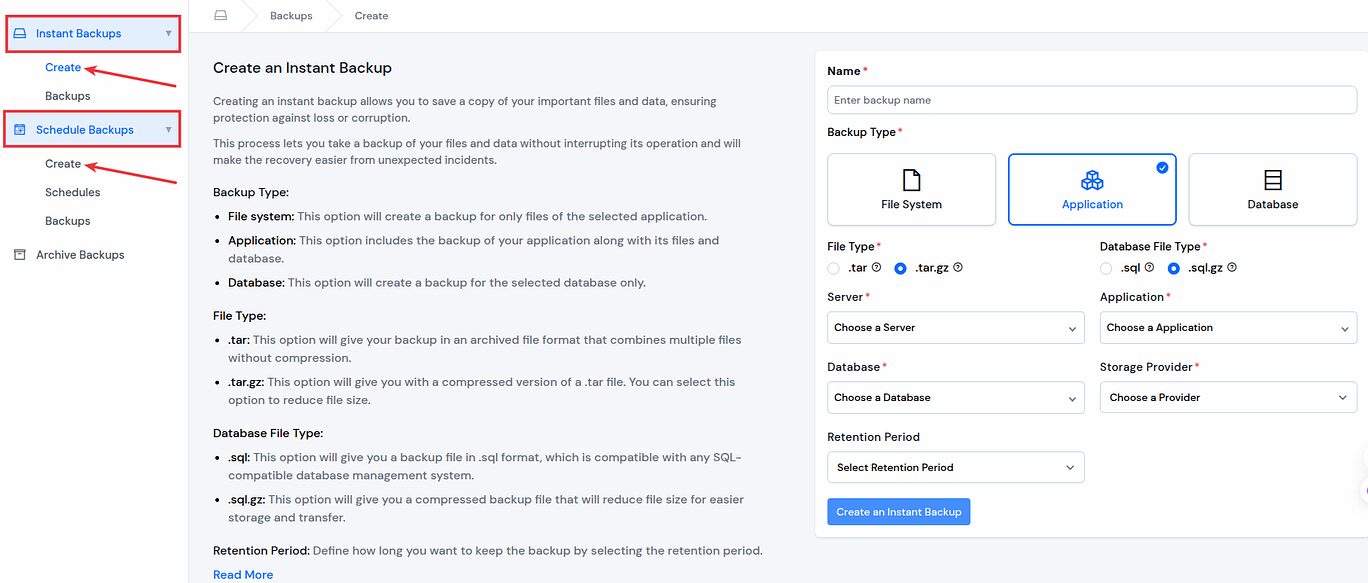
Using ServerAvatar You can create backups for each application and its database.
- Instant Backups with one click
- Schedule automatic backups on a daily/weekly schedule
- Restoring from a backup is just as easy. Select backup, hit “Restore”.
Pro tip: Always schedule backups before pushing new changes. It’ll save you hours of debugging if something goes wrong.
Conclusion:
Installing WordPress on a VPS might sound complex and intimidating at very first, but as you have seen, it is completely easy to do and hassle-free process, even for beginners. Yes, it is very confusing process at the first time, however also satisfying once it’s done. Whether you want to follow the manual process to install WordPress application as mentioned here or you want to take easier path with a deployment and management platform; ServerAvatar, you will gain full control over your website’s performance, security, and scalability.
VPS hosting gives you freedom to grow, experiment, and build exactly kind of site you want, without limits of shared hosting.
So, take deep breath, follow steps, and get your WordPress site live with confidence. Once it is up and running, don’t forget to secure it, and take backup of it, and optimize it for speed.
Takeaways:
- VPS gives you the freedom and power
- Follow step-by-step guide and you’ll never feel lost
- Use platform like ServerAvatar to simplify process even more
- Always keep your site updated, backed up, and secure
Frequently Asked Questions
1. Do I need technical knowledge to install WordPress on VPS?
Not at all! If you can copy and paste commands understand and follow guide, you’re good to go.
2. Is VPS better than shared hosting for WordPress?
Yes. VPS offers better speed, control, and security, and it is perfect for growing websites.
3. How much does it cost to host WordPress on VPS?
It can start as low as $5/month depending on the provider, and scales as your needs grow.
4. What if I mess something up during the setup?
Don’t panic! Most VPS providers offer snapshots. Restore and try again, practice makes perfect.
If you use the ServerAvatar for setup process you can directly contact to our support team for resolution of your issue.
Note: ServerAvatar is powerful and user-friendly server and application management panel and hosting platform. It simplifies server management and makes deploying PHP and Node.js applications like WordPress, N8N, Laravel, and others easy, even for non-experts.
If you’re looking to manage your server efficiently without dealing with complex command-line, you can try ServerAvatar for a fully hands-off experience.
- Register now to explore ServerAvatar: https://app.serveravatar.com