
Vultr is one of the most popular cloud platforms in 2025. ServerAvatar manages hundreds of WordPress or PHP-based sites across numerous Vultr cloud instances, with the demand for Vultr is growing rapidly.
Currently, Vultr has more than 25 data center locations in different countries, including India. If your primary audience is from India, you can host your sites in either Mumbai or Bangalore data centers if you are using Vultr.
I personally prefer Vultr for its outstanding performance. If you are looking for performance while selecting a cloud platform, Vultr is an excellent option. It also provides many features that you might not find in other cloud platforms.
This guide covers everything you need to know about Vultr, making it easier for you to host your websites on the cloud and make changes in servers as required. We will cover all the important actions you can perform on your Vultr cloud instance in this guide.
We will begin with the basics, considering you have no experience with cloud platforms. However, If you are an expert, you can jump to the topics or only read the topics that you desire. Here are the topics we will cover in this guide.
What is Vultr?
Vultr is a cloud platform just like AWS, GCP, and DigitalOcean. It simply provides cloud computing services on-demand. This allows you to quickly create or delete servers within minutes, as well as perform various server-level tasks such as reinstalling, restarting, or upgrading in minutes.
Vultr provides multiple cloud computing services, including:
- Cloud computing instances (servers)
- Managed databases
- Object storage instances
- and many more.
For this guide, we will focus on the first service: Cloud computing instances or servers.
Cloud instances are the most fundamental cloud computing product. It comes with all the essential computing resources and operating systems. You can configure cloud instances however you like to host your projects.
So, Let us first understand what exactly is a cloud instance or a server. You can skip the section if you are already familiar with cloud instances or servers.
What is Vultr Cloud Instance or Server?
At fundamentals, all the servers, VPS, dedicated, cloud instances, droplets, bare metals, etc are the same. Regardless of the type of server, the following components are common in all of them.
- Dedicated IPv4 Address
- vCPUs or CPUs
- Memory or RAM
- Storage space (usually SSD)
- Specific Bandwidth Limit
- GPUs (optional)
By combining these configurations in various ways, we can create different types of servers. For example, a server having a dedicated vCPU is known as a dedicated server. It does not share its computing power with other servers. In case your vCPUs are shared, your server shares or gets a specific amount of CPU time for computing.
With the combination of these six configurations, we can create many different types of cloud instances for different types of requirements. Let’s explore more about the different types of servers provided by Vultr.
Types of cloud instances in Vultr
As we discussed earlier, different types of instances are simply combinations of different types of hardware configurations like CPUs, Memory, Disk storage, GPUs, etc. There are four major categories, each with its own sub-categories of servers.
The four major categories are:
- Cloud Compute (Shared vCPUs)
- Optimised Cloud Compute (Dedicated vCPUs)
- Bare Metal Servers
- Cloud GPUs
Let’s take a closer look at each category and its sub-categories in detail.
Cloud Compute (Shared vCPUs)
These instances share cloud computing resources with other similar cloud instances, meaning you can’t always use 100% of the CPU all the time. As a result, these types of instances are ideal for small websites or applications with variable cloud computing requirements.
Here are the different types of servers in this category.
- High Performance: These servers are powered by NVMe SSDs and powerful Intel and AMD CPUs.
- High Frequency: These servers have 3GHz+ Intel Xeon CPUs and NVMe SSD.
- Regular Performance: These servers are powered by previous generation CPUs and regular SSD.
Note that these servers have shared vCPUs. The hardware is high-performance, offering faster computing, but it is not possible to use all the computing power of all the vCPUs for your instance.
Optimised Cloud Compute (Dedicated vCPUs)
These instances provide dedicated computing power or vCPUs, meaning this type of cloud instance does not share any computing power with other instances in the same category or different categories. You have the right to access the entire computing power of your vCPUs.
Usually, Optimized cloud computing is typically used to host important websites or systems that require a specific amount of resources, such as CPUs, RAM, storage, etc.
Here are the different types of servers with dedicated vCPUs in Vultr.
- General Purpose: These servers have balanced resources such as CPU, RAM, and Storage with dedicated computing power. If your website does not have particularly high CPU or memory requirements, you can select a server from this category to host your site.
- CPU Optimised: These servers have a 1:2 CPU:RAM ratio. meaning you get 1 dedicated vCPU for every 2GB of RAM. CPU optimised servers are ideal for hosting applications with high CPU demand.
- Memory Optimised: These servers offer a 1:8 CPU: RAM ratio, providing 8GB of RAM for every single vCPU you have on your server. Memory-optimized servers are good for tasks like running queues or memory-based caching systems.
- Storage Optimised: Storage-optimized servers feature a 1:8 CPU:RAM ratio with very high storage capacity. The smallest instance in this category includes 4TB of storage space, making these servers ideal for hosting large databases.
These are the various categories of cloud instances available in Vultr. Each category and sub-category offers multiple servers with different pricing and varying configurations.
Bare Metal Servers
Bare metal servers are the actual “servers” you have in your mind, hardware! It is the only category where you get your own hardware server to manage with the operating system. Cloud compute and Optimised cloud compute instances are virtual machines created from these physical servers.
Bare metal servers are generally more expensive, and you have the full responsibility of the server. Obviously, you get access to all the computing power of the hardware.
You can select a bare metal server based on the processor, RAM, and other available resources. This category does not have sub-categories.
Cloud GPUs
Cloud GPUs is a unique category that allows you to deploy instances with GPUs on-demand. These instances are ideal for running applications that require GPUs, such as Machine Learning or AI.
In most cases, you don’t need GPUs to run your sites. But if needed you can easily create instances with GPUs on Vultr.
You can see the pricing for all the different types of cloud instances on the Vultr pricing page.
Now, let’s see how to create a cloud instance or a server in Vultr.
How to create a server in Vultr
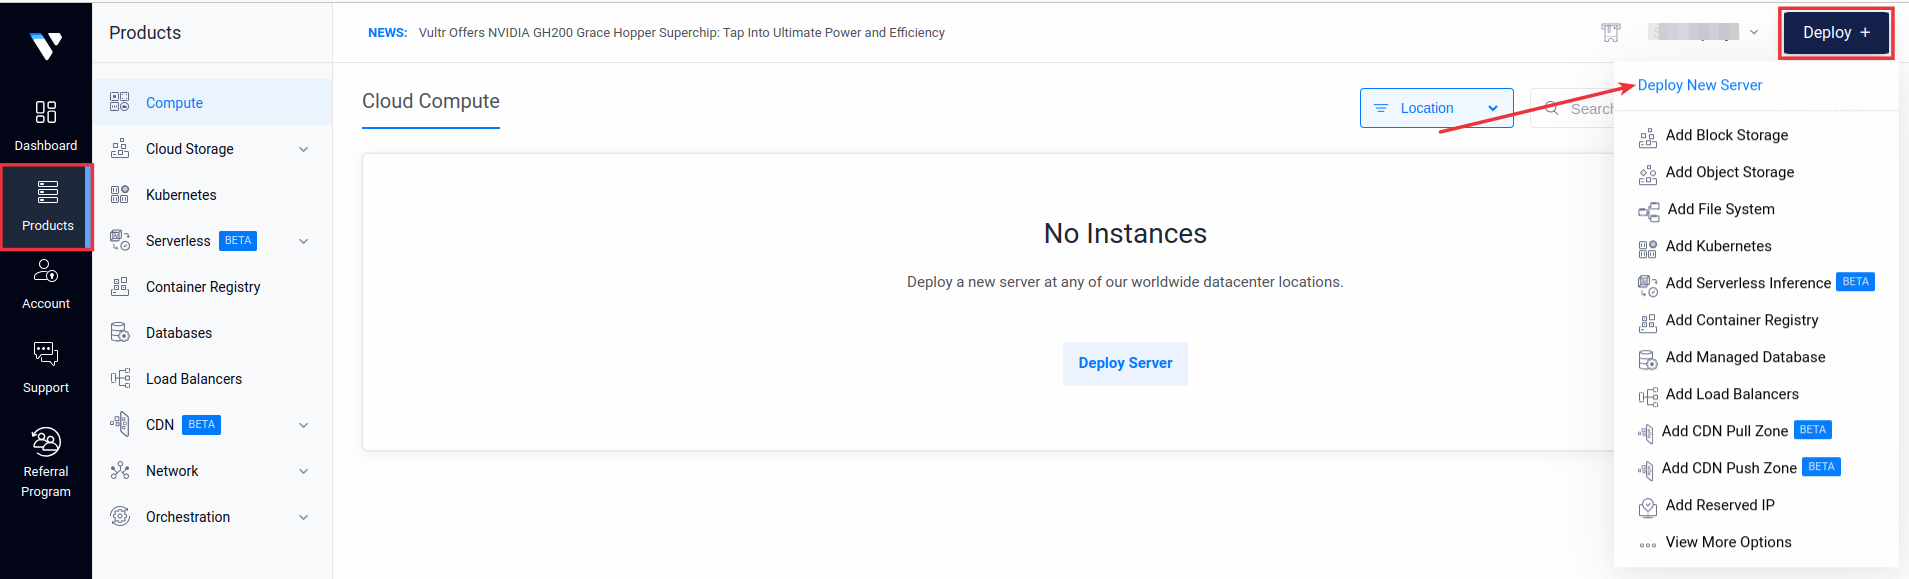
Creating a Vultr Instance is simple, and the process is the same for all the server types we discussed. To create a server, log in to your Vultr account or navigate to the “Products” section from the left sidebar.
Next, hover over the “Deploy +” button and click on “Deploy New Server“, as shown in the image below.
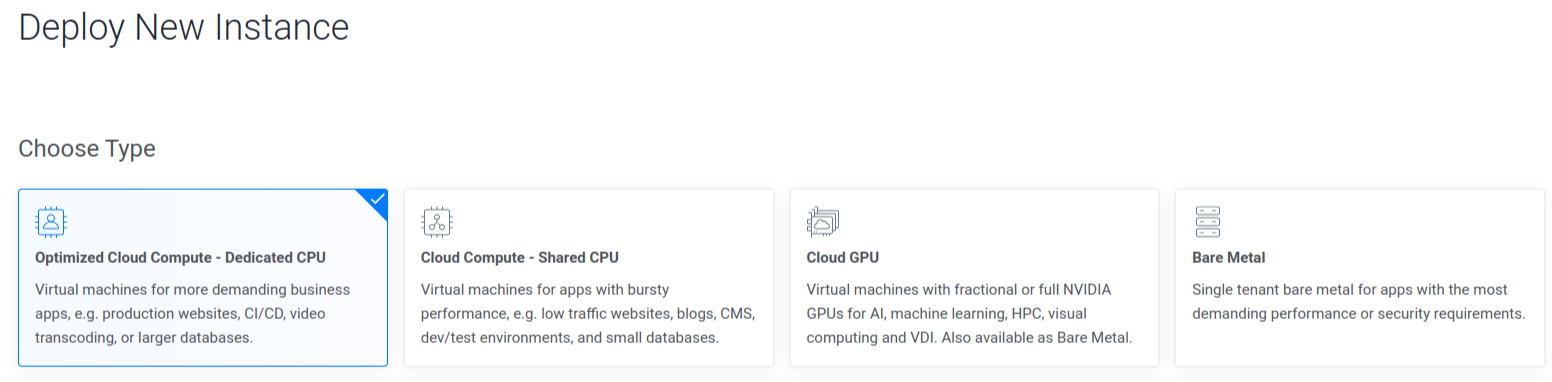
Step 1: Select Server Category
Selecting a server category depends on the specific needs of your website. You can select from options such as Optimized Cloud Compute – Dedicated CPU, Cloud Compute – Shared CPU, Cloud GPU, or Bare Metal. For more detailed information on these categories, refer to the previous topic “Types of Cloud Instances in Vultr”.
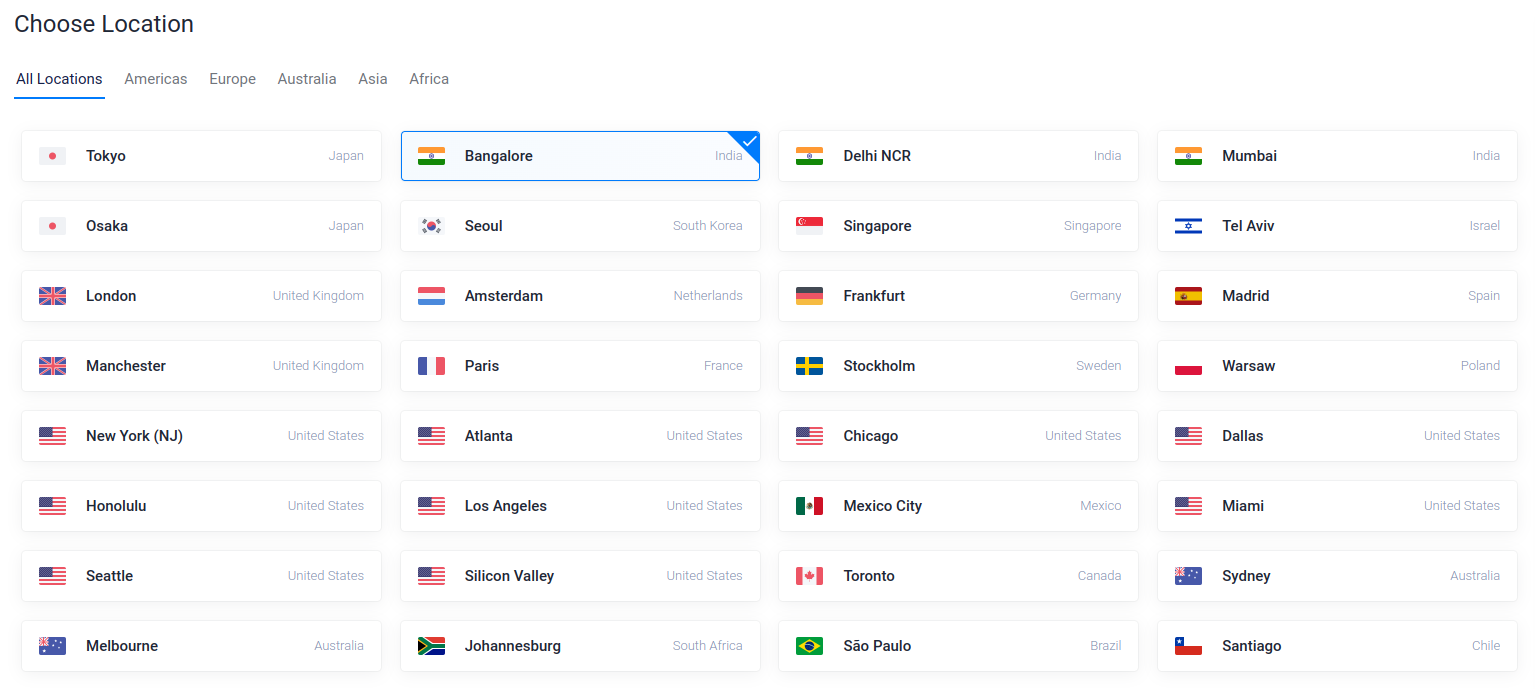
Step 2: Select Server Location
Vultr offers over 25 locations to choose from. Select a location that is nearest to your audience to ensure low latency and improved user experience.
Selecting the right server location for your server is crucial. Refer to our guide to learn how to select the optimal location for your server.
Step 3: Select Server OS
Select a server image from the various provided options. Select the one you wish to deploy. If you want to use a control panel or want to configure the server manually, You can select the OS image only.
From the Marketplace section, you can also select from different types of ready-to-use applications. Additionally, you can also select from any snapshots available in your account. You can learn more about snapshots in this guide later on.
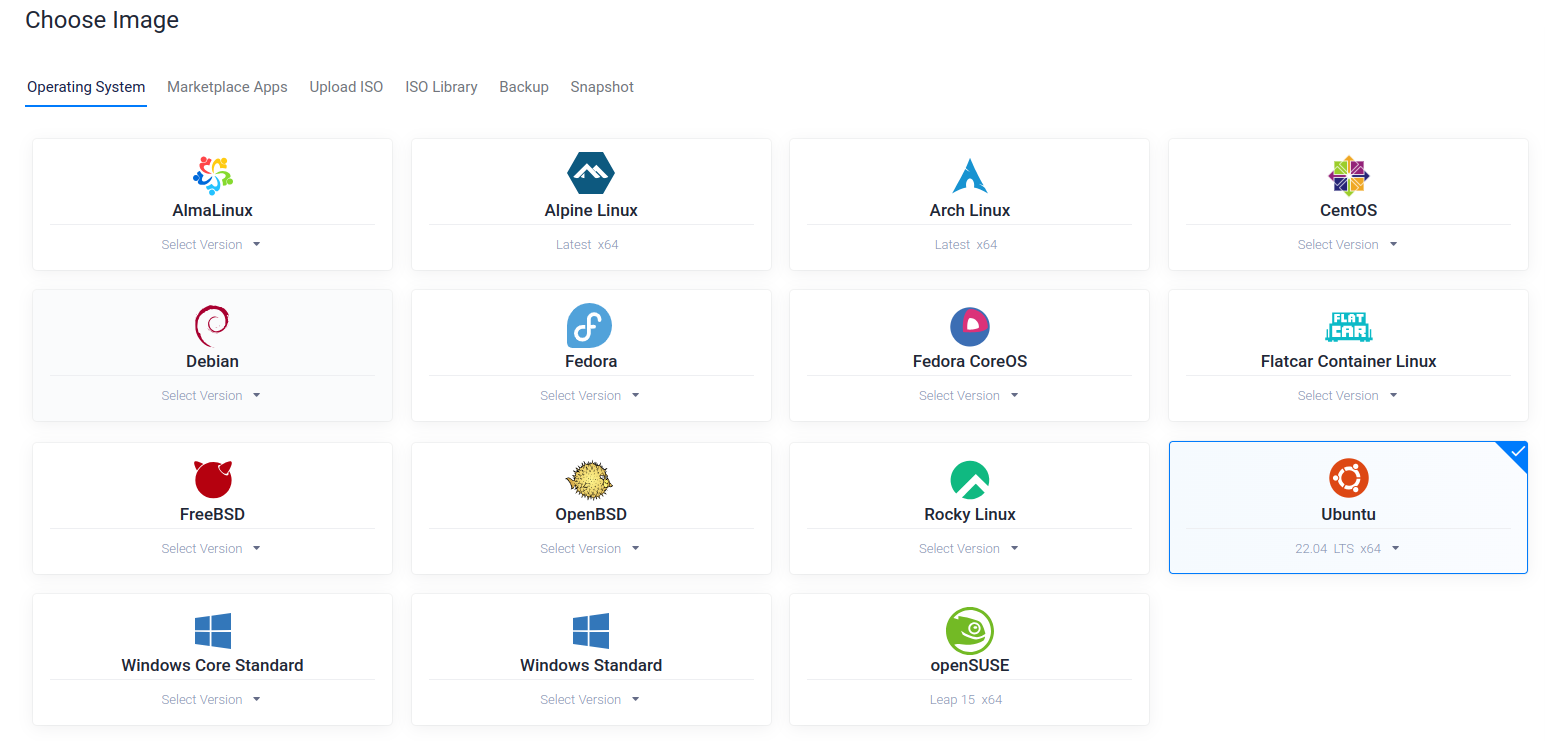
Note: If you want to manage your Vultr server with ServerAvatar, select either the Ubuntu 20.04, 22.04 or 24.04 operating system.
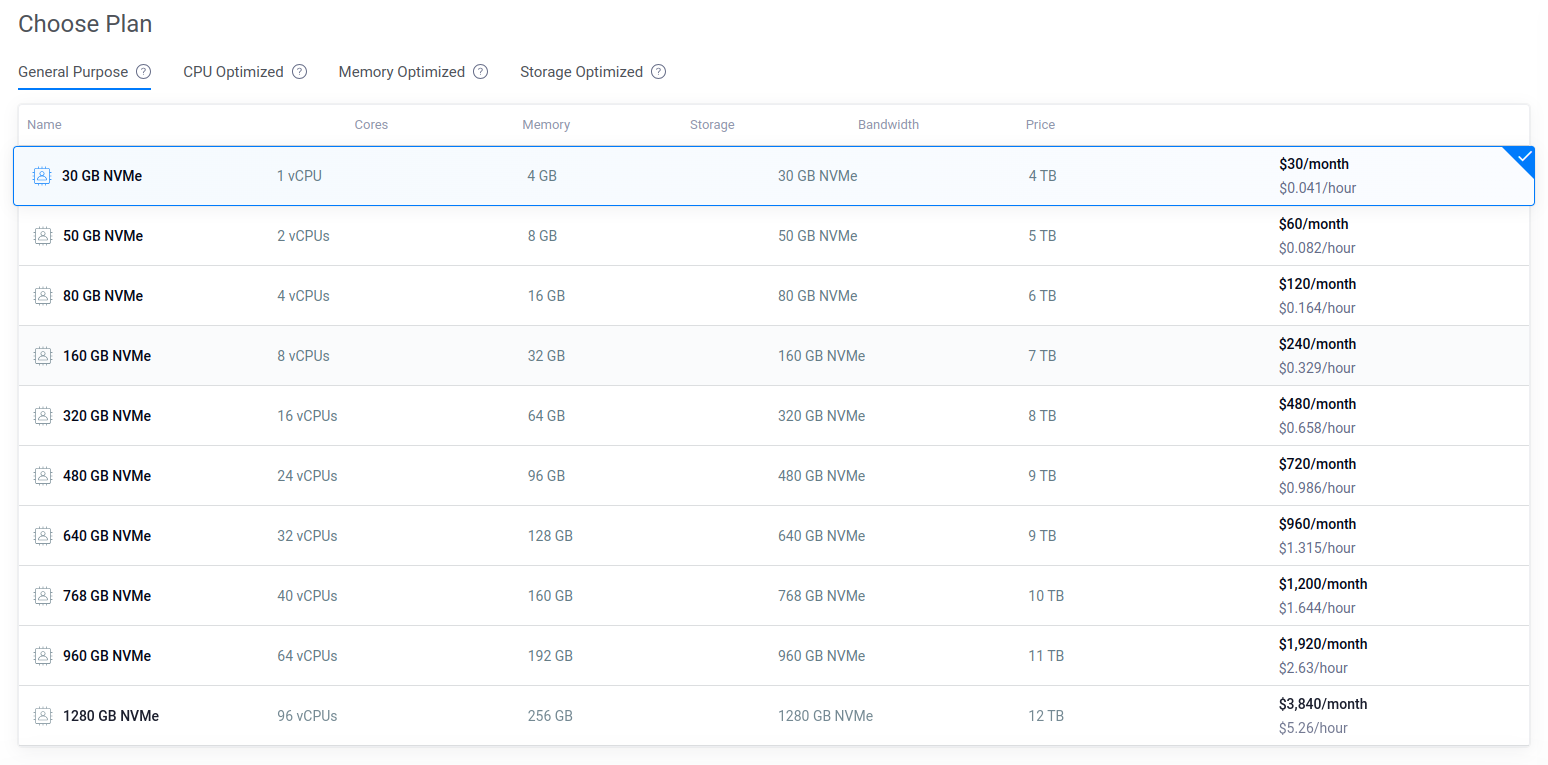
Step 4: Select Server Plan
You can see sub-categories, and each category contains different server types. For example, under Cloud Compute, you will find categories like High Performance, High Frequency, and Regular Performance. In the Optimized Cloud Compute category, you will find General Purpose, CPU Optimized, Memory Optimized, and Storage Optimized.
You can select from a range of server sizes based on your required vCPU, memory, and bandwidth.
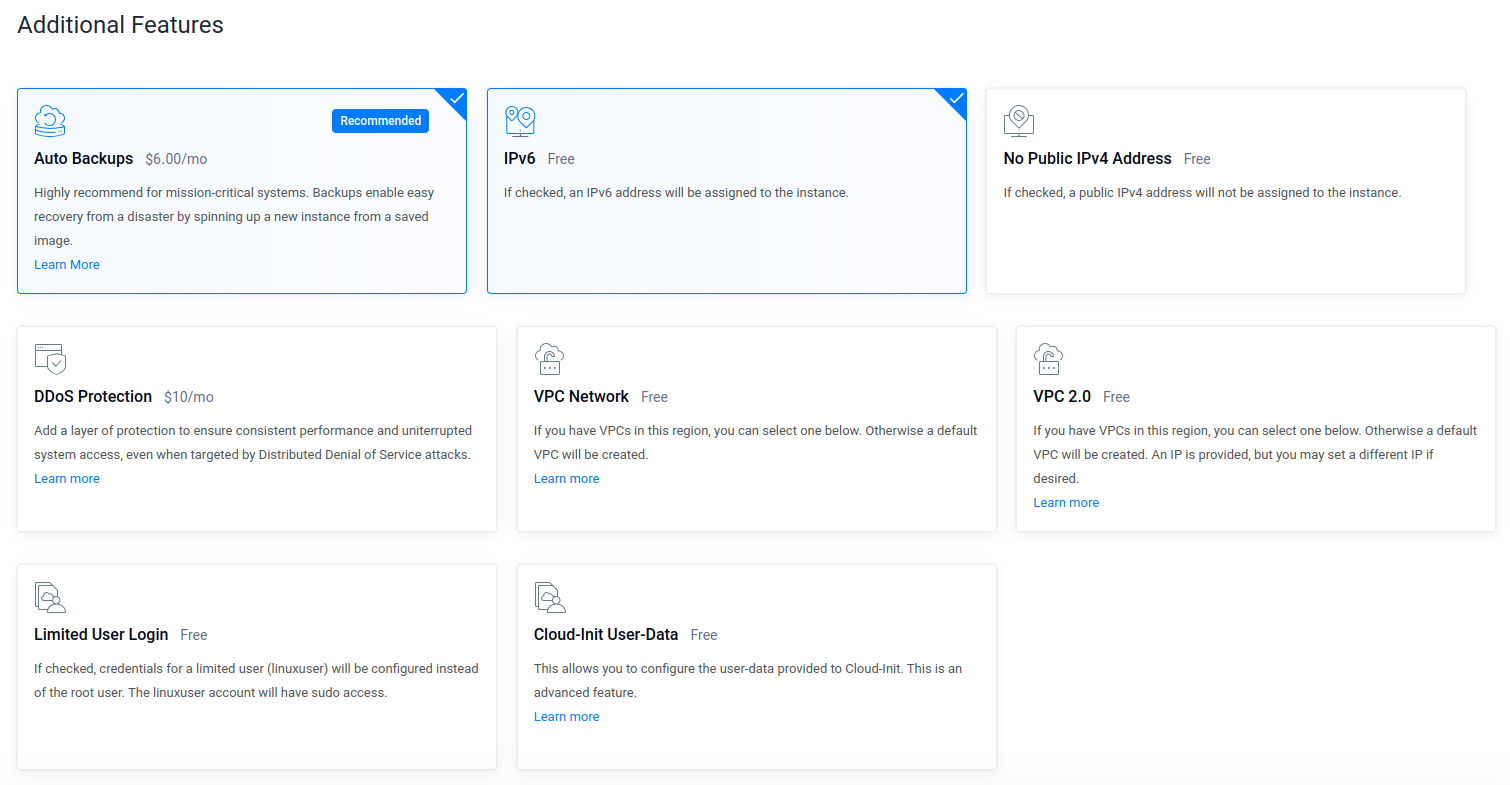
Step 5: Additional Features (optional)
It includes features like enabling Auto Backups, IPv6, DDOS Protection, Virtual Private Cloud network, and more. You can enable the features you want.
Automatic Backups are recommended as you can quickly recover existing data to a new instance from a backup in case of disaster recovery. The cost of automatic backups is 20% of the monthly pricing of your server.
Note that these options can also be activated after your server is created. So, it is not mandatory to select them now.
Step 6: Add/Select SSH Key (optional)
SSH keys improve the security of your instance by acting like passwords, helping you control who can access the server. If you don’t have an SSH key or prefer not to use it, you can access your server with the root password. The root password of the server is automatically generated by Vultr.
You can find the root password of your server from the server dashboard, once your server is ready.

Step 7: Enter Server Hostname & Label
Enter your server Hostname and Label, so you can identify your server easily from the list of multiple created servers.

Step 8: Deploy
Click on the Deploy Now button at the bottom of the screen.

You can also select the number of instances you want to create at once by selecting the desired quantity of instances in the bottom-left corner of the sticky bar given at the bottom of the screen.
The deployment will begin immediately and will take around 1-2 minutes to fully deploy the server. Once the server is ready, you can start hosting your projects on it.
If you want to manage your new Vultr server with ServerAvatar, below are the methods to automatically configure your server with ServerAvatar.
1. Connect a server using a direct method:
- Login/Register to ServerAvatar account, then click the Create button from the right side of the screen and select Server from the dropdown menu.
- Select Direct Method for the server connection.
- Enter your preferred Server Name.
- Select a Tech Stack based on your needs (Apache, Nginx, OpenLiteSpeed, or Node Stack).
- Select a Database: MySQL, MariaDB, or MongoDB.
- Enable the toggle if you want to install the latest LTS version of node.js on your server.
- Click the Connect Now button.
- You’ll see the command on your screen. Login to your server via SSH and execute that command as a root user.
- The server connection process will begin in your ServerAvatar account after executing the command.
2. Connect a server using commands:
Once you create a server as per your requirements, connect to your server using an SSH connection and execute the below three commands as a root user in your server console area.
wget https://srvr.so/install
chmod +x install
./install
It will ask if you want to configure your server with Apache, Nginx, or OpenLiteSpeed. You can select according to your requirements and hit enter. After that, It will check if the server is ready for installation.
After the installation starts, It will provide you with a link to your server management panel. The complete initial configuration will be over in 6-7 minutes, and you will be able to manage your servers and sites using a panel as displayed in the below image.
Server Overview and Information
Once the server is ready, you will have full access to the server. You can log in as a root user to manage your server.
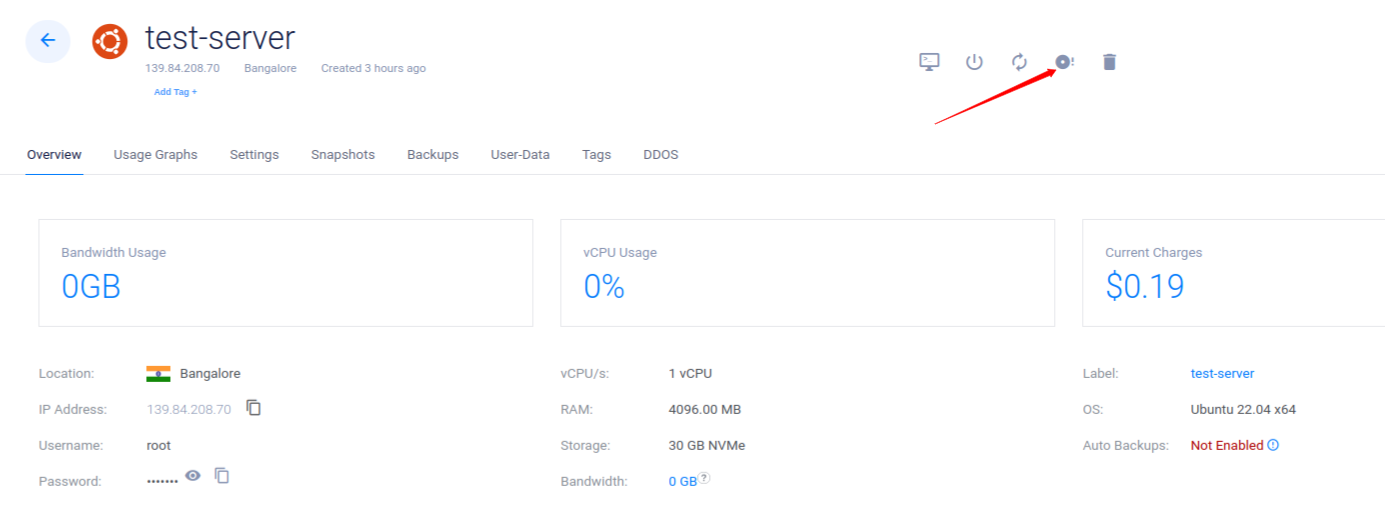
To view the server overview in Vultr, go to the list of servers and click on the name of the server. It will take you to the server overview section, as you can see in the following image.
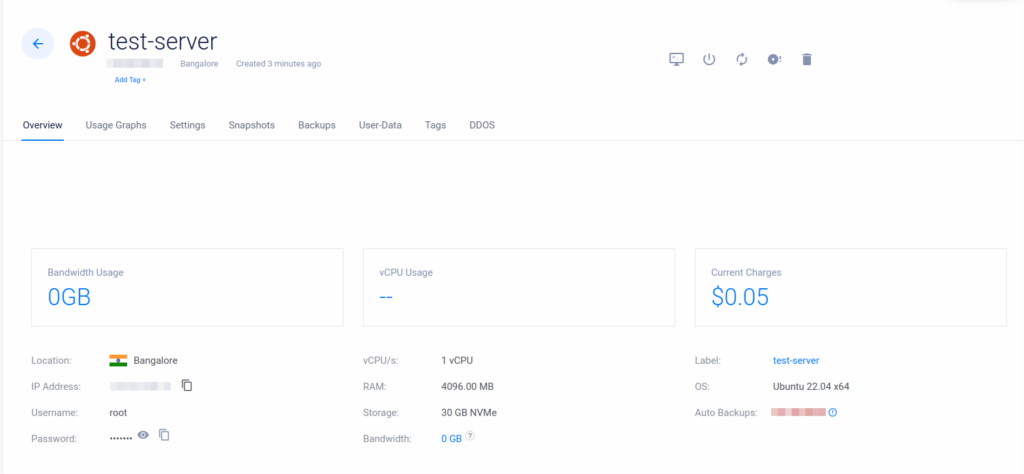
On this page, You will find all the information you need about your server. In the first row, you can view the details such as bandwidth usage, and vCPU usage along with current charges.
Note: The charges are calculated on an hourly basis.
Next, In the first column, you will find the information to “Access” your server. It contains location, public IPv4 Address, public IPv6 Address, Username, and Password. The username will always be “root“, as root is the default Linux user with ALL the privileges.
In the second column, you will find details about the server’s resources, such as the number of vCPUs on the server, RAM, storage, and bandwidth. The third column displays the Operating System and the server label.
Monitor Server Resource Usage
Monitoring your server’s resource usage is very important. If your server runs out of resources like RAM or CPU, your site might slow down or your server might crash. It is essential to keep an eye on how much of your server’s resources have been used and how much is remaining.
In Vultr, you can monitor the following metrics for your active server.
- Bandwidth usage
- vCPU usage
- Disk operations
- Network Monitoring
These four metrics can help you understand valuable insights into your server’s performance and can help identify potential issues. Monitoring them also allows you to determine when it’s time to upgrade your server, ensuring it can handle the traffic spikes without slowing down your site or application.
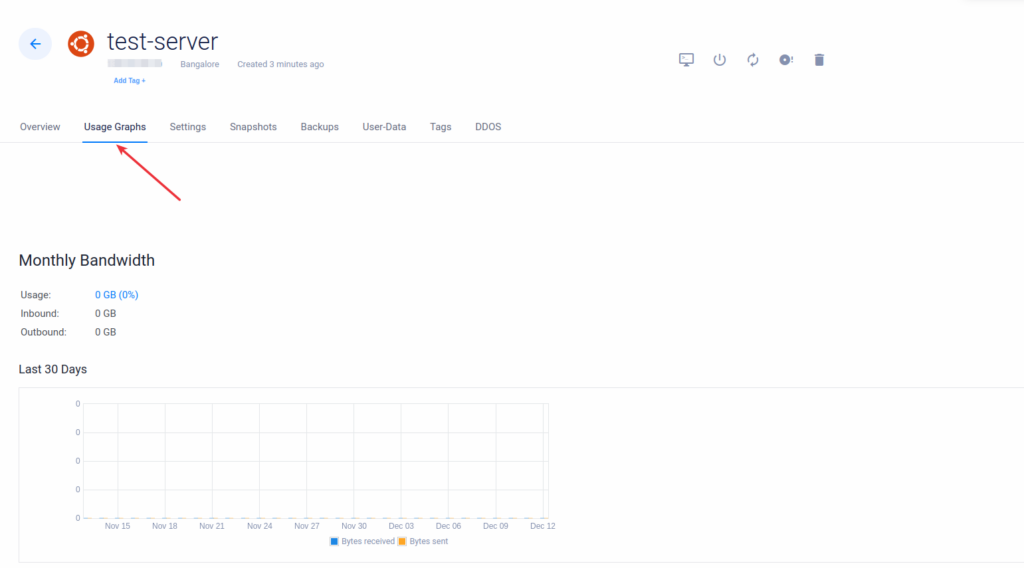
To access the monitoring data for your Vultr instance, simply go to the list of servers, click on your server’s name. and select “Usage Graphs” from the tabs given on the server dashboard as shown in the following image.
Once you are there, you will find multiple charts and graphs displaying monitoring data of your server. Let’s go over each monitoring metric in detail.
Bandwidth Monitoring
Bandwidth monitoring is the first thing you will see after accessing the Usage graphs section along with important bandwidth usage information like total Inbound and outbound bandwidth usage.
After that, you will find a chart displaying bandwidth usage information for the last 30 days. In this chart, you will see two bars for each day representing incoming and outgoing traffic for a particular day.
If you are a beginner, here is a quick explanation of inbound and outbound bandwidth/traffic.
- Inbound: Inbound bandwidth usage includes the data received by the server from the internet or users of the application. For example, if you’re downloading something on the server or lots of users submitting data to the server in some way. If you download 1GB on the server, your inbound bandwidth usage will be 1 GB.
- Outbound: Outbound bandwidth usage includes the data sent by the server to the internet. For example, when we open a site for the first time, our browser will request all the files required to load the site. This is the data sent by the server. If your site’s homepage is 1MB and you are receiving 1000 unique hits on your homepage, you will use 1GB of outbound bandwidth.
In Vultr, each server comes with a specific amount of free bandwidth. For the majority of websites, this allocated bandwidth is more than enough to function without any additional charges.
Note: If your site or application is bandwidth intensive and your bandwidth usage exceeds the limit, it will cost you a specific amount per GB of usage.
vCPU Usage
vCPU usage represents the computing power being utilized by your server. You will find the vCPU usage chart under the “Server Monitors” section. This chart displays the vCPU usage as a percentage and displays it in an easy-to-understand chart.
The vCPU usage monitor will appear as shown in the following image.
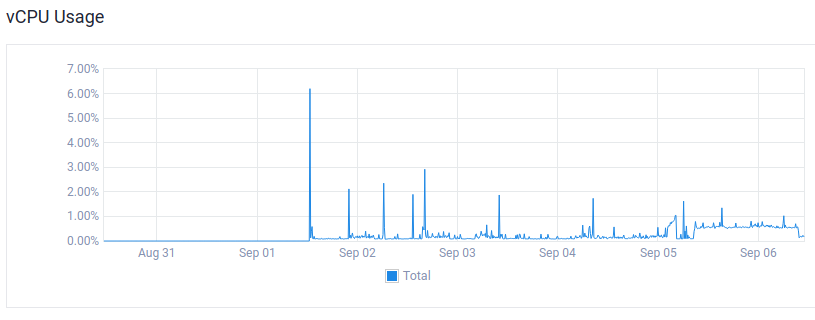
It is important to understand how vCPU usage is calculated. If you have a server with 1 core only, the chart will show you the exact percentage of usage, and the maximum you can reach is 100%.
However, if you have two cores on your server, the upper limit for this chart is 200%. If you have a server with shared vCPUs, you may not always be able to utilize the full capacity. However, If you have a server with dedicated vCPUs, you will be able to use all the computing power.
Note that 100% vCPU usage on this chart does not mean you need to upgrade, especially if your server has multiple cores in your server.
If you are a ServerAvatar user, you don’t have to manually calculate the actual CPU usage for multiple cores. ServerAvatar will automatically display the CPU usage percentage based on the number of cores you have on your server.
Disk Operations
Scroll down a bit from vCPU usage and you will find a chart for Disk operations. This chart contains two metrics called read and write. Both Vultr and other cloud platforms monitor these two metrics to help you understand disk operations.
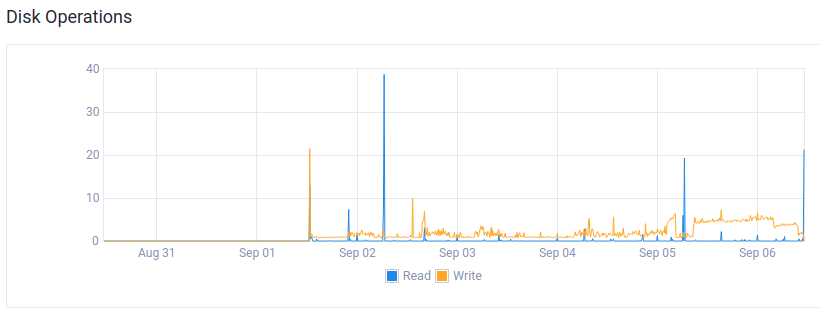
Let’s understand the difference between read and write operations on disk:
- Read Operations: A read operation occurs when you fetch something from the storage disk of your server. For example, when you open a file to see or edit its contents.
- Write Operations: A write operation takes place when data is saved or updated something on the disk. For example, when you save a file after editing or when you create a whole new file on the disk.
The chart displays the number of disk operations occurring on the server within a specific time period. Each command executed on the server triggers some read and write operations.
This chart is useful for identifying any unusual activities that are happening on your disk. It can help you to detect potential intrusions or bugs in your application, depending on the situation.
Network
Do not confuse this chart with the bandwidth monitoring chart we discussed earlier. Bandwidth usage is network usage too. However, there is a subtle difference between these two charts.
The bandwidth usage chart shows the total bandwidth used throughout the whole day, whereas the Network chart will show you network usage in bytes per second. The chart contains two metrics and looks like the following image.
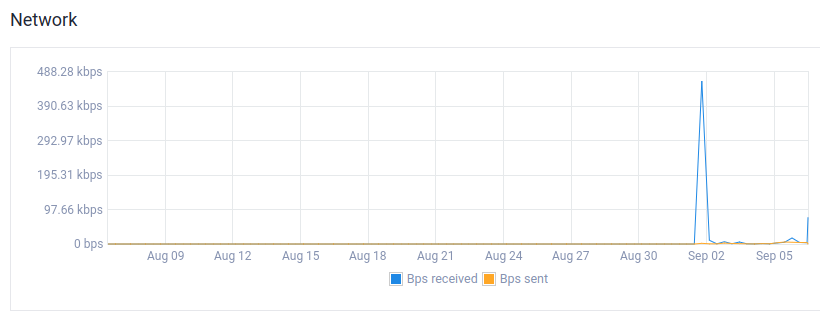
Let us understand both the metrics tracked by this chart.
- Bps Received: This metric shows the rate of data received by the server in bytes per second at a specific time. Imagine if you are downloading a file with size 1GB on the server and the download completes in 3 minutes. For these 3 minutes, the Bps received by the server will be very high!
- Bps sent: This metric shows the rate at which the server is sending data in bytes per second at a specific moment. Imagine you are transferring a file of 1GB from your server to a remote location, the Bps sent will spike while the file is being transferred.
To summarize, the key difference between the bandwidth usage chart and the network chart is that the bandwidth usage chart shows the total network usage in a whole day while the Network chart shows you the speed at which the server is sending or receiving the data.
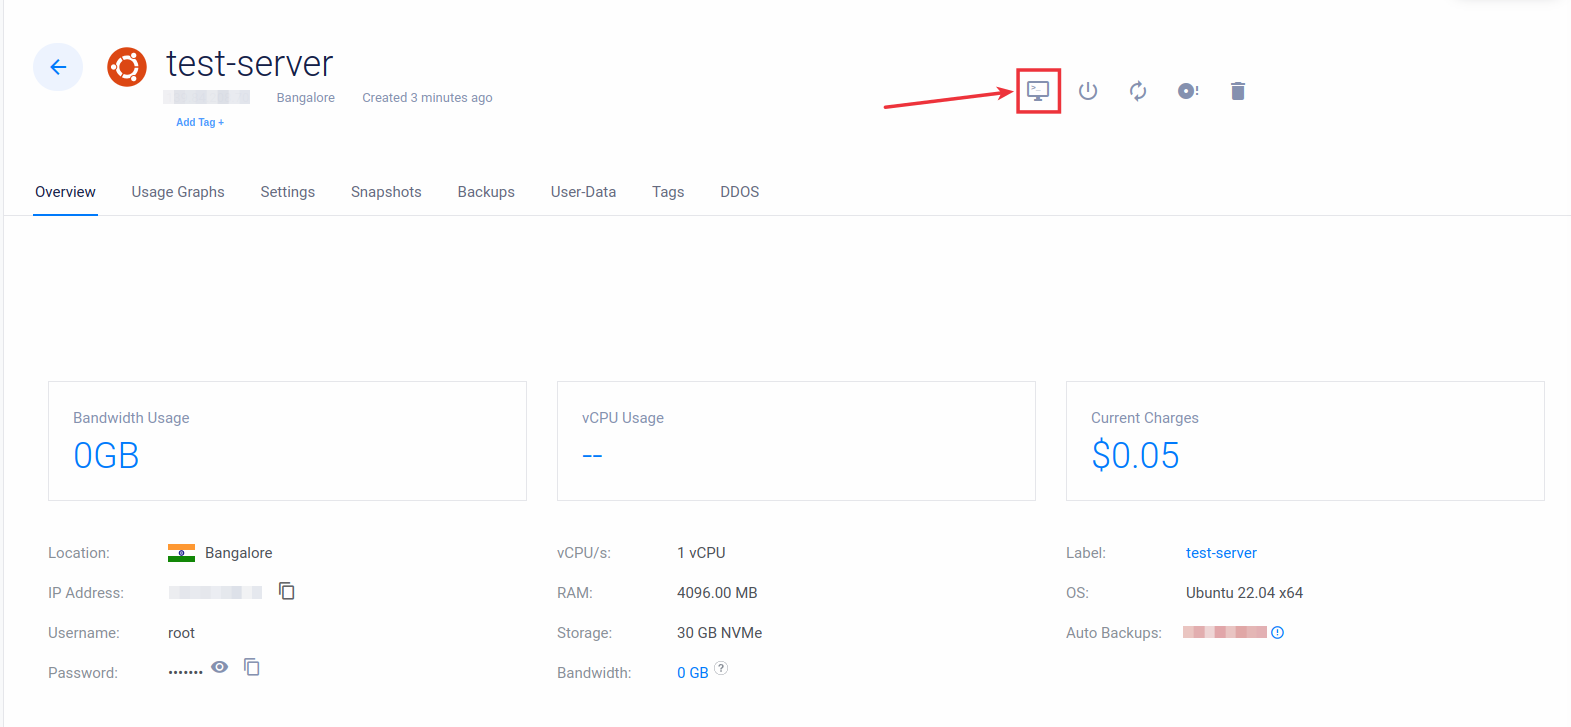
Access Server Console in Vultr
You may have to access the console of your server for multiple reasons. Even if you are planning to set up a server control panel to manage sites on your server, You might have the console access to complete the installation of the control panel.
There are two ways to access your server’s console. The first method is:
In the Products tab, go to the list of servers and click on the Three-dot icon in the last row. You‘ll see all quick action options. Click on the View Console button to access the server console. Alternatively, you can access your server’s dashboard by clicking on it in the Products tab and then selecting the View Console option from the top-right corner of the server dashboard.
If you don’t want to access the web-based terminal or console, you can also access the server console using the following apps on your computer:
- Mac or Linux: Terminal
- Windows: PuTTY
Simply open the respective application (terminal or PuTTY) and execute the following command to access your server via SSH.
ssh root@IPv4_ADDRESSIf you selected an SSH key while creating a server, the system will attempt to authenticate with SSH keys first. Alternatively, you can also access your server using the password provided by Vultr in the server overview section.
Restart or Power-off a Server
Sometimes you have to restart or power off your server. Vultr allows you to quickly restart or power off your server. Let’s first learn how to restart or reboot a Vultr server.
Restart a Vultr Server
There are two ways to restart a Vultr server:
- In the Products tab, locate your server in the list and click on the three-dot icon in the last row. From the quick action options, select the “Restart Server” icon to reboot your Vultr server.
- Alternatively, click on the specific server in the Products tab to access its dashboard, then use the restart icon as shown in the image below.
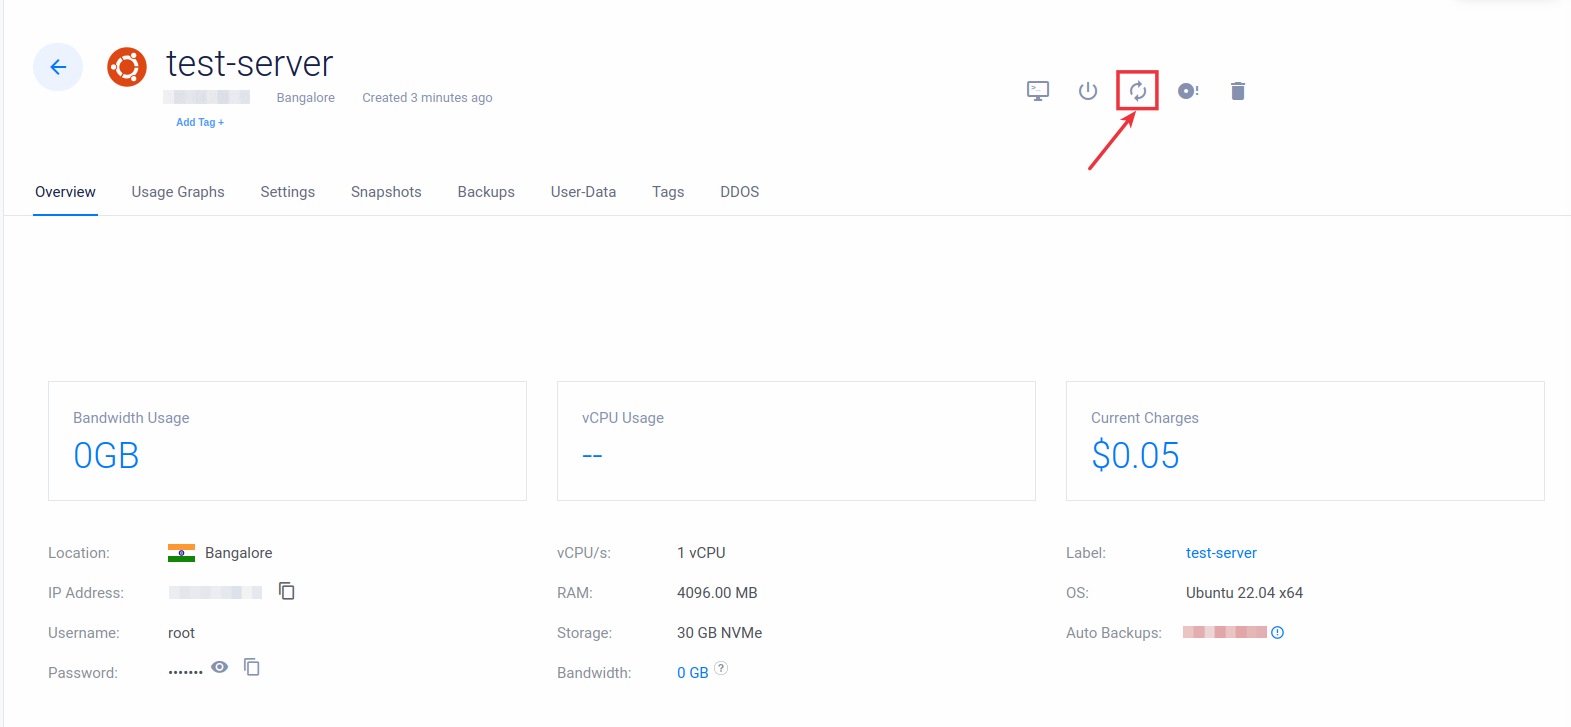
The restart process will take less than a minute. Note that, your sites will be temporarily down until the restart process is completed. Now, let’s see how to power off a Vultr server.
Pro Tip: It is good practice to restart your server periodically. You can restart your server once a week to maintain optimal performance.
Power off a Vultr Server
Powering off or turning off a server is as simple as restarting it. When you migrate your site from one server to another, you can turn off the old server for a day or two to make sure that the sites are successfully migrated. If the sites are not successfully migrated, your sites will face downtime once the old server is powered off.
Anyways, to power off a server, simply click on the Power off button given on the server dashboard, as shown in the image below.
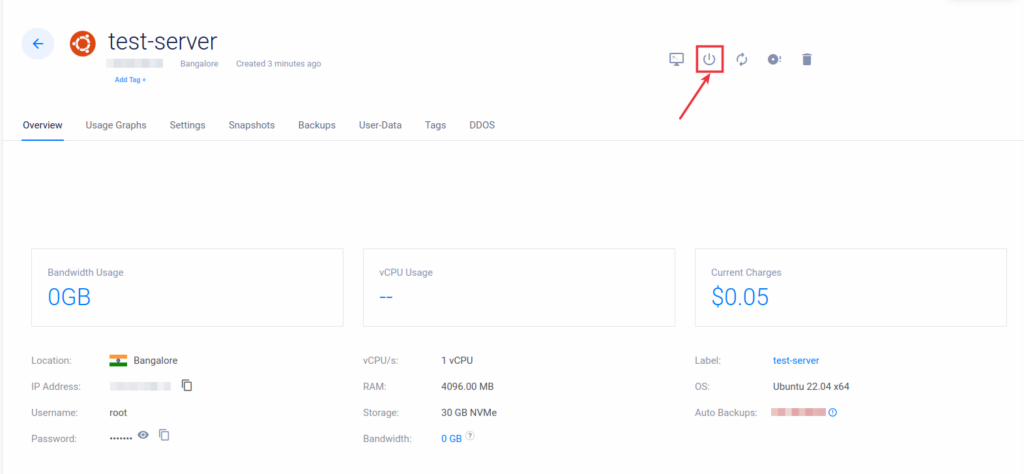
The server will instantly power off. Note that it will still incur charges even if it is powered off. This is because the computing and storage resources are still allocated to that server. In case you do not want the server anymore, you can simply delete it.
Scale your server(s)
Scaling an instance on Vultr is a quick and simple process. The whole process is completed in a minute or two.
Scaling refers to upgrading or downgrading your server. You can scale up (upgrade) your server or scale down (downgrade) your server depending on the resources you need for your site or application.
Vultr only supports scaling up. It does not allow you to downgrade your server once it has been upgraded. However, if you are a ServerAvatar user, there is a method to downgrade your cloud resources on Vultr without disrupting your setup.
Now, let’s first learn how to upgrade or scale up your Vultr instance.
Upgrade a Vultr Instance
There are several reasons you might need to upgrade your server.
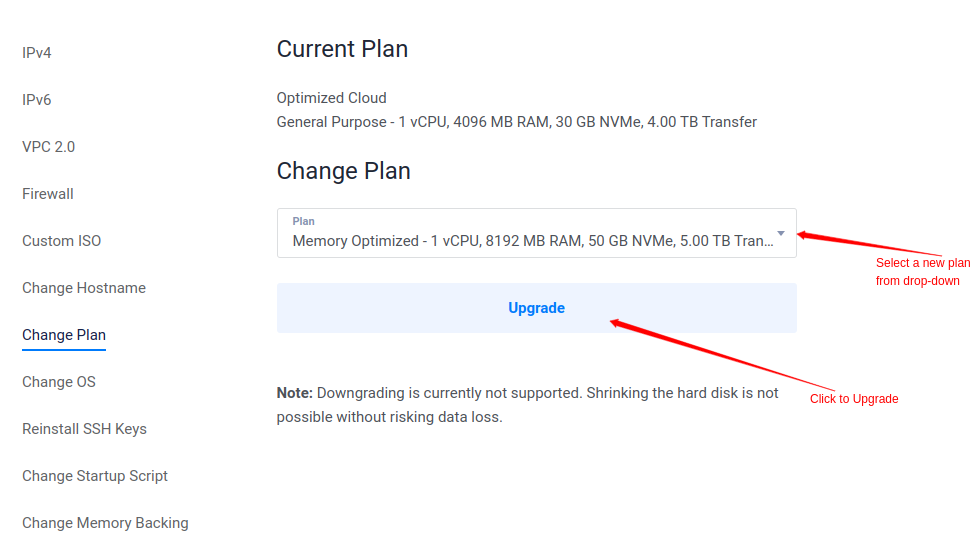
Step 1: To upgrade your server in Vultr, go to the Products section or the server list, and click on the server to access the server dashboard.
Step 2: In the server overview, click on the Settings section.
Step 3: In the left sidebar of the Settings section, click on the Change Plan option.
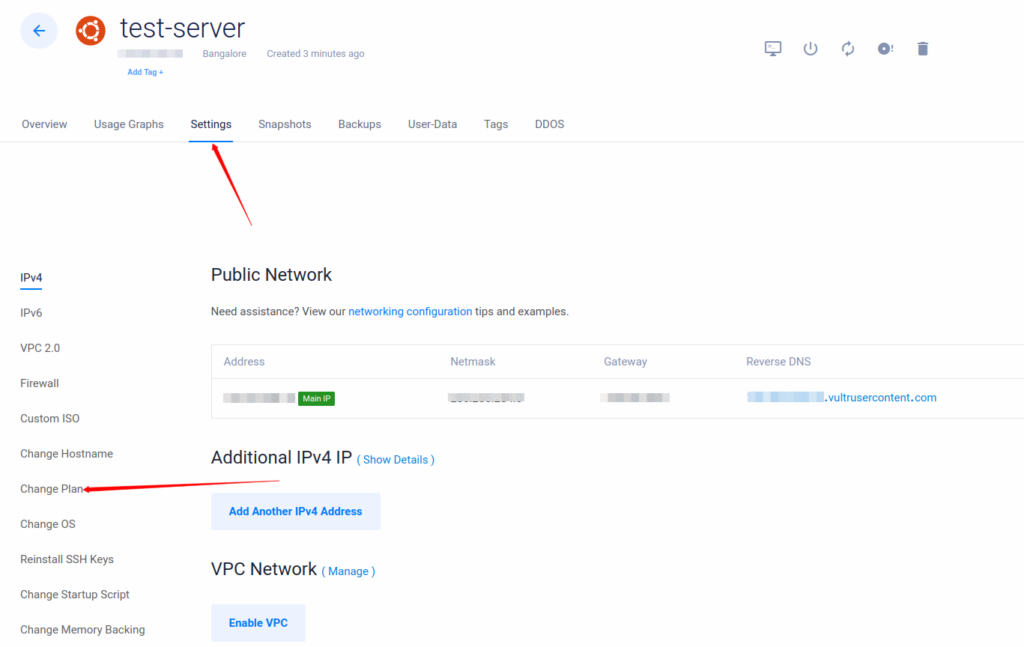
Step 4: Select a new plan from the drop-down menu.
You can upgrade your server from this panel. Vultr does not support downgrades. However, there is a method to downgrade, which will be covered in the next topic.
Step 5: Select your preferred plan from the drop-down menu, and click the Upgrade button to complete the server upgrade.
Note that when you upgrade your server, it may restart once. If you have an application with a lot of active data, it’s recommended to put the site, app, or API into maintenance mode during the upgrade.
The entire upgrade process usually takes less than 5 minutes to upgrade.
Note: If you are a ServerAvatar user, you can use the following method to downgrade your Vultr or any other cloud instance:
1. Create a new smaller instance of desired size.
2. Connect the new instance with ServerAvatar.
3. Use ServerAvatar’s automatic migration feature to migrate your sites to the smaller instance.
4. Update the DNS records by Changing the IP address in the A records of your domains.
5. Delete the larger instance.
Manage Server Backups
Automated backups are highly recommended! You can choose to enable automated server backups when creating your server. You will be charged an additional 20% of the server’s cost for creating and managing backups of your server automatically.
If you want to enable backups, modify the backup schedule, or restore from any backup at any time, you can easily manage everything from the Backups section in the server dashboard.
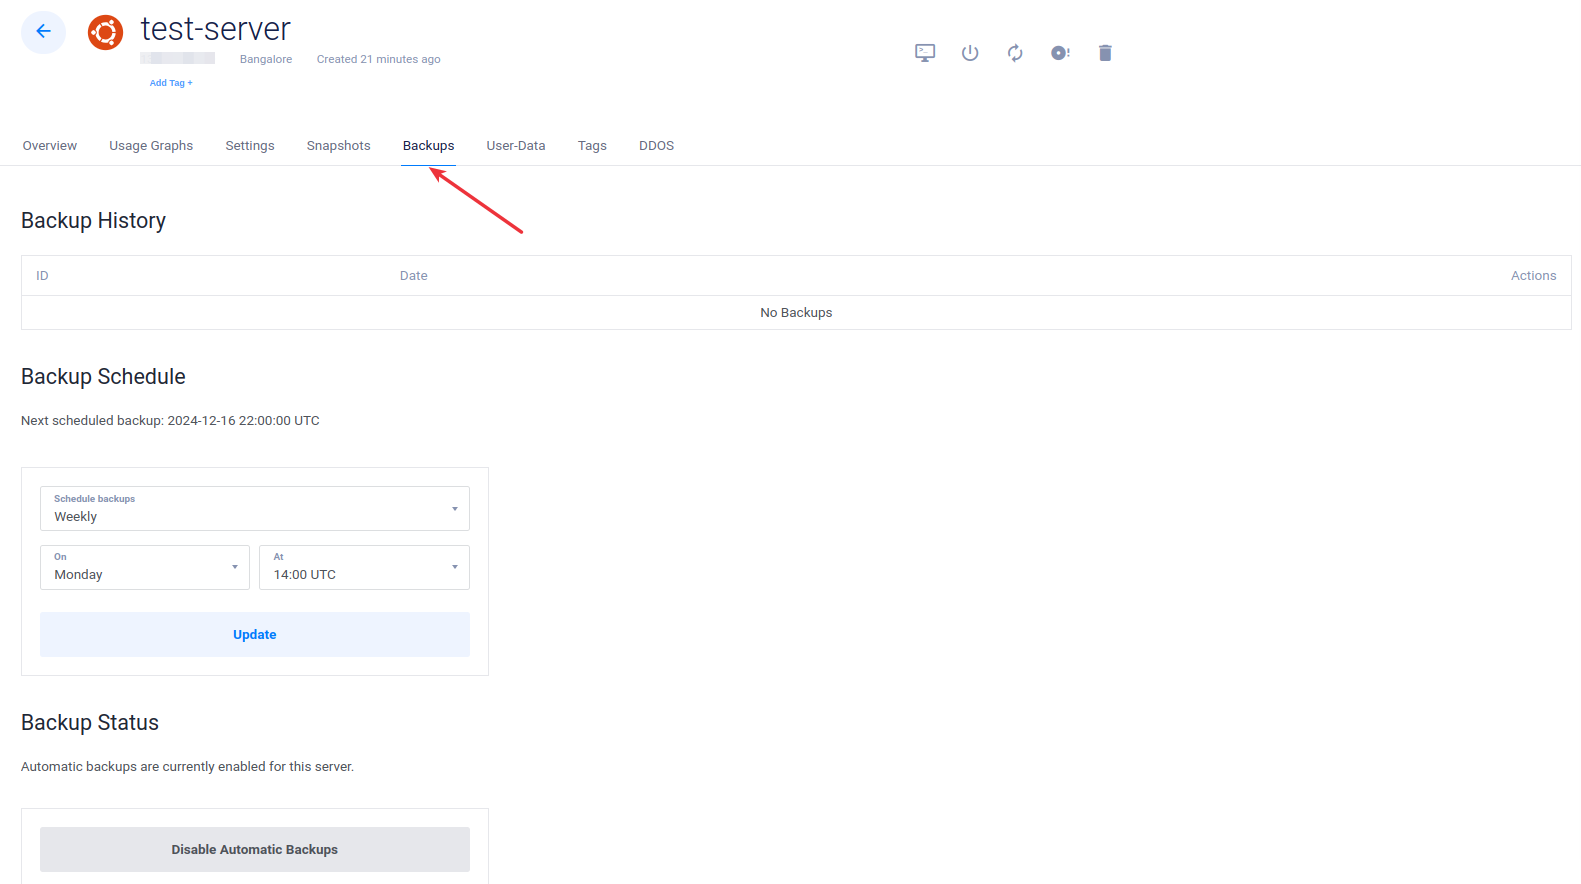
In the backups section, you will see three sub-sections to manage your backups, schedule, and current status:
- Backup History: This section displays a list of available backups. If you have just enabled automated backups, this section will be empty, as shown in the above image.
- Backup Schedule: Here, you can set up a schedule to process automated backups for your server. We recommend selecting a time when your site traffic is lowest. You can select the frequency, day, and time for the backups.
- Backup Status: From this section, you can enable or disable automated backups for your server.
If backups are available, you can easily restore them to recover from the disaster. If you don’t need regularly scheduled backups, you can also create snapshots of your server and then restore them whenever you want.
Manage Server Snapshots
A Snapshot is a point-in-time image of the instance SSD. Technically, Instance Backups and Instance Snapshots are the same.
The only difference is that backups are automated, while taking snapshots is a manual process. To create a snapshot of your server, follow the steps below.
Step 1: On the Products page, select the Server from the list of active servers.
Step 2: Now, navigate to the Snapshots section. Type the Label as per your wish, and then click the Take Snapshot button.
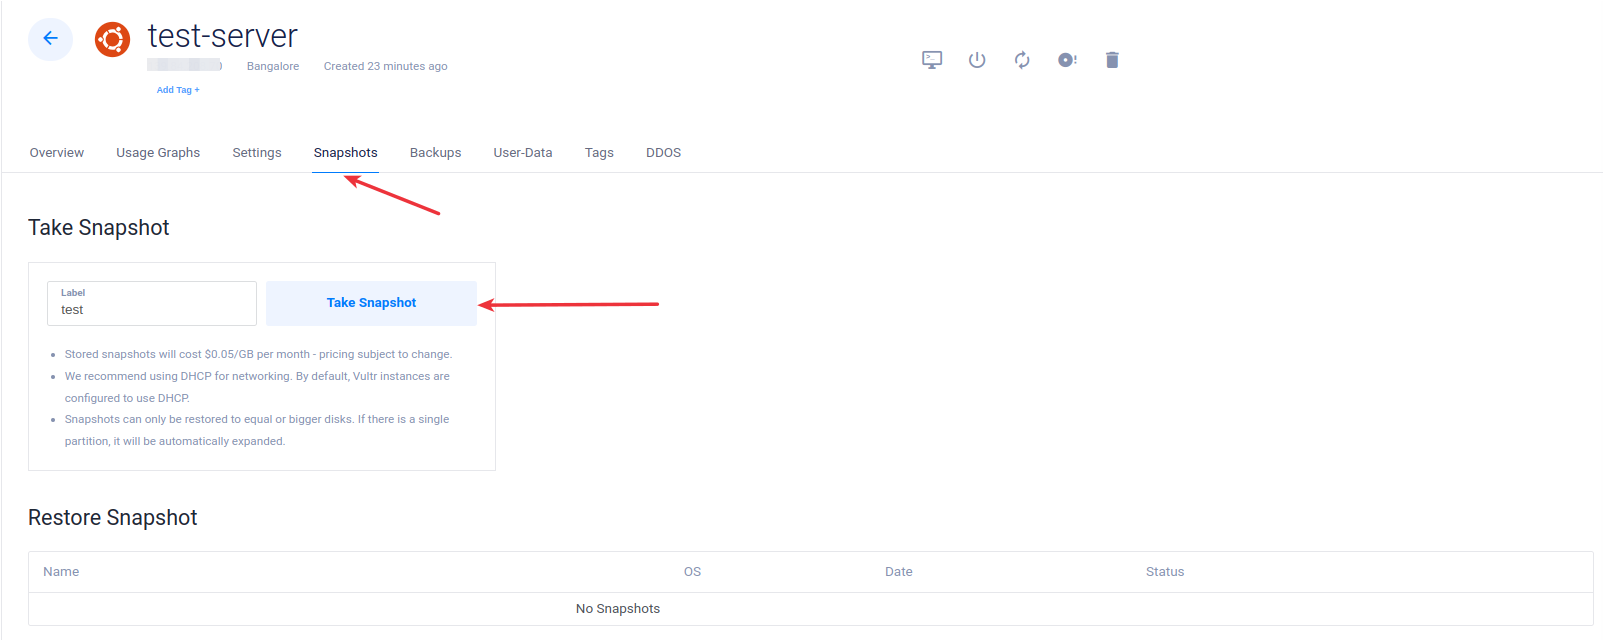
The process will start immediately. The time it takes to complete the process depends on the size of your server.

Note that a snapshot can only be restored to a disk of equal or larger size. Additionally, you can use snapshots from different servers to deploy new instances or servers.
You can also Upload Snapshots from a remote machine. The maximum size to upload a snapshot is 150 GB.
Create and Manage Firewalls
After creating your server, don’t forget to create and apply a firewall to your server. A Firewall protects your server from unauthorized access to different ports and services on the server.
If you have no previous experience with managing firewalls, let me briefly explain how it works.
A Linux server has 65536 ports and different services we install on the server run on different ports. For example, SSH runs on port 22, HTTP runs on port 80, and HTTPS on port 443.
When you configure your server to host WordPress or PHP sites, you might not need a lot of open ports on your server. If the port is open and accessible from the internet, (i.e., your browser), anyone in the world can potentially access that port of your server.
To protect your server from unauthorized access on different critical ports, you can isolate and secure them using a firewall.
Luckily, Vultr provides free firewall service for your server. You can manage firewall rules and assign different firewall instances to different servers.
Let’s go through the steps to set this up. First of all, we will create a firewall. Then we will assign it to a server.
Create a Firewall in Vultr
Creating a Firewall is very easy in Vultr. Follow the steps given below to create one now.
Step 1: Log in to your Vultr account, then navigate to Network >> Firewall option as shown in the image below.

Step 2: Click on the Add Firewall Group button on the Firewalls page.
Note: If you already have a firewall group in your Vultr account, click on the “+” button in the top-right corner of the section to reveal the “Add Firewall Group” option, then click on it.
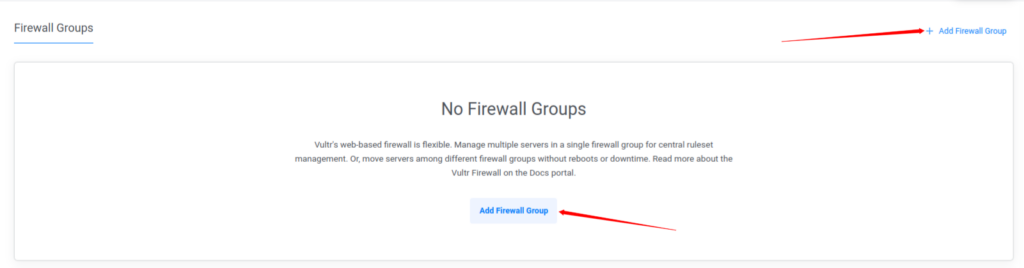
Step 3: Enter a description for your firewall group and click on Add.
Step 4: Add the required firewall rules to your firewall instance.
If you are running a website or API on your server, It’s recommended you to allow incoming requests on the following ports, as all other ports will be disabled by default.
- 22 (SSH): Without this rule, you will not be able to access your server via SSH or SFTP.
- 80 (HTTP): Without this rule, your site or API will not be accessible via HTTP.
- 443 (HTTPS): Without this rule, your site or API will not be accessible via HTTPS.
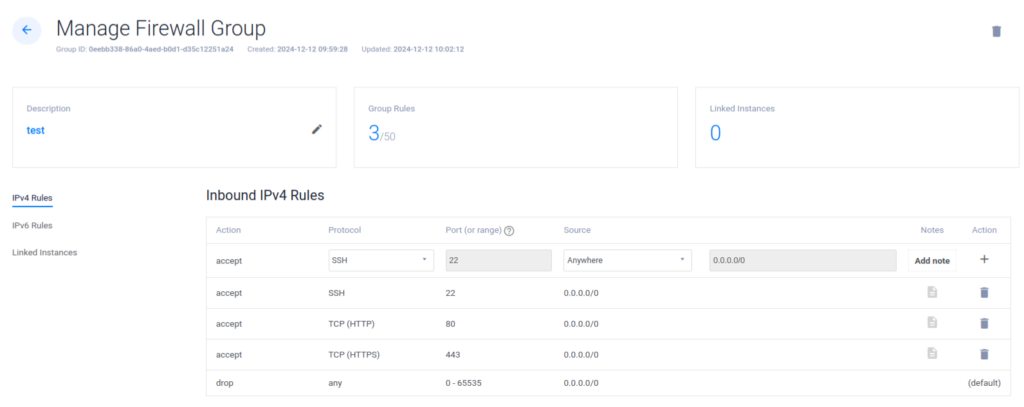
You can also allow incoming connections on other ports depending on your requirements. However, these three rules are crucial for basic server access and functionality.
After creating all the required firewall rules, you can link the firewall instance with your server(s).
Link the Firewall with Vultr Cloud Instance
When you link a firewall instance to your Vultr server, the firewall rules defined in a firewall instance will be applied to your server. You can attach one firewall group or instance with one or more Vultr servers at once.
If you are hosting the same type of website on multiple Vultr instances, you only need to create a firewall group once. After that, you can easily link that firewall to any new Vultr servers. Let’s go through the process of doing this.
Step 1: Navigate to the Settings section of a particular server instance, and click on the Firewalls from the left-hand sidebar as shown in the below image.

Step 2: Click on the firewall group or the edit icon next to the group name that you created in the previous topic.

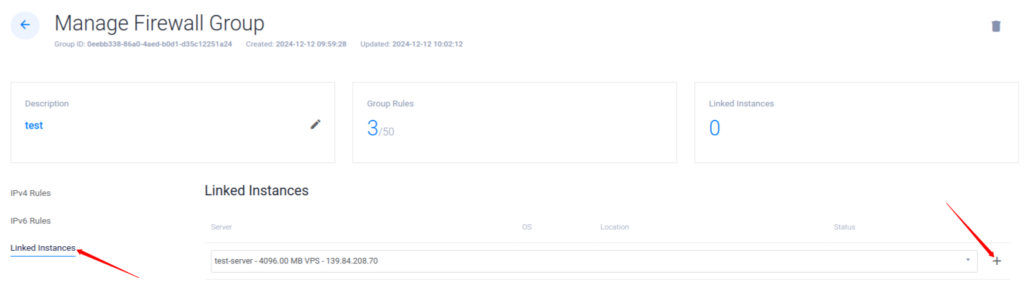
Step 3: In the firewall section, click on the Linked Instance option from the left sidebar.
Step 4: From the dropdown menu, select the server instance you want to link to the firewall.
Step 5: Click the “+” button to attach the firewall group to the selected server instance.
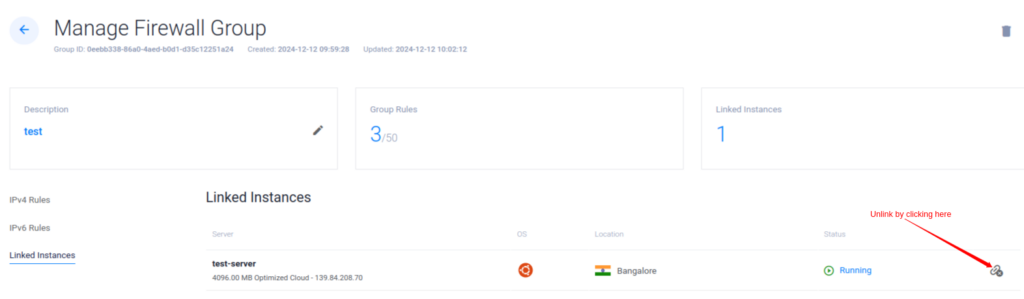
Once you have linked the firewall, your server will appear in the Linked Instances list. If you do not want to use the firewall with that server anymore, you can simply unlink it from the list of linked instances.
That’s how you can protect your Vultr server using a firewall. Firewall groups are totally free, and you can create and attach many different firewall groups to different instances as required.
Re-install OS on Vultr Cloud Instance
Sometimes you have to reinstall your server. Imagine you are configuring your server and something goes wrong beyond repair (Yeah, it happens when you are configuring your server by yourself).
Even if it takes more time to repair the server, it is a wise decision to reinstall your server and get started from a fresh server rather than repairing the messed up system.
If you are in a similar situation, you can reinstall the OS on your server. Here are the steps to follow.
Reinstalling the server leads to deleting all files related to the server and reset the settings you have configured. You can reinstall your server in two different ways:
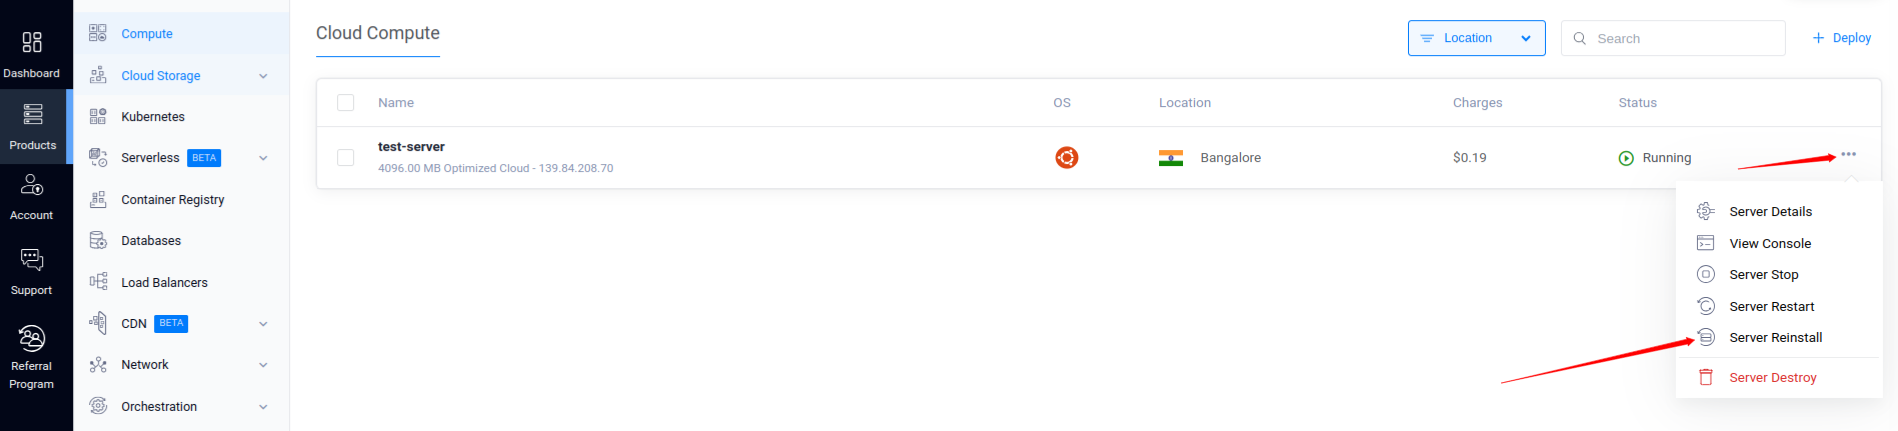
Method 1: On the Products Page, click on the three-dot icon next to your server to access the Server Reinstall option as shown below.
Method 2: Alternatively, you can access the Server Reinstall icon directly from the server dashboard.
Note that, once you begin the reinstall process, all data on your server will be permanently lost. So, make sure twice that you are reinstalling the OS on the correct server.
It will take a minute or two to re-install the OS on your server. Once the process is complete, you can start setting up your server again from scratch with a fresh OS installation.
Change the Operating System on Server
If you selected the wrong operating system when creating your server, or if you simply desire to change the operating system on your server, you can do it from Vultr. Vultr allows you to change the OS of your server after the server has been created.
To reinstall your server with a different OS in Vultr, follow these steps:
It’s straightforward to change the OS on your server. Click on the server where you want to change the operating system. Then, navigate to Settings and select the Change OS tab from the left sidebar in the settings section.
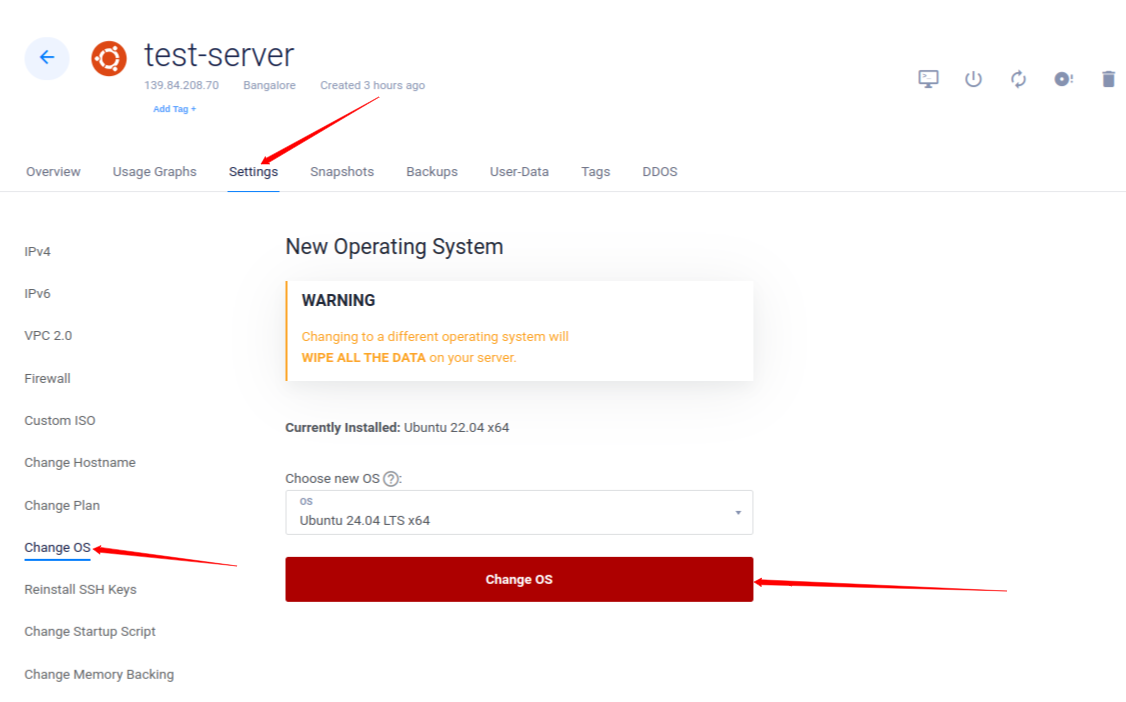
You can select a new operating system from the dropdown list. Note that it will wipe all the data on your server. Installing the new OS typically takes about 1-2 minutes to complete.
Delete a Vultr Cloud Instance
If you do not need a server anymore, you can delete a server instantly in Vultr. Note that the server deletion is not a reversible action. Make sure you do not need the server or the data on the server before deciding to delete a server.
In case you might need data on the server later in the future, it’s a good idea to create a snapshot of the server before deleting the instance.
If you are sure about deleting the server, you can delete your server by following these steps.
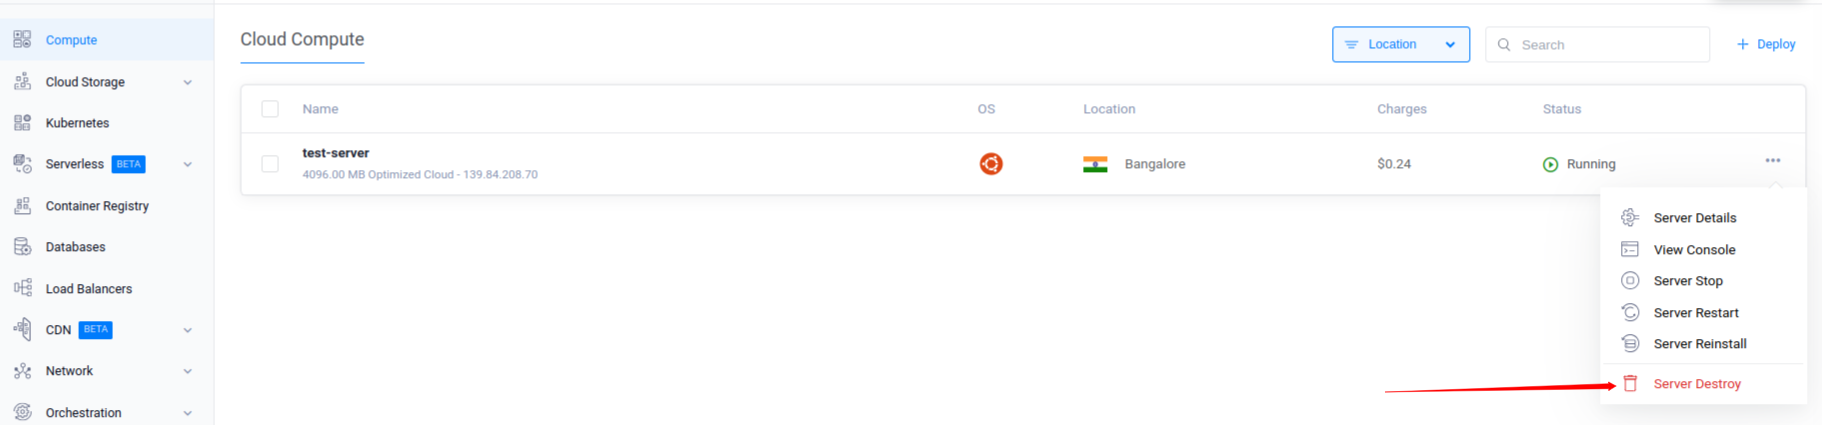
Method 1: On the Product page, click on the three dots corresponding to the server you want to delete, and you can see the Server Destroy option, as shown in the image below.
Method 2: On the Server dashboard, you can see the delete option, as shown in the following image.
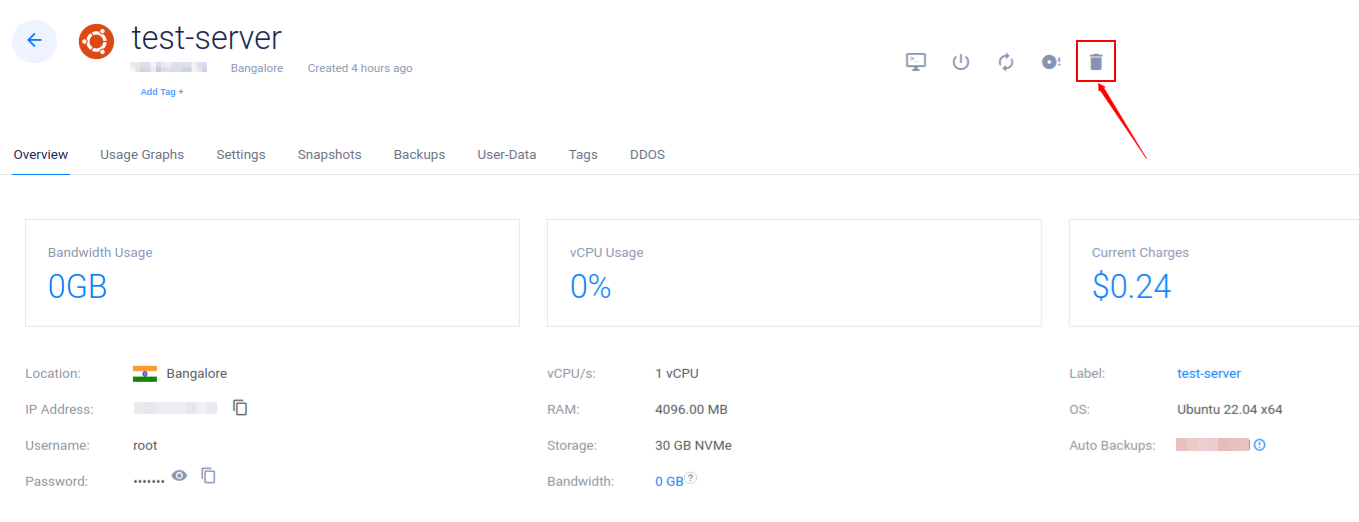
It will ask you for permission to delete your server. Select the “Destroy Server” option to finalize the delete process. Your server will be deleted in less than a minute, and you will only be charged for the hours you have used the server during the specific month.
Manage Domains and DNS
If you are hosting a website on a Vultr server, you will have to manage the DNS settings of your domain. You can use any DNS provider, as long as you are pointing the A record to the correct IP address, i.e. the IP address of your Vultr server.
The best choice to manage DNS would be through Cloudflare. However, If you do not want to use Cloudflare or any other DNS provider, you can use Vultr’s DNS service to manage DNS records for your domains.
Note: DNS management on Vultr is completely free.
To start managing your DNS with Vultr, set the following nameservers in your domain name settings.
- ns1.vultr.com
- ns2.vultr.com
- ns3.vultr.com
- ns4.vultr.com
Once you set these nameservers in your domain name, you can start managing your DNS records directly through Vultr.
Add domain to Vultr DNS
Managing DNS allows you to control how your domain name resolves to an IP address. It transfers your domain names into IP addresses which web browsers use to load web pages. You can transfer your domain to a new web host through DNS management.
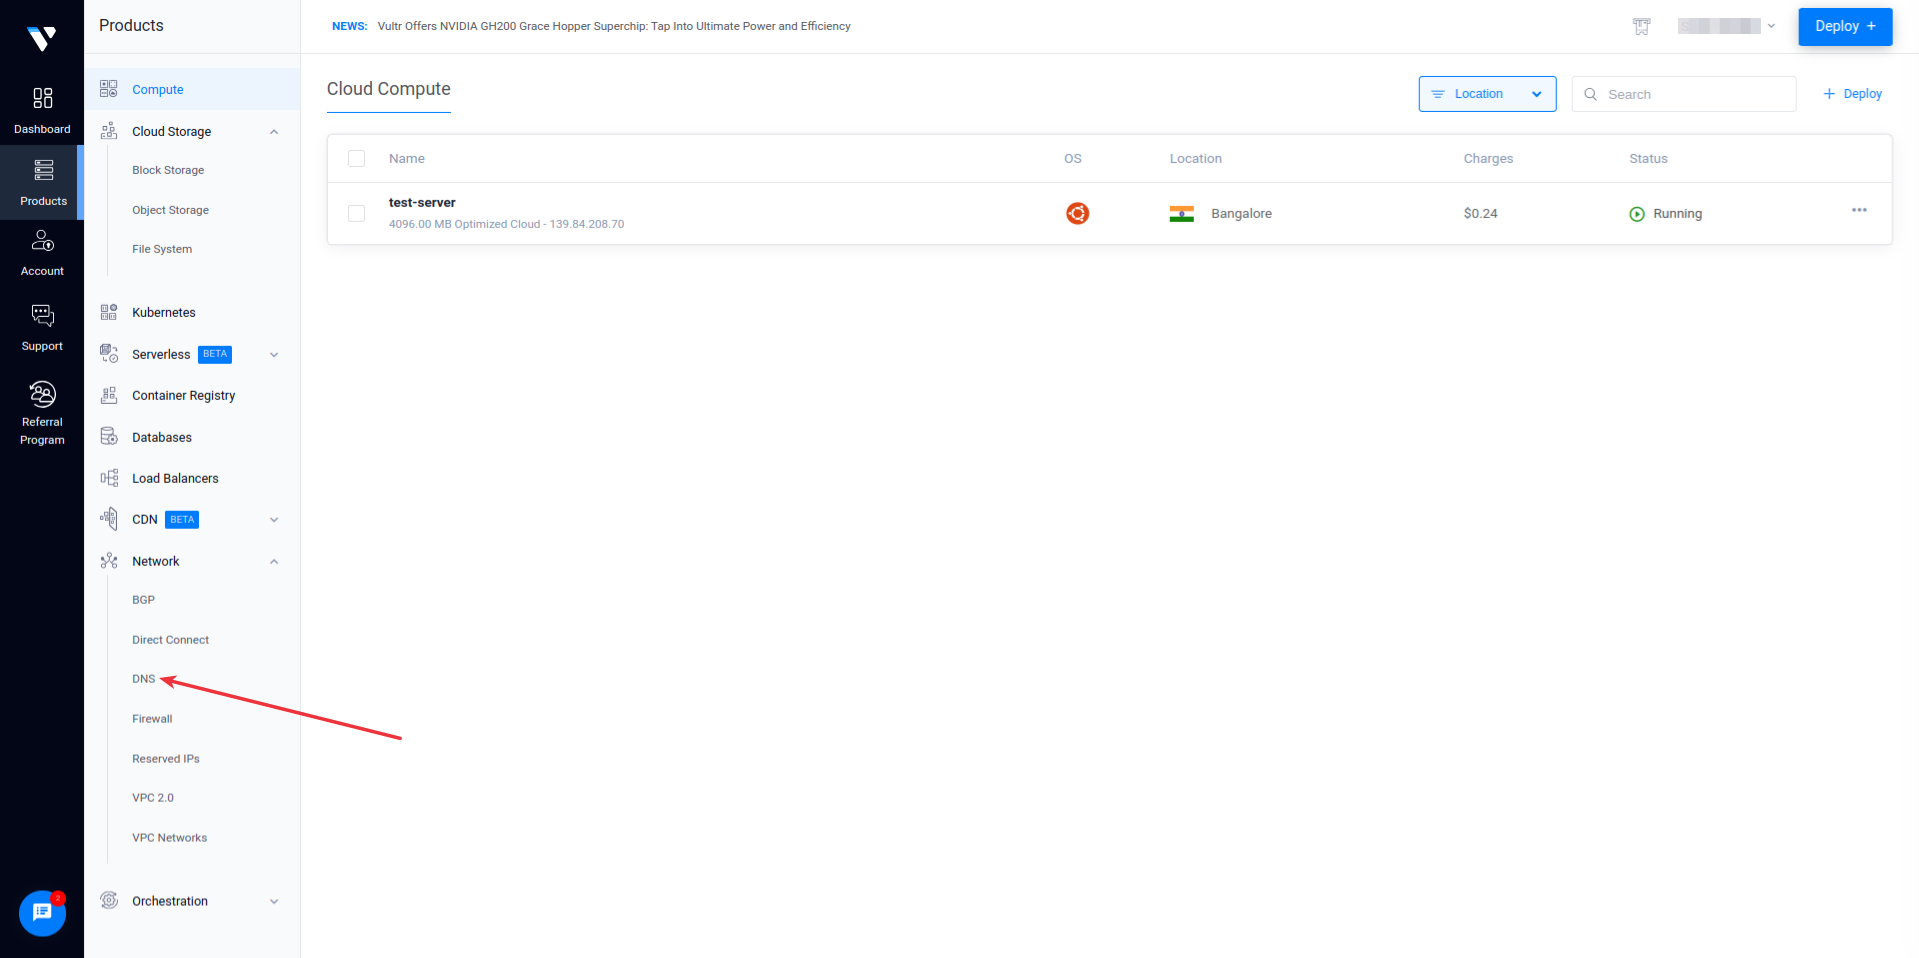
You can manage your domains by going to the Network >> DNS tab on the Products page.
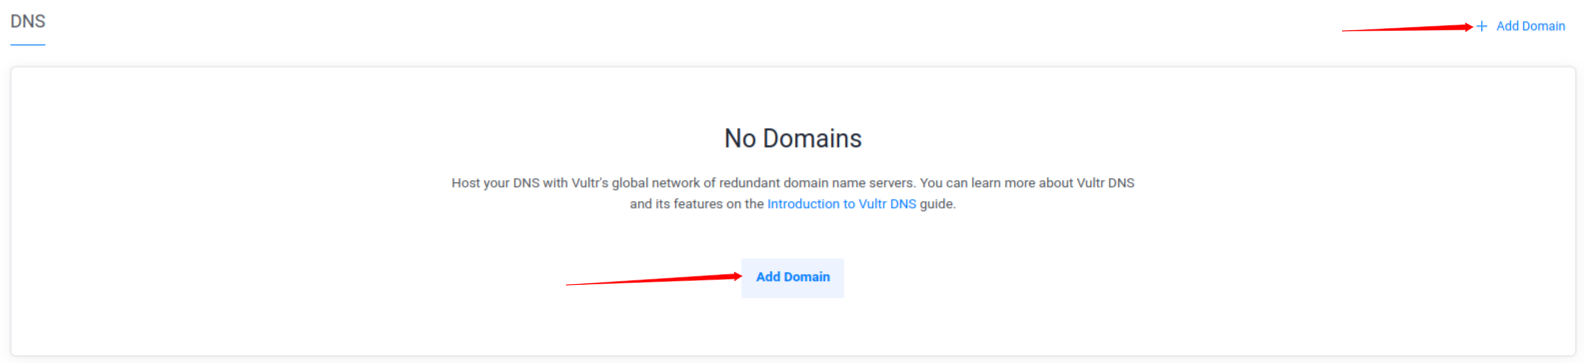
Here you will see the list of all domains along with their creation date and time. You can add a new domain to DNS management by clicking on the “Add Domain” button at the top right corner or by clicking on the Add Domain option displayed on the page.
After that, you will see a simple form as shown in the following image.
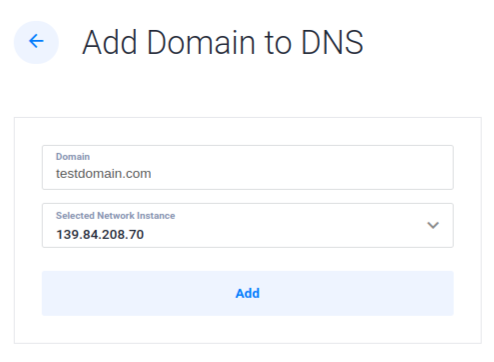
Enter the domain name in the Domain field and select the Vultr instance you want to use for that domain name. Once you have selected both options, click on the Add button to add the new domain to Vultr DNS.
Manage DNS records
To manage DNS records for a specific domain managed with Vultr DNS, go to the DNS tab in the products section. Now you will see a list of domain names managed through Vultr DNS.
Click the Edit icon next to the domain name you want to manage. Now, you will see a list of DNS records just like the following image.
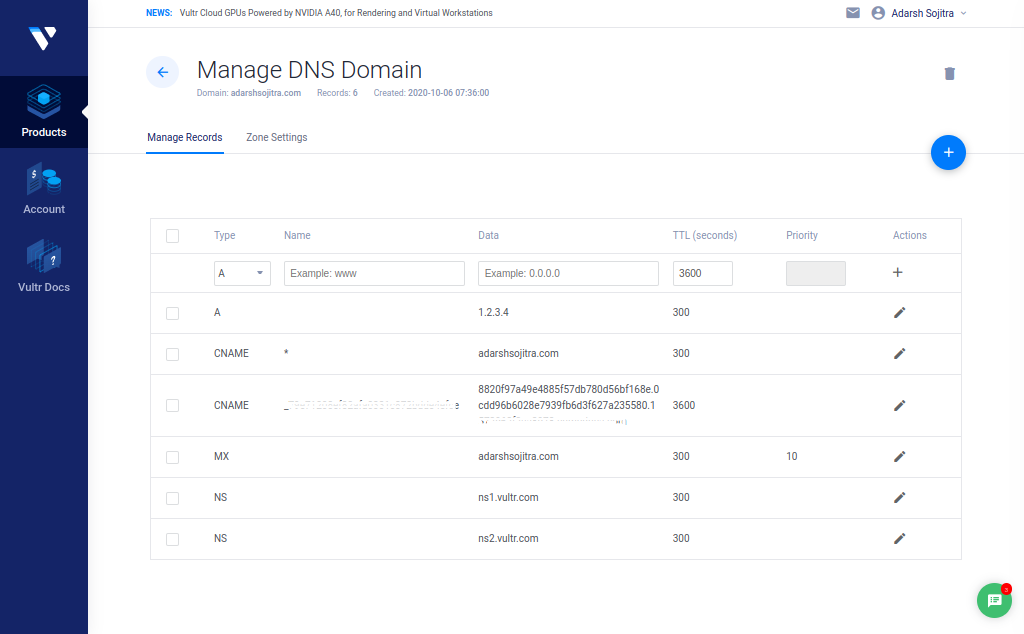
Once you have the list of DNS records, you can perform the following actions on the records.
- Add new DNS Record: To add a new DNS record, enter the DNS record information in the first row and click on the “+” button given in the last column of the first row.
- Edit an Existing DNS Record: If you want to edit an existing record, you can click on the Edit icon next to the record you want to edit. Then update the DNS record according to your requirements and save it.
- Delete DNS Record: To delete a DNS record, select the record(s) you want to remove from the first column, then click on Delete Records to instantly remove selected DNS records.
This is how you can manage your domain’s DNS with Vultr. If you decide to manage the DNS of your domains via Vultr, you can also enable DDoS protection for your servers in Vultr.
Finally, let’s see how to manage websites on your Vultr server or instance.
Manage PHP or WordPress Websites on Vultr Instance/Server
If you are still reading, you already know everything you need to know about Vultr servers or instances. We explored almost all the options available in the Vultr User Interface. But none of them covers this topic.
That’s because Vultr allows you to manage servers, not websites. When you create a server, you will get a server from Vultr. You will not find an option to add a new website. It is because managing websites on the server is not Vultr’s responsibility, it is yours. This approach is the same across all cloud platforms.
So, how can you host your websites on a Vultr server without needing any technical knowledge of Linux? There are a few options available:
- Hire a system administrator to host and manage websites on a server. (Expensive)
- Create a server with a pre-installed application. (No Management capabilities)
- Use a remote server management panel (Recommended)
Let’s explore the pros and cons of all the methods to help you select the best option for your requirements.
1. Hire a System Administrator
In this case, after creating your server, you would hire a freelancer to configure the server and host your websites on it. A skilled system administrator typically charges between $50-$100 for the initial configuration and to host your websites.
The problems arise when you want to get help, want to host more sites, solve server errors and perform other tasks at server level. It is because first, they might be slow to respond (We can expect a few hours of delay in response for any human being).
The second issue is that the system administrator might charge you every time you need help from them. As a human is working on your server, this can become expensive. Additionally, you will need to share the root password of your server with a person you have never worked with before, which can lead to a security risk.
If you still want to go with this method, you can explore gigs on Fiverr or other freelancing platforms.
2. Create a Server with Pre-installed Application
This is one option to consider. Vultr provides pre-installed applications on servers through its Marketplace. At the technical level, imagine you have initially configured a server with the website on it. Then you can take a snapshot of it, and after that, every time you create a new server from that snapshot, you will always have a website automatically installed on the server.
To find this option, select the Deploy New Server option from the top-right corner of the Vultr dashboard. In the section where you are asked to select a Server Image, click on the Marketplace Apps. Once you are there, you will see something like the image below.
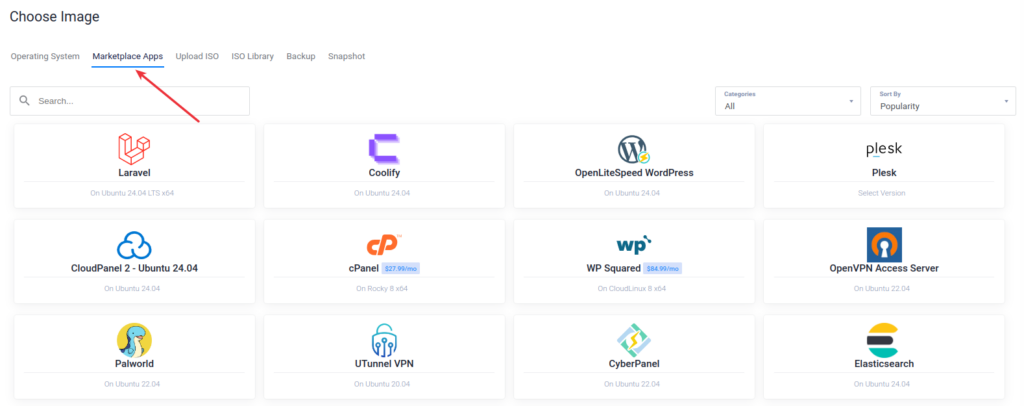
The problem with this setup is that you can only host one application per server, and the server configuration is basic, or say, might not be optimized. This creates a common problem similar to the first method: if something goes wrong and server errors occur, you will need to hire a system administrator to resolve this.
The only difference between the first and the second method is that in the second method, you don’t need to pay a system administrator for the initial server setup. However, both methods have the same problem after that.
It’s 2025, and you don’t have to settle for that anymore. To solve all the configuration, learning curve, and support problems, we have a third method. Note that this option was not viable before six years.
3. Use a remote server management panel
Brace Yourself!
A remote server management panel costs you up to 90% less than hiring a system administrator for the initial configuration of your server. Plus, here are some of the key features that any remote server management panel will provide.
- Instant, Automated, and Optimized configuration
- Host multiple sites on a single server
- Easy-to-use web application for managing sites on your server
- No learning curve required
- Clone websites, create staging areas, and set up demo environments
- Automatically and instantly migrate sites
- File manager to manage files of your sites
- Get support for server-level errors
- Get a Managed Hosting Experience with Vultr Integration
In short, you do not need to hire a person to host your sites on a Vultr server. It is as easy as managing websites on a managed hosting platform. Here are some screenshots of the ServerAvatar panel, which serves as a remote server management panel.
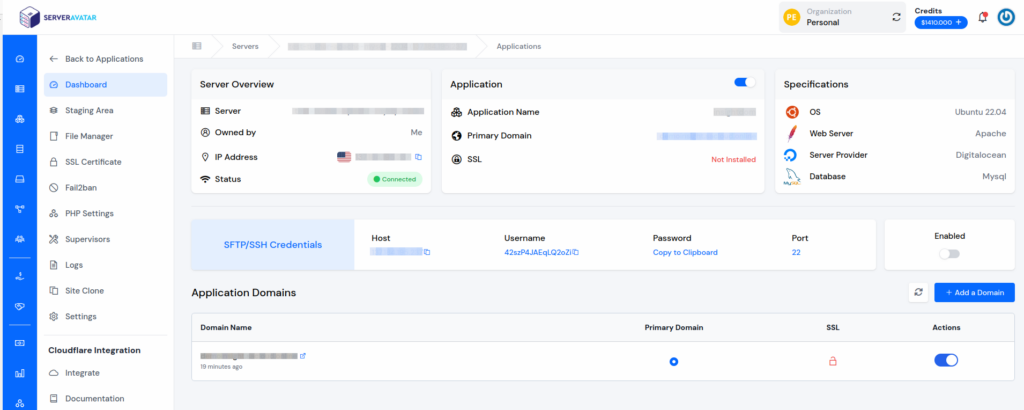
The following is an application management panel, where you can manage domains for your sites, use Auto Deploy to automatically install applications, manage the staging area, files, SSL certificates, PHP settings, backups, and a lot of things.
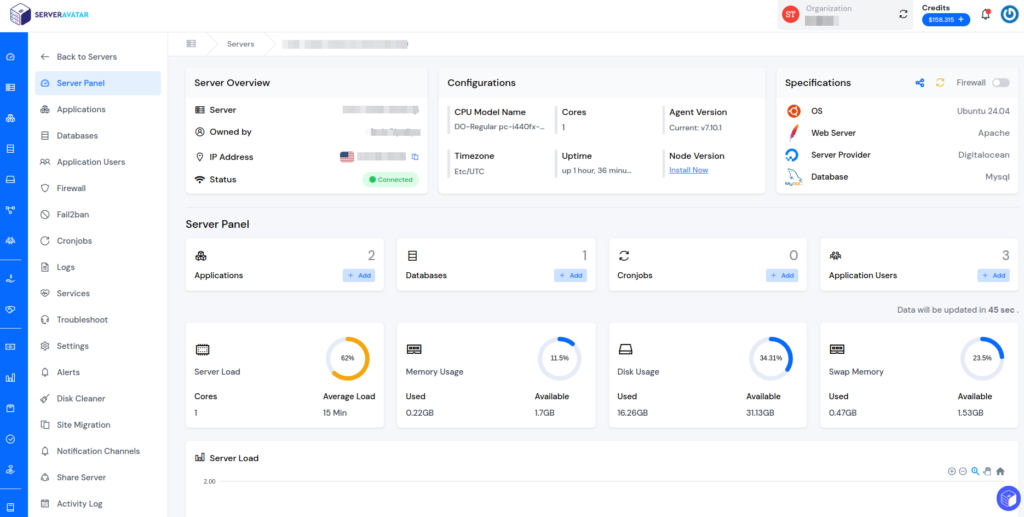
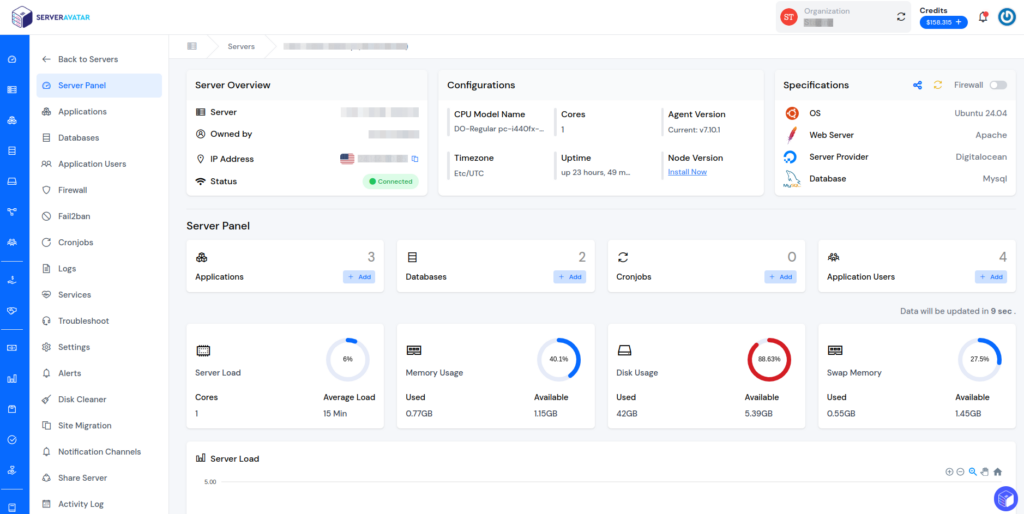
The below image is a server management panel where you can easily manage and monitor your server. You can handle various tasks such as managing applications/sites, databases, firewall settings, server alerts, migrations, and a lot more.

You can try ServerAvatar with the free plan. To get started with a fresh Vultr server with the Ubuntu 20.04, 22.04, or 24.04 operating system, follow the steps below to initiate the setup process for ServerAvatar.
Here are the three ways to automatically configure your server with ServerAvatar.
1. Connect a server using a direct method:
- Login/Register to ServerAvatar account, then click the Create button from the right side of the screen and select Server from the dropdown menu.
- Select Direct Method for the server connection.
- Enter your preferred Server Name.
- Select a Tech Stack based on your needs (Apache, Nginx, OpenLiteSpeed, or Node Stack).
- Select a Database: MySQL, MariaDB, or MongoDB.
- Enable the toggle if you want to install the latest LTS version of node.js on your server.
- Click on the Connect Now button.
- You’ll see the command on your screen. Login to your server via SSH and execute that command as a root user.
- The server connection process will begin in your ServerAvatar account after executing the command.
2. Connect a server using integration:
- Login/Register to your ServerAvatar account, navigate to the Integration tab from the sidebar of the panel and select Cloud Platform from the dropdown menu.
- Select a cloud platform you want to link with ServerAvatar.
- A popup form will appear, enter details to link your cloud provider account.
- The integration method is different based on the cloud provider you select.
3. Connect a server using commands:
Once you create a server as per your requirements, connect to your server using an SSH connection and execute the below three commands as a root user in your server console area.
wget https://srvr.so/install
chmod +x install
./install
It will ask if you want to configure your server with Apache, Nginx, or OpenLiteSpeed. You can select according to your requirements and hit enter. After that, it will check if the server is ready for installation.
After the installation starts, It will provide you with a link to your server management panel. The complete initial configuration will be over in 6-7 minutes, and you will be able to manage your servers and sites using a panel as displayed in the below image.
Quick Links: