
Let’s be honest, trying to host PHP application can be a frustrating and time-consuming task. If you’ve done it before, you already know the pain. From server setup to configuring LAMP, LEMP, or OLS stacks, managing databases, and deploying your application, it’s a complicated mess. And if you’re not a server expert, it’s easy to feel completely overwhelmed.
That’s exactly where ServerAvatar comes in.
It’s a powerful yet beginner-friendly tool designed to make it incredibly easy to host PHP application. No need to be a developer or understand Linux commands. Just click a few buttons, fill in the details, and your PHP application is deployed and live without the headache.
Introduction to ServerAvatar
What is ServerAvatar?
In simple terms, it’s a platform that helps you to host and manage your servers and applications, like PHP, Node.js, or Git-based applications, on your own VPS or managed server provided by ServerAvatar. No technical expertise required to use it.
ServerAvatar handles most of the complicated stuff in the background. You get a clean dashboard where you can install applications, monitor your server, take backups, and more. It’s perfect for hosting and managing your servers and applications.
And yes, you still get full control over your server. Nothing’s locked down. It just saves you the headache of doing everything manually. For solo developers, it’s like having a full-time system admin. For agencies, it’s a centralized control hub. And for startups, it’s a cost-saving infrastructure solution that grows with your app.
Benefits of Using ServerAvatar for PHP Applications
Features of ServerAvatar that Save Time
- Simplicity: No more struggling with terminal commands or installing server stacks manually
- Automation: From server setup to SSL installation, everything is automated
- Speed: You can get a PHP app online within 5 minutes
- Cost-Effective: It allows you to use a low-cost VPS while giving you premium control
- Scalable: You can manage dozens of servers and hundreds of apps from a single dashboard
Getting Started with ServerAvatar
Signing Up and Creating an Account
Signing up and creating an account for ServerAvatar is very easy. Just navigate to https://serveravatar.com and hit the “Get Started” button.
Once you have logged in and you’re inside the ServerAvatar dashboard, you’ll see a clean interface that prompts you to create or connect a server.
Create or Connect Your VPS or Cloud Server with ServerAvatar
This is where the magic happens. You can directly create a new server on DigitalOcean or Vultr by using ServerAvatar’s Managed Server Feature. If you want to connect your own VPS from a custom VPS provider. ServerAvatar supports that too. Additionally, you can integrate your VPS account with ServerAvatar of popular cloud providers like DigitalOcean, Linode, Vultr, Hetzner, and Amazon LightSail.
One-Click PHP App Deployment Explained
How the One-Click Install Works
This is ServerAvatar’s most powerful feature, designed to save users’ time and simplify the process of deploying applications. Instead of setting up an app manually, you just have to click on “Create an Application“, enter the application name, select the domain, select the method, and just deploy.
ServerAvatar simplifies the process of uploading a file using a file manager, sets up the custom web root path, add or change the domain for your application, and installs SSL.
There’s no need to run multiple commands, copy files via FTP, or manage .env files manually. Everything is easily configurable in the dashboard.
So, whether you’re building a blog, e-commerce site, or SaaS dashboard, ServerAvatar has you covered. You can also run multiple apps on the same server, each with its own domain, PHP version, and database.
Custom PHP App Deployment
Setting up an application in ServerAvatar to host your custom PHP scripts and projects is a straightforward process. You have to give the application name, domain, system user, and customize settings like the PHP version and web root directory.
Just select the deployment method as “Custom PHP” to configure your server for running PHP code. Once the application is set up, you can upload your PHP files and run them in the public_html directory. ServerAvatar makes it very simple to create and manage custom PHP applications.
- Log in to your ServerAvatar account. Click on the “Server Dashboard” icon on which you want to host your custom PHP application.
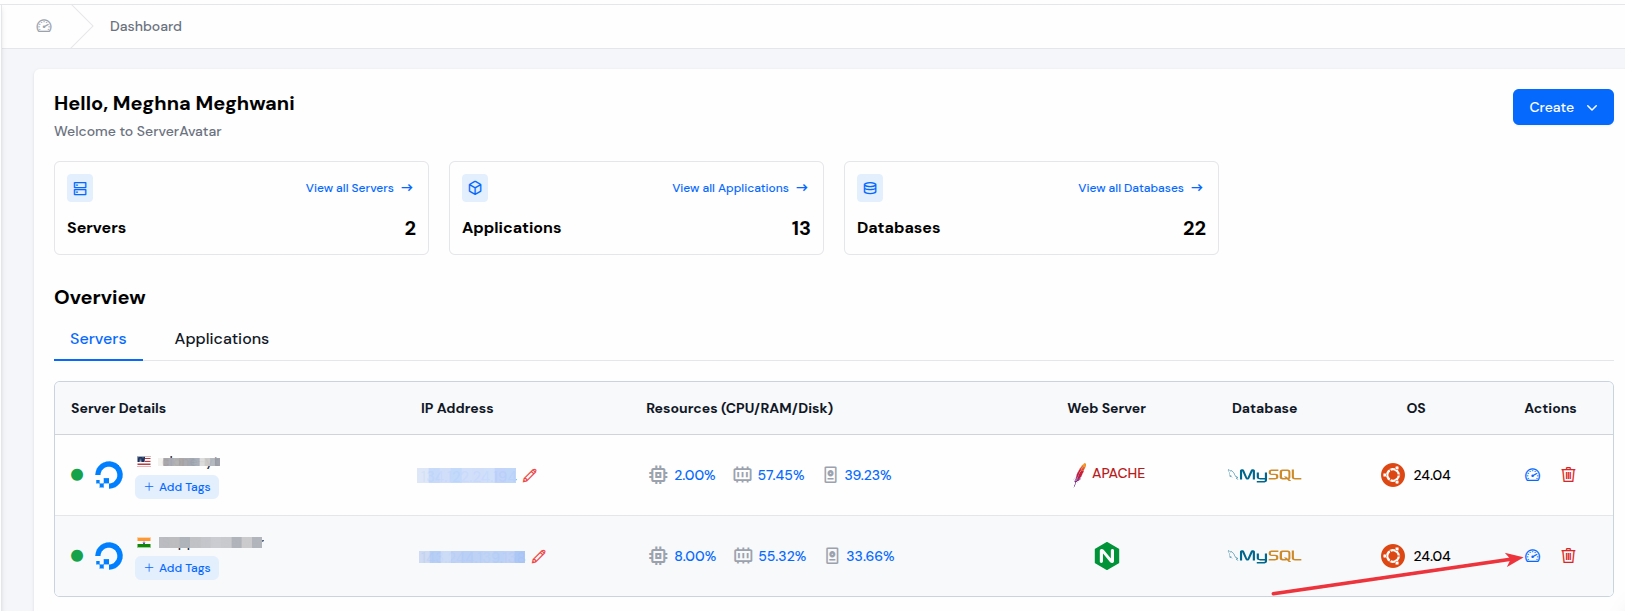
- Once you’re inside your ServerAvatar panel, look for the “Applications” tab on the left side bar. Click that, then hit the “Create an Application” button.

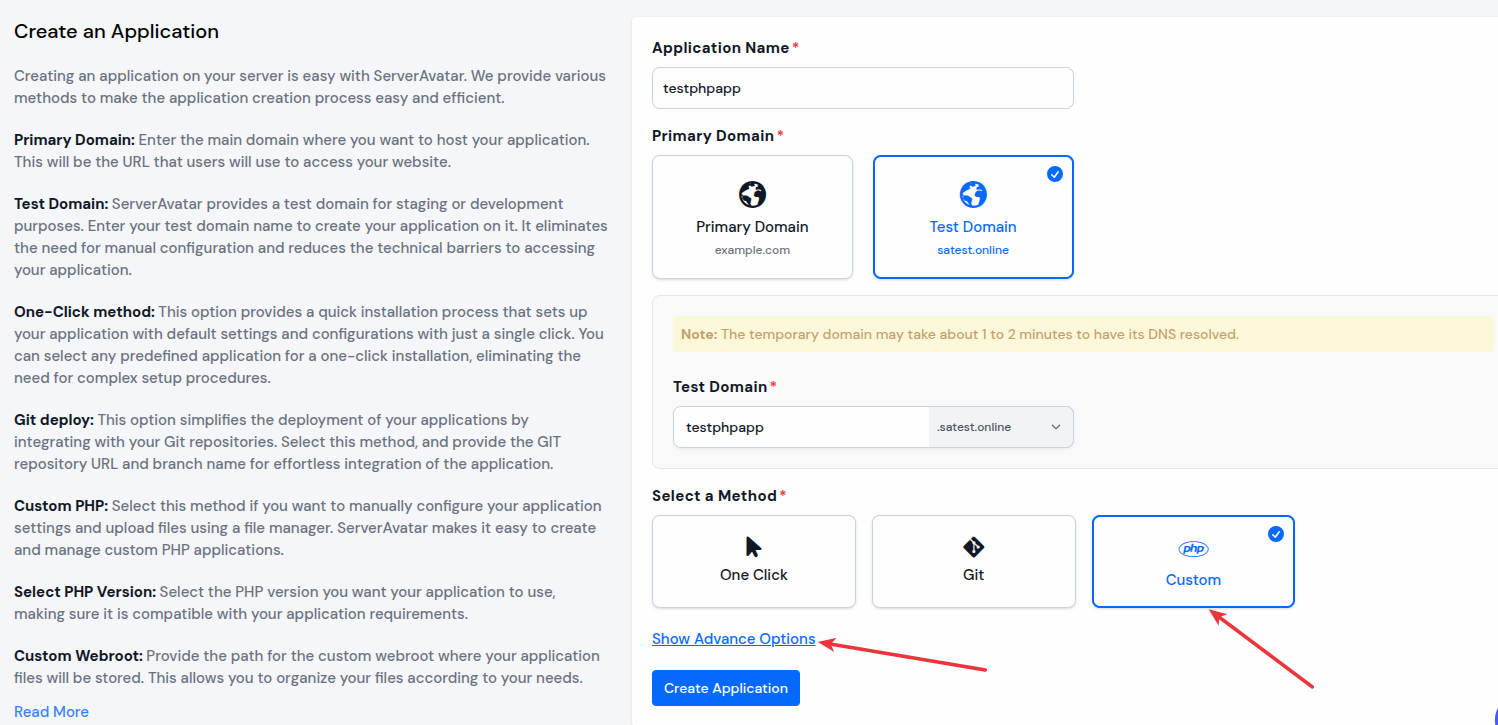
- Fill out the form for creating the application, enter your application name, select the domain from primary or test (ServerAvatar provides test domains to create your application without your own domain), enter the domain name, and select the method as “Custom PHP”.
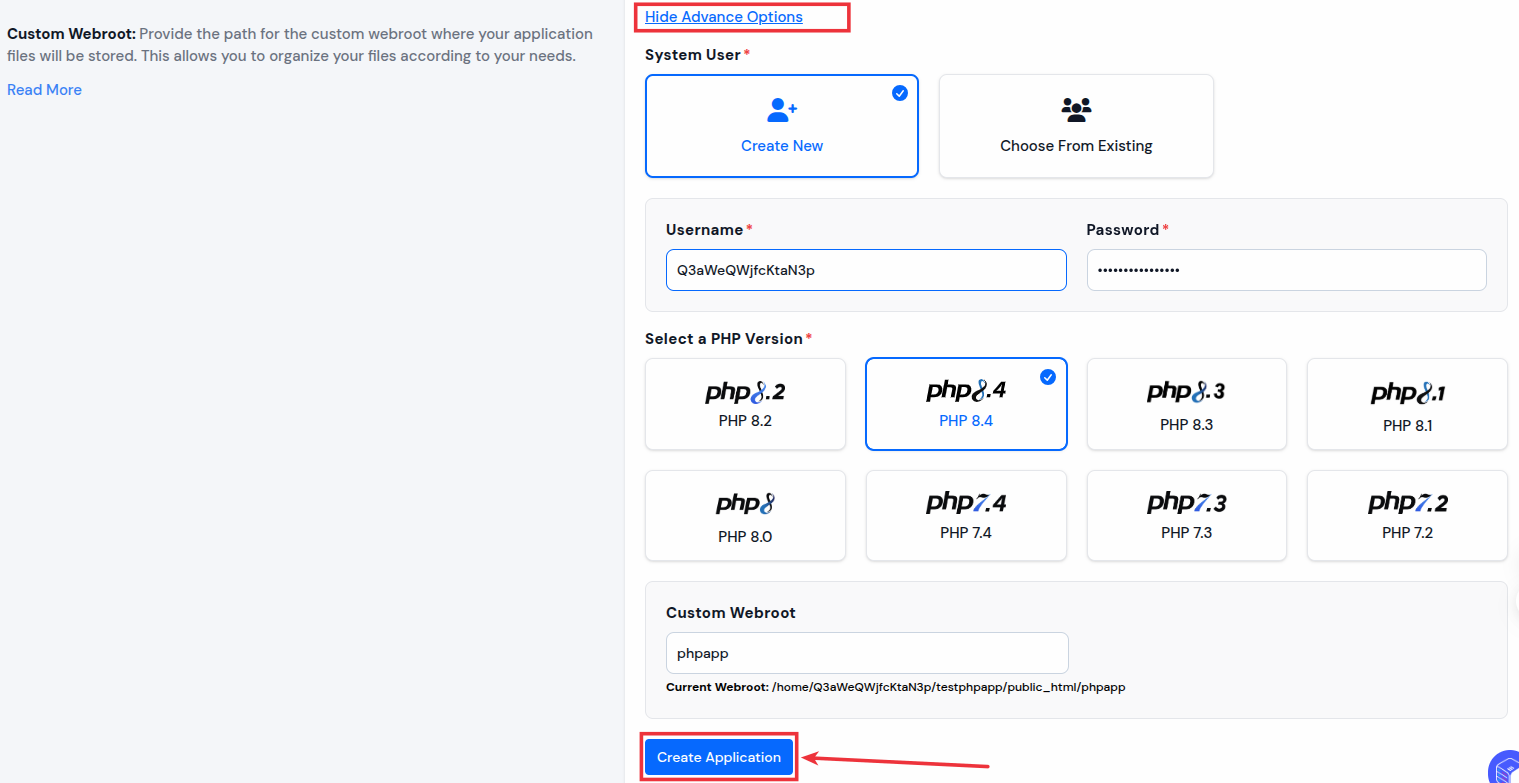
- If you want to customize more settings, click on the “Show Advanced Options”; here you can select your system user or create a new one, select the custom PHP version for your application, and enter the Custom Webroot path for your Custom PHP Application.
- After filling out the details, simply click on the “Create Application” button. This will take about 10-15 seconds to deploy the website. Once it is deployed, you can see it on the application dashboard.
Upload your application through ServerAvatar File Manager
The “File Manager” in the application panel lets you manage your application files directly through the ServerAvatar dashboard. It allows you to perform a range of file operations, as you would do with any standard file manager. You can simply upload a file of your application using ServerAvatar’s File Manager Feature.
- In the application panel, you will see the File Manager option on the left-hand sidebar. Click on the “File Manager” section.
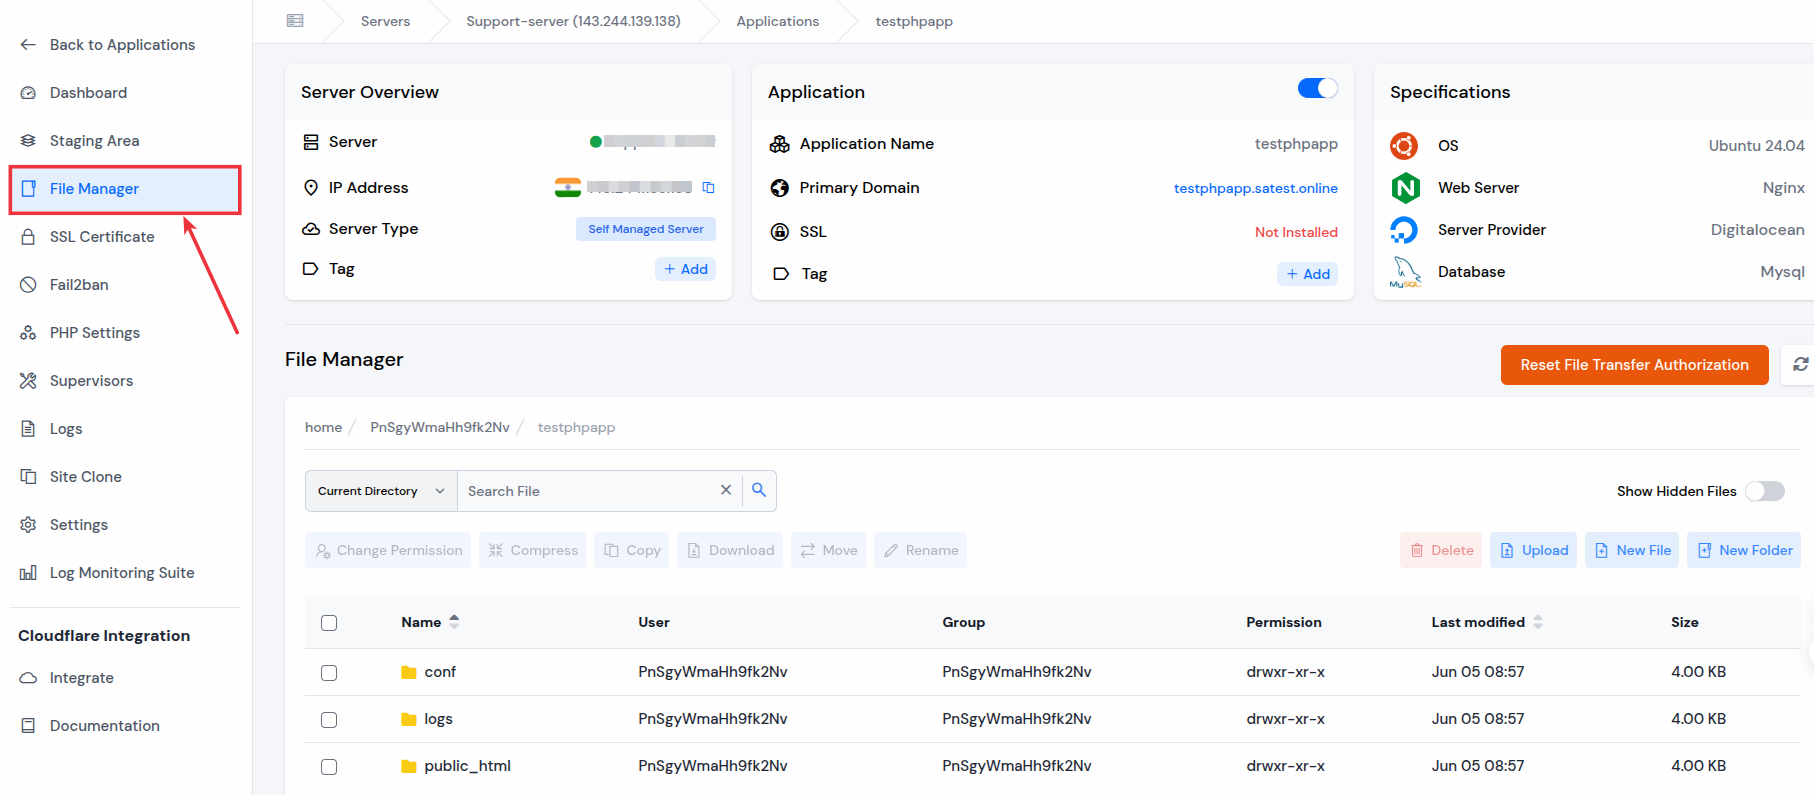
2. Navigate to the public_html directory and upload your Application File. Click the upload icon and either choose your file or drag and drop it into the File Manager area.
3. Please note that do not refresh the page or leave the page till the upload process is not finished.
4. Once the upload is complete, you can complete your further process if there is any.
Set your Custom Webroot Path
Now, to be clear, setting up a webroot path is still a risky process. If something goes wrong, your app might not load properly. But ServerAvatar takes care of most of those risky parts, so you don’t have to stress over it.
The content that the application serves is generally the content in the index.php file of your application.
To change the custom webroot path for your application:
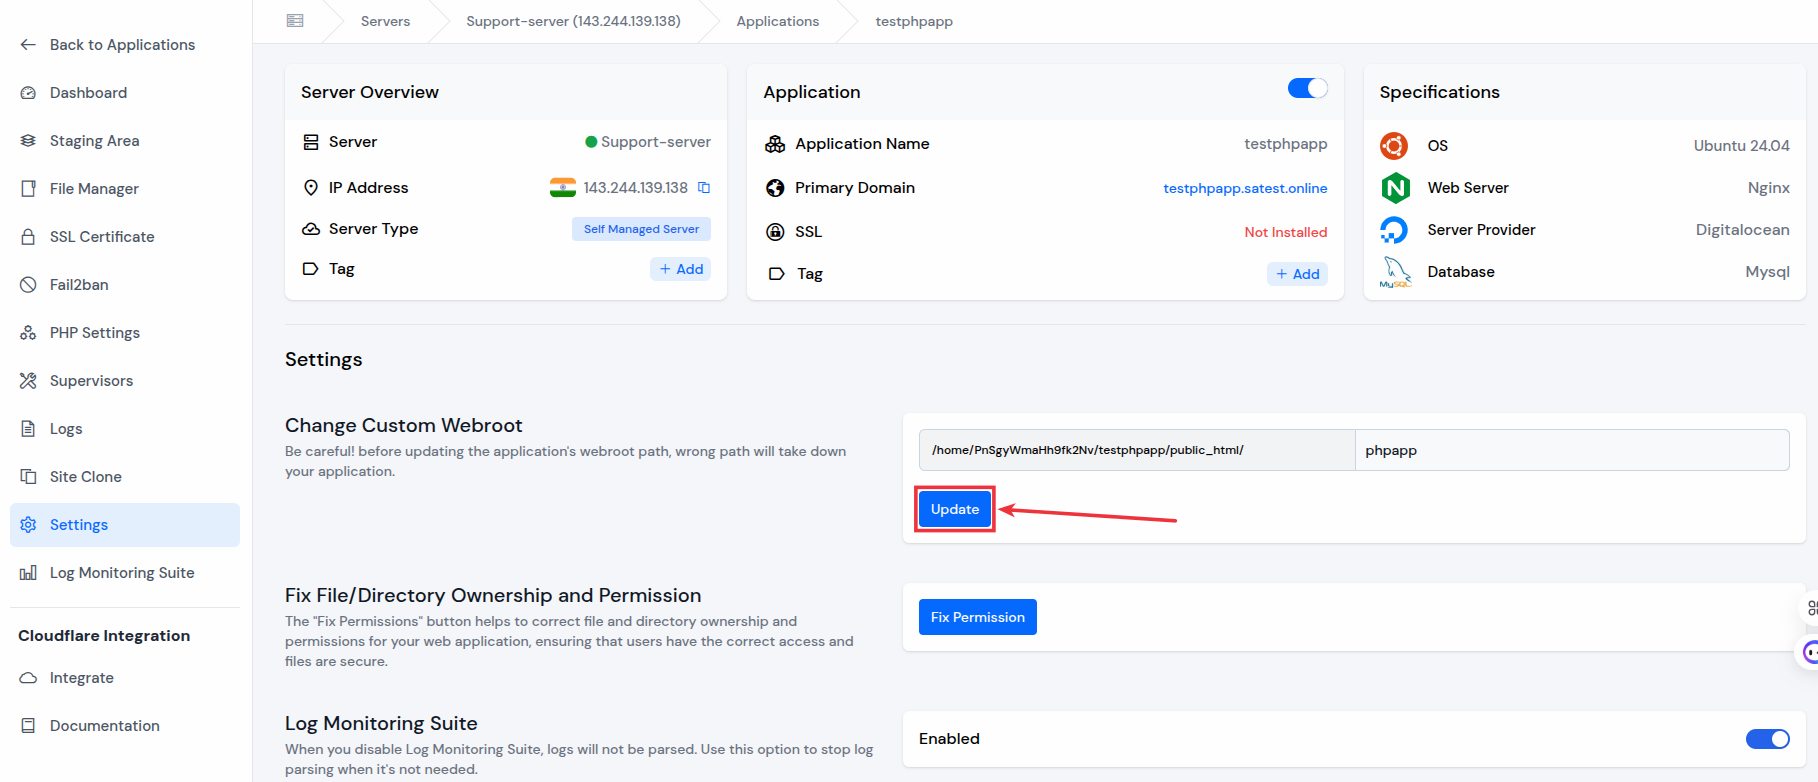
1. Click on the Settings option from the left-hand sidebar of the application panel.

2. Make the necessary changes to the webroot path, then click the “Update” button to update the custom webroot for your application and save your changes.
Security and Performance Optimization
Built-In Firewalls and Fail2Ban
Security is non-negotiable when you’re hosting production applications. That’s why ServerAvatar comes with built-in security features that would take hours to configure manually.
Each server comes pre-installed with:
- Firewall (UFW): Blocks all unnecessary ports
- Fail2Ban: Keeps an eye on failed login attempts and blocks IP addresses that seem suspicious.
- App-level protection: Isolated environments reduce the risks of cross-app infections
You can even whitelist IPs, set custom firewall rules, and many more security configurations, all without touching the command line.

Automatic Backups and Restore Options
Imagine deploying a client site and then breaking it with a bad update. Backups are your safety net, and ServerAvatar makes them effortless.
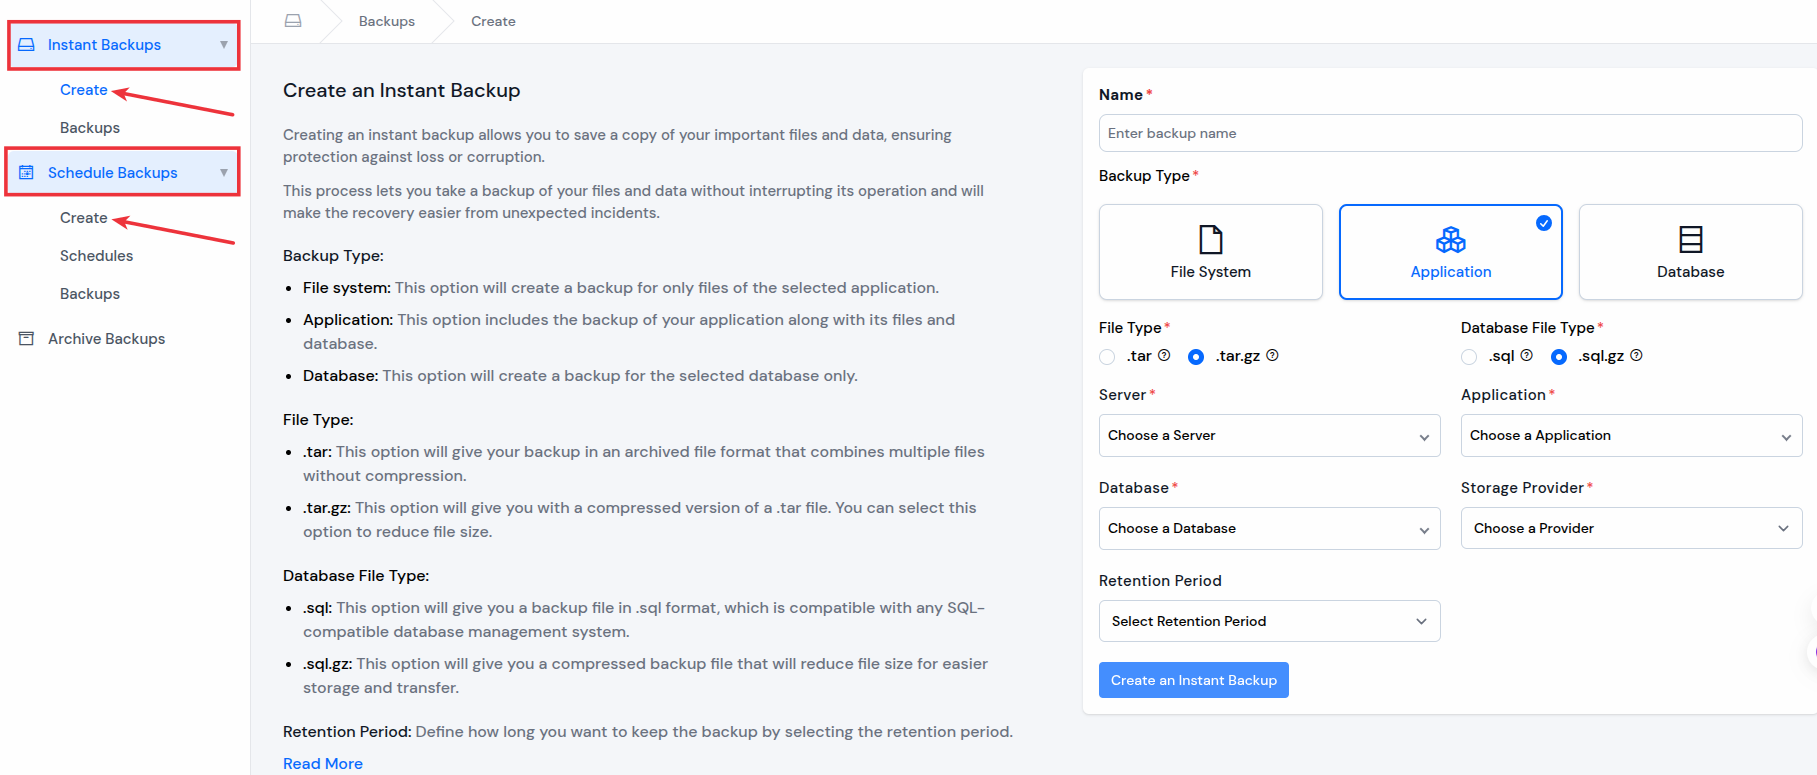
You can create backups for each application and its database.
- Instant Backups with one click
- Schedule automatic backups on a daily/weekly schedule
- Restoring from a backup is just as easy. Select backup, hit “Restore”.
Pro tip: Always schedule backups before pushing new changes. It’ll save you hours of debugging if something goes wrong.
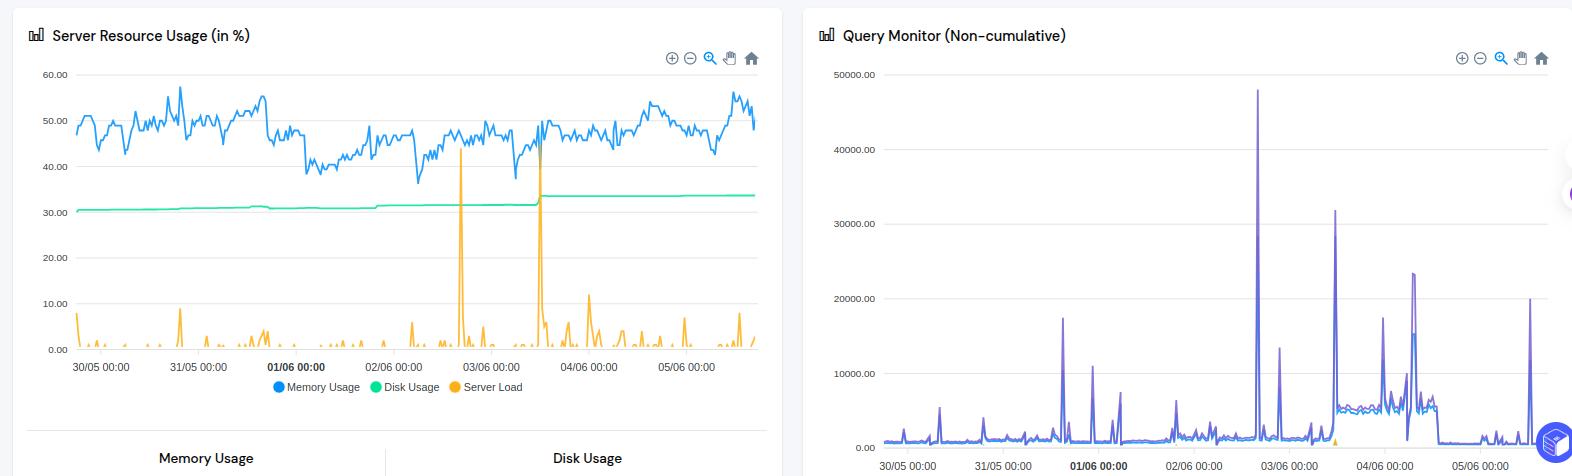
Performance Monitoring and Alerts
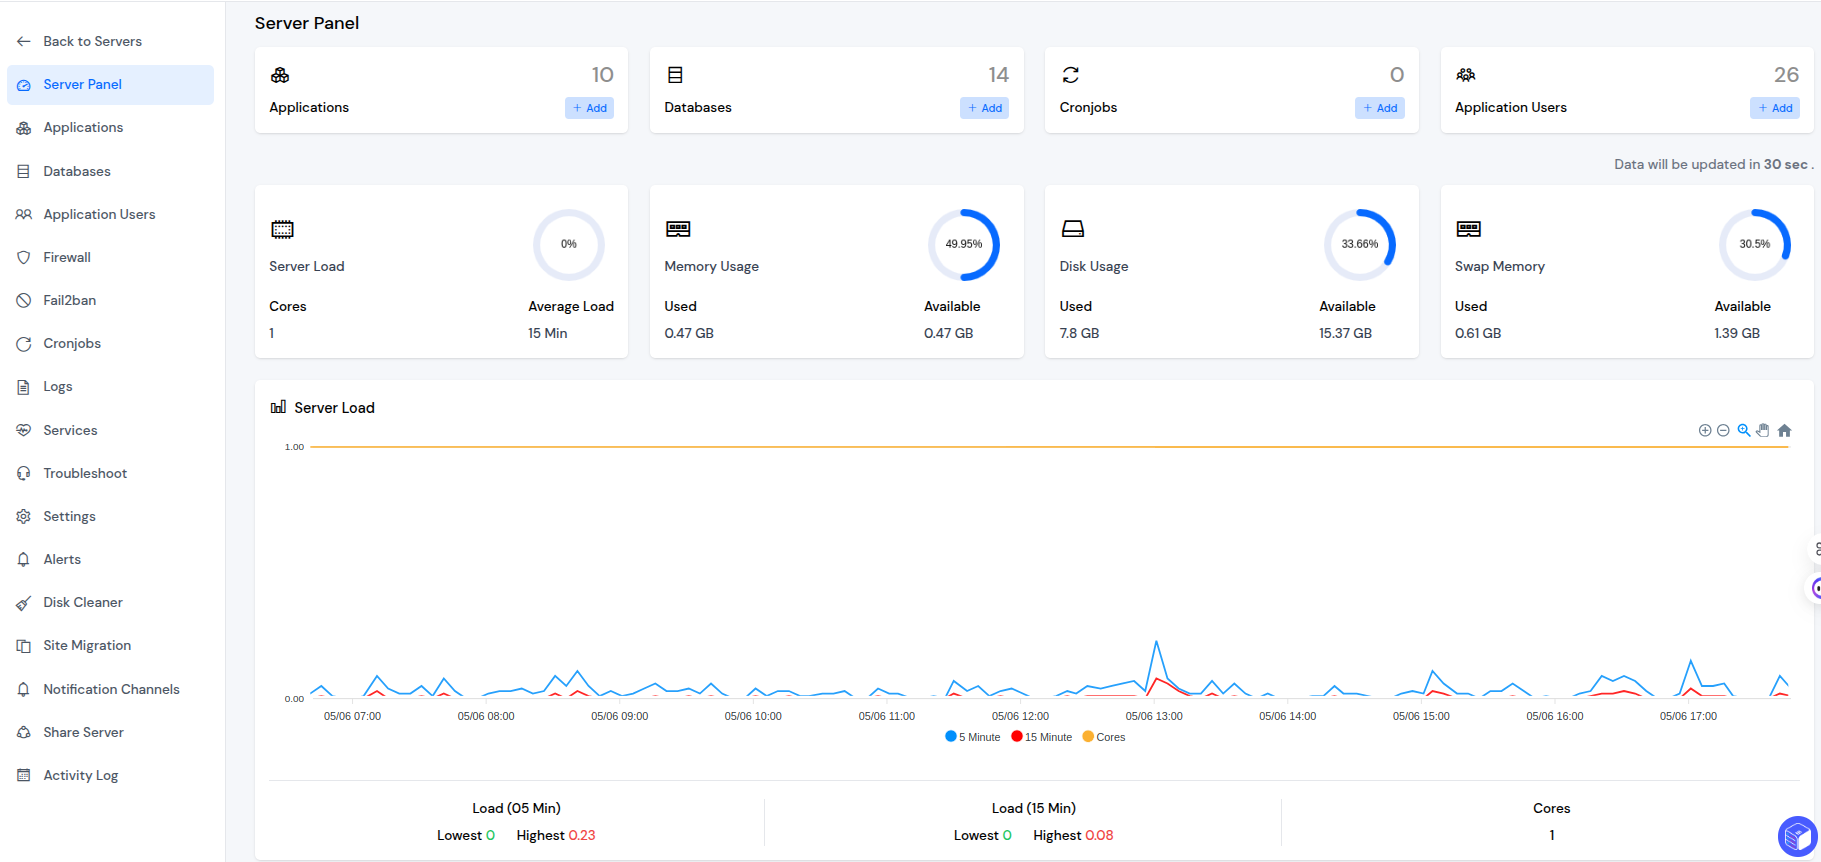
ServerAvatar isn’t just about deployment, it’s also about keeping your apps running at peak performance. The dashboard includes real-time monitoring for:
- Server Load
- Server Resource Usage
- Query Monitor
Set up alerts to get notified via email when the set limit is reached.
Common Use Cases
ServerAvatar is great for freelancers, developers, or anyone managing multiple sites. A lot of agencies use it too, especially if they’re handling client work and don’t want to spend time setting up each site from scratch. If you’ve got a bunch of projects going on and need a faster, easier way to handle hosting, ServerAvatar’s got your back.
With its centralized management and automation features, you can manage multiple servers and applications in a way that scales with your workload. It’s perfect for anyone managing multiple sites without needing to master Linux commands. Below are the common use cases of ServerAvatar:
- Website and Web App Hosting
- One-Click Popular Application Deployment
- Server Provisioning and Management
- Security and Monitoring
- Backups and Restoration
- Team Management
- Staging Environments for Testing Purposes
ServerAvatar Pricing Plans
ServerAvatar offers free and paid plans. A very generous free plan for beginners who want to test and explore the ServerAvatar platform. You can connect one server and host one application on it, perfect for solo devs or hobby projects. Check out the ServerAvatar pricing page for more detailed information on plans and features included in it.
However, the real power lies in the paid plans, which unlock features like:
- Multiple server support
- Unlimited server (except Starter Plan)
- Unlimited applications
- Staging environments
- Team management (except Starter Plan)
- Daily automated backups
- Email alerts
- API access
- Log Monitoring Suite (except Starter and Professional Plan)
- WhiteLabel Suite (except Starter, Professional, and Master Plan)
- and many more
Troubleshooting and Support
Accessing Community and Docs
Even though ServerAvatar simplifies complex processes, you might still need help sometimes. Fortunately, ServerAvatar’s support system is excellent.
Start with the knowledge base, which covers each and every guides from server setup to application deployment and SSL installation.
The community forum is also a great place to get peer support, especially from other members who are using ServerAvatar and have faced similar issues.
Live Chat and Ticket Support
If you’re on a paid plan, you can create a ticket for your issue on the ServerAvatar support panel and get live chat support from our technical experts. ServerAvatar provides 24/7 support. This is where ServerAvatar truly shines, they understand users’ pain points and often provide detailed, step-by-step solutions instead of canned replies. They even guide you with the issue you face or any further queries you may have.
Conclusion
You don’t need to be a server wizard to host a PHP application anymore. ServerAvatar makes it possible to launch, manage, and even scale your apps, without needing to learn a ton of technical stuff.
Whether it’s a WordPress blog, a Laravel project, or an eCommerce store, this tool helps you skip the complicated setup and get straight to building your site.
It’s simple, reliable, and saves you time. What more do you need?
From one-click app deployment to real-time server monitoring and backups, the platform is designed to save users’ time and headaches. You don’t need to be a server expert or hire DevOps engineers.
More importantly, ServerAvatar puts you in full control. You pick your server, set your configurations, and decide how you want your apps to run. And with powerful security tools, robust backup systems, and seamless integration options, your applications are not only easy to manage, they’re also safe and optimized.
So, whether you’re a solo developer, startup founder, or part of a growing agency, ServerAvatar is the smart choice for anyone who needs reliable, flexible, and lightning-fast PHP application
FAQs
Can I host Laravel or WordPress apps on ServerAvatar?
Absolutely! ServerAvatar is built to support modern PHP frameworks like Laravel, as well as CMS platforms like WordPress, Joomla, Statamic, and Craft CMS. It even includes one-click installers and environment customization options for each application.
What if I don’t know Linux or server commands?
No worries at all. ServerAvatar is specifically made for users who don’t want to deal with command-line interfaces. Everything from server setup to app deployment is handled via a beautiful and intuitive web dashboard.
Is ServerAvatar secure enough for client projects?
Yes. ServerAvatar implements best security practices out of the box, including UFW firewalls, Fail2Ban intrusion prevention, SSH key authentication, automatic SSL, 2 Factor Authentication, and IP Whitelisting.
How quickly can I launch my PHP application?
Within 5 to 10 minutes, depending on your VPS provider’s provisioning speed. You can sign up, connect a server, install PHP and dependencies, deploy an app, and set up SSL, all in that short time frame.
What limitations are there for the free plan users?
The free plan allows you to manage one server with one application & basic server and application management features. However, it does not include advanced features like Staging Area, email alerts, Automatic Backups, API access, or team collaboration. These and many more features are available in the paid plan.