Users
In the User Management section, select the Users option to view and manage user accounts. Here, you can view and manage various details for each user, as well as create new users and search for specific user accounts.
Step 1: First, log in to the Self Hosted panel, and go to the admin side by clicking on Admin as shown in the image below.
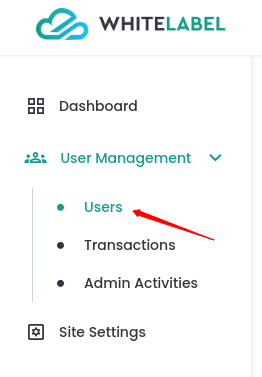
Step 2: Click on the User Management -> Users option from the left side panel.
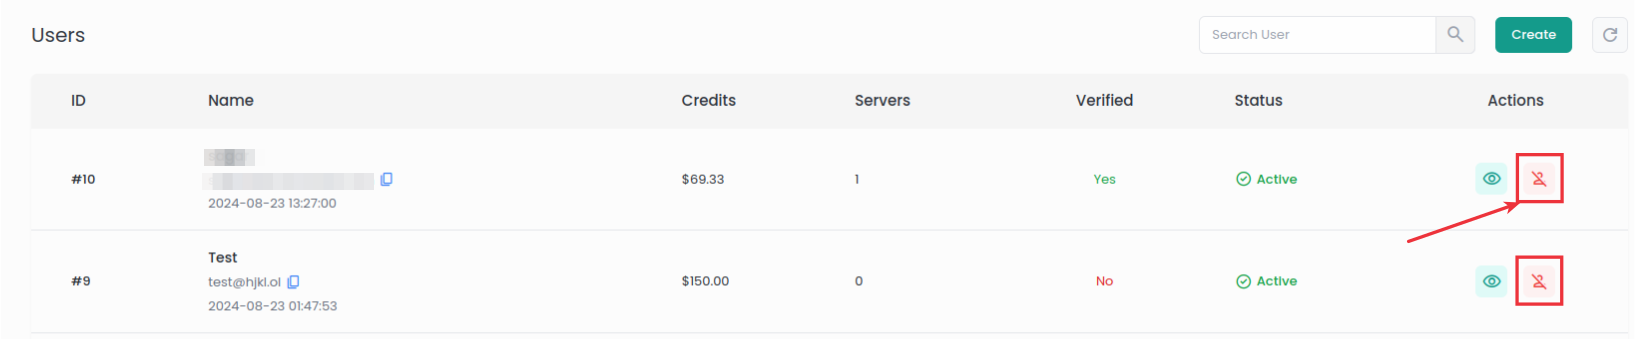
Step 3: You can see various details about each user including their user ID, name, email address, credit balance amount, and the total number of connected servers as shown in the below image.
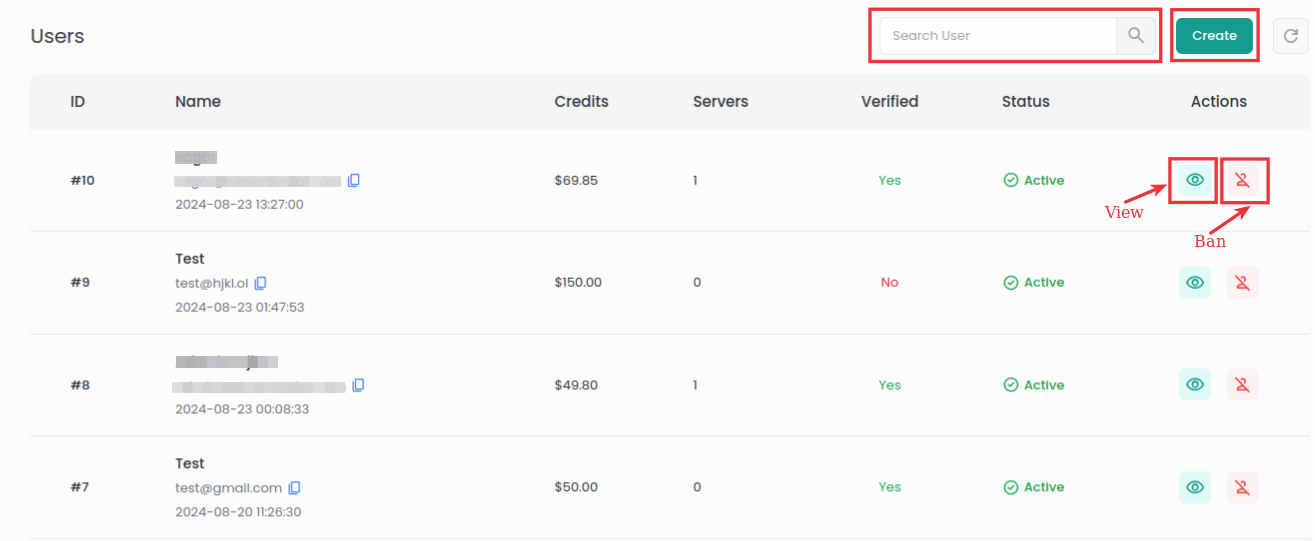
- Here, you can view and manage various details of users. You can see the user account is verified or not and the status of particualr user account. Also, You can take different actions for the particular user account.
- You can perform various actions on user accounts, such as banning the particular user account by clicking on the ban icon, and see the user details in brief by clicking the view icon next to particular user account.
- You can search for particular user and create user by using the given option as shown in the image.
Create User
- You can create a new user by clicking on the Create button as shown in the image below.

-
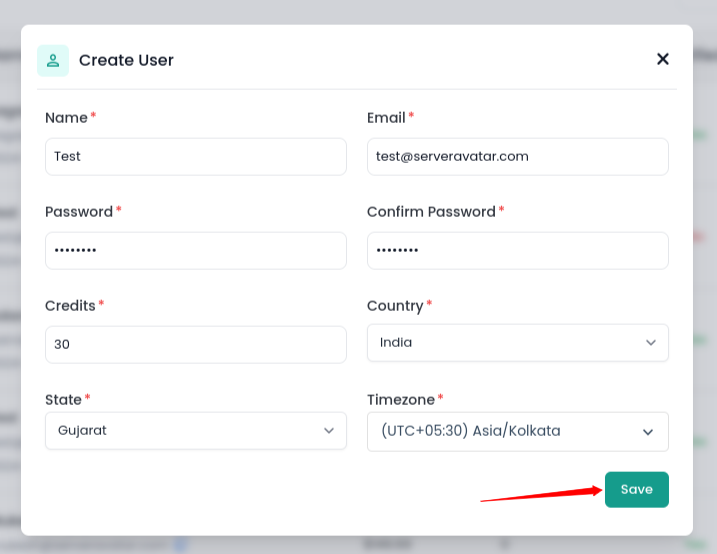
You will see the form as shown in the image below:
-
Enter the required details, including Name, Email ID, Password, Credit, and Select the Country, State and Timezone. Once you have filled out the information, click on the Save button. The user will be created and added to the Users list.
Export Users
- You can export the complete list of users to a CSV file by clicking on the Export Users button as shown in the image below.

-
After clicking the Export Users button, the system will automatically generate and download a CSV file containing all user data including:
- ID: Unique identifier for each user
- Name: User's full name
- Email: User's email address
- Email Verified At: Timestamp when the user's email was verified
- Credits: User's current credit balance
- Mobile No.: User's mobile phone number
- Servers: Number of servers associated with the user
- Country: User's country
- Region: User's specific region or district
- Status: Current account status (active, pending, banned)
- Created At: Timestamp when the user account was created
-
This exported CSV file can be used for backup purposes, data analysis, or integration with other systems.
Ban User
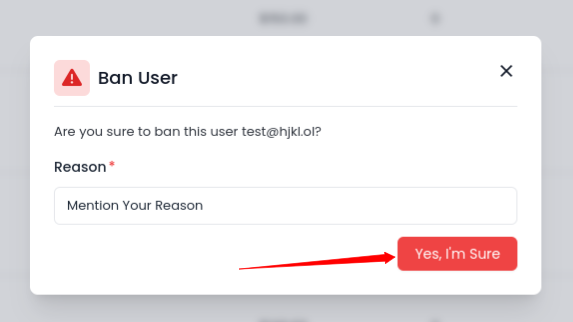
- You can restrict a specific user from accessing the Self Hosted panel. This measure is typically taken due to violations of rules, inappropriate behavior, or security concerns, and it helps maintain the integrity and safety of the online environment. To ban any user from SelfHosted simply click on the Ban icon next to the particular user.
- After clicking on the Ban icon, mention your Reason for Ban the user. Click on Yes, I'm Sure.
View User
- You can view and modify the details of particular users. Simply, click on the View icon next to the particular user to view the detailed information as shown in the below image.
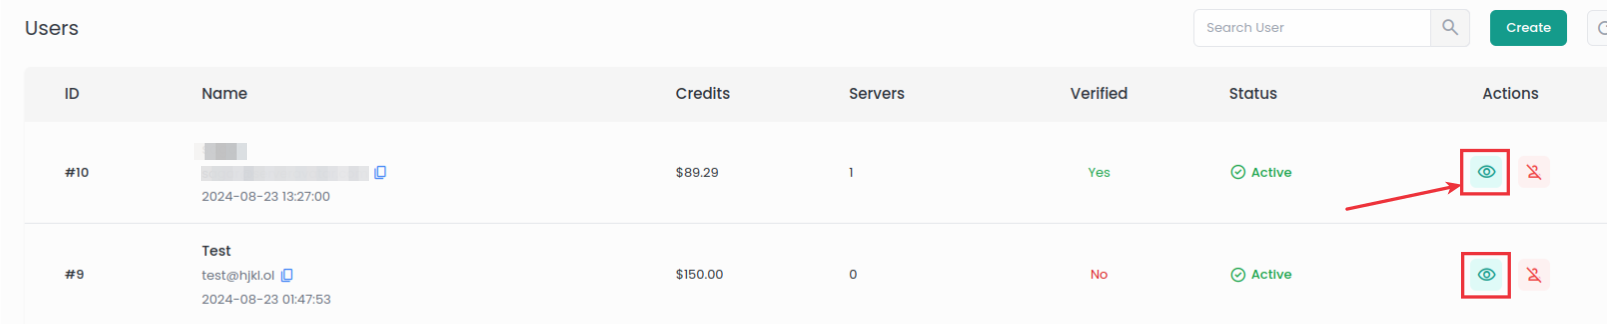
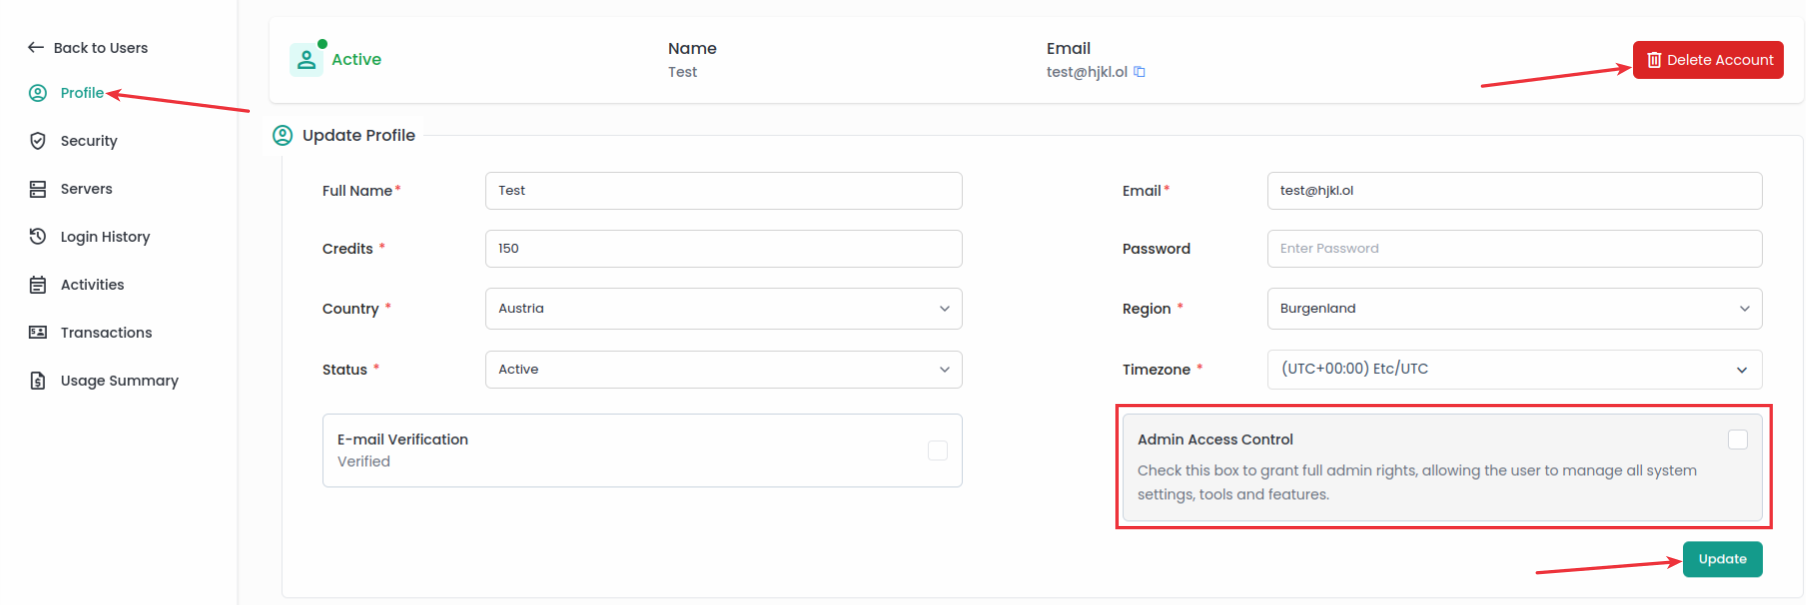
- After clicking the View icon, You can see the user information displayed as shown in the image below. You can check the user's status, indicating whether they are active or not.
Profile
-
Name: The user's name will be displayed here. You can update it by entering a new name for the user.
-
Email: The email id associated with the user's account will be displayed here. You can update it by entering a new email address.
-
Credits: The remaining credit for the user's account is displayed in the Credits section.
-
Password: You can update the password for the user account by entering the new password here.
-
Country: You can see and update the country by selecting from this section.
-
Region: You can see and update the region in this section.
-
Status: You can see and update status of user account. You can change the status of user account to active, pending or banned by selecting the appropriate option from this section.
-
TimeZone: You can see and update the user's timezone by selecting the desired option from this section.
-
E-mail Verification: You can verify the user's email address by clicking on the checkbox. If the user has not verified their email address, the admin can simply verify the email address by selecting this checkbox.
-
Admin Access Control: Select the checkbox to give the user full admin rights, this will allow users manage all system settings, tools and features. This action gives the user with complete control over the system, allowing them to configure and manage all aspects of its functionality.
Once you give the admin access control to the user, you cannot delete their account from the profile section. You must first uncheck the admin access control box before you can proceed with deleting the account.
-
Update: Click on the update button after making any changes or updating information in the user profile.
-
Delete Account: You can delete the user account by simply click on the delete account button.
Security
-
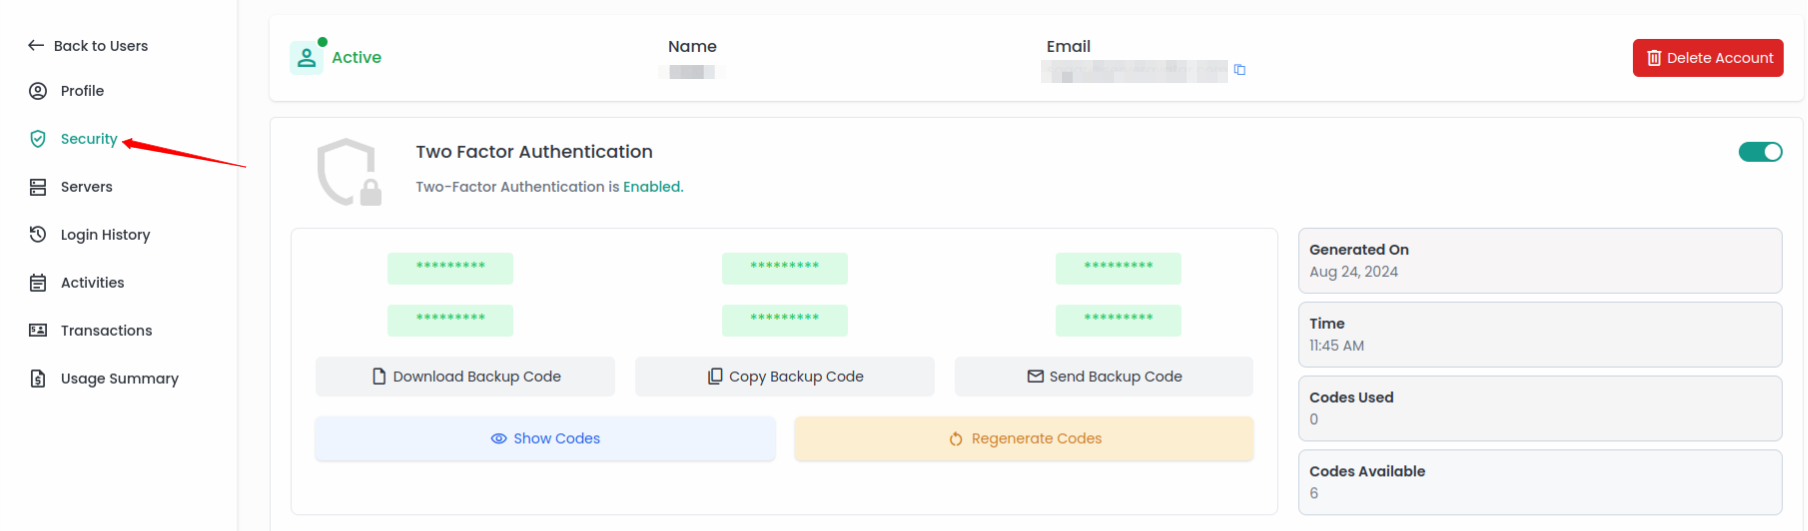
In the Security section of the user account, you can enable or disable the Two Factor Authentication for the User. Once the Two Factor Authentication is enabled, the relevant details will be displayed as shown in the image above.
- Download Backup Code: You can download all the backup codes by clicking this option.
- Copy Backup Code: You can copy all the backup codes by clcking this option.
- Send Backup Code: Clicking this option will automatically send the backup codes to the email address associated with the account.
- Show Codes: You can view the Backup Codes by clicking on this icon.
- Regenerate Codes: You can generate the new backup codes by just clicking on this option.
- Generated On: This will display the Date when the backup codes were generated.
- Time: This will display the exact time when the backup codes were generated.
- Codes Used: The number of used backup codes will be displayed here.
- Codes Available: The total number of remaining available backup codes will be displayed here.
Servers
-
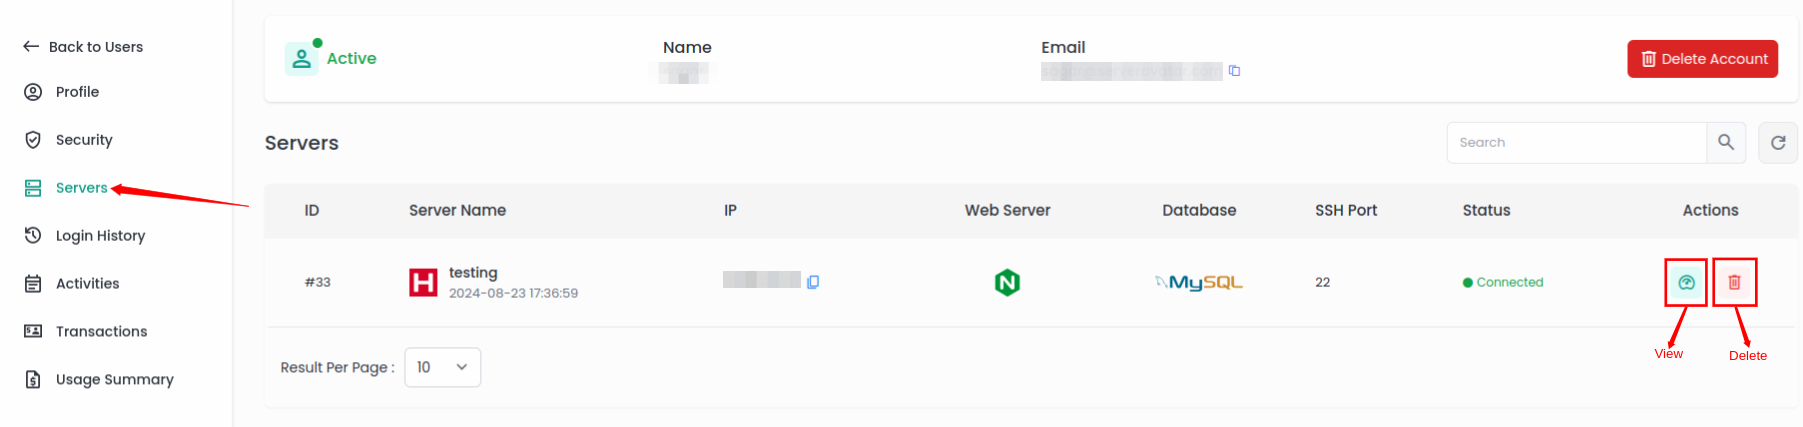
In the Servers section of the user account, you can see the list of servers along with details of the servers such as the Server Name, IP Address, installed Web Server, installed Database, the SSH Port that is used, and the Status of the Server whether it is connected or not. Additionally, action icons are available to view the details of the server and delete the server as shown in the image above.
-
View: Click on the view icon to see the detailed information of the server as mentioned in the image below.
-
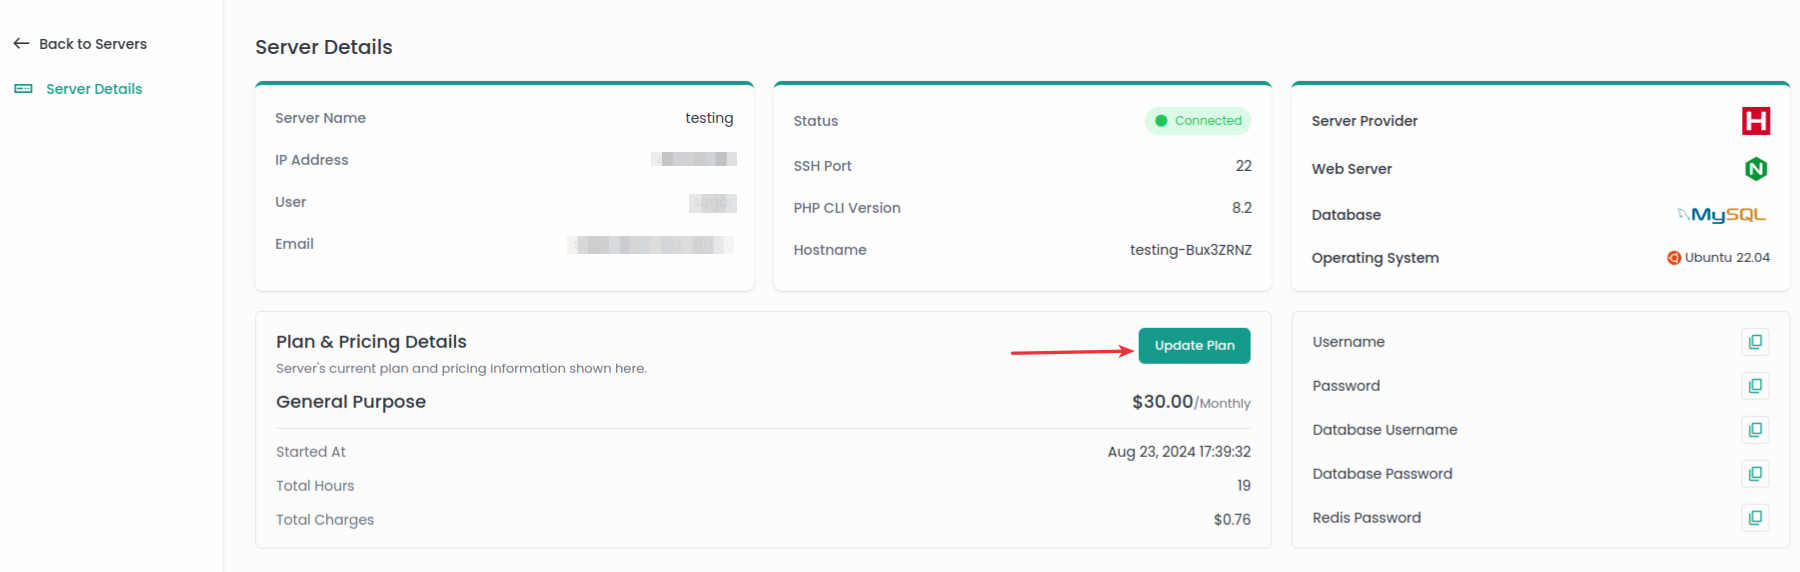
You can see the Server Details, Plan and Pricing Details for the particular server.
- Server Details: You can see the server details including the server name, IP address, username, email ID, server status, SSH Port of the server, PHP CLI Version of the server, hostname, server provider, installed Webserver, installed database, and operating system of the Server.
- Additionally, you can copy the server's username and password, the database username and password, and copy the Redis password by clicking on the provided copy icon next to each detail.
- Plan & Pricing Details: Here, you can view the plan and pricing of the server including the starting date of the plan with the total usage hours and total usage charge. Additionally, You can update the server's plan by clicking on the Update Plan button.
-
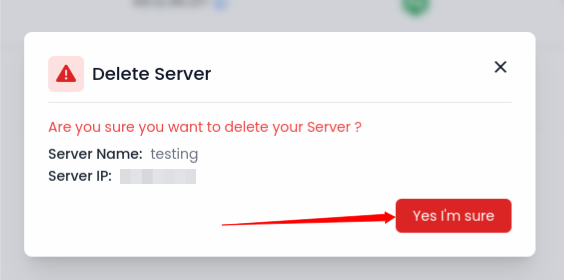
Delete: Click on the Delete icon and then select the Yes, I'm sure option to delete the particular server from the User Account.
Login History
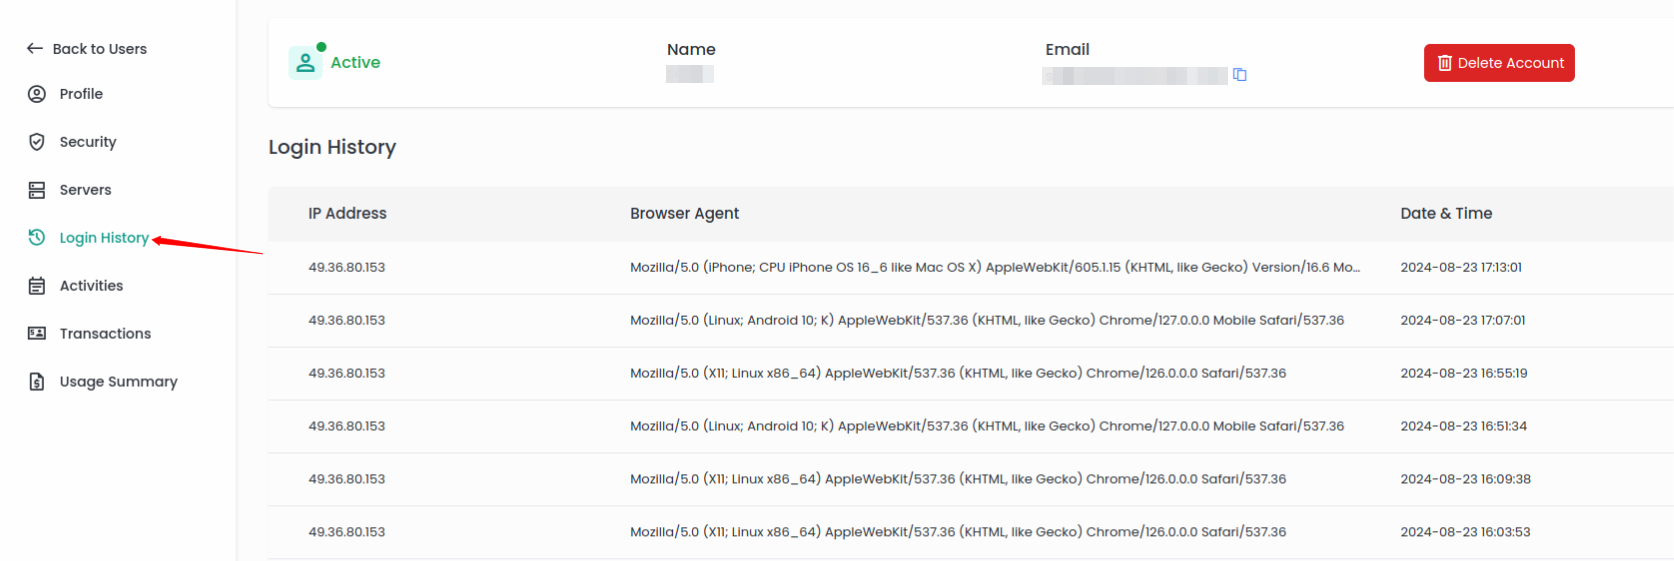
- You can see the Login History of the user, including the IP Address, Browser Agent, and Date & Time as displayed in the image. This information helps you to monitor and analyze user activity, identify potential security concerns, and ensure that access to the account is legitimate.
Activities
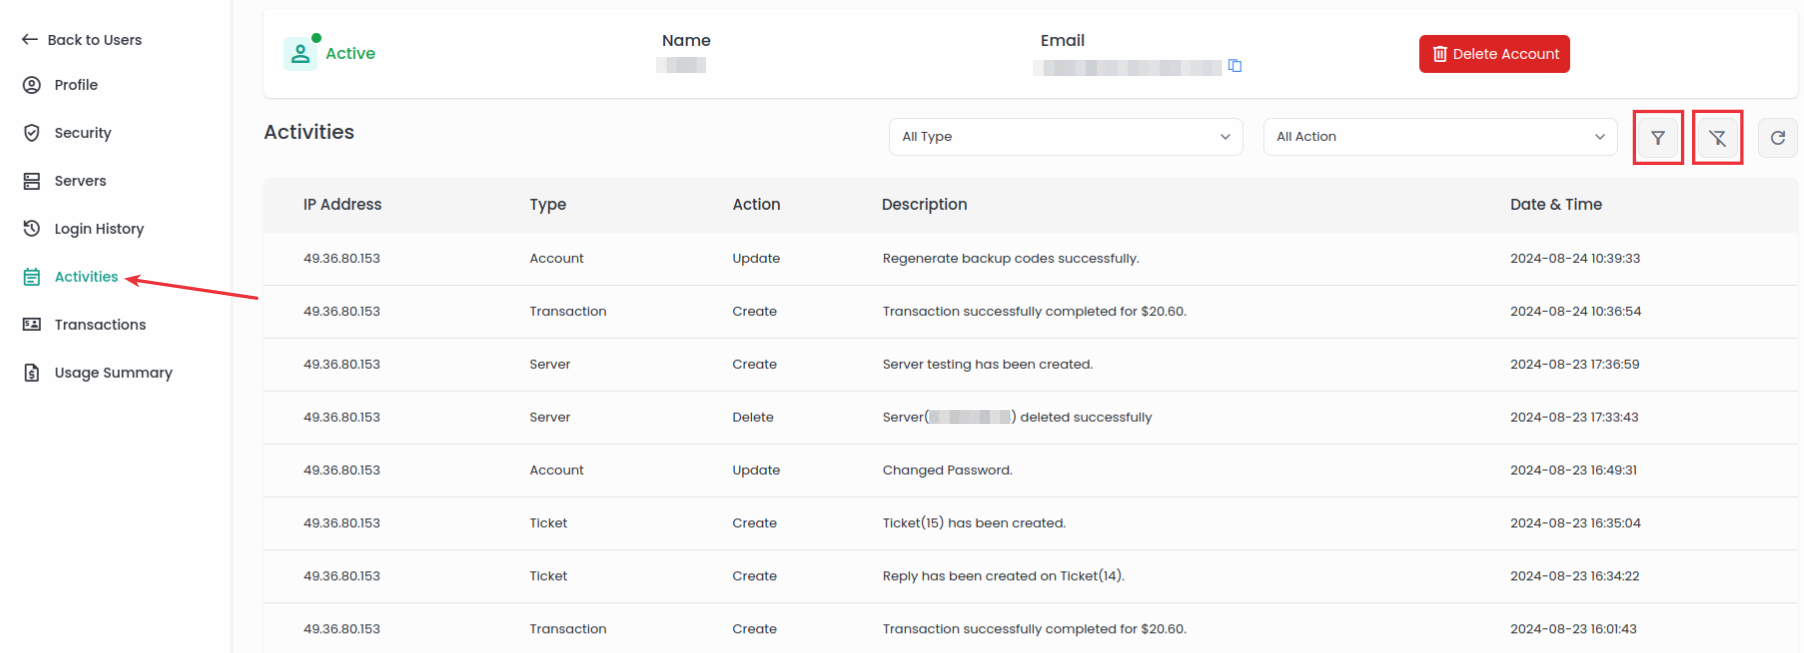
- You can view the activities performed by the user on their account.
- You can see the IP Address, Activity Type, the action taken from the user account with the detailed description of the activity, and the Date and Time of each action taken, as displayed in the image.
- Additionally, you can filter activities by Type and Action. You can simply filter the types and actions as well as unfilter the same. Also, there is a button to refresh the page.
Transactions
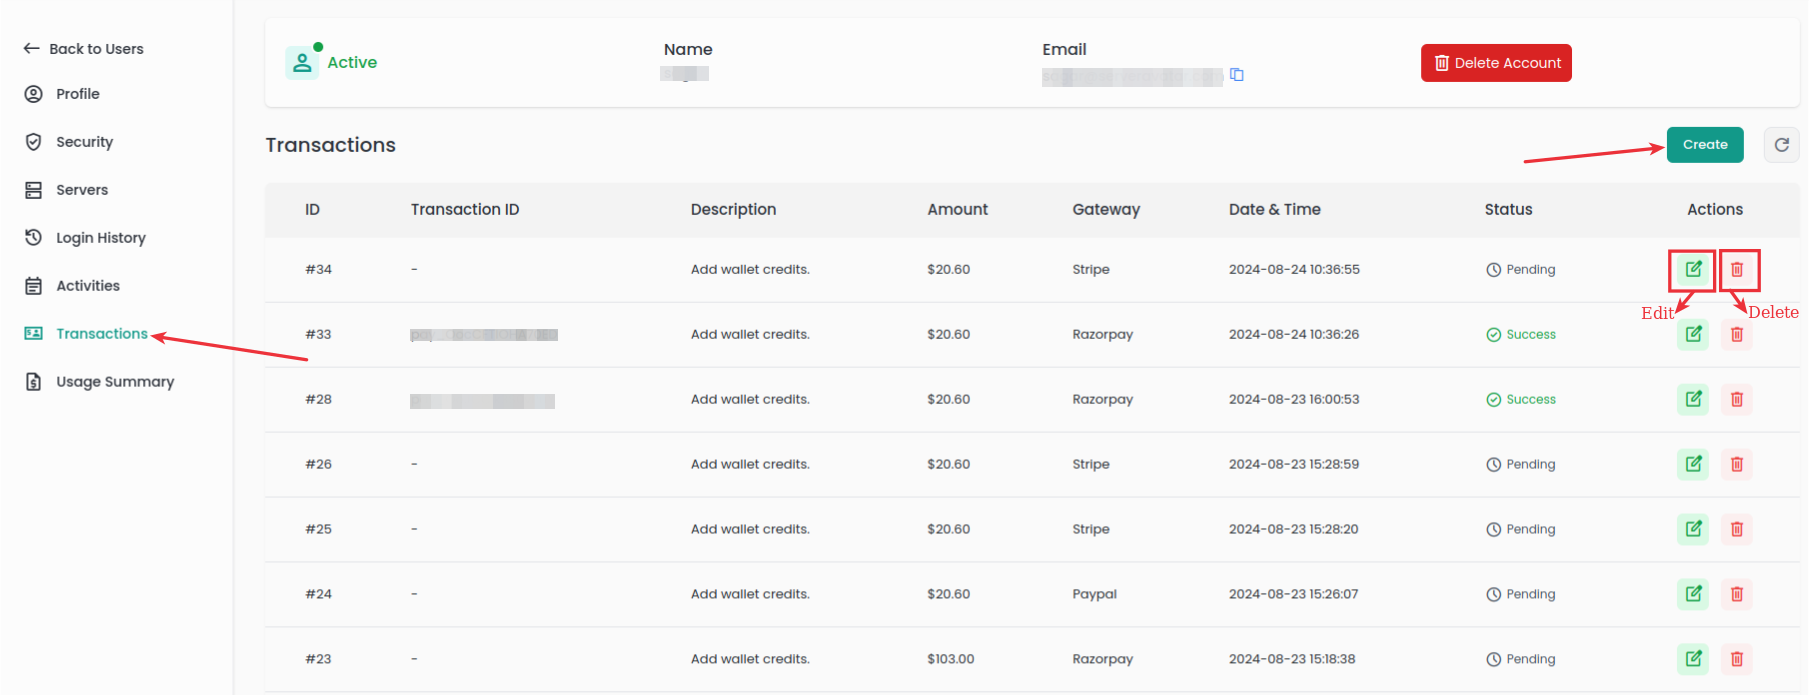
-
In the Transaction section of the user account, you can view transaction details for the Particular user.
-
You can see the transaction details including Transaction ID, Description for the transaction, Amount, used Payment Gateway, Date and Time of the transaction, and transaction status. Also, you can take different actions such as editing or deleting a transaction from the list by selecting the appropriate icons from the actions.
-
Additionally, you have the option to create new transactions and manually enter the details.
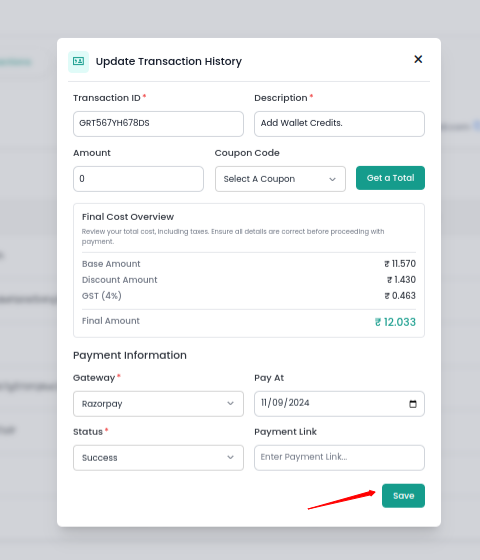
- Edit Transaction: You can modify and update the transaction details by clicking on the edit icon.
This allows you to change information such as Transaction ID, Description, Payment Gateway, Payment Status, Payment Link, and Payment Date.
Enter the amount in the amount field and click on the Get Total button, which calculates the Base amount, Discount amount, and Tax.
After updating the details, click on the Save button, as shown in the image below.
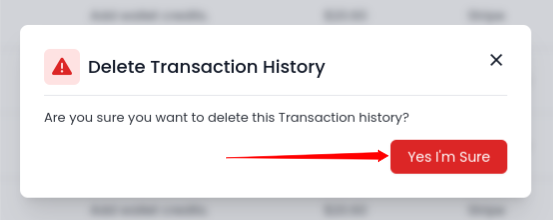
- Delete Transaction: To remove a specific transaction form the transaction history, click on the Delete icon next to the transaction detail. Then, click on the Yes I'm Sure button as shown in the image below. This will delete the particular transaction entry from the transaction list.
-
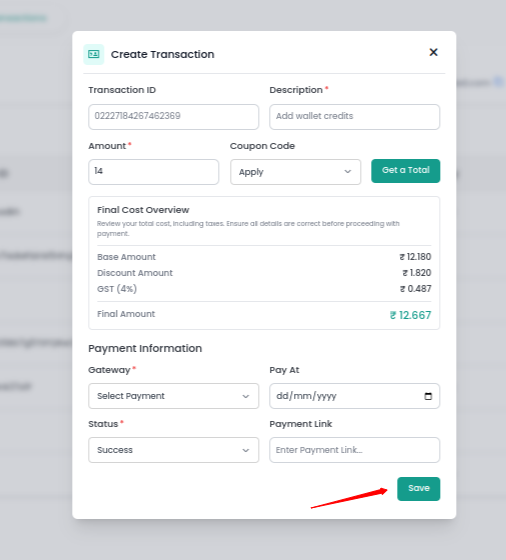
Create Transaction: You can create a transaction entry by manually entering the details, this will help you to record and manage transactions that are not automatically captured, ensuring all financial activities are accurately recorded.
Click on the Create button, and you will see the form as shown in the below image.
Enter the transaction details such as Transaction ID, Description, Payment Gateway, Payment Status, Payment Link, and Payment Date.
Enter the amount in the amount field and click on the Get Total button, which calculates the Base amount, Discount amount, and Tax.
After filling up the details click on the Save button. The trancation will be added to your transaction List.
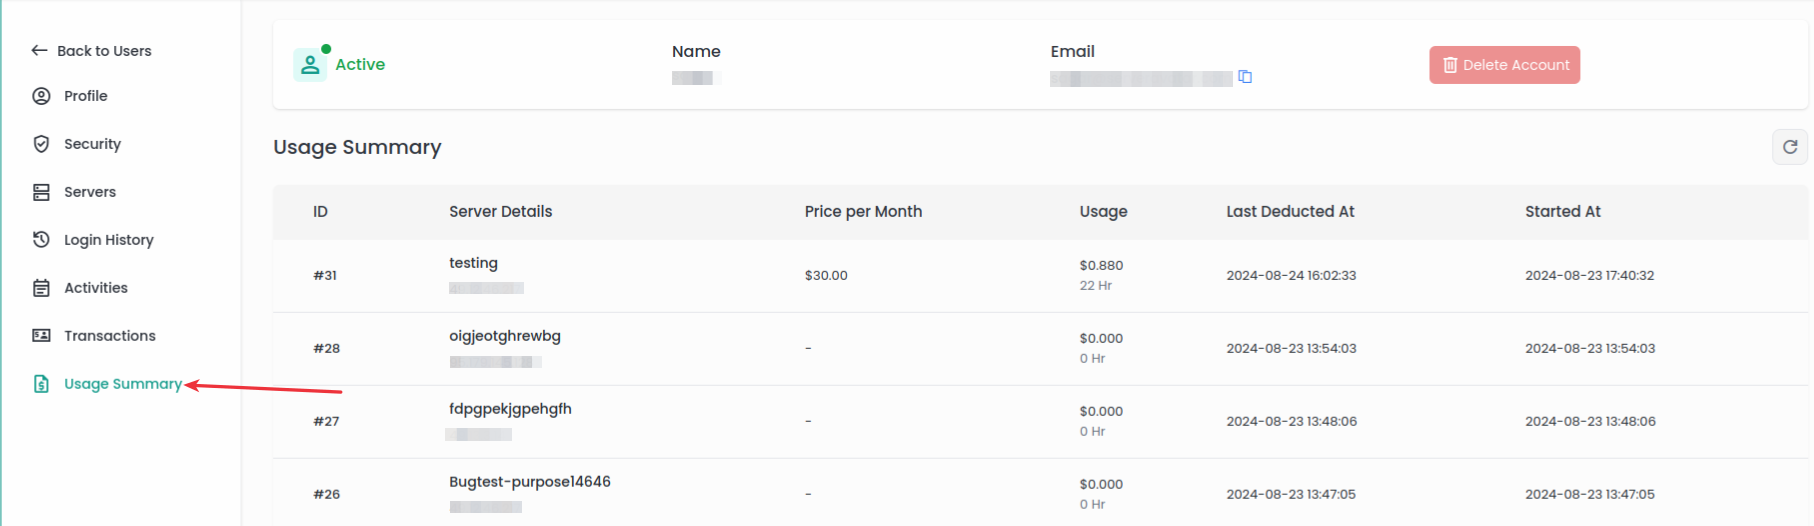
Usage Summary
Usage Summary provides a detailed overview of resource utilization and associated costs, including server details, monthly server price, usage, the date and time of the last deduction, and the start date of server utilization, as displayed in the image below.